Visual Studio is a comprehensive integrated development environment (IDE) used for developing applications across different platforms. It is essential to run Visual Studio as Administrator for tasks that require elevated privileges, such as installing extensions, accessing certain system files, or debugging applications with system-level permissions. In this article, we will check out How to open this Application with Elevated Privileges on Windows 11 using different methods. Let’s get Started.
Multiple Methods to Run Visual Studio Code as Administrator on Windows 11
- Quick way to Open Visual Studio as Administrator on Windows 11 using the Start Menu.
- Use the Run Command and open Visual Studio with Administrative Privileges.
- Create a New Task to Run Visual Studio with Elevated Permissions using the Task Manager.
- Always Open Visual Studio with Administrative Permissions by creating a Dedicated Desktop Shortcut.
- Open Command Prompt or Windows PowerShell as Administrator and Run Visual Studio Application.
IMPORTANT: Running applications as an administrator grants elevated privileges that can significantly affect your system. Please use caution when doing so, as it can lead to Unintended System Modifications, Security Vulnerabilities, Accidental Data Loss, Unauthorized Access, Irreversible Changes, etc.
1. How to Run Visual Studio as Administrator on Windows 11?
This method is common for both 2019 and 2022 VS Edition. Here are the steps.
- Go to the Start menu, or you can use the shortcut WinKey + S, and search for Visual Studio.
- Once you find the application, right-click on that and click Run as Administrator.
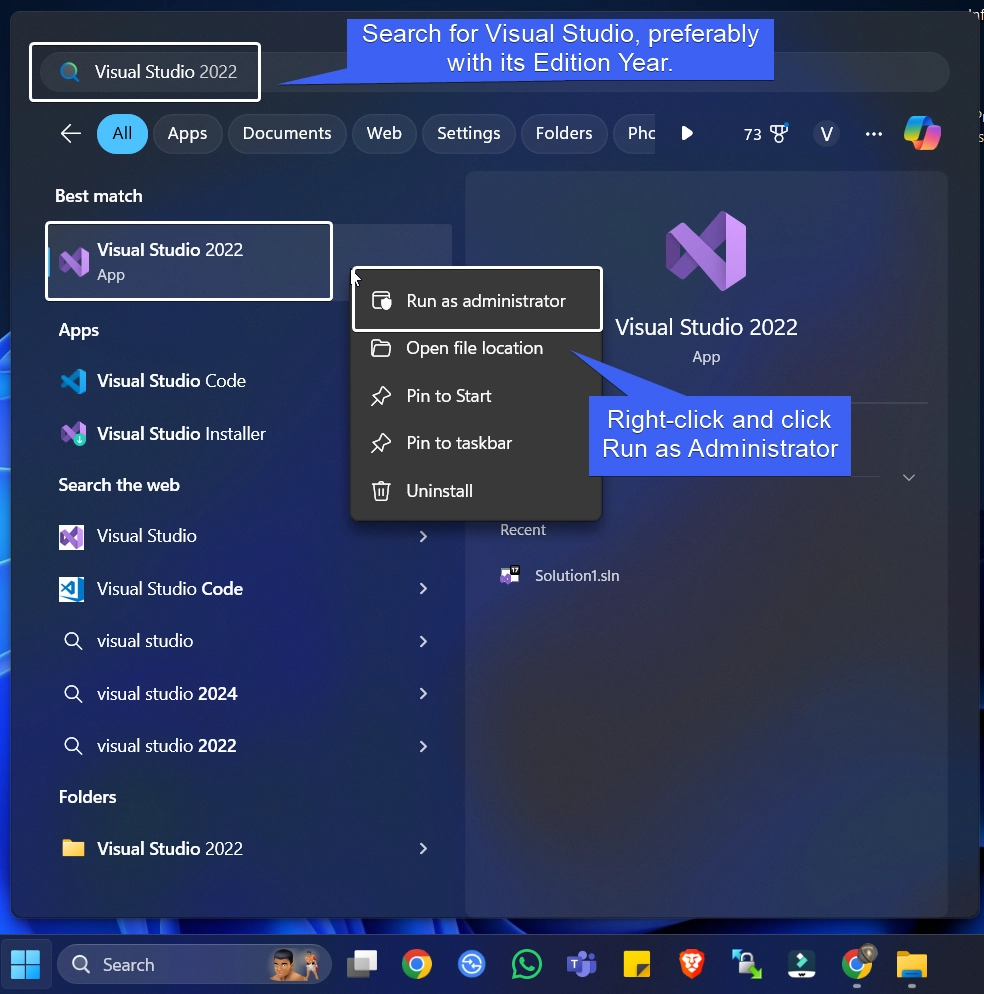
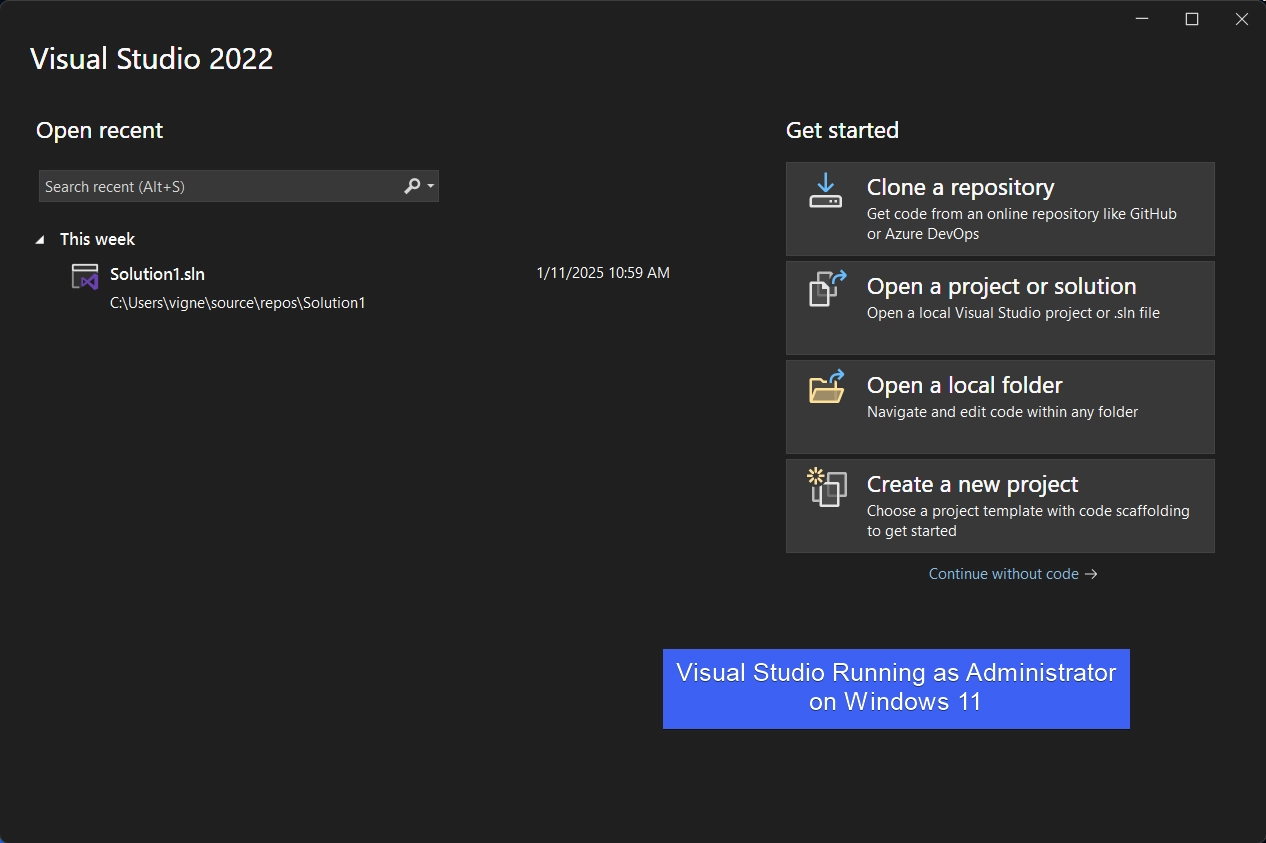
- The User Account Control will prompt for your confirmation and open Visual Studio (2019 or 2022 Edition) with Administrative Privilges.
Default Installation Paths for Various Visual Studio Editions:
The path of the application is crucial in this method and it varies with the Type of VS installed (Community, Professional, Edition, Etc), 2019 Edition or 2022 Edition, and the Installed Location.
Get your Visual Studio Installation File Path:
If you are unsure about where Visual Studio is installed on your system, kindly follow the steps below.
- Go to the Start menu and search for Visual Studio.
- Once you find the application, right-click on it, and click on Open File Location.
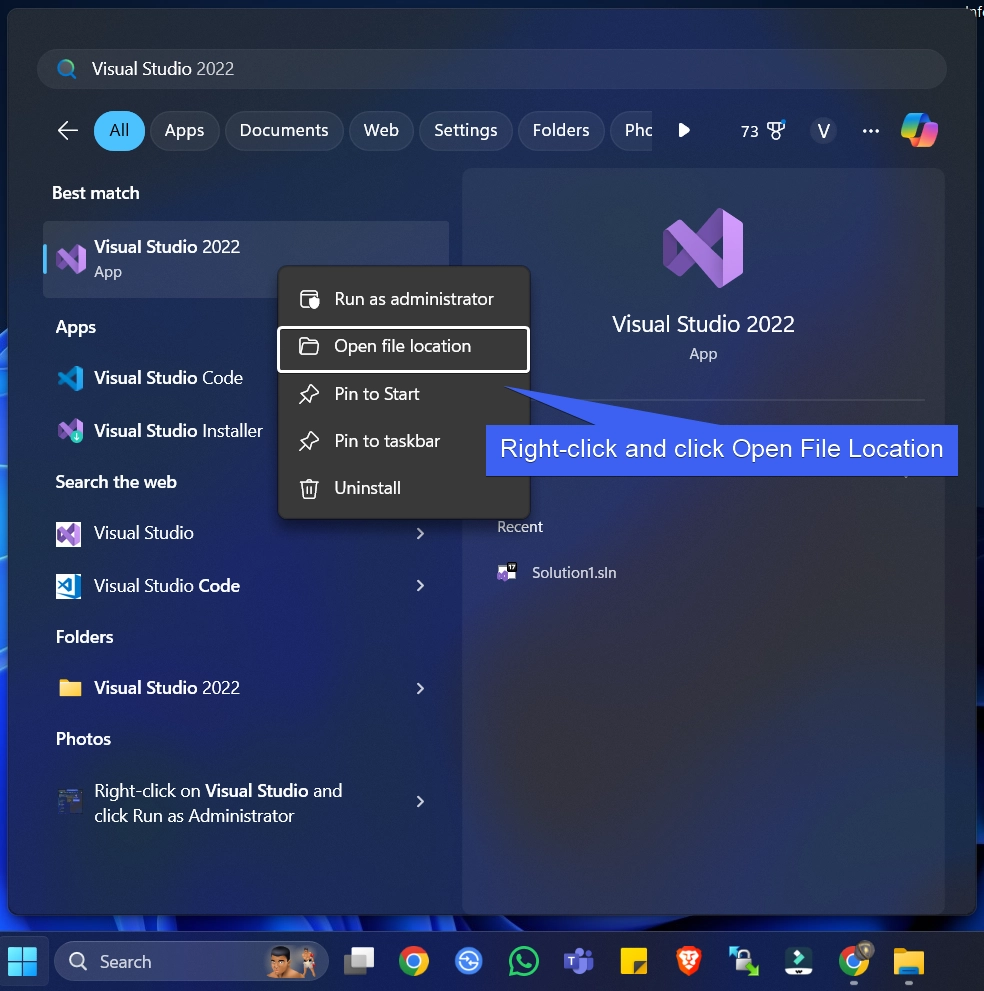
- Now, the system will open the File Location.
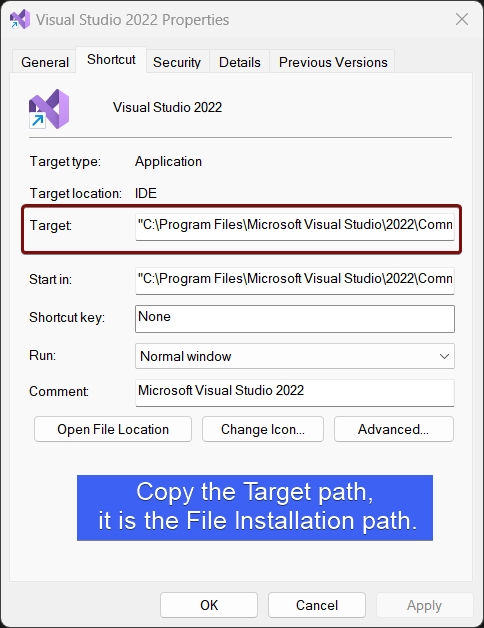
- Right-click on Visual Studio and click Properties.
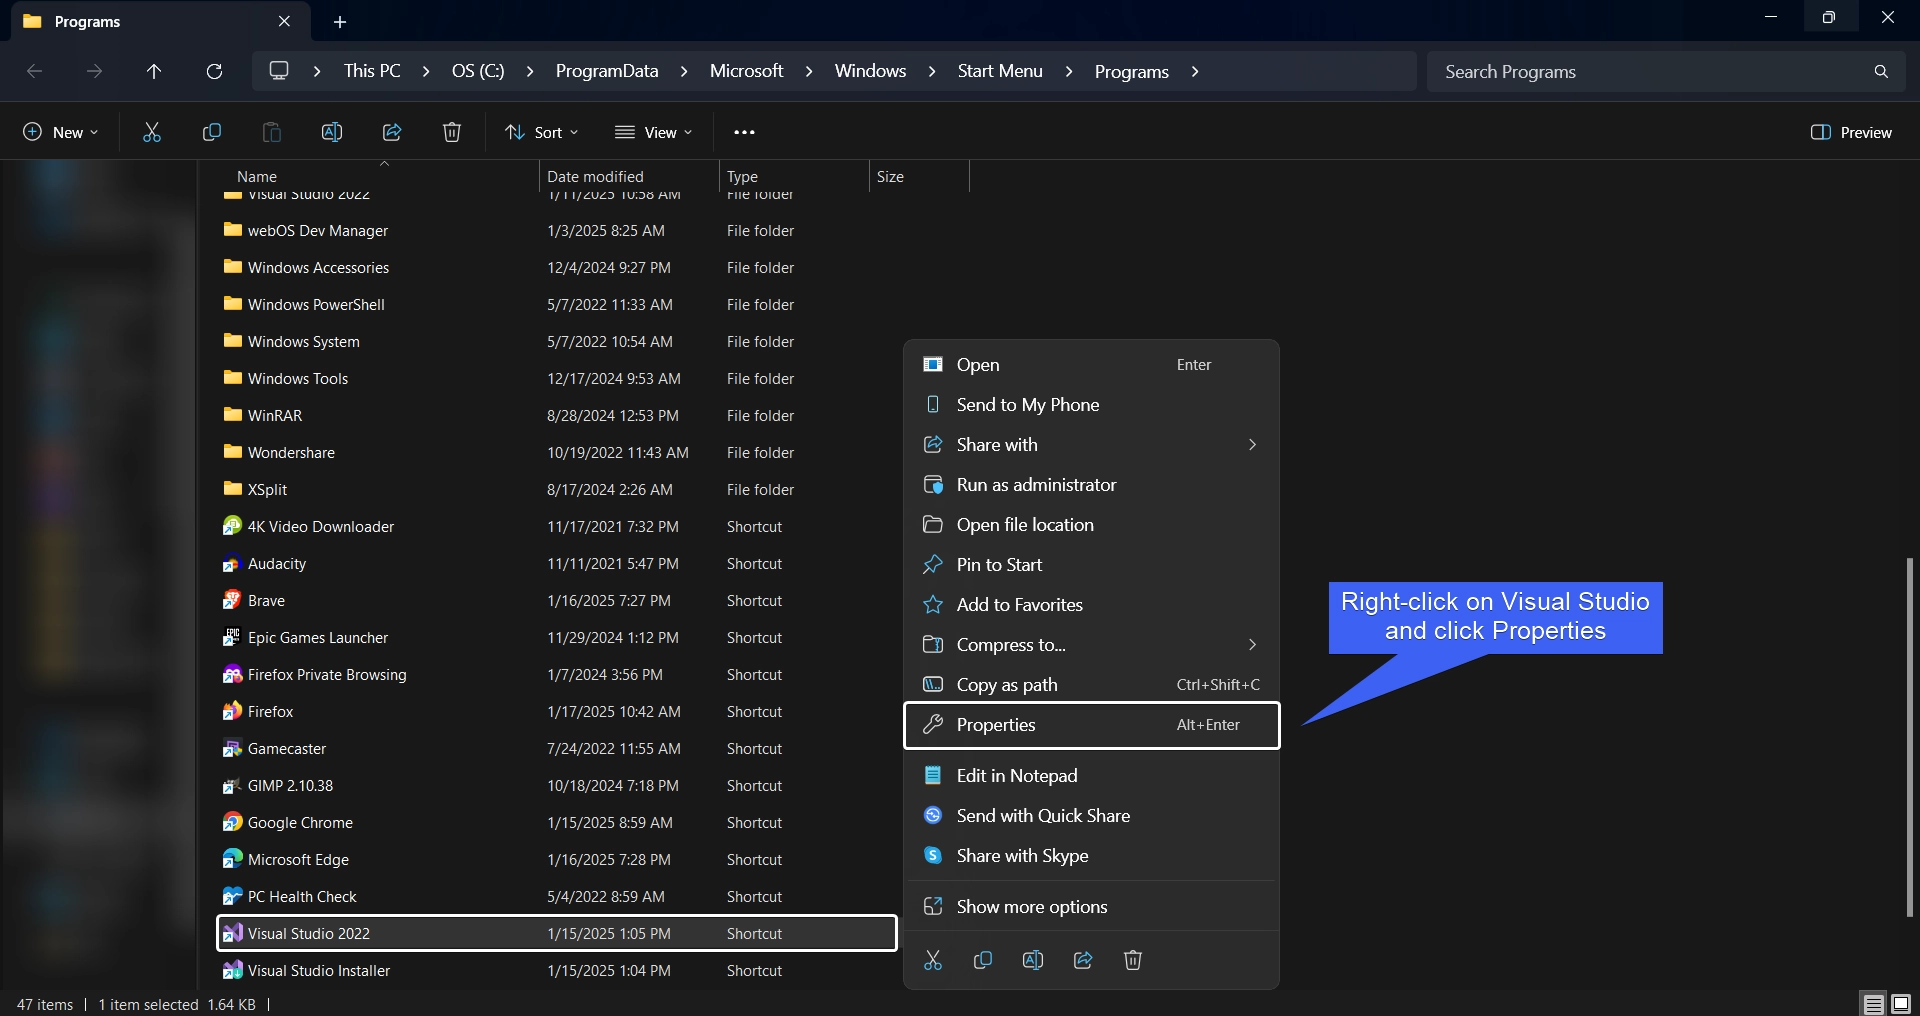
- Here, you can get the complete file path under Target.
Heads-up!
Though accessing Visual Studio as Administrator via the Start menu is a simple and straight-forward method, users may prefer alternate methods to access it via the Command Prompt, Windows Terminal, Run Command, etc and access it accordingly for their personal convenience.
By default, the following will be the application’s standard path for various editions.
VS 2022 Community Edition:
C:\Program Files\Microsoft Visual Studio\2022\Community\Common7\IDE\devenv.exe
Visual Studio 2022 Professional Edition:
C:\Program Files\Microsoft Visual Studio\2022\Professional\Common7\IDE\devenv.exe
Visual Studio 2022 Enterprise Edition:
C:\Program Files\Microsoft Visual Studio\2022\Enterprise\Common7\IDE\devenv.exe
V Studio 2019 Community Edition:
C:\Program Files (x86)\Microsoft Visual Studio\2019\Community\Common7\IDE\devenv.exe
V Studio 2019 Professional Edition:
C:\Program Files (x86)\Microsoft Visual Studio\2019\Professional\Common7\IDE\devenv.exe
V Studio 2019 Enterprise Edition:
C:\Program Files (x86)\Microsoft Visual Studio\2019\Enterprise\Common7\IDE\devenv.exe
Note: Visual Studio 2019 uses the
Program Files (x86)folder by default because it installs some components as 32-bit applications. Visual Studio 2022 is fully 64-bit, so it usesProgram Files. If you have customized your installation, then the path may vary, the above paths are applicable only for the default installations.
2. Use the Run Command & Open Visual Studio with Administrative Privileges on Windows 11
In this section, we will use the Run Command and open this Application with Administrative Privileges. I am using Visual Studio 2022 Community Edition on Windows 11 Home Edition.
IMPORTANT: In this article, for explanation, I will use the path that is relavant to the Visual Studio 2022 Community Edition.
- Go to the Run Command. The easy way to access the Run Command is to use the Keyboard Shortcut, WinKey + R.
- Type the command
C:\Program Files\Microsoft Visual Studio\2022\Community\Common7\IDE\devenv.exeand press CTRL + SHIFT + ENTER. This will prompt the system to execute the Application with Administrative Privileges.

- The system will confirm and run Visual Studio as Administrator on Windows 11.
3. Create New Task to Open Visual Studio with Administrative Privileges using the Task Manager
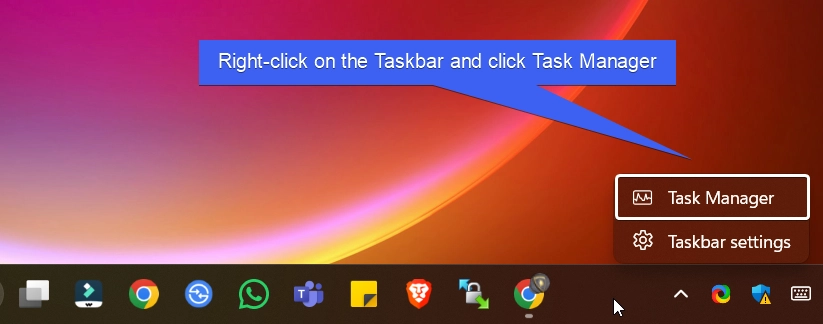
- Right-click on the Taskbar and click Task Manager. You can also use the shortcut CTRL + SHIFT + ESC. This combination will open Task Manager directly.
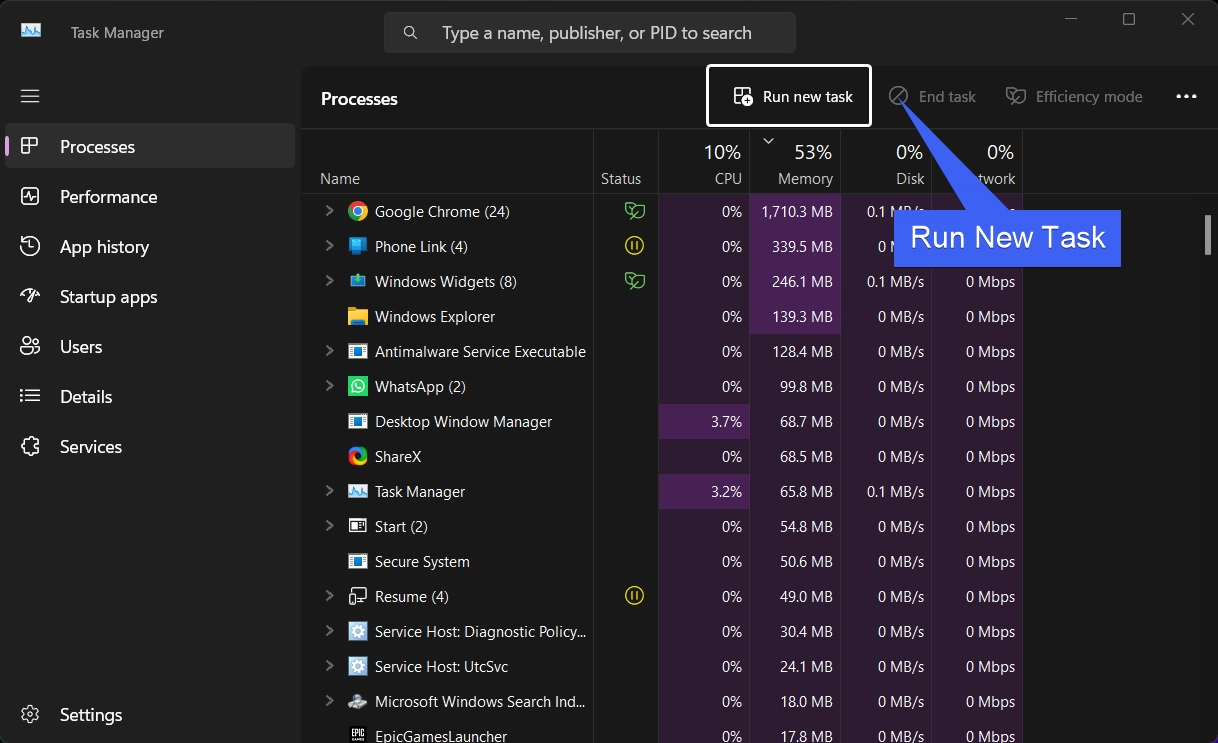
- In the Task Manager, under Processes, click on Run New Task. Create New Task dialog will pop up now.
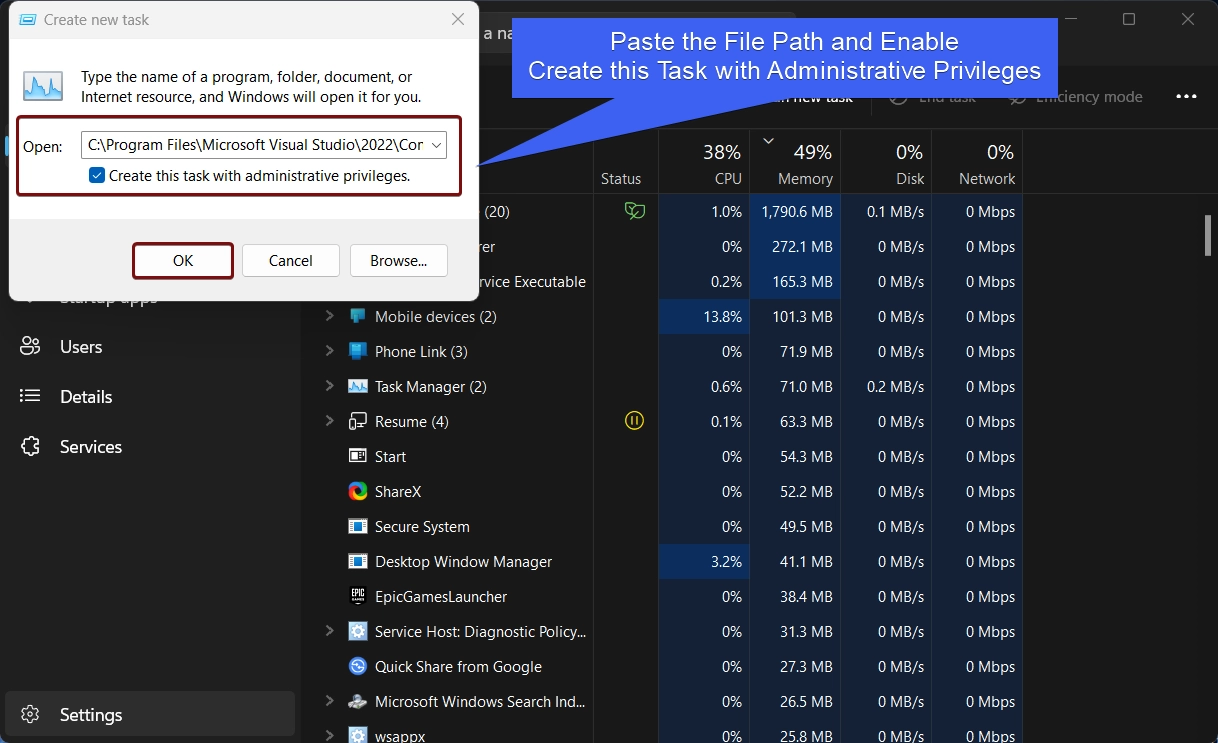
- Type the command
C:\Program Files\Microsoft Visual Studio\2022\Community\Common7\IDE\devenv.exe
4. Create a Dedicated Desktop Shortcut and Always Open Visual Studio as Administrator on Windows 11
This method is convenient for users who prefer to use VS with Administrative Privileges frequently.
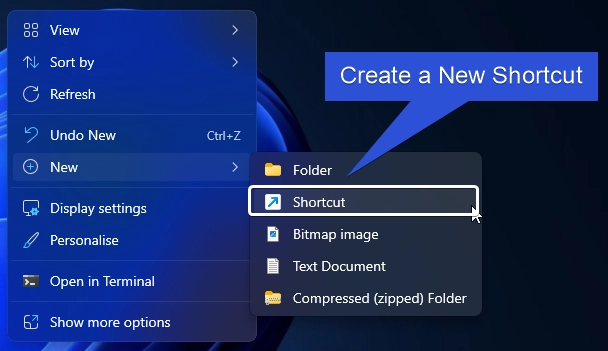
- Right-click on the Empty space of the Desktop, and click New > Shortcut.
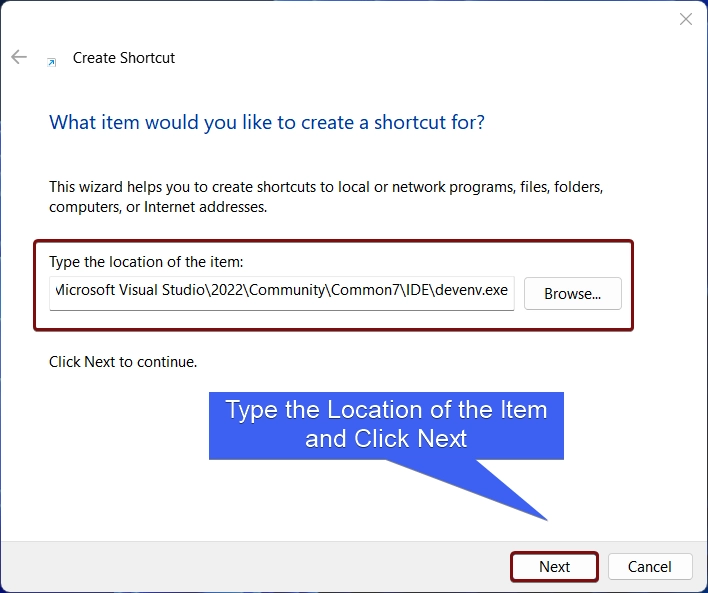
- The Create Shortcut dialog box will open now. In “Type the Location of the Item“, enter the command
C:\Program Files\Microsoft Visual Studio\2022\Community\Common7\IDE\devenv.exeand click Next.
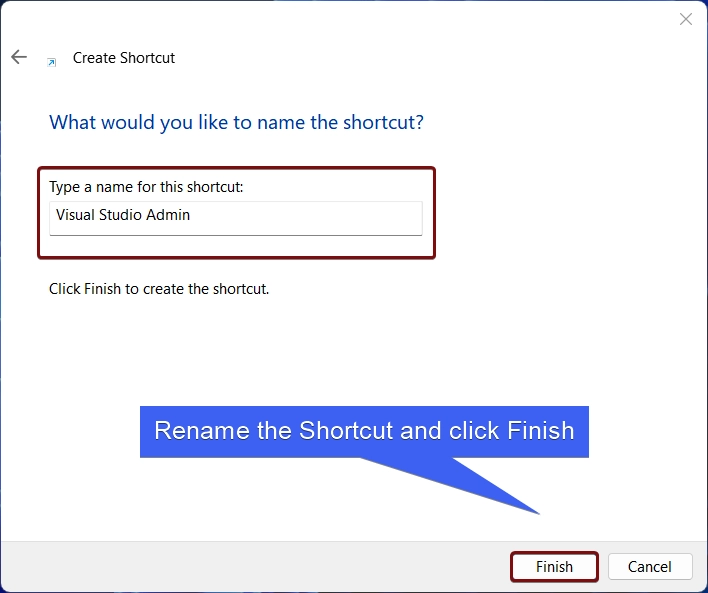
- The system will assign the shortcut name devenv. Kindly change it to as per your convenience. Finally, click Finish.
- Visual Studio Desktop Shortcut will be created.

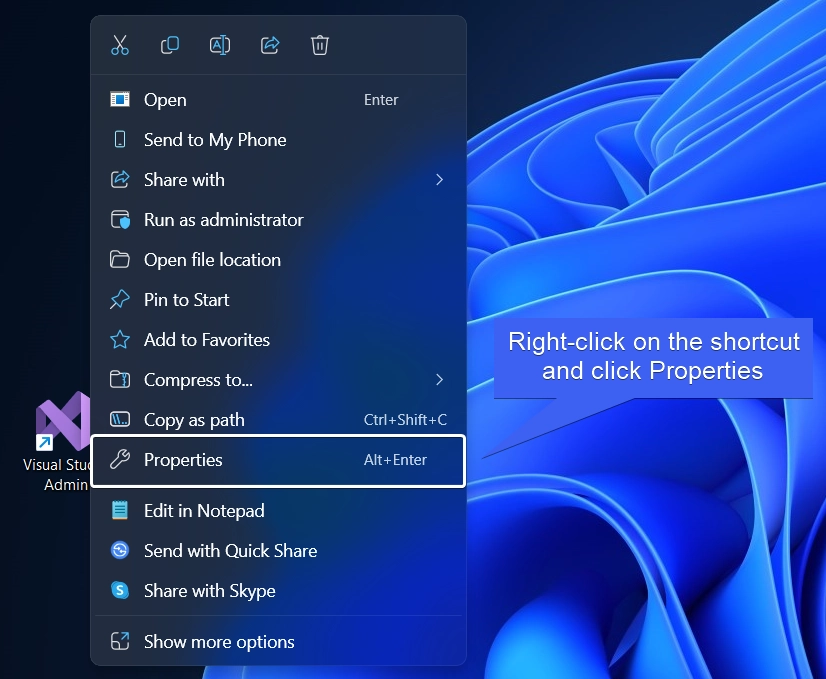
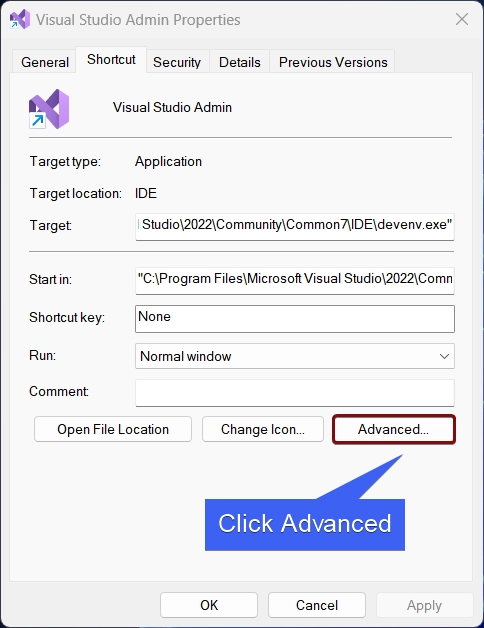
- Right-click on the Shortcut and click on Properties.
- Visual Studio Shortcut Properties will open now. Click Advanced.
- In Advanced Properties, make sure to enable the checkbox “Run as Administrator“. Finally, click OK, and then Apply.
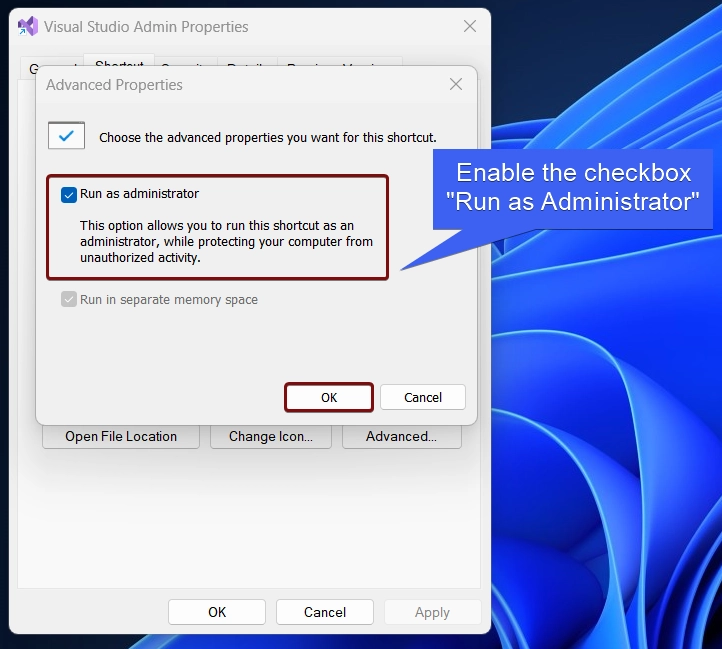
- This option allows you to run this shortcut as an administrator, while protecting your computer from unathorized activity.
- That’s it. Everytime you open Visual Studio via this shortcut, the User Account Control will prompt for your confirmation and run Visual Studio as Administrator.
Open Command Prompt or Windows PowerShell with Administrative Privileges and Run Visual Studio
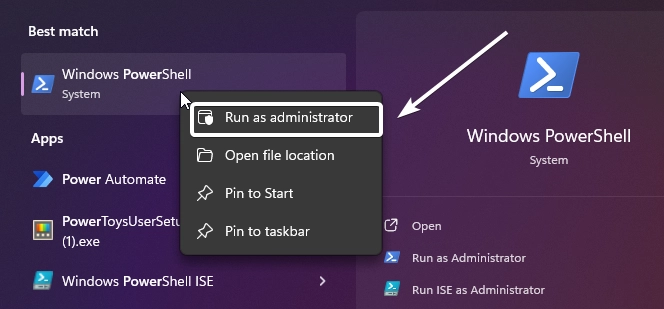
- Open Run Command using the shortcut WinKey + R.
- Type
powershell(For Command Prompt, use the commandcmd), and press CTRL + SHIFT + ENTER. We will use Windows PowerShell here.
- Execute the following command
Start-Process "C:\Program Files\Microsoft Visual Studio\2022\Community\Common7\IDE\devenv.exe" -Verb RunAs

- As PowerShell is running as Administrator, the system will open VS with Administative Privileges.
Always be Cautious while Running an Application as Administrator on Windows 11
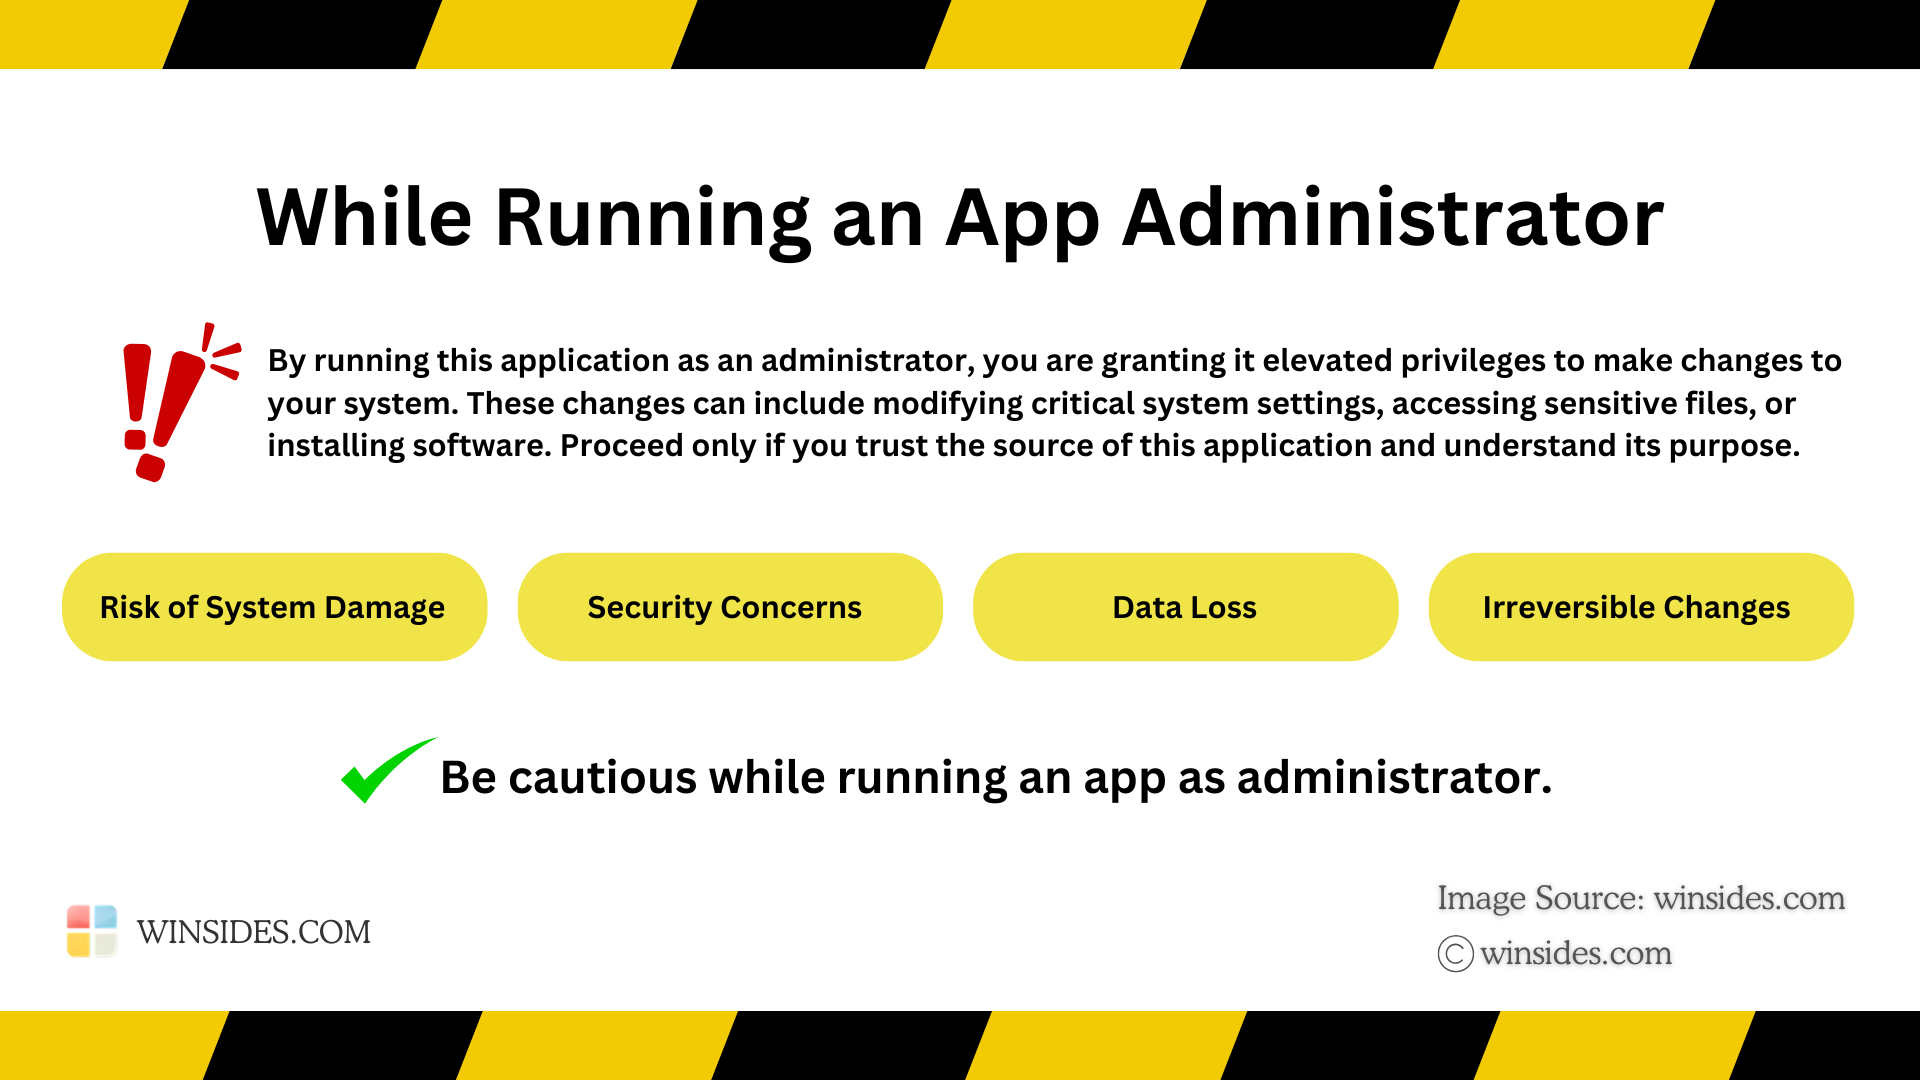
While Running Visual Studio as Administrator on Windows 11 grants it elevated privileges, which can potentially bypass system security restrictions. Please proceed with care and only run trusted applications in this mode. At Winsides.com, we advise our users to use Administrator privileges only when absolutely necessary to perform tasks requiring elevated rights. Misuse of administrative privileges may lead to System Vulnerabilities, Data Loss, System Instability, Security Concerns, Irreversible Changes, etc.
Have Queries?
If you have any queries, or if you find difficulty following the above steps, kindly let us know in the Comment Section. For more interesting articles, stay tuned to Winsides.com. Happy Coding! Peace out!
 How to Check PC Specs without Logging into Windows 11?
 How to Enable HDR Video Streaming on Windows 11?
 How to Clean Temporary Files on Windows 11?
 How to Use ODBC on Windows 11?