I work late nights because most of the users for the web apps I develop are in Tier 1 countries, which have a completely different time zone from mine. To make things easier, I prefer using dark mode when working at night. However, the brightness of my laptop still causes me headaches sometimes. To avoid this, I always lower the brightness while working.
Out of curiosity, I looked into different ways to adjust brightness and found that there are more than 8+ methods to change brightness on Windows 11. Let’s dive into these methods and I will recommened you to find the Windows Features.
Quick Steps:
- Open Settings app using keyboard shortcut Winkey + I.
- You need to select the System from the left menu.
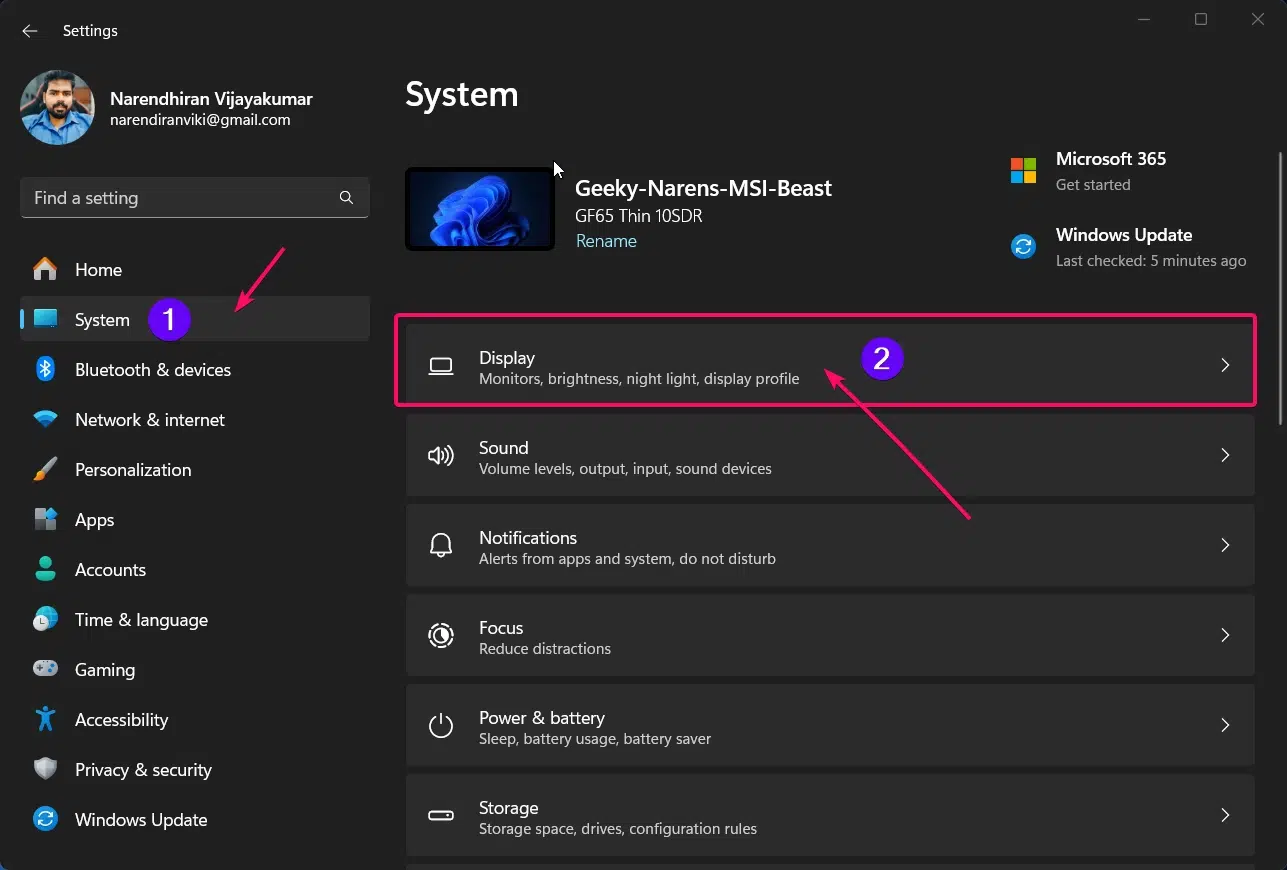
- Then click the Display option from the list on the right side.
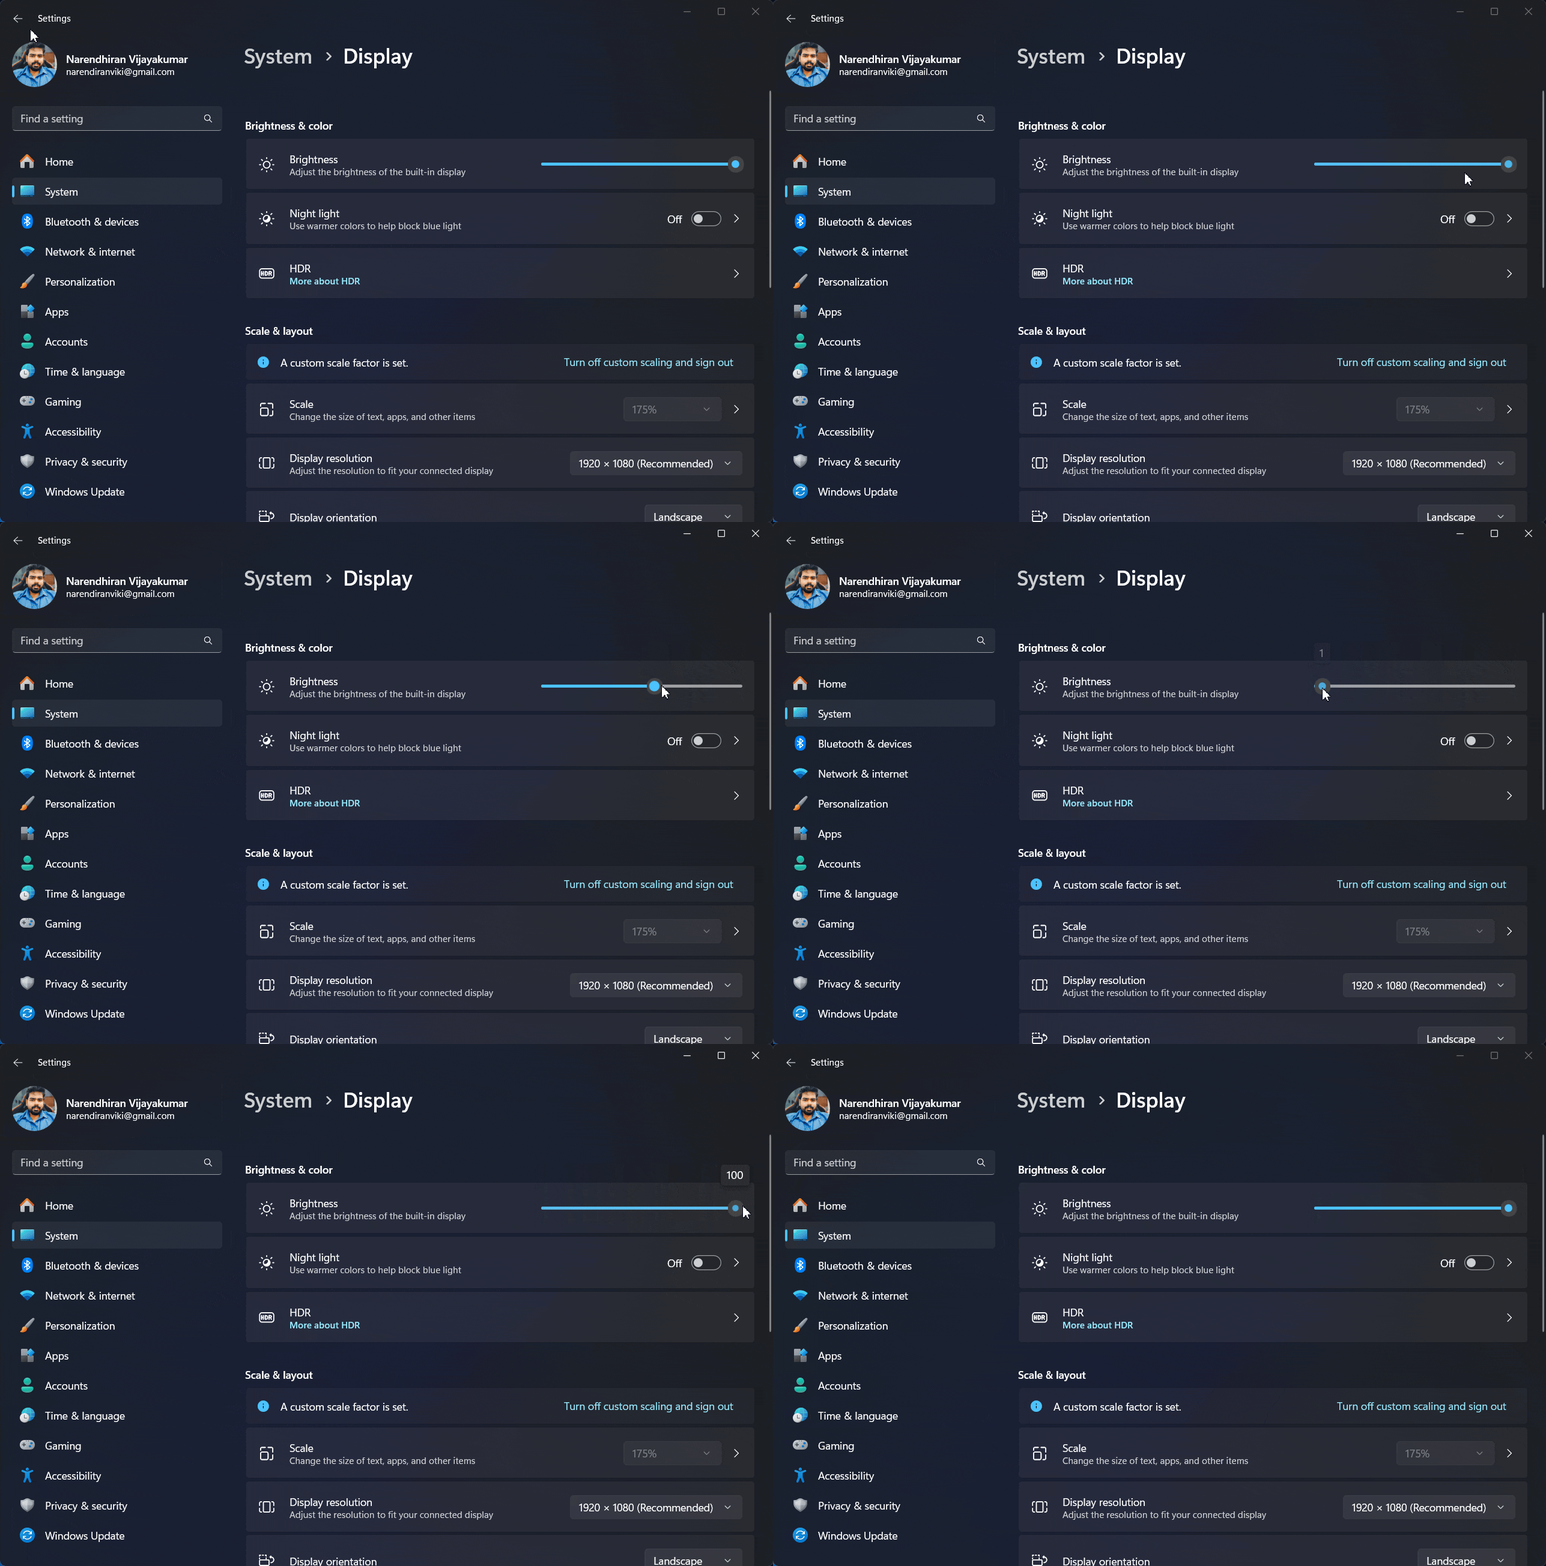
- Now, you need to adjust the slider to increase or decrease the brightness of your screen.
Method 1: Using Keyboard Shortcut Function Keys:
This is the easiest way to adjust the brightness on your Windows 11 screen. Look for the brightness icons on your keyboard one for increasing and one for decreasing brightness. By pressing the Function (Fn) key along with the brightness buttons, you can easily change the brightness of your screen.
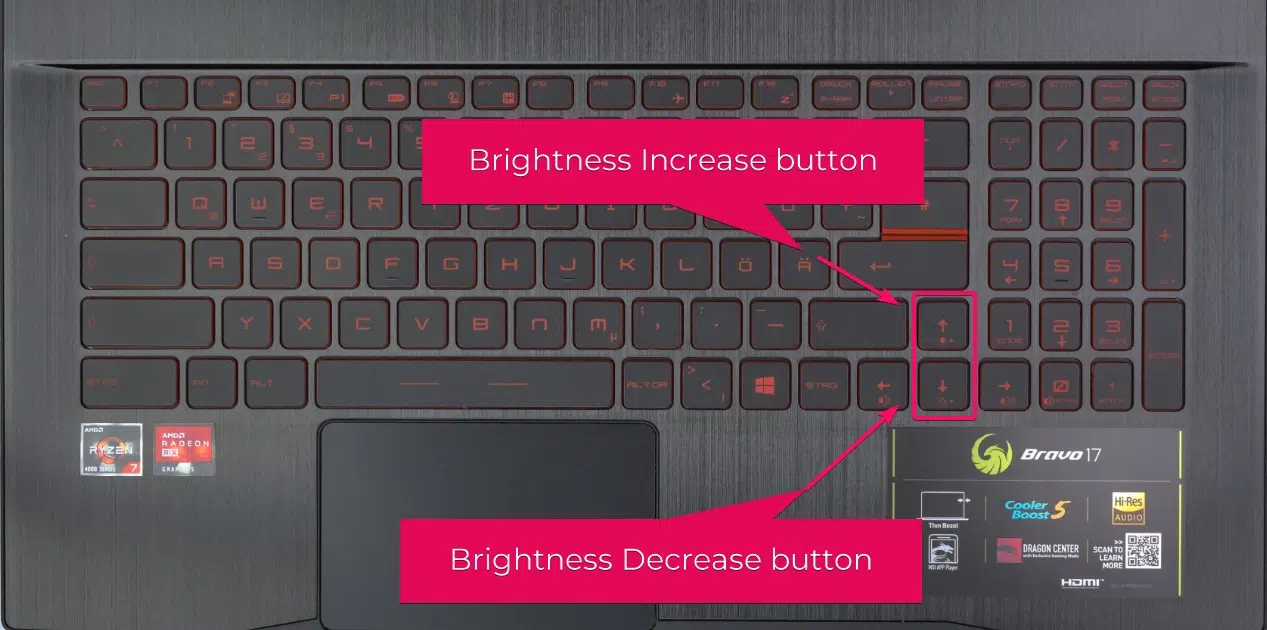
As you can see in the image above, the brightness increase/decrease buttons are combined with the arrow keys. In this case, you have to press Fn + Up arrow to increase the brightness and Fn + Down arrow to decrease the brightness. This setup may be different depending on the brand of your computer. If you are using a desktop keyboard, the location of these buttons can also vary between different brands.
Method 2: Using Action Center Menu:
- You need to use the keyboard shortcut
Winkey + Ato launch the Action Center Menu. - Now, you need to adjust the scrollbar to change the brightness of your device screen.
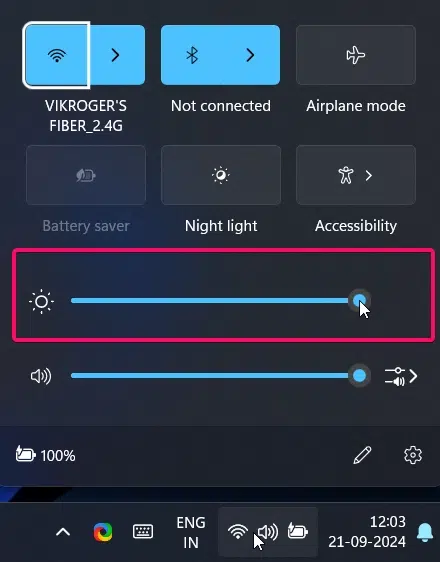
This is one of the easiest and quickest method to change your device brightness.
Method 3: Using Mobility Center to Change Brightness:
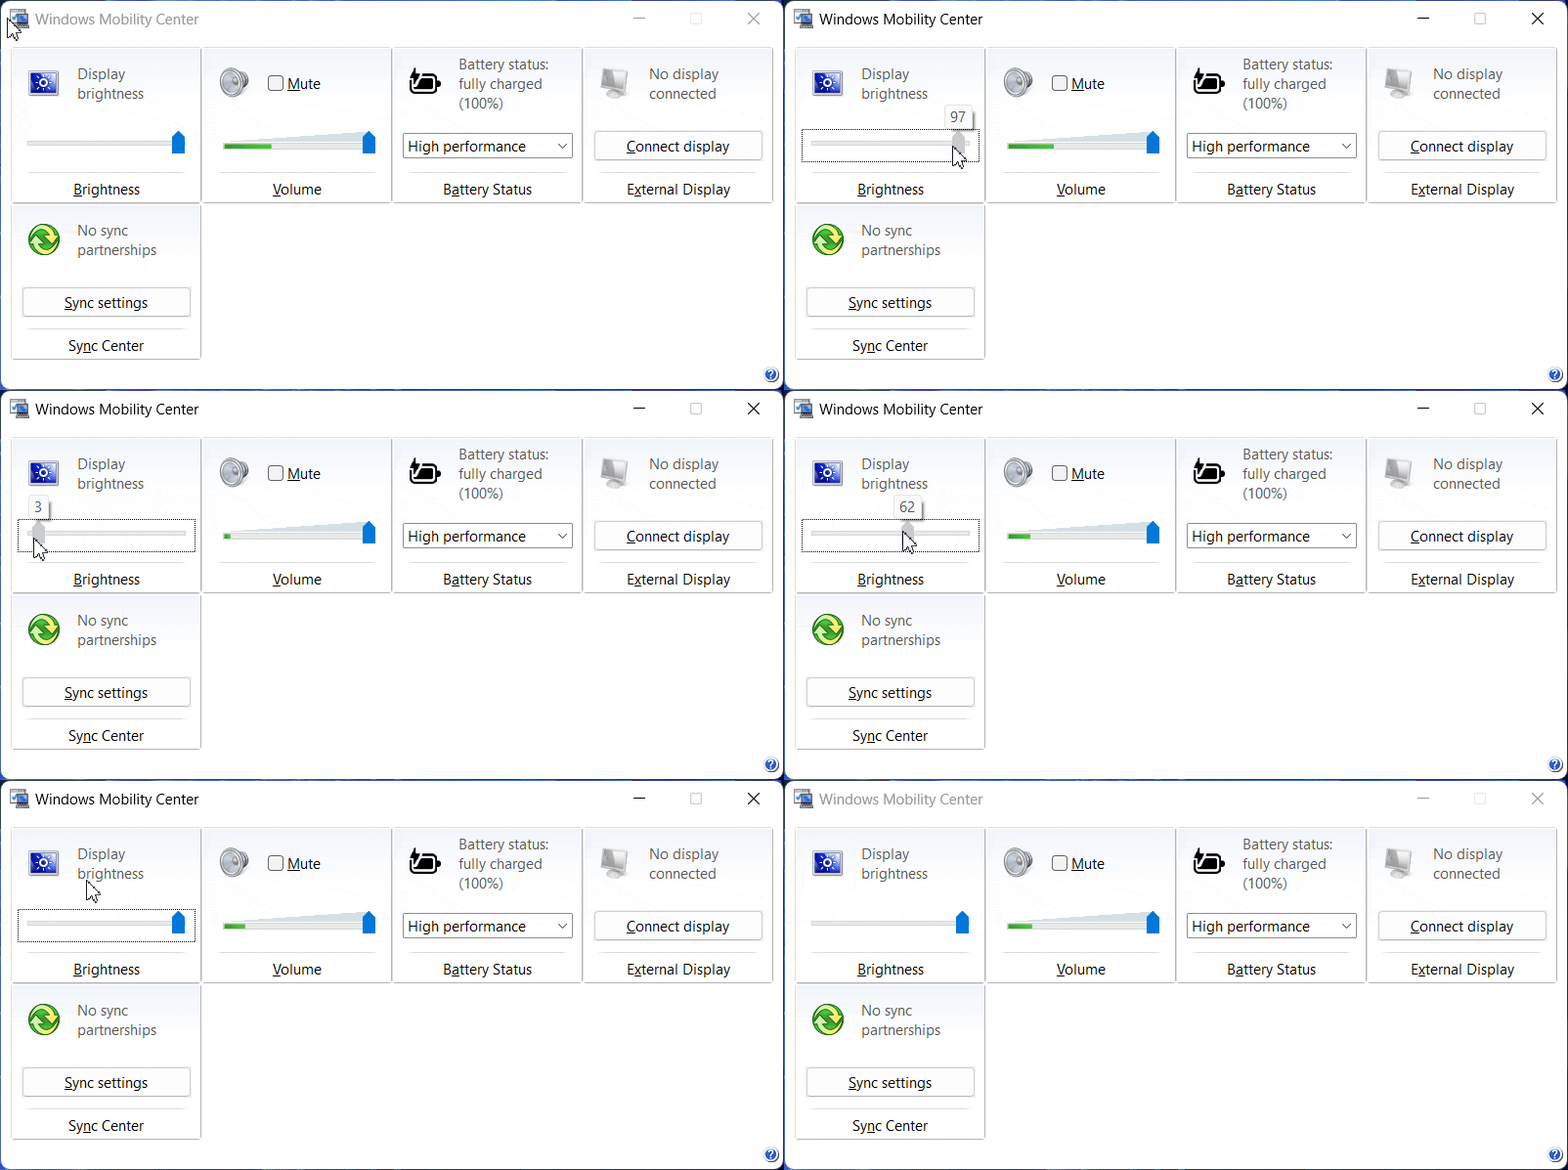
The Mobility Center is a quick access window that gives you control over settings like display brightness, audio output, battery status, multiple displays, and synchronization options.
- Use the Winkey keyboard shortcut to launch the Start Menu on your device.
- I want you to enter the text Mobility Center to display the mobility center and its options.
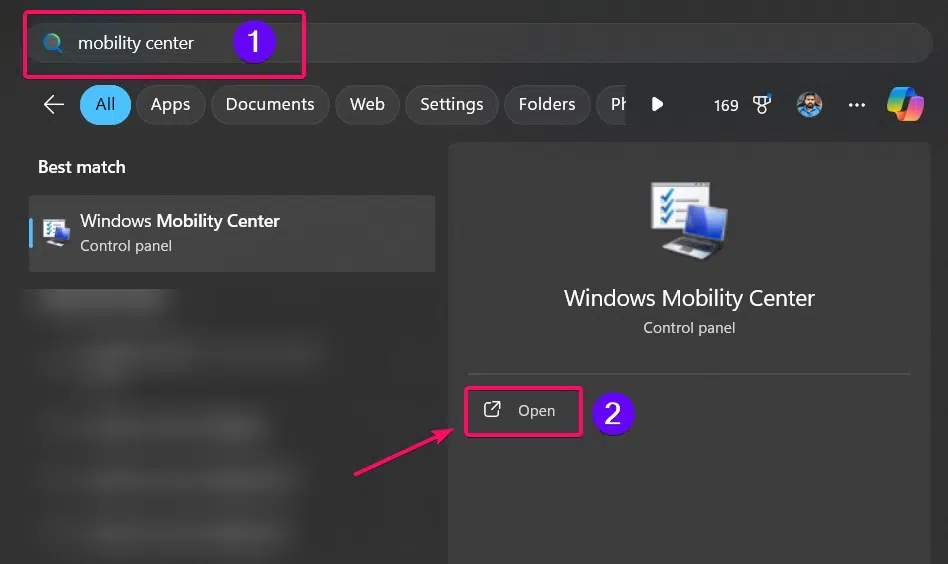
- Under the Display Brightness menu, you need to adjust or change the scroll bar to increase or decrease the screen brightness as shown in the below image.
Method 4: Using Settings App to Alter Brightness of your Screen:
This is one of the official and quickest ways to adjust the screen brightness on your Windows 11 device.
- To open the Settings app, you can either use the keyboard shortcut
WinKey + Ior open the Settings app by searching for it in the Start menu.
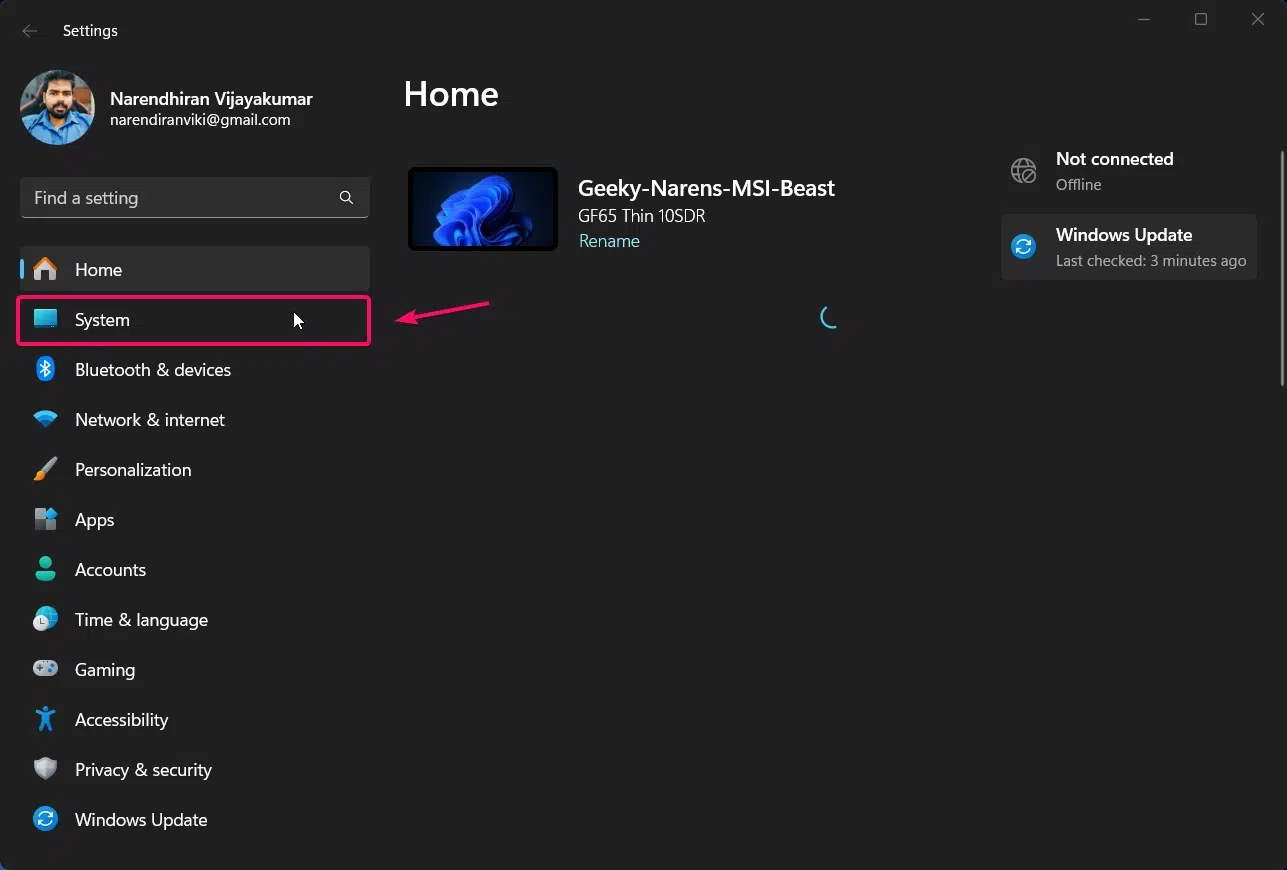
- Click on the System from the left side menu to expand its option.
- Now, you need to choose the option Display from the list.
- Use the Brightness slider under the “Brightness and Color” section to adjust the brightness.
Method 5: Automatic Screen Brightness Adjustment by Windows:
With the recent update of Windows 11, you can now automatically adjust your device’s screen brightness! Follow the instructions below to do this.
- open the Settings app, you can use the keyboard shortcut
WinKey + I

- Click on the System from the left side menu to expand its option.
- Now, you need to choose the option Display from the list.

- Now, expand the Brightness section by clicking the arrow next to it. Then, check the box for Change brightness automatically when lighting changes.
Method 6: Using Command Prompt:
- Click the Start Menu and search for Command Prompt
- You need to choose the “Run as Administrator” option to launch the command prompt in admin mode.
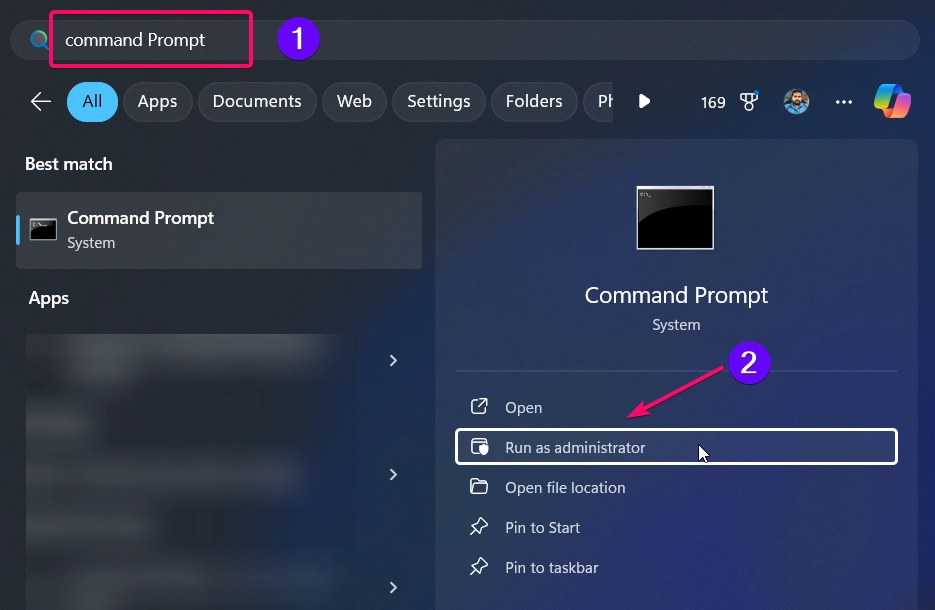
- Now, you need to execute the following command:
PowerShell (Get-WmiObject -Namespace root/WMI -Class WmiMonitorBrightnessMethods).WmiSetBrightness(1, 100)
In the above command, the lowest brightness value is 1, and the highest is 100. You can change the numbers to adjust your screen brightness using the Command Prompt.
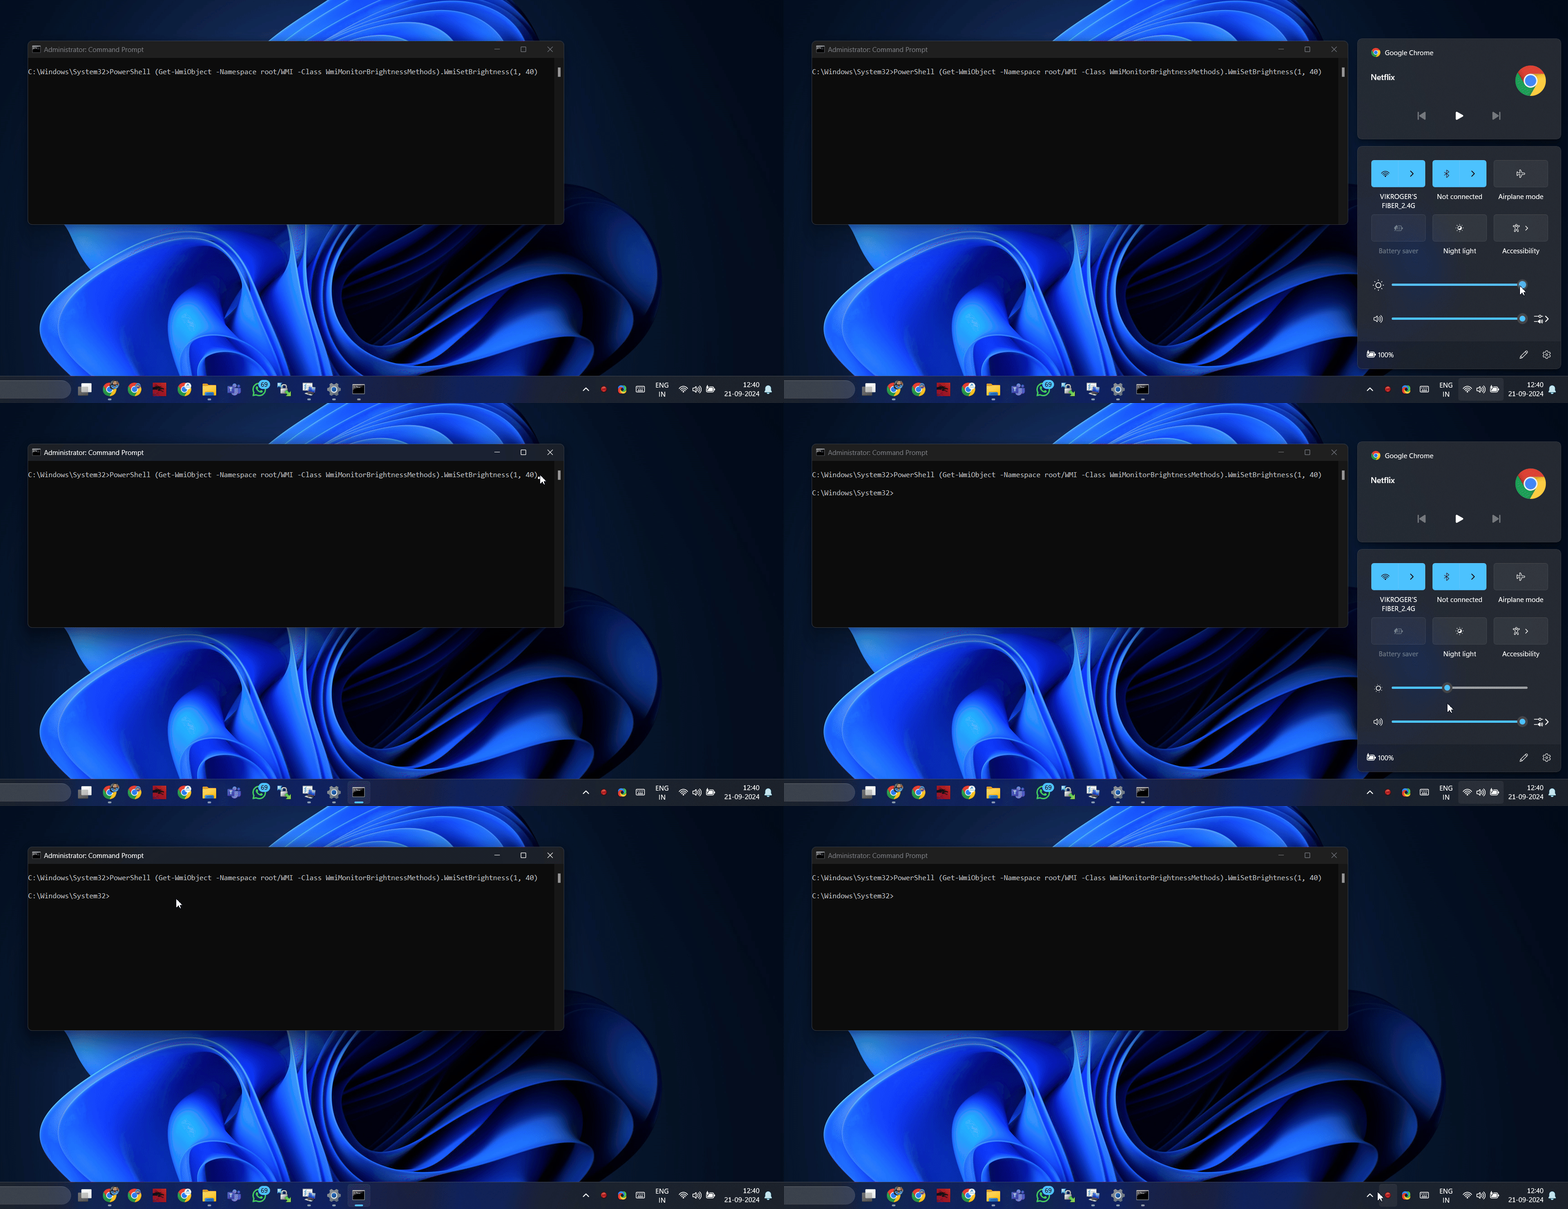
As you can see in the above GIF, before running the command, the brightness was set to 100%, as shown in the Action Center. After executing the command, the screen brightness was reduced to 40%, which can also be seen in the Action Center.
Method 7: Using PowerShell Method:
- Click the Start Menu and search for PowerShell
- You need to choose the “Run as Administrator” option to launch the powershell in admin mode.
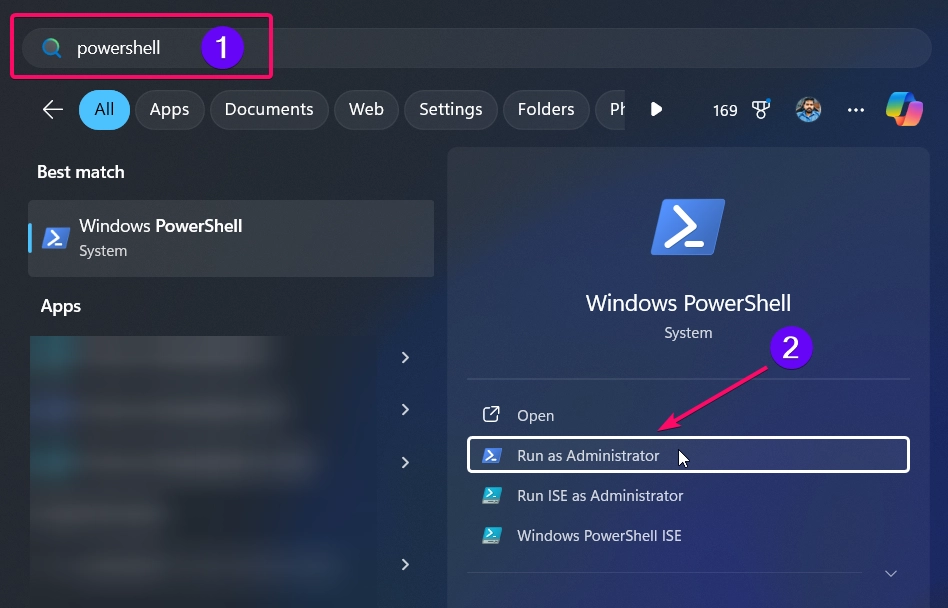
- Now, copy the following command and execute it on your powershell window:
(Get-WmiObject -Namespace root/wmi -Class WmiMonitorBrightnessMethods).WmiSetBrightness(1,100)
In the above command, the lowest brightness value is 1, and the highest is 100. You can change the numbers to adjust your screen brightness using the PowerShell.
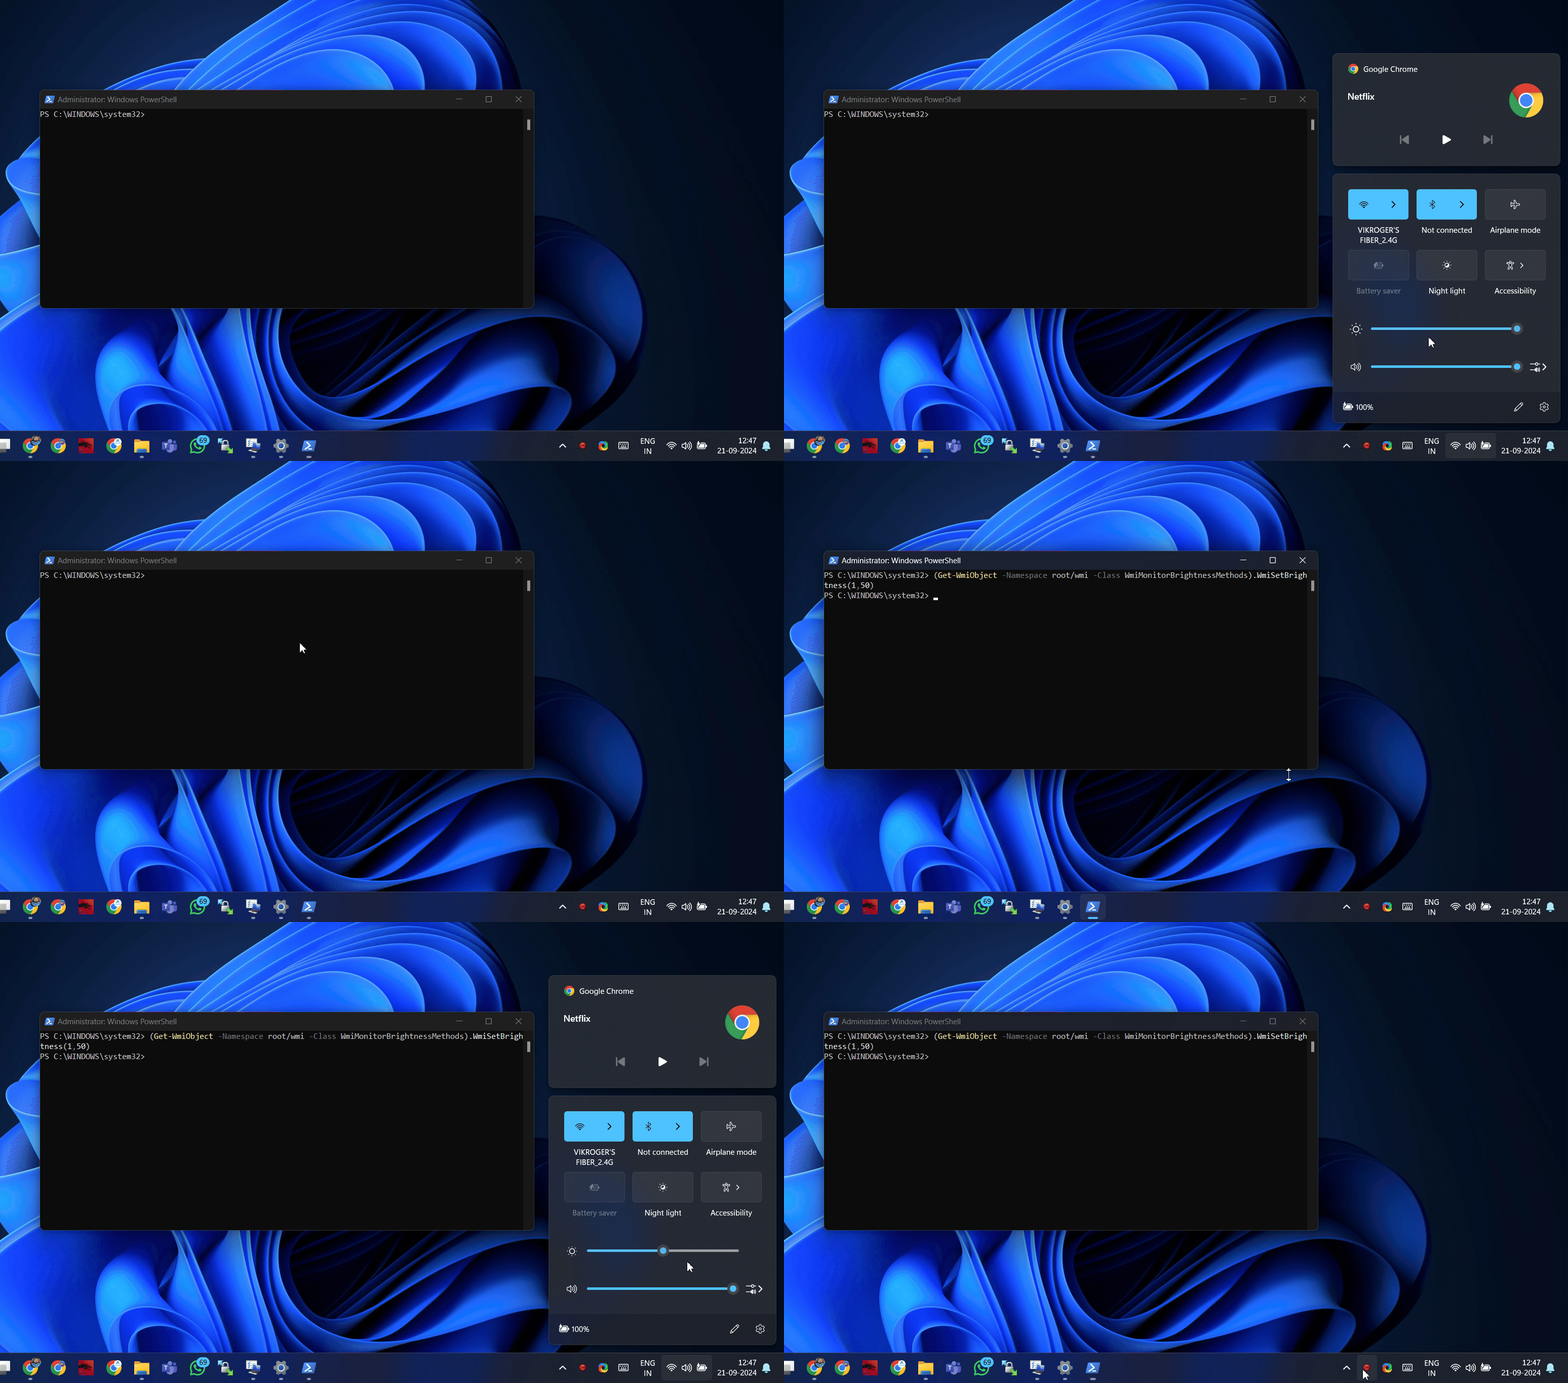
As you can see in the above GIF, before running the command in the powershell, the brightness was set to 100%, as shown in the Action Center. After executing the command, the screen brightness was reduced to 50%, which can also be seen in the Action Center.
Method 8: Using Twinkle Tray 3rd Party Apps:
There are many third-party apps available to adjust brightness, but Twinkle Tray is authorized by Microsoft and regularly updated by its developer on GitHub and the Microsoft Store. That’s why I recommend this app.
- Firstly, you need to download the application from the official website. https://twinkletray.com/
- Install the exe file, if you choose to download the standalone installer.
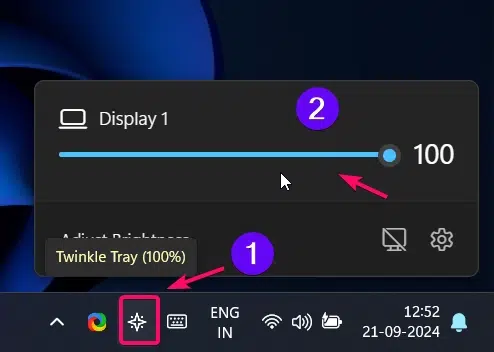
- Once the installation completed, you can see the star shaped twinkling icon in the tray menu.
- Click on the icon to explore its options and use the scroll bar to changes the screen brightness.
Feature of Twinkle Tray App:
Twinkle Tray offers a range of options and features to suit your needs, and it’s completely free.
- Blends seamlessly with Windows 10 & Windows 11.
- Works with most laptops and DDC/CI-enabled monitors.
- Set hotkeys to adjust the brightness of specific displays or all displays.
- Control DDC/CI features like contrast, volume, and power state.
- Adjust brightness based on the time of day or when idle.
- Supports command-line arguments for custom scripting.
- Normalize backlight across different monitors.
- Available in over 20 languages.
- Starts automatically with Windows.
You can find more essential information in their official website.
Method 9: Using Graphics Card Control Panels:
- Right-click on the desktop and choose NVIDIA Control Panel if your device uses NVIDIA. Otherwise, select the control panel for your graphics card.
- Once the application opens, go to Display and select Adjust desktop color settings.
- Use the scroll bar to adjust the screen brightness.
- When you’re done, you can close the application by clicking the Exit button.
Conclusion:
In conclusion, adjusting the brightness on your Windows 11 device is essential for a comfortable and productive work environment, especially during late night sessions. Whether you prefer using keyboard shortcuts, the Settings app, or third-party tools like Twinkle Tray, there are plenty of methods available to suit your needs. By exploring and customizing these options, you can find the best way to control your screen brightness and reduce strain on your eyes. I highly recommend exploring these features and tools to make your nighttime work more comfortable and headache free.
 How to Check PC Specs without Logging into Windows 11?
 How to Enable HDR Video Streaming on Windows 11?
 How to Clean Temporary Files on Windows 11?
 How to Use ODBC on Windows 11?