Recently, my laptop’s PRNT SCRN button stopped working due to minor water damage. Unfortunately, I don’t have a backup external keyboard and don’t have the time to buy a new one right now. After doing some research, I discovered that it’s possible to take screenshots on a Windows 11 PC without using the PRNT SCRN button. In this article, I’ll explain how you can take a screenshot or capture the screen without relying on the Print Screen button on your Windows PC.
3 Ways to Take Screenshot without PrintScreen Button:
- Using Snipping Tool.
- Using Keyboard Manager from PowerToys
- Using 3rd Party Apps.
Print Screen using Snipping Tool:
If your PRNT SCRN button is not working, I recommend using the Snipping Tool to take a screenshot or capture the screen on your Windows PC. To do this, follow these steps:
- You need to use the keyboard shortcut:
Shift + WinKey + S- (or)
Winkey + Shift + S
- By using the above keyboard shortcut, the snipping tool will appear on your screen.

- Once the Snipping Tool is launched, your mouse cursor will turn into a “+” shape, allowing you to select the area you want to capture for the screenshot.
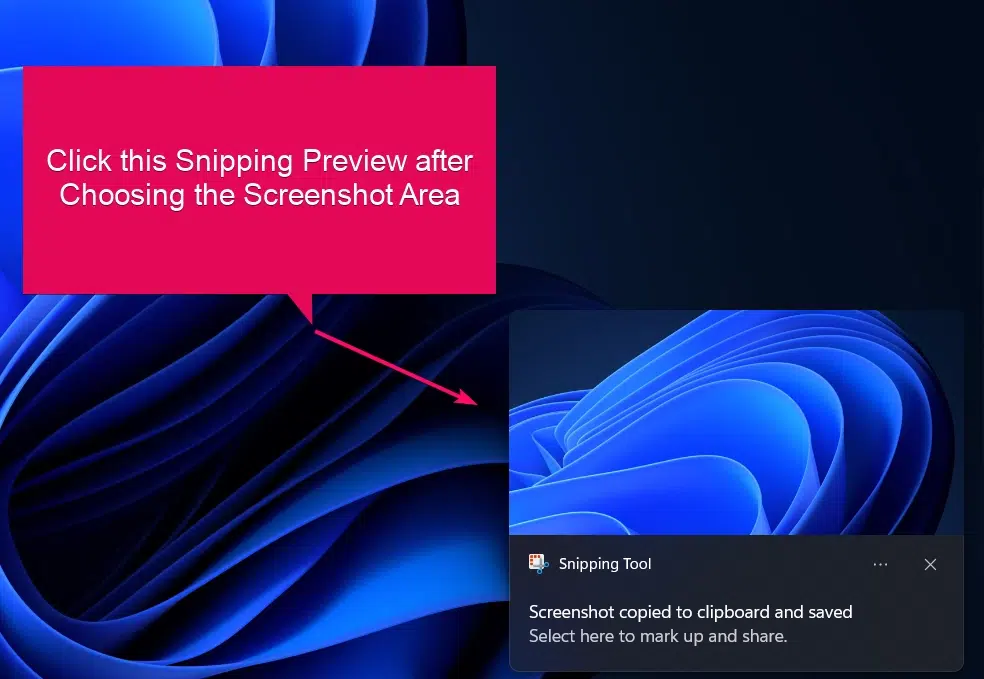
- After choosing the area, the screenshot taken using the snippet tool will be appear in the right bottom on your screen.

- Note: Your screenshot will be saved automatically. If you want to edit your screenshot and then you will need to open the popup that appears after the Snipping Tool shows you a preview of the screenshot you just captured.
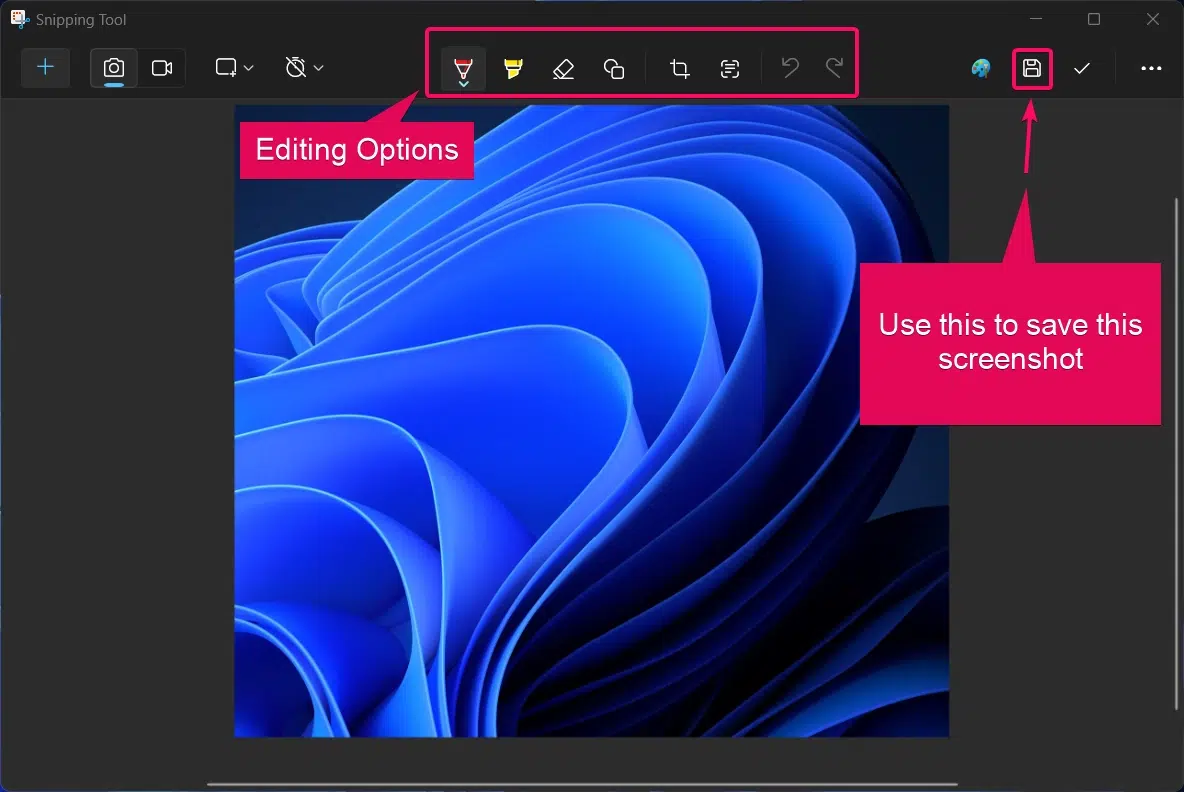
- Now, you can edit your screenshot using the basic editing tools provided by the Snipping Tool, or you can directly save the screenshot by clicking the save button in the top right corner of the Snipping Tool window.
- Next, you need to choose the file location, enter the file name, and save the screenshot to your desired folder.
This way, you can take a screenshot using the Snipping Tool if your PrintScreen button is damaged or not working.
Using Keyboard Manager from PowerToys Application:
You can download the latest version of PowerToys from the official GitHub repository. Alternatively, my brother wrote a helpful guide on how to download and install the PowerToys tool on your Windows 11 PC.
To use this tool, you need to enable it in the PowerToys application. Follow the steps below to do this.
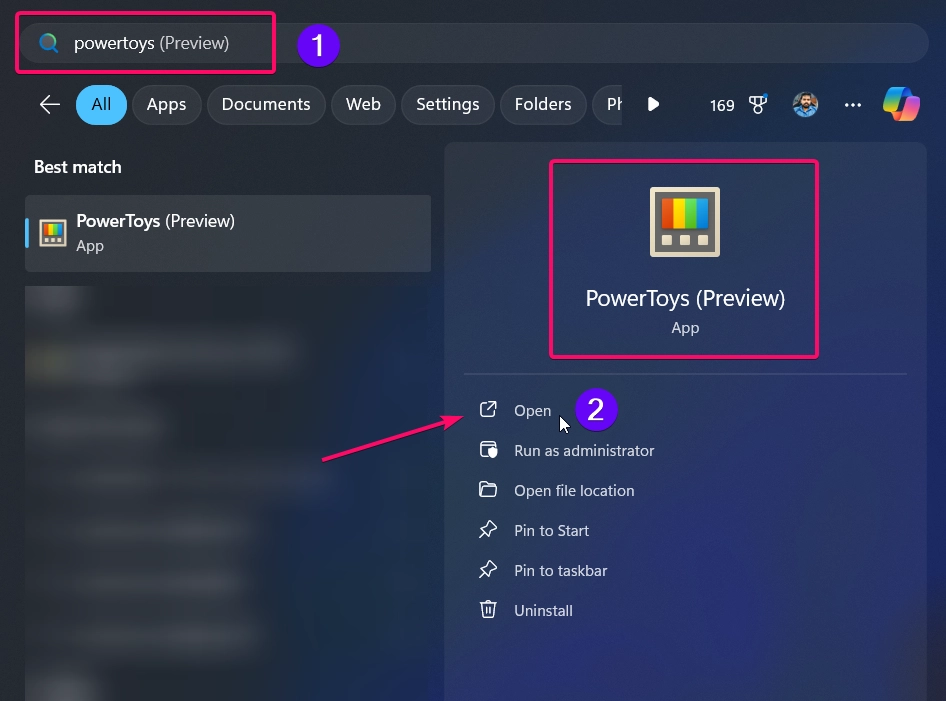
- From the Start Menu, you need to enter the term “PowerToys” and launch the application.
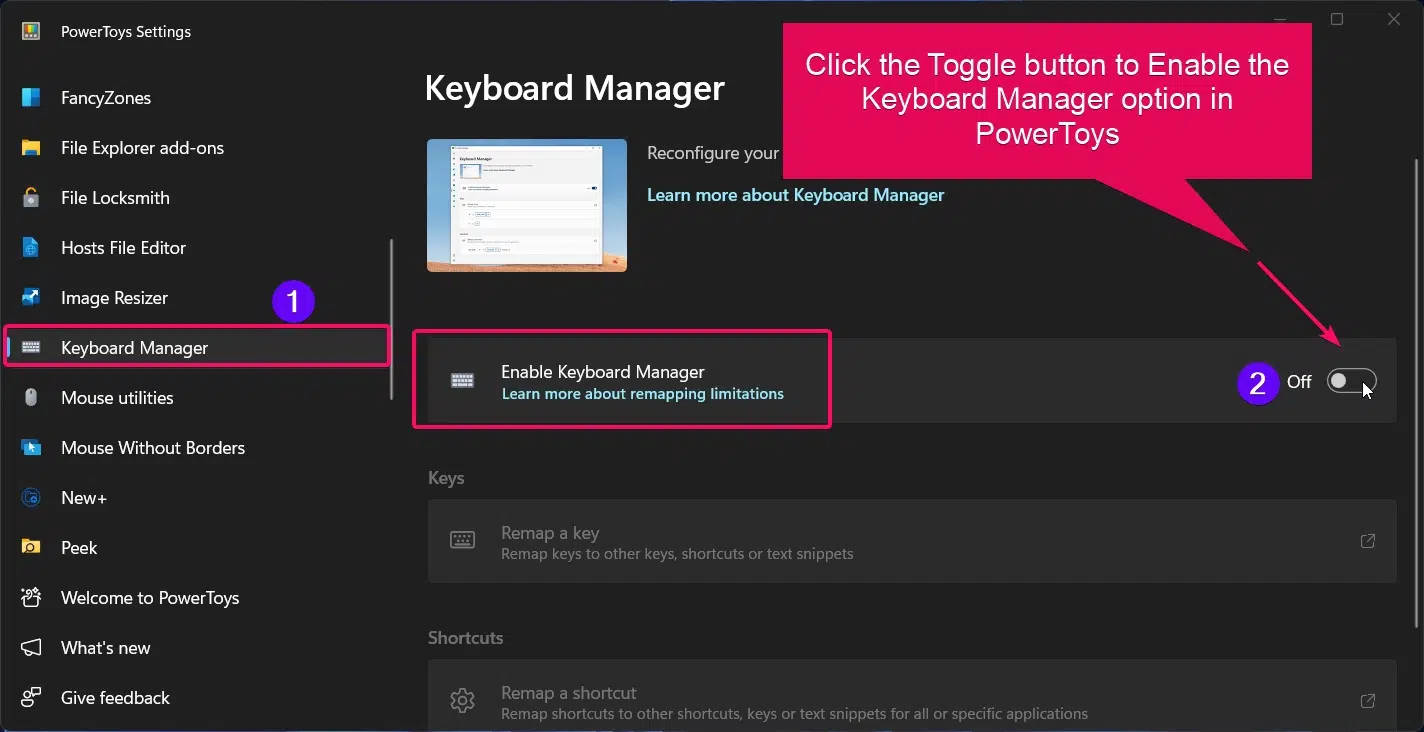
- Once the application is launched, scroll down and find the Keyboard Manager option. Then, click the toggle switch to enable the Keyboard Manager utility on your PC.
- Now, you need to use the option named Remap a key.
- In the Remap a key option, you can Select the key you want to change (“Select“) and then configure the key, shortcut or text you want it to send (“To send“). For example: Select A and send CTRL + C, A would be your “Select” and CTRL + C would be your “To send” command.
- Now, you need to do the configuration, I have configured the SHIFT + E option mapped to the PRNT SCRN button to take screenshot.
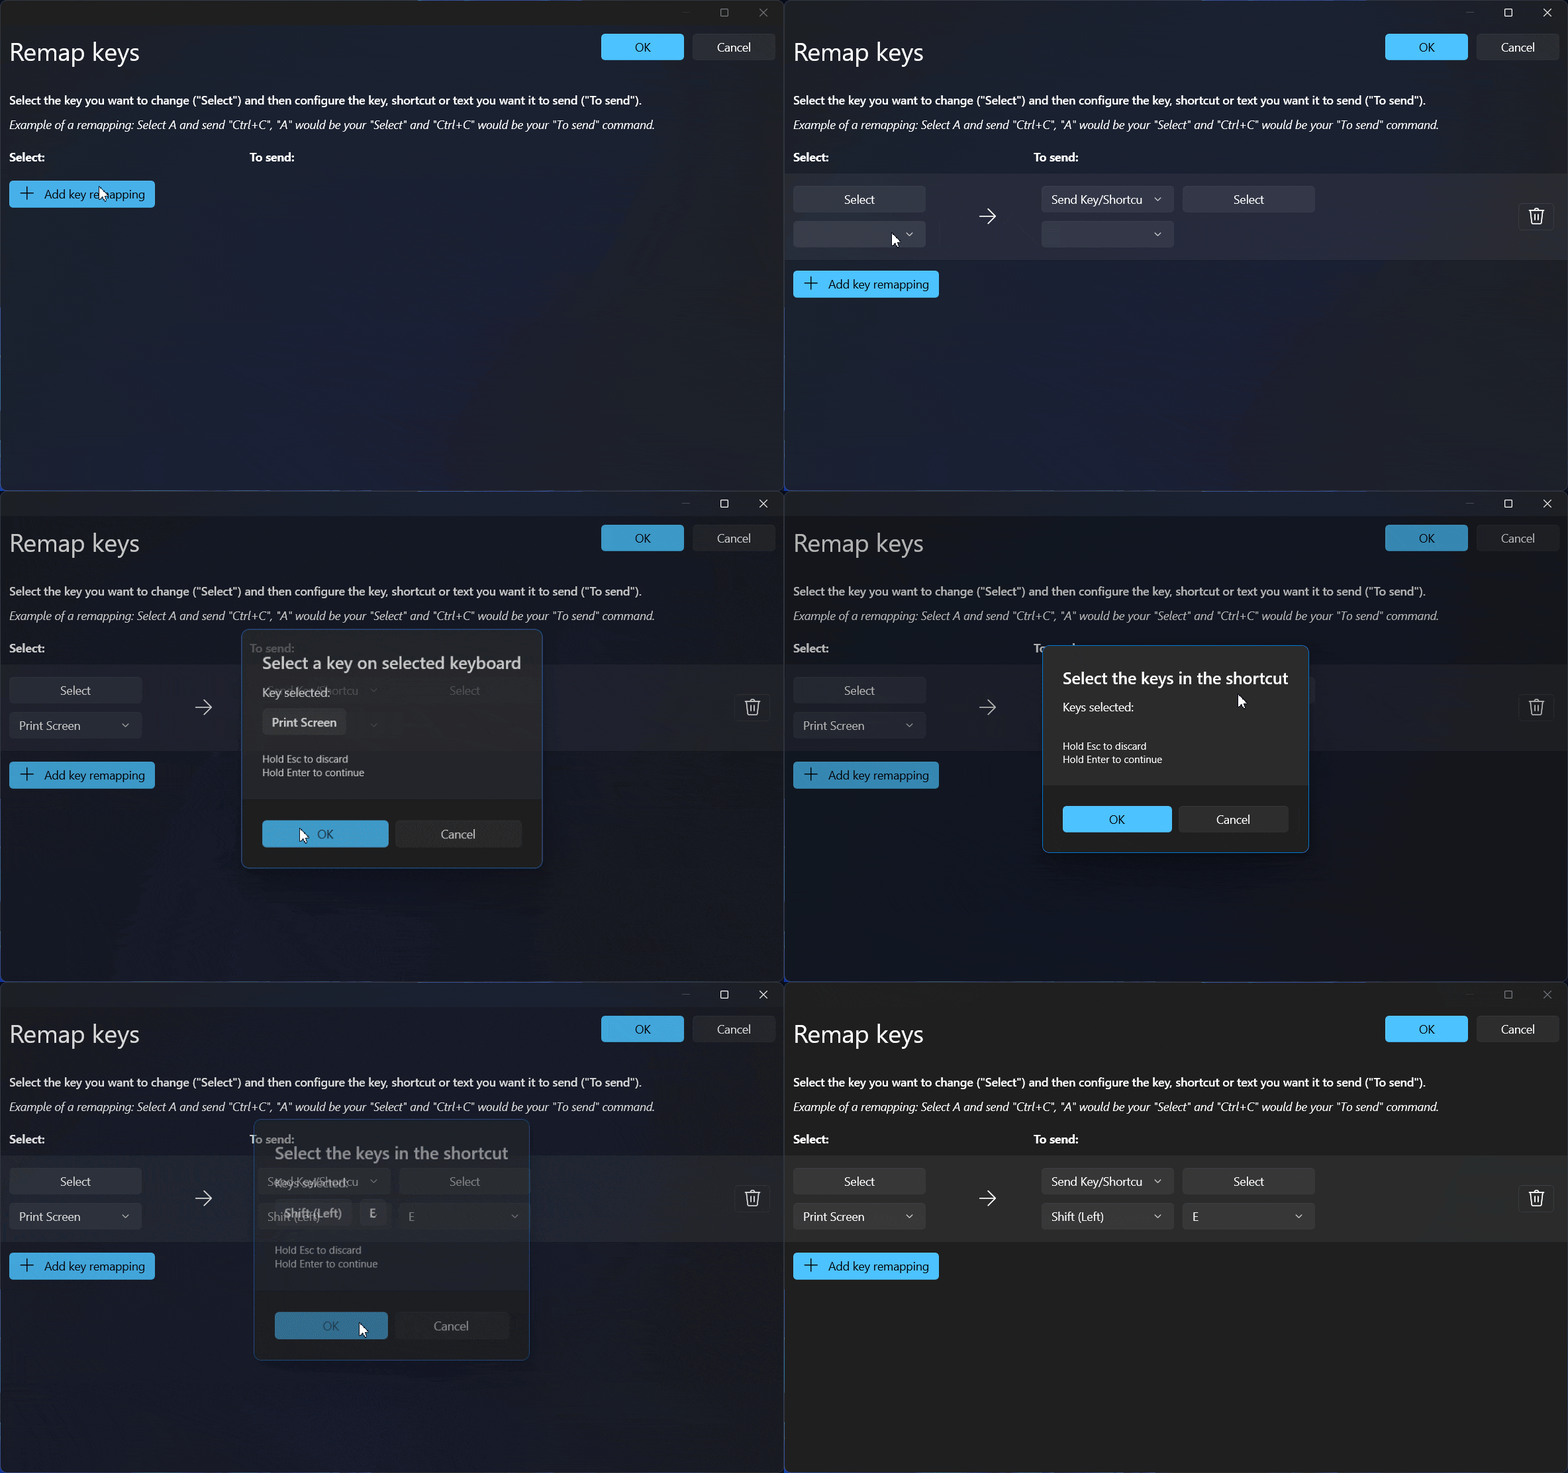
Once setting the new keyboard buttons, then you can use the new keyboard buttons to screenshot on your pc.
Using 3rd Party Apps:
If you want to try the 3rd party apps other than the above methods, then follow the below instructions. The most recommended 3rd party apps to take screenshots are LightShot, ShareX, Greenshot & Snagit.
LightShot:

LightShot is one of the most popular screenshot apps used by many. It has limited features and functions, With its lightweight design, it allows you to capture, edit, and share screenshots instantly, making it a great option for beginners. You can download the LightShot app here: https://app.prntscr.com/en/index.html
ShareX:

ShareX is an open-source screenshot and screen recording tool that comes with a wide range of features. It’s perfect for users who need flexibility, as it supports various capture modes, automated tasks, and easy sharing options. ShareX supports multiple file formats and offers advanced editing options like annotations, blurring, and adding text. Additionally, ShareX integrates with a wide range of online services, allowing you to upload and share your captures instantly. You can download the ShareX app here: https://getsharex.com/
Snagit:

Snagit is a powerful, feature-rich screenshot and screen recording tool designed for professional use. It provides extensive editing tools and the ability to capture both images and videos, making it great for detailed screen documentation. With Snagit, you can capture images, videos, and even scrolling windows, making it ideal for tutorials, presentations, and documentation. It includes powerful editing options like annotations, effects, and templates, allowing users to create polished visuals. You can download the Snagit app here: https://www.techsmith.com/snagit/
Greenshot:

Greenshot is a lightweight, user-friendly screenshot tool that offers more advanced features like image annotations and basic editing options. It’s ideal for users who need quick and easy captures with some extra functionality. Greenshot also includes customizable keyboard shortcuts and various export options, making it a great choice & You can save the captured screenshots directly to your computer or upload them to online services like Imgur You can download the Greenshot app here: https://getgreenshot.org/
Conclusion:
By following the steps mentioned in this article, you can easily capture screenshots on your Windows 11 PC without needing the Print Screen button. Whether you use the Snipping Tool or other popular screenshot apps like LightShot, Greenshot, Snagit, or ShareX, you have plenty of options to take screenshots efficiently. Hopefully, these methods help you work around the issue and continue capturing your screen. If you have any issues or queries related to the above tutorial and then feel free to comment us below and find more informational tutorials on our blog WinSides.com
 How to Check PC Specs without Logging into Windows 11?
 How to Enable HDR Video Streaming on Windows 11?
 How to Clean Temporary Files on Windows 11?
 How to Use ODBC on Windows 11?