

Introduction to BitLocker Recovery Key
A BitLocker recovery key is the emergency unlock information Windows uses when a BitLocker-protected drive cannot be unlocked through its normal method. On a Windows 11 PC, the normal unlock method is often the Trusted Platform Module, also called the TPM, working quietly during startup. If Windows decides the boot environment has changed, the TPM cannot validate the expected state, or a protected data drive cannot be opened with its usual password or auto-unlock method, BitLocker asks for the recovery key.
For most home users, the key they need is a 48-digit recovery password. Microsoft’s recovery-key guidance says the BitLocker recovery screen also shows a recovery key ID, and the first 8 digits of that ID are important because they help identify which stored key belongs to the locked device. That matters if your Microsoft account, work account, IT department, or printed records contain more than one recovery key. The correct key must match the ID shown on the locked screen.
The most important thing to understand is that Microsoft Support cannot retrieve, provide, or recreate a lost BitLocker recovery key for you. If the key is not in your Microsoft account, work or school account, printed records, USB drive, admin system, or backup location, and you cannot undo the change that triggered recovery, you may be forced to reset the device. Microsoft warns that resetting removes files. That is why a BitLocker recovery key should be treated like a house key for encrypted data, not like an ordinary password you can simply reset.
This guide explains where to find a BitLocker recovery key, how to match the key ID, why Windows 11 asks for the key, how to back it up before problems happen, what to do after using it, and what not to do when you are locked out. The main references are Microsoft Support’s Find your BitLocker recovery key page, Microsoft Learn’s BitLocker recovery overview, the BitLocker operations guide, and Microsoft’s BitLocker overview.
Table of contents
Key Takeaways
- A BitLocker recovery key is usually a 48-digit recovery password. It unlocks a BitLocker-protected drive when the normal unlock method cannot be used.
- Always match the key ID. The recovery screen shows a key ID, and the first 8 digits help you choose the correct stored key.
- Check the Microsoft account first on personal PCs. Use another device and sign in at aka.ms/myrecoverykey with the Microsoft account used on the locked PC.
- Check work or school storage for managed devices. Use aka.ms/aadrecoverykey or contact the organization IT help desk.
- Printed copies, USB drives, and saved text files still matter. Those may be the only copies if the key was not backed up to a cloud account or organization.
- Microsoft Support cannot recreate a lost key. If no key can be found and the triggering change cannot be reversed, reset may remove files.
- Suspend BitLocker before planned firmware, TPM, boot, or hardware changes. That prevents avoidable recovery prompts while keeping the drive encrypted.
What Is a BitLocker Recovery Key?
A BitLocker recovery key is a recovery method for a BitLocker-encrypted volume. In everyday language, most people call the 48-digit recovery password the recovery key. Microsoft documentation is more precise: a recovery password is a 48-digit number, while a recovery key can also refer to a key stored on removable media, such as a .bek file. For a Windows 11 lockout screen, the user usually needs the 48-digit recovery password.
BitLocker protects data by encrypting the drive. When Windows starts normally, the TPM or another configured protector unlocks the drive automatically or after the user enters a PIN, password, or startup key. Recovery mode appears when that normal path cannot be trusted or completed. The recovery key is the fallback. It proves that the person trying to unlock the drive has access to the recovery material saved when BitLocker was enabled.
This design is intentional. If someone steals a laptop and changes the boot path, removes the drive, tampers with the TPM, or tries to access Windows outside the normal trusted startup path, BitLocker should not unlock automatically. Recovery mode can be annoying when it appears after legitimate changes, but it is also the mechanism that keeps encrypted data protected when the system no longer looks the way BitLocker expects.
Step 1: Write Down the Recovery Key ID
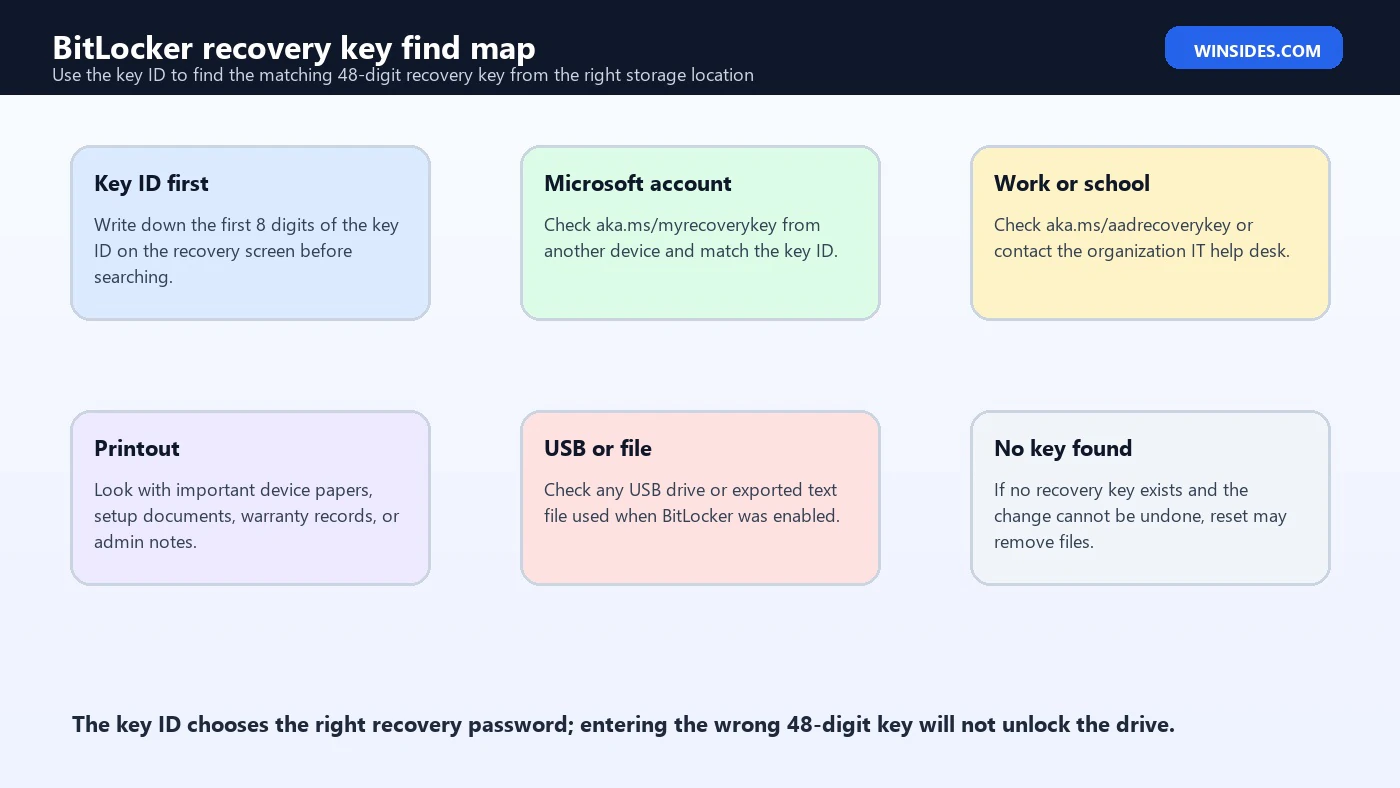
Before searching every account and drawer, look at the BitLocker recovery screen and write down the recovery key ID. Microsoft recommends taking note of the first 8 digits. That ID is not the recovery password itself. It is a label that helps you choose the correct recovery key from a list. This is especially important if you have owned several PCs, reinstalled Windows, encrypted multiple drives, or used the same Microsoft account on more than one device.
When you open a Microsoft account recovery-key page or a work-account device page, you may see multiple keys. Do not randomly try them. Match the key ID shown on the locked PC with the key ID shown in the account. Then enter the related 48-digit recovery password exactly. BitLocker groups the digits for readability, but every digit matters.
If the recovery screen is on a laptop, keep the laptop plugged in while you search. Use another phone, tablet, or computer to look up the key. Do not repeatedly reboot, clear the TPM, change boot settings, or reinstall Windows while you are still trying to find the key. Extra changes can make troubleshooting harder.
Step 2: Check Your Microsoft Account
For many personal Windows 11 PCs, the recovery key may be saved to the Microsoft account used during setup or when device encryption was enabled. From another device, open a browser and go to aka.ms/myrecoverykey. Sign in with the Microsoft account connected to the locked computer. If you see several devices or keys, use the key ID from the recovery screen to select the correct one.
If you cannot find the key in your own account, think about who set up the PC. Microsoft notes that if somebody else set up the device or turned on BitLocker, the key might be stored in that person Microsoft account. This commonly happens with a family member, a repair shop, a previous owner, a parent account, or a shared household PC. The account that uses the device today is not always the account that originally saved the key.
Starting with Windows 11 version 24H2, Microsoft says the BitLocker recovery screen can show a hint of the Microsoft account associated with the recovery key. If you see such a hint, use it. It can save a lot of guessing, especially on PCs that have had multiple accounts over time.
Step 3: Check Work or School Accounts
If the device was ever connected to a work or school organization, the recovery key may be stored with that organization. Go to aka.ms/aadrecoverykey from another device and sign in with the work or school account. Microsoft’s support guidance says you may be able to select Devices, expand the device, and view BitLocker keys. Use the key ID to choose the right one.
If the organization manages the device, you may not be allowed to view the recovery key yourself. Contact the IT help desk. Give them the device name, serial number if available, and the first 8 digits of the recovery key ID. Do not send the full recovery password in chat after you receive it unless the organization has a secure process. Recovery keys are sensitive.
This applies even if the PC feels personal. A laptop that was once joined to a company tenant, school tenant, or Microsoft Entra ID environment may have escrowed the key there. If you bought a used business laptop and it still prompts for a recovery key controlled by the prior organization, the seller or organization must resolve it. A random buyer cannot recreate that key.
Step 4: Check Printed Copies, USB Drives, and Files
BitLocker can be backed up in several ways. Some users print the key. Some save it to a USB flash drive. Some save it as a text file. Some administrators save it to Active Directory, Microsoft Entra ID, or a management system. If cloud account searches fail, check physical and local records carefully. Look with purchase paperwork, repair notes, device setup documents, password-manager attachments, secure notes, external backup drives, and admin folders.
If you saved the key on a USB flash drive, plug it into the locked device and follow the prompt if Windows supports that route. If the key is saved as a text file, use another computer to read it and type the 48-digit number into the locked PC. Do not save the only copy of a recovery key on the encrypted drive it unlocks. That copy becomes useless when the drive is locked.
For removable or external drives, the recovery key might be stored separately from the operating system key. A laptop OS drive, an external USB drive, and a secondary internal data drive can all have different BitLocker recovery passwords. Match the key ID every time.
What If You Cannot Find the Recovery Key?
If you cannot find the BitLocker recovery key, Microsoft’s guidance is blunt: Microsoft Support cannot retrieve, provide, or recreate a lost key. If the device is managed by an organization, contact IT. If the device is personal, keep searching accounts and backups. If you are unable to undo the change that caused recovery and cannot find the key, resetting the device may be the only available path, and resetting removes files.
This is the hard part of encryption. BitLocker is designed so that encrypted data cannot be accessed without a valid unlock method. That is the point when a device is stolen. It is also painful when the legitimate owner loses every recovery copy. There is no safe universal bypass. Any website promising to unlock BitLocker without the key should be treated with suspicion.
Before resetting, check all reasonable places: personal Microsoft accounts, old Microsoft accounts, family member accounts, work or school accounts, printed copies, USB drives, password managers, secure notes, OneDrive documents, external backups, and IT admin portals. Also consider whether a recent change can be undone, such as restoring boot order, reconnecting the original TPM state, or reversing a hardware change. Do not make destructive changes until the search is exhausted.
Why Windows Asks for the BitLocker Recovery Key
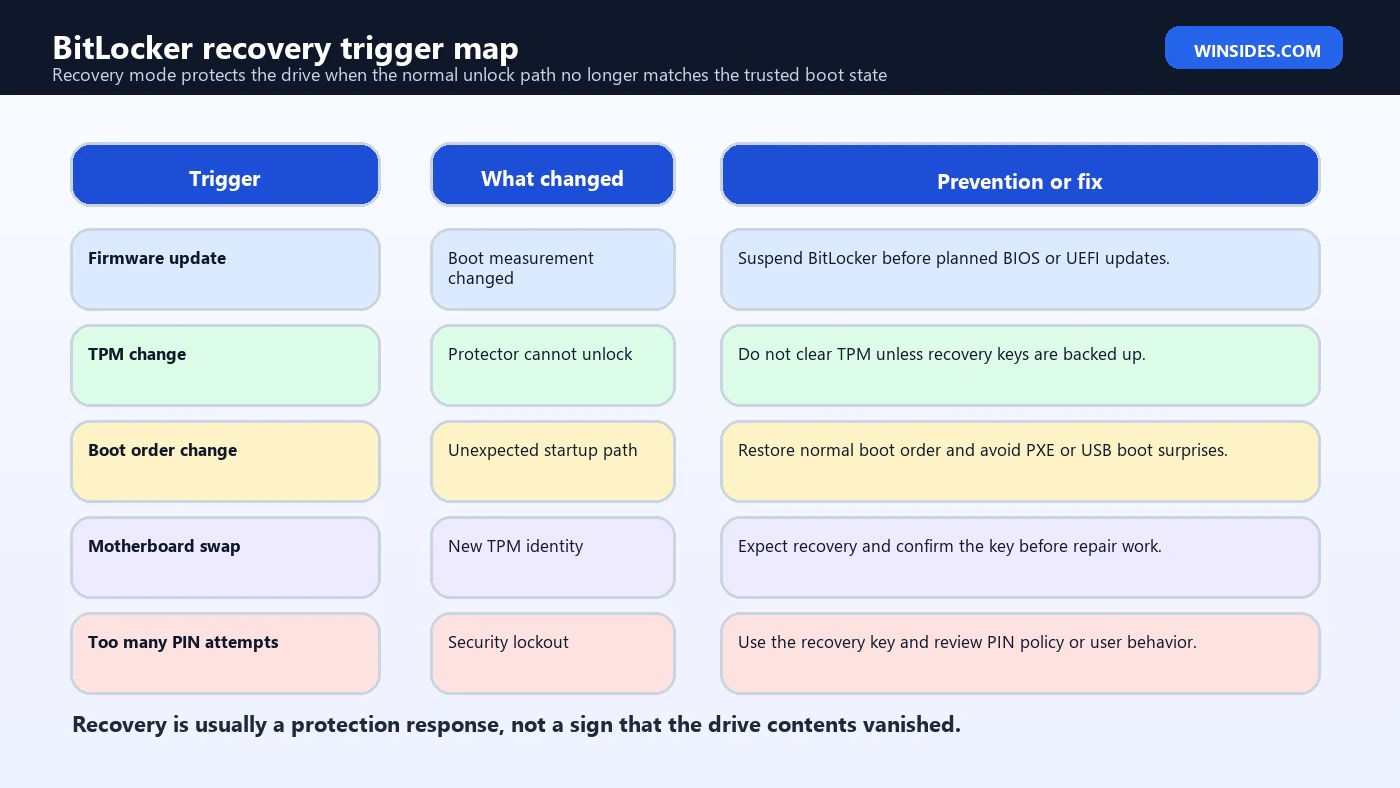
BitLocker recovery is triggered when the protected drive cannot be unlocked through its default mechanism. Microsoft lists many examples: entering the wrong PIN too many times, changing boot order, using PXE boot, disabling or clearing the TPM, upgrading a motherboard, changing early startup components such as BIOS or UEFI firmware, modifying TPM validation measurements, moving a protected drive into another computer, docking or undocking in certain scenarios, and other startup-state changes.
The common theme is trust. BitLocker sealed the unlock process to a known state. If the state changes, BitLocker asks for recovery rather than silently unlocking. That protects the drive from offline attacks, tampering, and unauthorized access. A recovery prompt after a legitimate firmware update can feel like a bug, but technically BitLocker is doing what it was designed to do: asking for proof before releasing the encrypted data.
Sometimes Windows updates, firmware updates, TPM configuration changes, Secure Boot changes, or boot-manager changes can trigger recovery. Most users simply enter the key once and continue. If recovery repeats on every boot, there may be a persistent configuration problem that needs diagnosis.
How to Check BitLocker Status After Unlocking
After you regain access to Windows, check BitLocker status. Open Start, search for Manage BitLocker, and review each drive. You can also use PowerShell or Command Prompt. Microsoft’s operations guide lists several management tools, including Control Panel, PowerShell cmdlets, and manage-bde.exe. Basic users can use Control Panel; administrators may prefer command-line tools.
manage-bde -status\nmanage-bde -protectors -get C:\n\nPowerShell:\nGet-BitLockerVolume C: | Format-ListLook for protection status, encryption percentage, lock status, and key protectors. A healthy OS drive may show protection on, encryption complete, and key protectors such as TPM and recovery password. If protection is suspended, resume it after the planned work is complete. If the recovery password is missing, back it up or add a recovery protector according to your policy and edition.
Back Up Your BitLocker Recovery Key Before You Need It
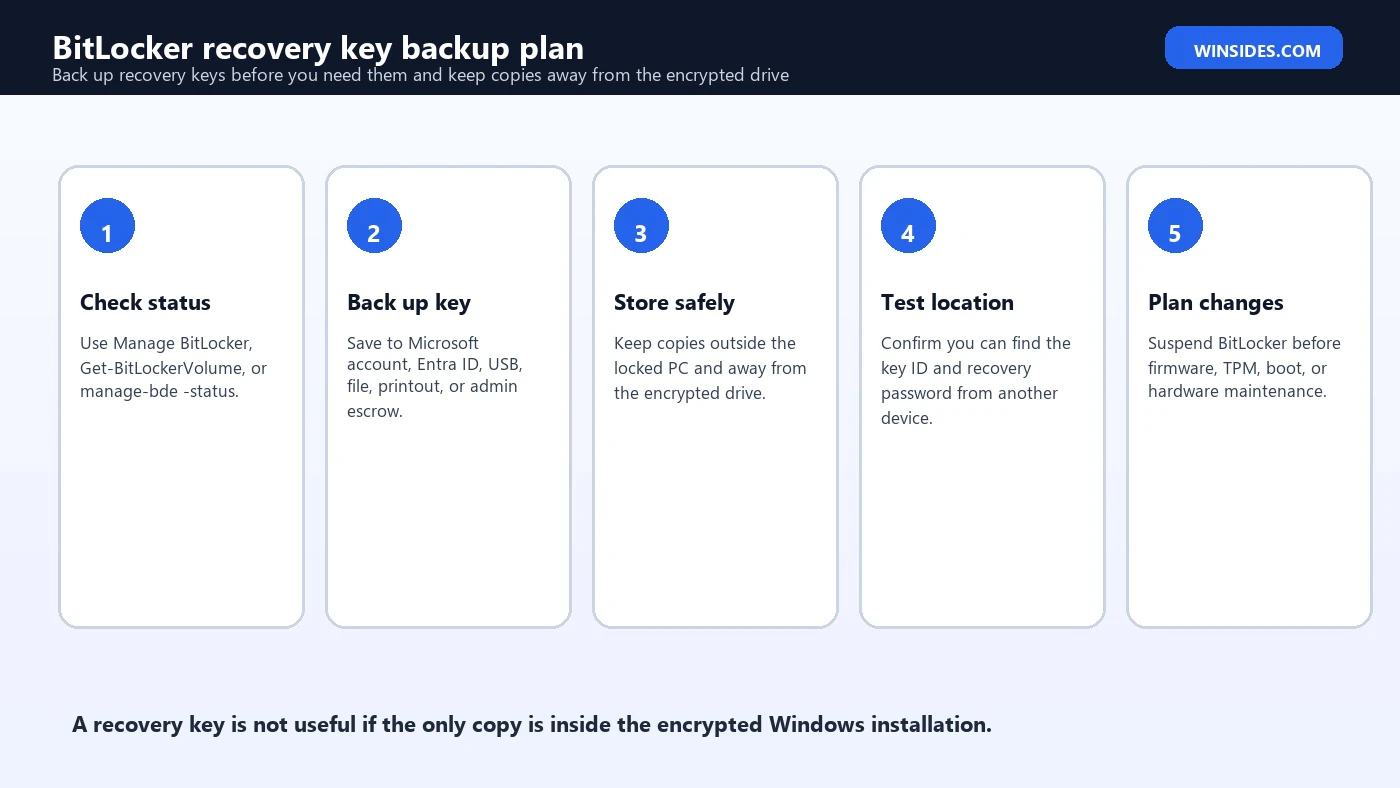
The best time to solve a BitLocker recovery-key problem is before the recovery screen appears. If Windows is working now, back up the key. Open Manage BitLocker, choose the protected drive, and select the option to back up the recovery key if available. Depending on edition and account type, options may include saving to a Microsoft account, saving to a work or school account, saving to a USB flash drive, saving to a file in a safe location, or printing the key.
A good backup plan has at least two independent locations. For example, store the key in your Microsoft account and also keep a printed copy in a secure place. Or, for an organization, escrow to Microsoft Entra ID or Active Directory and keep a help-desk process for recovery. Do not store the only copy on the encrypted C: drive. Do not paste it into an unsecured note that syncs to devices you do not trust.
If privacy is a major concern, decide consciously where the key should live. Cloud backup is convenient because it lets you recover from another device. Local-only storage gives you more direct control but increases the risk of permanent data loss if you lose the local copy. There is no single best answer for every user. The dangerous choice is having no known backup at all.
Suspend BitLocker Before Planned Firmware or Hardware Work
Microsoft’s recovery overview recommends avoiding planned recovery prompts by temporarily suspending BitLocker protection before known hardware or firmware upgrades. Suspending BitLocker leaves the drive encrypted but allows the system to handle planned changes and reseal the protector afterward. This is especially relevant before BIOS or UEFI updates, TPM changes, boot configuration changes, major Windows upgrades from external media, motherboard work, or storage controller changes.
Suspending is not the same as decrypting. The drive remains encrypted. The goal is to prevent the normal trusted-boot measurements from surprising BitLocker during a planned change. After the work is complete, resume protection if it does not resume automatically. Microsoft notes that suspended BitLocker can automatically resume after reboot unless a reboot count is specified.
For home users, the simple habit is this: before BIOS updates or motherboard service, confirm you have the recovery key. Then suspend BitLocker if the change is planned and you understand the steps. For business users, follow the organization policy because IT may have automated suspension, escrow, and compliance workflows.
After Using a Recovery Key
After you enter the recovery key and Windows starts, do not ignore the event. First, confirm the device is healthy. Check BitLocker status. Check whether Windows Update, firmware, docking, TPM, boot order, or hardware changes triggered the prompt. If the prompt happened once after a known update and never returns, it may not require more work. If it happens repeatedly, investigate the cause.
In managed environments, Microsoft recommends root-cause analysis so the same recovery event does not happen again. Administrators may also rotate or invalidate recovery passwords after use, depending on policy. That means removing the old recovery password protector, adding a new one, and backing it up to Microsoft Entra ID or Active Directory. Home users do not usually need that workflow, but they should still confirm the key is backed up.
If the key was exposed in an insecure place, such as a chat window, shared note, or photo sent to someone, consider rotating recovery protectors after you are safely back into Windows. A recovery password unlocks encrypted data. Treat it as sensitive.
BitLocker Recovery Key vs BitLocker Password vs PIN
A BitLocker recovery key is not the same thing as your Windows sign-in PIN. It is not the same as your Microsoft account password. It is not the same as a data-drive password unless that password is the configured protector for that volume. The recovery key is a fallback recovery method used when the normal protector cannot unlock the drive.
This distinction explains why resetting a Microsoft account password does not magically unlock a BitLocker recovery screen. The Microsoft account may store the recovery key, but the account password is not the drive-unlock secret. You sign in to the account to retrieve the stored recovery password, then type the 48-digit key into the BitLocker screen.
For data drives, users may have a normal BitLocker password plus a recovery key. If the password is forgotten, the recovery key can regain access. For operating system drives, the TPM usually unlocks silently, unless the device requires a PIN, startup key, or recovery password due to policy or a changed boot state.
Personal PC vs Work or School PC
On a personal PC, the recovery key is often in the Microsoft account used during setup. On a work or school PC, the recovery key is often controlled by the organization. Do not mix those paths. If a company laptop asks for recovery, your personal Microsoft account may have nothing. If a personal laptop asks for recovery, the company help desk may have nothing unless the device was enrolled there.
For work devices, follow policy. The IT team may need the key ID, device name, serial number, asset tag, user name, or ticket number. Some organizations allow users to view keys through a portal. Others require help-desk approval. That friction is deliberate because a recovery key can unlock protected company data.
For used devices, ownership history matters. If a second-hand laptop is still tied to a previous organization and asks for a recovery key, the buyer may be unable to unlock it. The seller should remove management, decrypt or reset properly, and transfer ownership before sale. A recovery key controlled by the previous tenant cannot be guessed.
Common Mistakes to Avoid
- Do not ignore the key ID; it tells you which stored recovery key matches the locked drive.
- Do not clear the TPM while locked out unless you already have the recovery key and understand the impact.
- Do not change BIOS boot order repeatedly while trying to recover.
- Do not assume your Windows PIN, Microsoft account password, or device password is the BitLocker recovery key.
- Do not store the only recovery-key copy on the encrypted drive.
- Do not post the 48-digit key publicly or send it through insecure channels.
- Do not trust websites claiming to bypass BitLocker without a key.
- Do not reset the PC until all account, printout, USB, file, and IT-admin locations have been checked.
Troubleshooting: Recovery Key Does Not Work
If the recovery key does not work, first verify the key ID. The wrong key from the same Microsoft account will not unlock the drive. Type the digits carefully. If possible, use the number row rather than a numeric keypad if keyboard layout or Num Lock is questionable. Check whether the recovery screen is for the OS drive, a data drive, or a different device.
If you have multiple keys with similar device names, match the key ID rather than the device name alone. Device names can change, Windows can be reinstalled, and old keys may remain in an account. The ID is the reliable matching clue. If a work account shows several keys, ask IT to confirm the correct device and key ID.
If every matching key fails, stop and document the screen. There may be a misunderstanding about which drive is locked, which account owns the key, or whether the recovery password has been rotated. For managed devices, escalate to IT rather than trying random firmware or TPM changes.
Troubleshooting: BitLocker Recovery Appears After Every Restart
A one-time recovery prompt after a legitimate update or hardware event may not be serious. A repeated prompt on every restart means BitLocker keeps seeing a state it cannot trust. Common causes include changed boot order, disabled or hidden TPM, firmware settings, Secure Boot changes, docking or hardware state changes, PCR validation policy issues, startup-device changes, or a protector configuration that no longer matches the device.
After unlocking, check BitLocker status and review recent changes. Restore normal boot order. Confirm TPM and Secure Boot settings are as expected. Update firmware and drivers only from trusted OEM sources. If you are an administrator, review BitLocker policy and TPM validation settings. If this is a managed device, contact IT because policy may be involved.
Do not simply suspend BitLocker forever to avoid the prompt. Suspension reduces protection while it is active. Use suspension for planned maintenance, then resume protection after the cause is fixed. If the prompt repeats, fix the root cause.
Useful Commands After Windows Starts
These commands are for after Windows is unlocked. They do not bypass recovery. They help you inspect status and protectors, which is useful when documenting a recovery event or preparing future backups.
manage-bde -status\nmanage-bde -protectors -get C:\n\nPowerShell:\nGet-BitLockerVolume\n(Get-BitLockerVolume -MountPoint C).KeyProtectorRun administrative commands from an elevated terminal when required. If you are not comfortable using command-line tools, use Manage BitLocker in Control Panel. For business PCs, use the organization approved process rather than changing protectors manually.
Best Practices for Keeping Recovery Keys Safe
A recovery key should be accessible during an emergency but protected from casual access. That balance is personal. A Microsoft account copy is convenient if the laptop is locked and you have a phone. A printed copy in a secure place is resilient if account access is unavailable. A password-manager secure note can work if the password manager is accessible from another device. An organization should use escrow and audited help-desk recovery.
Keep the key away from the encrypted device. A text file on C: is not a backup. A photo stored only on the locked PC is not a backup. A note inside an account you cannot access without the locked PC is weak. Test recovery-key access from another device before you need it. That simple test is the difference between a stressful prompt and a disaster.
For high-security users, think about who can access each copy. Cloud storage improves availability but may not match every privacy model. Local storage gives more control but creates loss risk. If you choose local-only storage, make multiple durable copies and store them securely. If you choose cloud storage, protect the account with strong authentication.
Frequently Asked Questions
What is a BitLocker recovery key?
It is recovery information used to unlock a BitLocker-protected drive when the normal unlock method cannot be used. For most Windows recovery screens, it is a 48-digit recovery password.
Where do I find my BitLocker recovery key?
Check your Microsoft account at aka.ms/myrecoverykey, your work or school account at aka.ms/aadrecoverykey, printed copies, USB drives, saved files, or your organization IT department.
What is the BitLocker recovery key ID?
It is an identifier shown on the recovery screen. The first 8 digits help you match the locked device to the correct stored recovery key.
Can Microsoft Support give me my lost BitLocker recovery key?
No. Microsoft Support says it cannot retrieve, provide, or recreate a lost BitLocker recovery key.
Why is Windows asking for my BitLocker recovery key?
Common causes include firmware changes, TPM changes, boot order changes, motherboard replacement, too many failed PIN attempts, recovery environment access, or other startup-state changes.
Can I bypass BitLocker without the recovery key?
No safe general bypass exists. BitLocker is designed to protect encrypted data from access without a valid protector or recovery key.
Does resetting my Microsoft account password unlock BitLocker?
No. The account may store the recovery key, but the account password is not the BitLocker recovery password.
What happens if I cannot find the recovery key?
If no key can be found and the triggering change cannot be reversed, you may need to reset the device, which removes files.
Should I suspend BitLocker before BIOS updates?
Yes, for planned firmware or hardware changes, confirm the key is backed up and suspend BitLocker according to Microsoft guidance or your organization policy.
Can a recovery key unlock any BitLocker drive?
No. Recovery keys are tied to specific protectors and drives. Use the key ID to match the correct key to the locked drive.
Conclusion: Find the Key, Match the ID, Then Prevent the Next Lockout
A BitLocker recovery key is the safety line for an encrypted Windows drive. It is usually a 48-digit recovery password, and the recovery key ID on the screen helps you identify which saved key belongs to the locked drive. Start with that ID, then check the right storage locations: Microsoft account, work or school account, IT admin portal, printed copy, USB drive, saved file, or secure backup.
If no key exists, the reality is harsh: Microsoft Support cannot recreate it, and resetting the device may remove files. That is not a flaw in the recovery screen; it is the consequence of strong drive encryption. BitLocker is designed to protect data from access without the right unlock material. That protection helps when a device is stolen, but it demands a real backup plan from the owner or organization.
Once you regain access, back up the recovery key, confirm BitLocker status, understand what triggered recovery, and suspend BitLocker before planned firmware, TPM, boot, or hardware changes. A few minutes of preparation can prevent a future lockout from turning into data loss.
For more interesting articles, stay tuned to Winsides.com!









Community
Comments (0)