

Introduction to the Blue Screen of Death on Windows 11
Encountering a Blue Screen of Death on Windows 11 can be one of the most frustrating experiences for any computer user. This critical system error, often abbreviated as BSOD, abruptly halts your workflow, displaying a stark blue screen with an error message before your PC restarts. It’s Windows’ way of telling you that something has gone fundamentally wrong, so much so that the operating system cannot continue running safely. For additional context, see troubleshoot blue screen errors, bug check code reference, Windows 11 specifications, and driver verification.
While the sight of a BSOD might induce panic, it’s actually a diagnostic tool. The information presented on that blue screen, particularly the stop code, offers crucial clues about the underlying problem. Understanding these messages and knowing how to respond is paramount for maintaining system stability and preventing potential data loss.
This comprehensive guide aims to demystify the blue screen of death on Windows 11. We will explore its causes, decipher common error codes, and provide a step-by-step approach to troubleshooting and resolving these disruptive events. Our goal is to equip you with the knowledge and tools to confidently tackle BSODs, restoring your Windows 11 system to optimal health.
Table of contents
Key Takeaways for Troubleshooting BSOD Errors
When confronted with a blue screen of death on Windows 11, immediate action and a systematic approach are vital. Here are the most crucial points to remember for effective troubleshooting:
- Note the Stop Code: Always write down the error message and hexadecimal stop code displayed on the BSOD. This code is your primary clue for diagnosing the problem.
- Start with Safe Mode/WinRE: If your PC can’t boot normally, access the Windows Recovery Environment (WinRE) or Safe Mode. These environments allow you to perform diagnostics and repairs without the full operating system loading.
- Update Drivers and OS: Outdated or corrupt drivers are a leading cause of BSODs. Ensure your graphics, chipset, and other critical drivers, along with Windows 11 itself, are always up to date.
- Check for Recent Changes: Think about what you recently installed or updated. New software, drivers, or Windows updates are frequent culprits. Revert or uninstall them if the BSOD started occurring afterward.
- Hardware Diagnostics: Don’t overlook hardware. Memory (RAM) and hard drive issues are common. Utilize built-in tools like Windows Memory Diagnostic and
chkdskto test these components. - Malware Scan: Malicious software can deeply destabilize your system. Perform a thorough scan using Windows Security or a reputable third-party antivirus to rule out infections.
Understanding Blue Screen of Death (BSOD) Errors
The Blue Screen of Death, or BSOD, is more than just an alarming visual; it’s a critical error message from the Windows operating system. It appears when the system encounters a problem so severe that it cannot recover gracefully, forcing a shutdown or restart to prevent potential damage or data corruption. This mechanism is a safeguard, not just a nuisance.
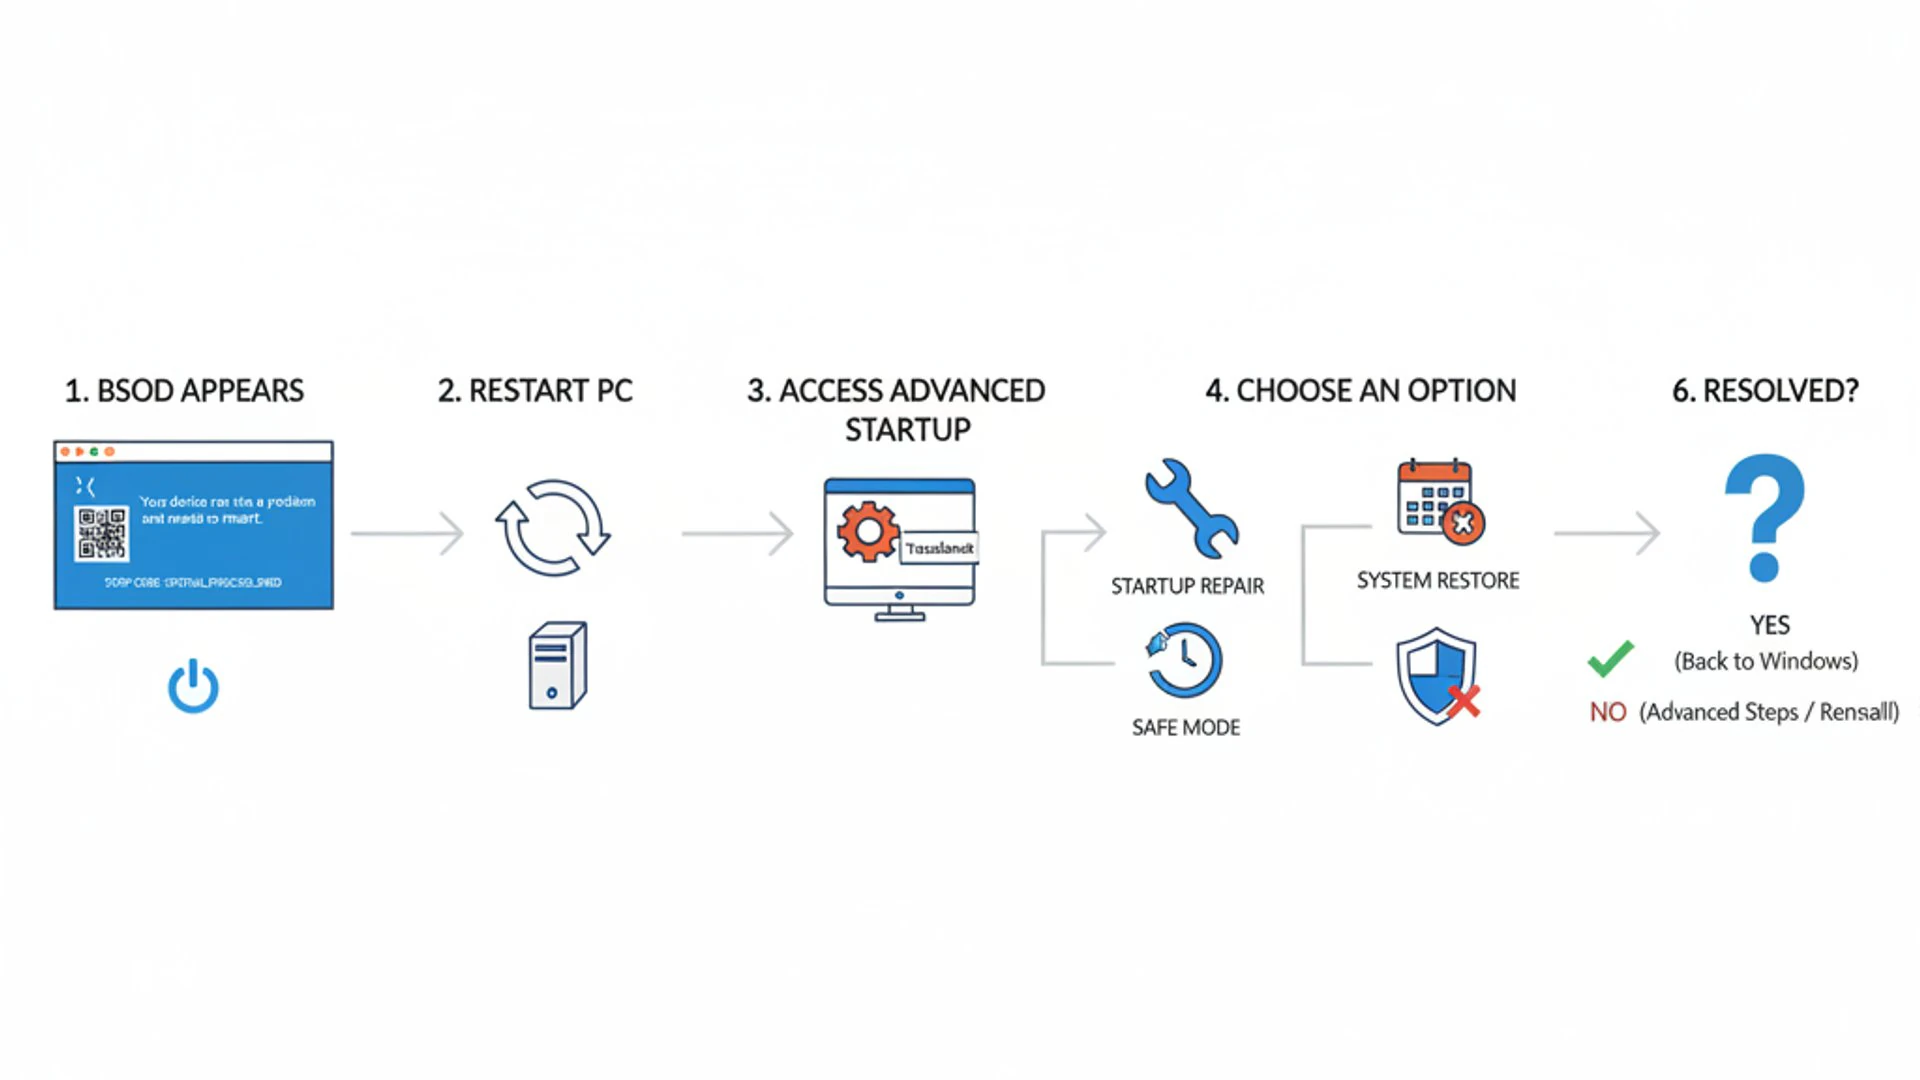
Understanding the technical underpinnings of why these errors occur is the first step toward effective resolution. BSODs typically indicate a fundamental instability within the system, often pointing to issues at the kernel level, where the operating system directly interacts with hardware.
These errors can stem from a variety of sources, including faulty hardware components, incompatible or corrupted device drivers, problematic software installations, or even malicious attacks. Each BSOD carries a unique “stop code” that provides specific information about the nature of the crash, acting as a crucial diagnostic breadcrumb.
What is a BSOD and Why Does it Occur?
A BSOD is essentially a “stop error” screen displayed by Microsoft Windows upon encountering a critical system error. It signifies that the operating system has reached a state where it can no longer operate reliably or safely. The system then halts, dumps its memory contents to a log file (if configured), and typically restarts.
The primary purpose of a BSOD is to prevent further damage to your system and data. If Windows continued to run with a severe underlying issue, it could lead to data corruption, hardware failure, or other irreversible problems. The blue screen acts as an emergency brake.
Common reasons for a BSOD appearing on Windows 11 include:
- Driver Issues: Incompatible, outdated, or corrupt device drivers are a very frequent cause. Drivers are the software that allows Windows to communicate with your hardware.
- Hardware Failures: Faulty RAM, a failing hard drive (SSD or HDD), an overheating CPU, or a problematic graphics card can all trigger BSODs.
- Software Conflicts: Newly installed applications, especially those that interact deeply with the system, can sometimes conflict with other software or the operating system itself.
- Corrupted System Files: Essential Windows system files can become damaged due to improper shutdowns, disk errors, or malware, leading to instability.
- Malware and Viruses: Malicious software can compromise system integrity, leading to crashes and security vulnerabilities.
- Overclocking or Overheating: Pushing your hardware beyond its specifications or inadequate cooling can cause instability and system failures.
Common BSOD Error Codes and Their Meanings
The hexadecimal code displayed on the blue screen is your most valuable piece of information. While there are hundreds of possible stop codes, some appear more frequently than others. Understanding what these common codes generally indicate can significantly narrow down your troubleshooting efforts for the blue screen of death on Windows 11.
Each code points to a specific type of error, often with parameters that provide even more detail. A quick search for the exact stop code online, combined with the context of recent system changes, is usually the fastest way to begin diagnosing the issue.
STOP Code: DRIVER_IRQL_NOT_LESS_OR_EQUAL
This particular stop code, 0x000000D1, is one of the most common BSOD errors and almost always points to a problematic device driver. It signifies that a kernel-mode driver attempted to access memory at an inappropriate interrupt request level (IRQL).
In simpler terms, a driver tried to access a memory address that it shouldn’t have, or at a time when it wasn’t allowed. This often happens when a driver is faulty, outdated, or incompatible with your current Windows 11 version or other hardware. Graphics card drivers, network adapter drivers, and sound card drivers are frequent culprits.
Initial steps for this error involve identifying the problematic driver (often named on the BSOD itself), updating all drivers, or rolling back to a previous driver version. If a specific device was recently installed, its driver is a prime suspect.
STOP Code: KERNEL_SECURITY_CHECK_FAILURE
The 0x00000139 stop code, KERNEL_SECURITY_CHECK_FAILURE, indicates a problem with the integrity of the Windows kernel or system files. This error suggests that the operating system detected a corruption or inconsistency in critical kernel data structures, which could compromise system security or stability.
This BSOD can be triggered by a variety of issues, including corrupted system files, memory corruption (faulty RAM), incompatible drivers, or even malware. It’s a broad error that often requires a more thorough investigation into system health.
Troubleshooting for this code typically involves running system file checks (SFC and DISM), testing memory, updating all drivers, and performing a comprehensive malware scan. It’s a strong indicator that the core of your Windows 11 system might be compromised or unstable.
Initial Steps When Facing a BSOD
When a blue screen of death on Windows 11 appears, the immediate priority is to safely restart your computer and gain access to diagnostic tools. Panicking won’t help; a calm, methodical approach will.
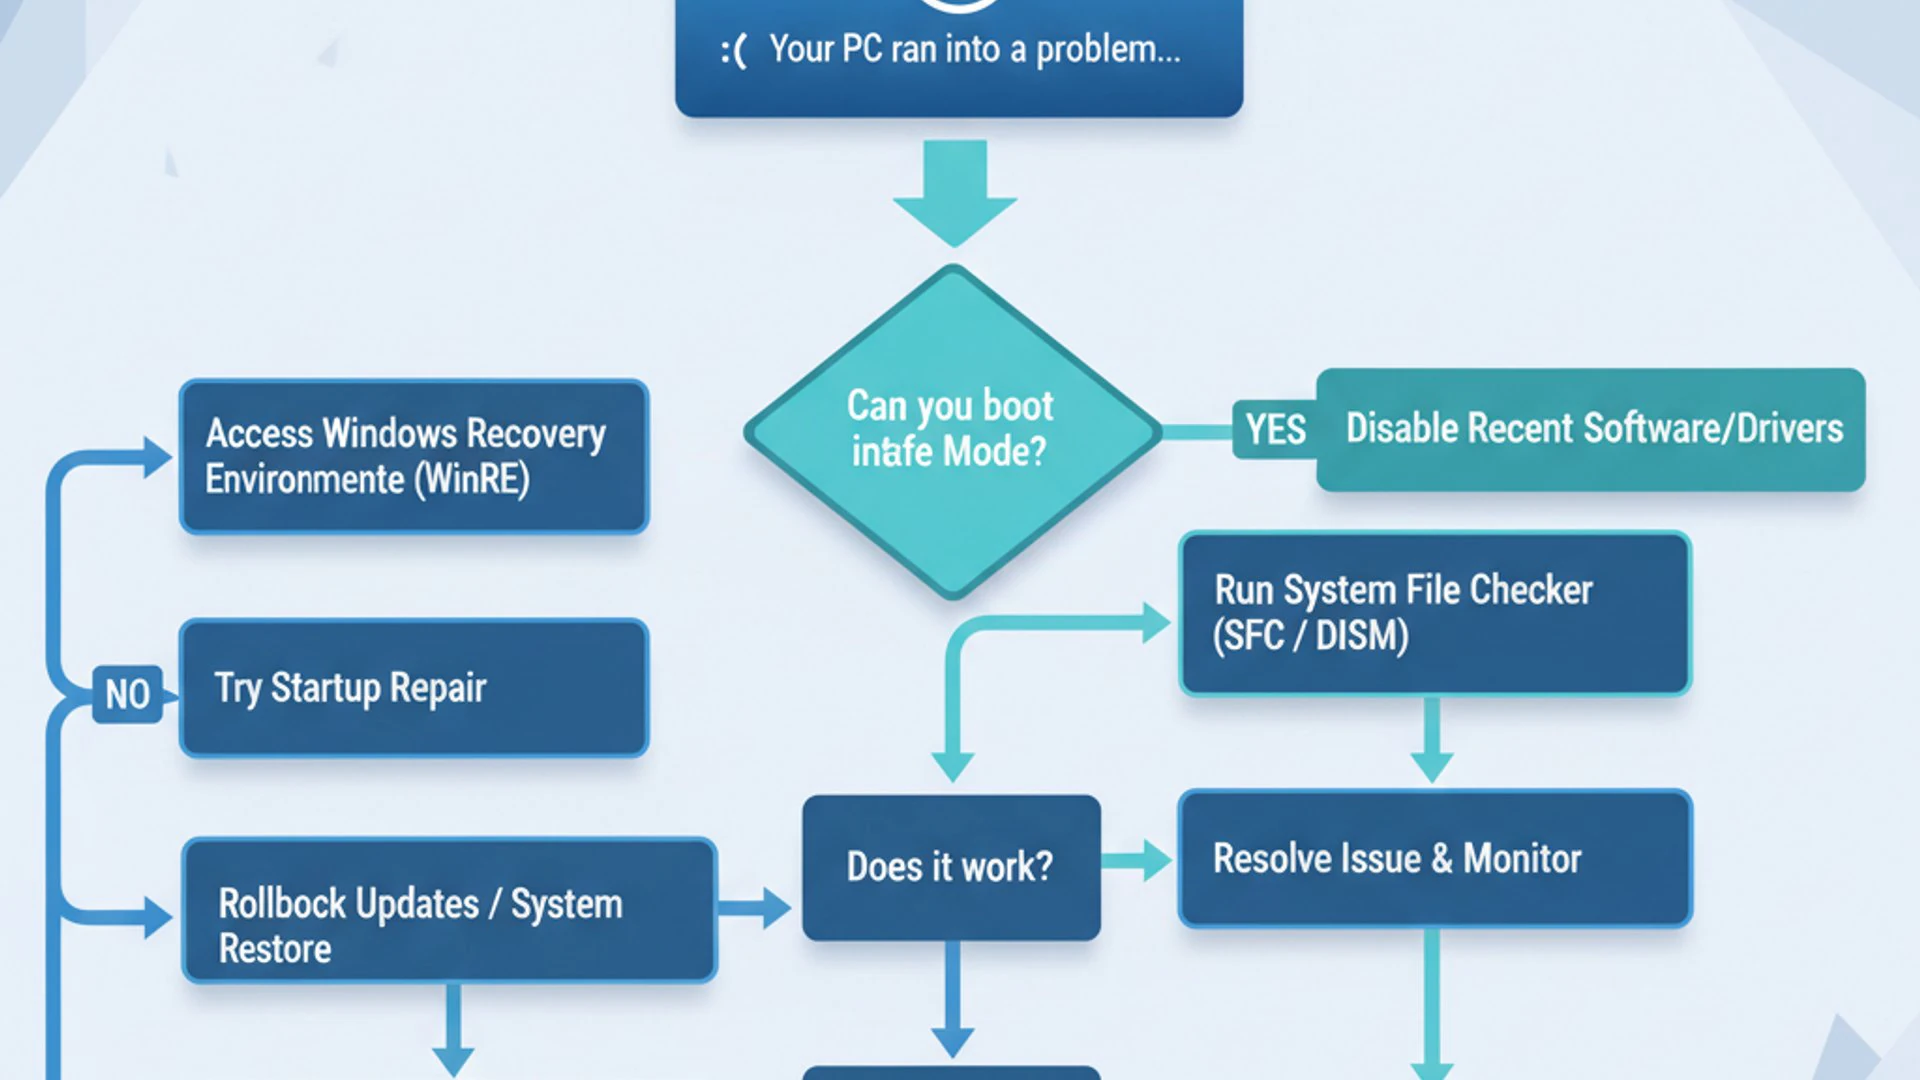
The first few steps are crucial for preventing further issues and setting the stage for effective troubleshooting. These initial actions focus on getting your system into a state where you can begin to analyze the problem without the BSOD continuously interrupting you.
Safely Restarting Your PC After a Crash
After a BSOD, your PC will usually attempt to restart automatically. If it doesn’t, or if it gets stuck, you may need to perform a forced shutdown. Press and hold the power button for about 10-15 seconds until the computer completely turns off. Wait a few moments, then press the power button again to restart.
Upon restarting, Windows 11 might automatically enter the Windows Recovery Environment (WinRE) if it detects multiple failed boot attempts. If it boots normally, great! You can proceed with software-based checks. If it crashes again, or if it doesn’t enter WinRE automatically, you’ll need to manually access it.
Accessing Safe Mode is often the next logical step if your PC keeps crashing during normal startup. Safe Mode loads Windows with a minimal set of drivers and services, which can help pinpoint if the issue is related to a specific driver or application loading during startup.
Accessing Windows Recovery Environment (WinRE)
The Windows Recovery Environment (WinRE) is a powerful suite of tools that can help you diagnose and fix many boot-related and system issues, including those causing a blue screen of death on Windows 11. There are several ways to access it:
- Automatic Access: If Windows 11 fails to boot correctly multiple times (typically three consecutive failed attempts), it will automatically launch WinRE.
- Shift + Restart: If you can reach the login screen or desktop, hold down the Shift key while clicking “Restart” from the Power menu.
- Boot from Installation Media: If your PC won’t boot at all, you can boot from a Windows 11 installation USB drive or DVD. On the setup screen, click “Repair your computer” instead of “Install now.”
- Advanced Startup from Settings: Go to Settings > System > Recovery, then click “Restart now” next to “Advanced startup.”
Once in WinRE, you’ll see options like “Troubleshoot,” which leads to “Advanced options.” Here, you can access tools like System Restore, Startup Repair, Command Prompt, and Safe Mode settings. These are critical for deep-level diagnostics and repairs.
Software-Related BSOD Troubleshooting
Many instances of the blue screen of death on Windows 11 can be traced back to software-related problems. These include outdated or corrupt drivers, conflicts between applications, corrupted system files, or even malicious software. Addressing these issues often doesn’t require opening your computer case, making them easier to tackle initially.
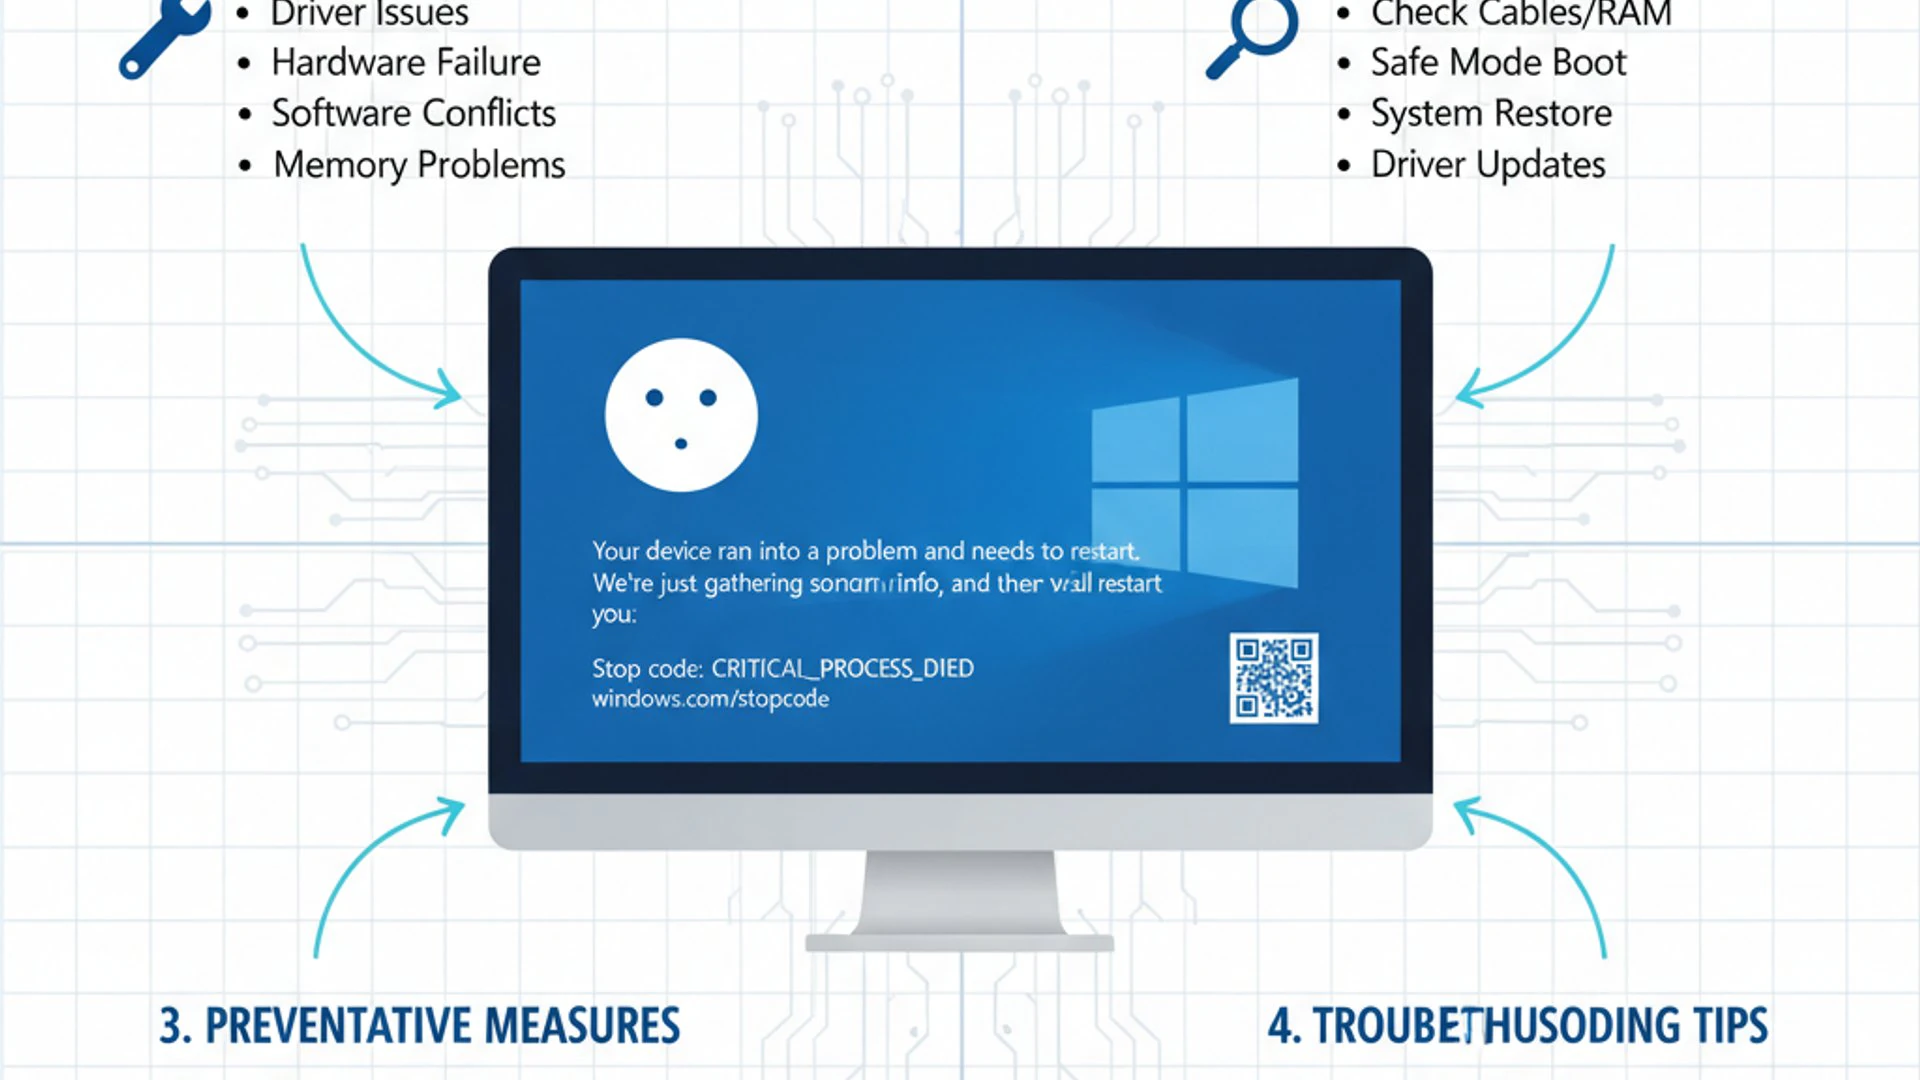
This section will guide you through common software troubleshooting steps, starting with the most frequent culprits. A systematic approach here can save you a lot of time and frustration, often resolving the BSOD without needing more drastic measures.
Updating Drivers and Windows OS
Keeping your drivers and Windows 11 operating system up to date is one of the most effective preventative measures against BSODs. Outdated drivers can lead to compatibility issues, performance problems, and critical system crashes when they interact improperly with newer OS versions or other hardware components.
Similarly, Microsoft regularly releases updates for Windows 11 that include bug fixes, security patches, and performance enhancements. Skipping these updates can leave your system vulnerable to known issues that could trigger a blue screen of death on Windows 11.
It’s a best practice to ensure both your operating system and all critical device drivers are running the latest stable versions. This proactive maintenance significantly reduces the chances of encountering stability problems.
How to Update Drivers Manually and Automatically
Updating drivers can be done in a couple of ways:
- Automatic Update via Windows Update:
- Go to Settings > Windows Update.
- Click “Check for updates.” Windows will often find and install updated drivers for many components.
- You can also check “Advanced options” and then “Optional updates” for additional driver updates.
- Automatic Update via Device Manager:
- Right-click the Start button and select Device Manager.
- Expand the category for the device you want to update (e.g., Display adapters).
- Right-click on the device and choose “Update driver.”
- Select “Search automatically for drivers.” Windows will attempt to find a newer driver online.
- Manual Update from Manufacturer’s Website:
- This is often the most reliable method, especially for graphics cards, motherboards, and critical peripherals.
- Identify your hardware components (e.g., NVIDIA GeForce RTX 3080, Intel Z690 chipset).
- Visit the official website of the hardware manufacturer (e.g., NVIDIA, AMD, Intel, Dell, HP, Asus).
- Navigate to their support or driver download section.
- Download the latest driver specifically designed for your hardware model and Windows 11.
- Run the installer and follow the on-screen instructions. It’s often a good idea to perform a “clean installation” if the option is provided, especially for graphics drivers.
Always download drivers from official sources to avoid malware or incompatible software. After updating, restart your PC to ensure changes take effect.
Running System File Checker (SFC) and DISM
Corrupted system files are a common cause of instability and can lead to a blue screen of death on Windows 11. Microsoft provides two powerful command-line tools, System File Checker (SFC) and Deployment Image Servicing and Management (DISM), to repair these issues.
SFC scans for and restores corrupted Windows system files. DISM, on the other hand, is used to repair the Windows image itself, which SFC relies upon. Running DISM before SFC is often recommended to ensure SFC has a healthy source to draw from.
To use these tools:
- Open Command Prompt as an administrator. You can do this by searching for “cmd” in the Start menu, right-clicking “Command Prompt,” and selecting “Run as administrator.” If you’re in WinRE, select “Command Prompt” from Advanced options.
- First, run DISM to prepare the system image:
- Type
DISM /Online /Cleanup-Image /RestoreHealthand press Enter. - This process can take some time to complete. Ensure you have an active internet connection if running from a live Windows environment.
- Type
- Once DISM is finished, run SFC:
- Type
sfc /scannowand press Enter. - SFC will scan all protected system files and replace corrupted files with cached copies.
- Type
- After both commands complete, restart your computer.
Tip: If you are running these commands from WinRE and your system drive is not C:, you may need to specify the correct drive letter (e.g.,
sfc /scannow /offbootdir=D:\ /offwindir=D:\Windows, replacing D: with your actual Windows drive).
Uninstalling Recent Software or Updates
If the blue screen of death on Windows 11 started occurring shortly after you installed a new program or a Windows update, that software is a prime suspect. Conflicts between applications or bugs introduced by updates can severely destabilize your system.
Windows 11 provides mechanisms to uninstall recently added software and roll back problematic updates. This is often a quick way to identify and resolve software-induced BSODs.
To uninstall recent software:
- Right-click the Start button and select Apps and Features (or go to Settings > Apps > Installed apps).
- Sort the list by “Install date” to see recently added programs.
- Select the suspicious application and click “Uninstall.” Follow any prompts.
To uninstall recent Windows updates:
- Go to Settings > Windows Update > Update history.
- Scroll down and click on “Uninstall updates.”
- This will open a Control Panel window listing installed updates. Sort by “Installed On” date.
- Select the most recent update that you suspect is causing issues and click “Uninstall.”
- Restart your PC after uninstalling.
Checking for Malware and Viruses
Malicious software can wreak havoc on your system, leading to corrupted files, system instability, and frequent BSODs. Rootkits, for instance, can deeply embed themselves in the operating system kernel, causing critical failures. Therefore, a thorough malware scan is an essential step in troubleshooting the blue screen of death on Windows 11.
Windows Security (formerly Windows Defender) is built into Windows 11 and offers robust protection. For more comprehensive scans, especially if you suspect a deep infection, consider a reputable third-party antivirus solution.
To perform a scan using Windows Security:
- Open Windows Security from the Start menu or system tray.
- Click on “Virus & threat protection.”
- Under “Current threats,” click “Scan options.”
- Select “Full scan” for a comprehensive check of your entire system.
- Click “Scan now.” This process can take a long time, so allow it to complete.
- If you can’t boot into Windows normally, try booting into Safe Mode with Networking and then running the scan.
Consider running a second opinion scan with a tool like Malwarebytes (external link: Malwarebytes.com) if Windows Security doesn’t find anything or if issues persist. These tools can sometimes catch what others miss.
Hardware-Related BSOD Troubleshooting
When software troubleshooting doesn’t resolve the blue screen of death on Windows 11, the problem often lies with your computer’s hardware. Faulty components such as RAM, hard drives, or even an inadequate power supply can cause critical system failures. Diagnosing hardware issues typically involves testing individual components to pinpoint the source of the problem.
This section will guide you through common hardware diagnostic steps. It’s important to remember that some hardware checks might require physical access to your computer’s internal components, so always ensure your PC is powered off and unplugged before opening the case.
Testing RAM for Errors with Windows Memory Diagnostic
Defective or unstable RAM (Random Access Memory) is a very common cause of BSODs, especially those related to memory access violations (like DRIVER_IRQL_NOT_LESS_OR_EQUAL or KERNEL_SECURITY_CHECK_FAILURE). Windows 11 includes a built-in tool called Windows Memory Diagnostic to check your RAM for errors.
To run the diagnostic:
- Save all your work and close any open applications.
- Open the Start menu, type “Windows Memory Diagnostic,” and select the application.
- You will be presented with two options:
- “Restart now and check for problems (recommended)”
- “Check for problems the next time I start my computer”
- Choose the first option. Your computer will restart and run the memory test. This process can take several minutes to over an hour, depending on your RAM size.
- After the test completes, your computer will restart into Windows. The results will usually be displayed in a notification. If not, you can find them in the Event Viewer under “Windows Logs” > “System” (look for “MemoryDiagnostic” entries).
If errors are found, it strongly suggests a problem with one or more RAM modules. If you have multiple RAM sticks, try removing them one by one and re-running the test to identify the faulty stick. Replacing faulty RAM is usually necessary.
Checking Hard Drive Health
A failing hard drive (HDD) or solid-state drive (SSD) can lead to data corruption, file access errors, and ultimately, a blue screen of death on Windows 11. Windows provides a command-line utility called chkdsk (Check Disk) to scan for and repair disk errors. Additionally, third-party tools can provide more detailed SMART (Self-Monitoring, Analysis, and Reporting Technology) data for SSDs and HDDs.
To run chkdsk:
- Open Command Prompt as an administrator (as described in the SFC/DISM section).
- Type
chkdsk /f /rand press Enter. - If the drive is in use (which it will be if it’s your system drive), you’ll be asked if you want to schedule the check for the next restart. Type
Yand press Enter. - Restart your computer. The check will run before Windows loads, which can take a significant amount of time depending on your drive size and number of errors.
For more detailed drive health monitoring, consider tools like CrystalDiskInfo (external link: CrystalDiskInfo.info) which can read SMART data and warn you of impending drive failure. Look for warnings or critical statuses. If your drive is failing, immediate data backup is crucial, followed by drive replacement.
Verifying Power Supply and Component Connections
Sometimes, the cause of a blue screen of death on Windows 11 is as simple as a loose connection or an inadequate power supply. An unstable power delivery can lead to intermittent component failures, causing random crashes that are difficult to diagnose through software alone. This step requires opening your PC case, so proceed with caution.
- Power Off and Unplug: Completely shut down your computer and unplug it from the wall socket.
- Open Case: Open your computer’s side panel.
- Check All Connections: Gently but firmly push on all internal power cables (motherboard, CPU, graphics card, drives) and data cables (SATA for HDDs/SSDs) to ensure they are securely seated.
- Inspect Components: Look for any signs of physical damage, burn marks, or bulging capacitors on the motherboard or other components.
- Test Power Supply: While difficult to test definitively without specialized equipment, if you suspect your power supply unit (PSU) is failing, you might notice flickering lights, random shutdowns, or a burning smell. If possible, try swapping with a known good PSU.
Even a slightly loose RAM stick or graphics card can cause system instability. Reseating all components can sometimes miraculously resolve persistent BSODs.
Overheating Issues and Cooling Solutions
Excessive heat is a silent killer for computer components and a frequent cause of system instability, leading to freezes, shutdowns, and the dreaded blue screen of death on Windows 11. When components like the CPU or GPU get too hot, they can throttle performance or even shut down abruptly to prevent damage.
Monitoring your system’s temperatures is crucial. Many free utilities, such as HWMonitor (external link: CPUID.com), can display real-time temperatures for your CPU, GPU, and other components.
If you suspect overheating:
- Clean Dust: Dust accumulation is the primary culprit for poor cooling. Use compressed air to carefully clean out dust from CPU coolers, GPU fans, and case fans. Ensure the PC is powered off and unplugged.
- Check Fan Functionality: Ensure all fans (CPU, GPU, case) are spinning freely and not making unusual noises. Replace any failing fans.
- Verify Airflow: Ensure your PC case has adequate airflow. Make sure intake and exhaust fans are oriented correctly and that cables inside the case aren’t obstructing airflow.
- Reapply Thermal Paste: If your CPU temperatures are consistently high despite cleaning, the thermal paste between your CPU and its cooler might have dried out. Reapplying fresh thermal paste can significantly improve heat transfer. This is a more advanced step.
- Improve Ventilation: Ensure your PC is not placed in an enclosed space where heat can build up. Give it room to breathe.
Maintaining optimal operating temperatures is vital for the long-term health and stability of your Windows 11 system.
Advanced Troubleshooting and Recovery Options
When the blue screen of death on Windows 11 persists despite basic software and hardware troubleshooting, it’s time to consider more drastic recovery options. These steps involve reverting your system to an earlier state, resetting Windows, or, as a last resort, performing a clean installation. These methods can resolve deep-seated issues but often come with the potential for data loss if not handled carefully.
Always ensure you have a backup of your important files before proceeding with these advanced recovery options. For robust backup solutions, consider creating a System Image Backup on Windows 11.
Performing a System Restore
System Restore is a valuable Windows feature that allows you to revert your system files, installed applications, Windows Registry, and system settings to a previous point in time, known as a restore point. This can be incredibly useful if a recent software installation, driver update, or system change caused the BSOD.
System Restore does not affect your personal files (documents, pictures, videos), but it will uninstall programs and drivers installed after the chosen restore point. Windows often creates restore points automatically before major updates or software installations.
To perform a System Restore:
- Access the Windows Recovery Environment (WinRE) as described earlier.
- From the “Choose an option” screen, select Troubleshoot > Advanced options > System Restore.
- Select your Windows 11 operating system.
- Follow the wizard, clicking “Next” to see available restore points.
- Choose a restore point from before the BSOD issues began. If you don’t see any, ensure “Show more restore points” is checked.
- Click “Next” and then “Finish” to confirm. The process will begin and your PC will restart. Do not interrupt it.
If System Restore successfully completes, your system should boot into Windows 11 without the BSOD. You may need to reinstall some applications or drivers that were removed.
Resetting Windows 11 While Keeping Your Files
If System Restore doesn’t work or if you don’t have suitable restore points, resetting Windows 11 can be the next step. This option reinstalls the operating system while giving you the choice to keep your personal files. It effectively removes all installed applications and drivers, providing a fresh start for the OS.
This is a powerful troubleshooting step for persistent software-related BSODs, as it eliminates most software conflicts and corrupted system files without requiring you to manually back up and restore all your personal data.
To reset Windows 11:
- Access the Windows Recovery Environment (WinRE).
- From the “Choose an option” screen, select Troubleshoot > Reset this PC.
- You will be presented with two main options:
- Keep my files: This option reinstalls Windows 11 and keeps your personal files but removes apps and settings.
- Remove everything: This option completely wipes the drive and reinstalls Windows 11. Choose this only if you have backed up everything or are selling the PC.
- Select “Keep my files.”
- You’ll then be asked how you want to reinstall Windows: “Cloud download” (downloads a fresh copy from Microsoft) or “Local reinstall” (uses existing system files). Cloud download is often more reliable.
- Review the changes that will be made and click “Reset.” The process will take some time, and your PC will restart multiple times.
After the reset, you will need to reinstall all your applications and reconfigure your settings, but your personal documents will remain intact.
Clean Installation of Windows 11
A clean installation of Windows 11 is the ultimate last resort for resolving a persistent blue screen of death on Windows 11 when all other troubleshooting steps have failed. This process completely erases your hard drive and installs a fresh copy of the operating system. It guarantees the removal of all software conflicts, corrupted files, and malware.
However, a clean installation means all data on your system drive will be lost. Therefore, creating a comprehensive backup of all your important files to an external drive or cloud storage is absolutely critical before proceeding.
To perform a clean installation:
- Backup Your Data: Ensure all critical files are backed up.
- Create Installation Media: Download the Windows 11 Media Creation Tool (external link: Microsoft.com) and create a bootable USB drive (at least 8GB).
- Boot from USB: Restart your PC and boot from the USB drive. You may need to change the boot order in your BIOS/UEFI settings.
- Follow Setup:
- Select your language and region.
- Click “Install now.”
- Enter your product key or select “I don’t have a product key” if Windows 11 was previously activated on this PC.
- Choose “Custom: Install Windows only (advanced).”
- Delete all partitions on your primary drive until it shows as “Unallocated Space.”
- Select the unallocated space and click “Next” to install Windows.
- Complete Setup: Follow the on-screen prompts to set up your new Windows 11 installation.
- Reinstall Drivers and Software: Install all necessary drivers (especially chipset, graphics, and network) and your applications.
While time-consuming, a clean installation provides the most stable foundation for your Windows 11 system, often resolving even the most stubborn BSOD issues.
Preventing Future BSODs on Windows 11
Successfully resolving a blue screen of death on Windows 11 is a great achievement, but the goal should be to prevent them from recurring. Proactive maintenance and vigilant system management are key to maintaining a stable and reliable Windows 11 environment. By adopting good habits, you can significantly reduce the likelihood of encountering future critical system errors.
Prevention is always better than cure, especially when it comes to system stability. Implementing a routine of checks and updates will keep your PC running smoothly and alert you to potential issues before they escalate into a BSOD.
Regular Maintenance and Best Practices
Consistent maintenance is the cornerstone of a healthy Windows 11 system. Incorporating these practices into your routine can help ward off many common causes of BSODs:
- Keep Windows Updated: Always install Windows updates promptly. These often contain critical security patches and bug fixes that improve stability.
- Update Drivers Regularly: Periodically check for and install the latest drivers for your hardware, especially graphics cards, chipset, and network adapters, from the manufacturer’s official websites.
- Run Antivirus Scans: Schedule regular full scans with Windows Security or your preferred antivirus software to detect and remove malware.
- Manage Startup Programs: Reduce the number of programs that launch with Windows. Too many startup items can slow down your system and introduce conflicts. Use Task Manager’s “Startup” tab to disable unnecessary programs.
- Maintain Disk Health: Regularly run
chkdskand consider using Disk Cleanup (search for it in the Start menu) to remove temporary files and free up space. For traditional HDDs, occasional defragmentation can be beneficial (search for “Defragment and Optimize Drives”). - Monitor System Temperatures: Keep an eye on CPU and GPU temperatures, especially during heavy usage. Ensure your PC’s cooling system is clean and functioning correctly.
- Backup Your Data: Regularly back up your important files. This is the most crucial practice to protect against data loss from any system failure. Consider cloud backups or external drives. For system-level protection, explore System Image Backup on Windows 11.
Monitoring System Health and Performance
Windows 11 provides several built-in tools that allow you to monitor your system’s health and performance, helping you identify potential issues before they lead to a blue screen of death on Windows 11. Becoming familiar with these tools can give you an early warning system.
- Task Manager: (Ctrl+Shift+Esc) Use the “Performance” tab to monitor CPU, memory, disk, and network usage. High, sustained usage by a particular process can indicate a problem. The “Processes” tab helps identify resource-hungry applications.
- Event Viewer: (Search “Event Viewer” in Start) This tool logs all system events, including errors, warnings, and informational messages. Look under “Windows Logs” > “System” for critical errors that occurred around the time of a BSOD. These logs often provide valuable context and error codes.
- Reliability Monitor: (Search “Reliability Monitor” in Start) This tool provides a historical view of system stability and application crashes. It presents a graph of system stability over time and lists events that might have affected reliability, making it easy to spot patterns or recent issues.
- Performance Monitor: (Search “Performance Monitor” in Start) For advanced users, this tool allows you to create custom data collector sets to monitor specific performance counters over time, helping to diagnose subtle performance bottlenecks or resource leaks.
By regularly checking these tools, you can often catch minor issues like a misbehaving driver or a struggling hard drive before they escalate into a full-blown system crash.
Conclusion: Regaining Stability on Your Windows 11 System
The blue screen of death on Windows 11 can be a daunting experience, but it is rarely an insurmountable problem. By systematically approaching the issue, understanding the meaning behind the stop codes, and applying the troubleshooting steps outlined in this guide, you can effectively diagnose and resolve most BSOD occurrences. From simple driver updates to more advanced hardware diagnostics and system resets, each step brings you closer to a stable and reliable computing experience.
Remember that patience and a methodical approach are your best allies when facing a BSOD. Don’t rush into drastic measures until you’ve exhausted the simpler, less invasive solutions. Always prioritize data backup, especially before undertaking any recovery options that involve reinstalling the operating system.
Ultimately, preventing future BSODs involves maintaining good system hygiene: keeping your Windows 11 operating system and drivers updated, regularly scanning for malware, monitoring system health, and ensuring your hardware is functioning optimally. By adopting these best practices, you can minimize disruptions and enjoy a smooth, efficient Windows 11 environment for years to come. Your journey to a stable PC is a continuous one, and with this knowledge, you are well-equipped to navigate any challenges.
For more interesting articles, stay tuned to Winsides.com!









Community
Comments (0)