How to Hide/Unhide Drives or Volumes in Windows 11 PC? 5 Effective Ways!
What are the Multiple Methods to Hide or Unhide a Drive or Volume In Windows 11 PC?
As a web app developer working on multiple online apps and websites, my drives are filled with project files and future ideas. Recently, my PC’s graphics card malfunctioned, requiring me to visit the MSI service center for repairs. However, they requested my login password to address the graphics driver issue, which made me uncomfortable as it could grant access to my project files. I decided not to proceed with the repair at that moment.
After doing some research, I found that Windows 11 offers a method to hide drives without deleting or losing data. I tried this feature, and it worked well! I successfully hid the drive containing all my important project data.
In this tutorial, I’ll share my experience and provide step by step instructions on how to hide drives in Windows 11. This is a great way to secure sensitive information without needing to share access.
Method 1a: Hide Drive Using Disk Management:
- Firstly, you need to use the keyboard shortcut to launch the quick menu.
- Winkey + X
- Then in the menu, you need to choose the Disk Management option.

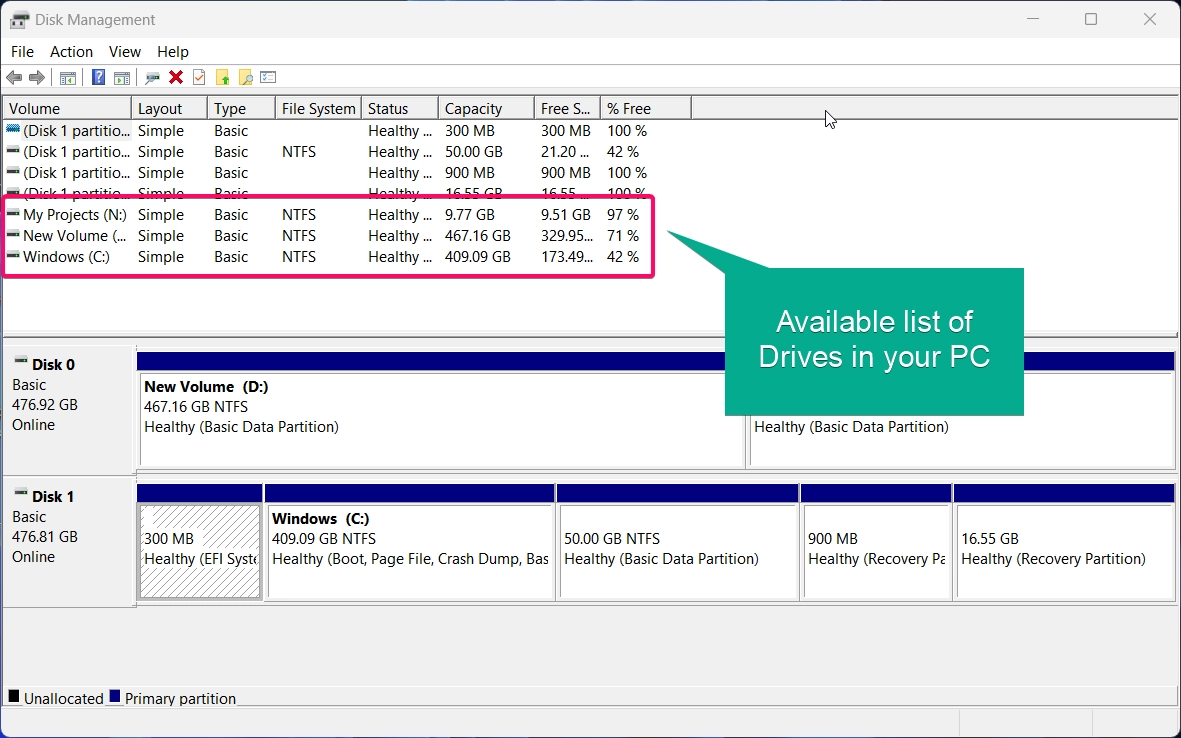
- It will display all the available drives on your device.
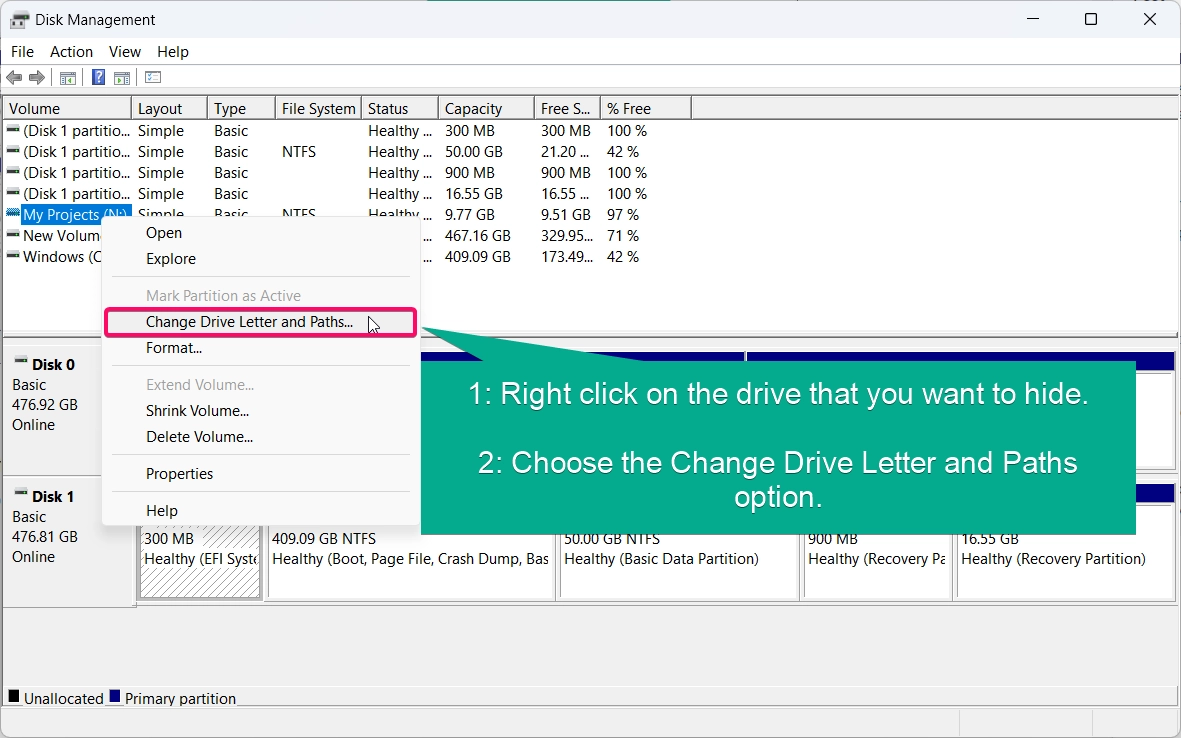
- Now, you need to right-click the drive that you want to hide and choose the Change Drive Letter and Paths option.
- Now in the pop-up window, you need to click the Remove button to hide the drive.
- Click the Yes button if it prompted to complete the action.
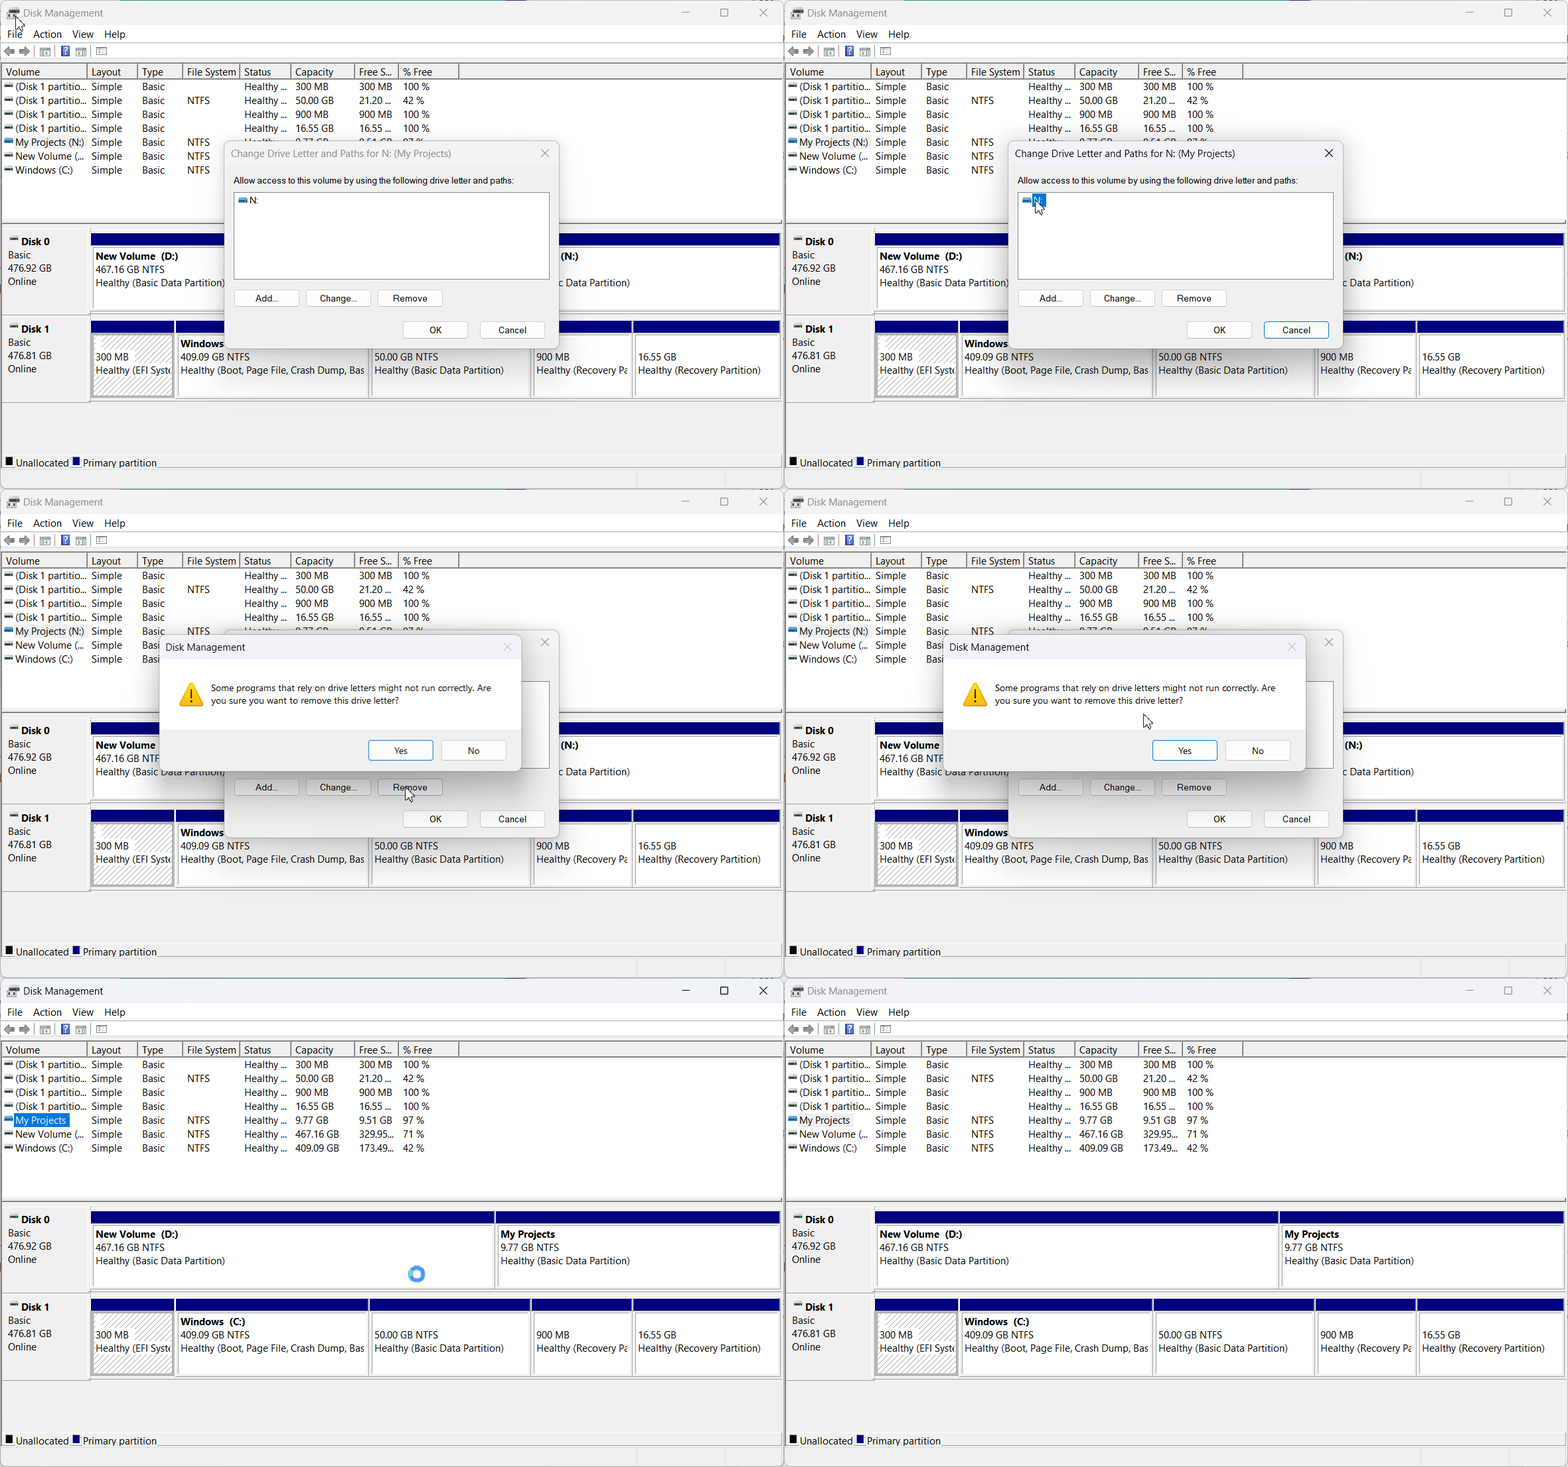
Note: This method will not delete or remove any data while hiding it. Your data will be protected while doing the process.
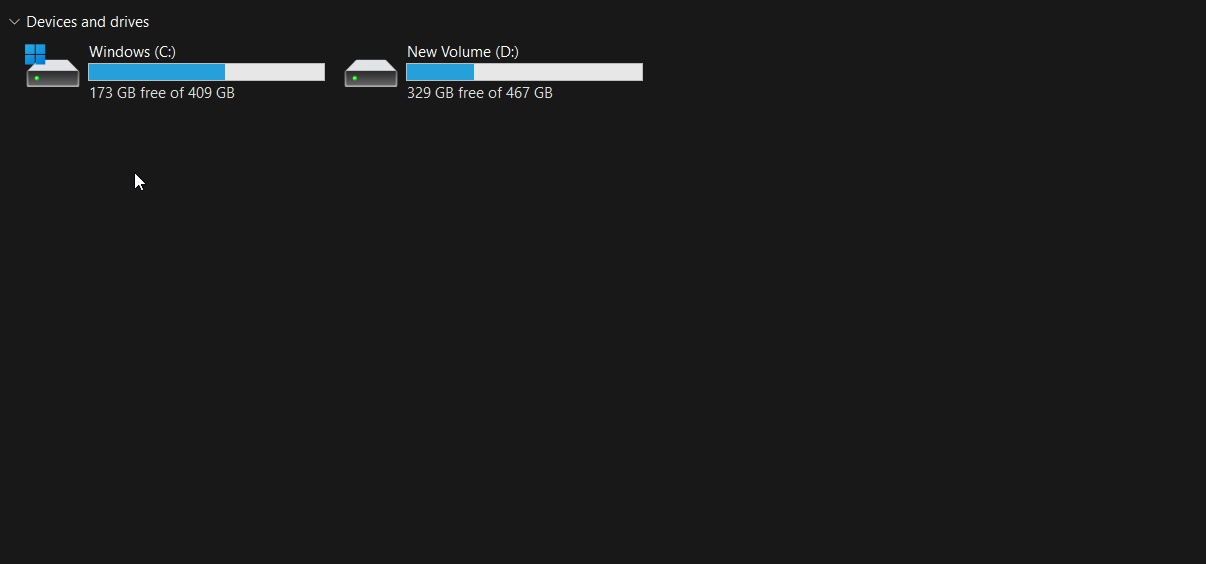
Method 1b: Unhide Drive using Disk Management:
To unhide the drives that has been hidden using disk management tool. Follow the below steps.
- Choose the hidden drive (The drives without having any Letter assigned).
- Once you found the hidden drive and then you need to Right-click the hidden drive and choose the Change Drive Letter and Paths option.
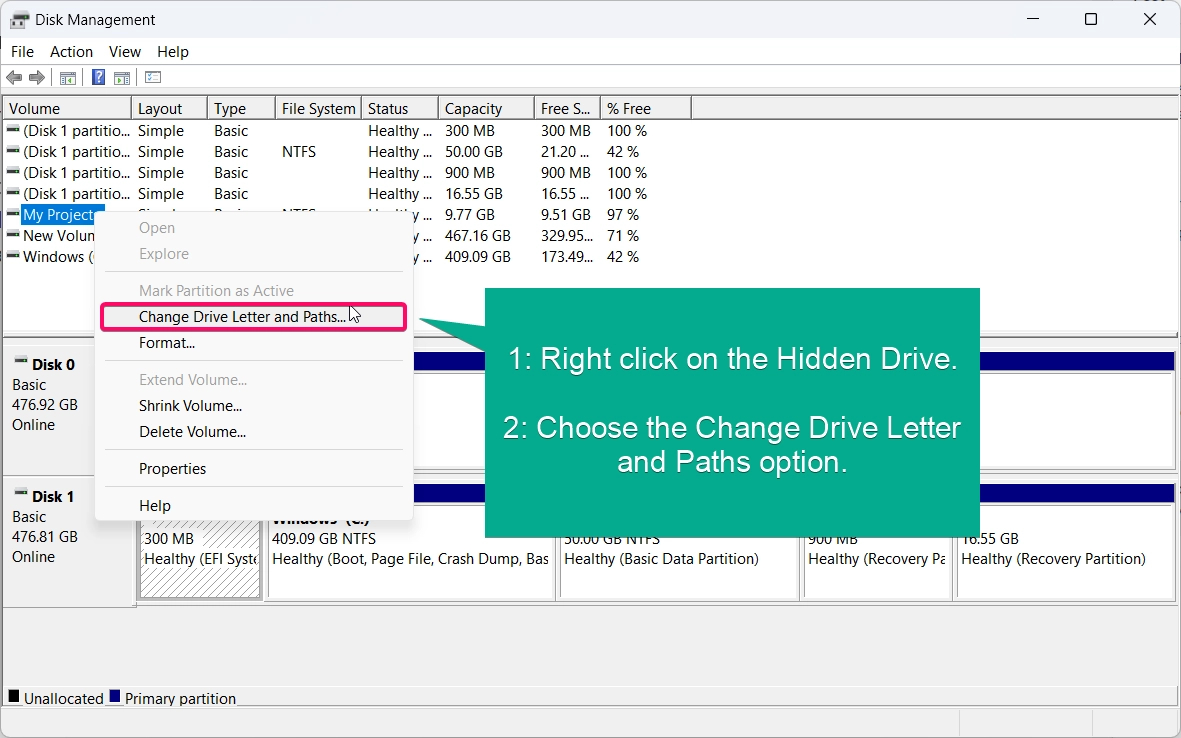
- Now, choose the Add button will launch the Add Drive Letter or Path window will be appear on your screen.
- Choose the Drive Letter from the Drop down box or if you add it with other drive choose the “Mount in the following NTFS Folder” option.
- Finally, Click the Okay button to confirm the changes.
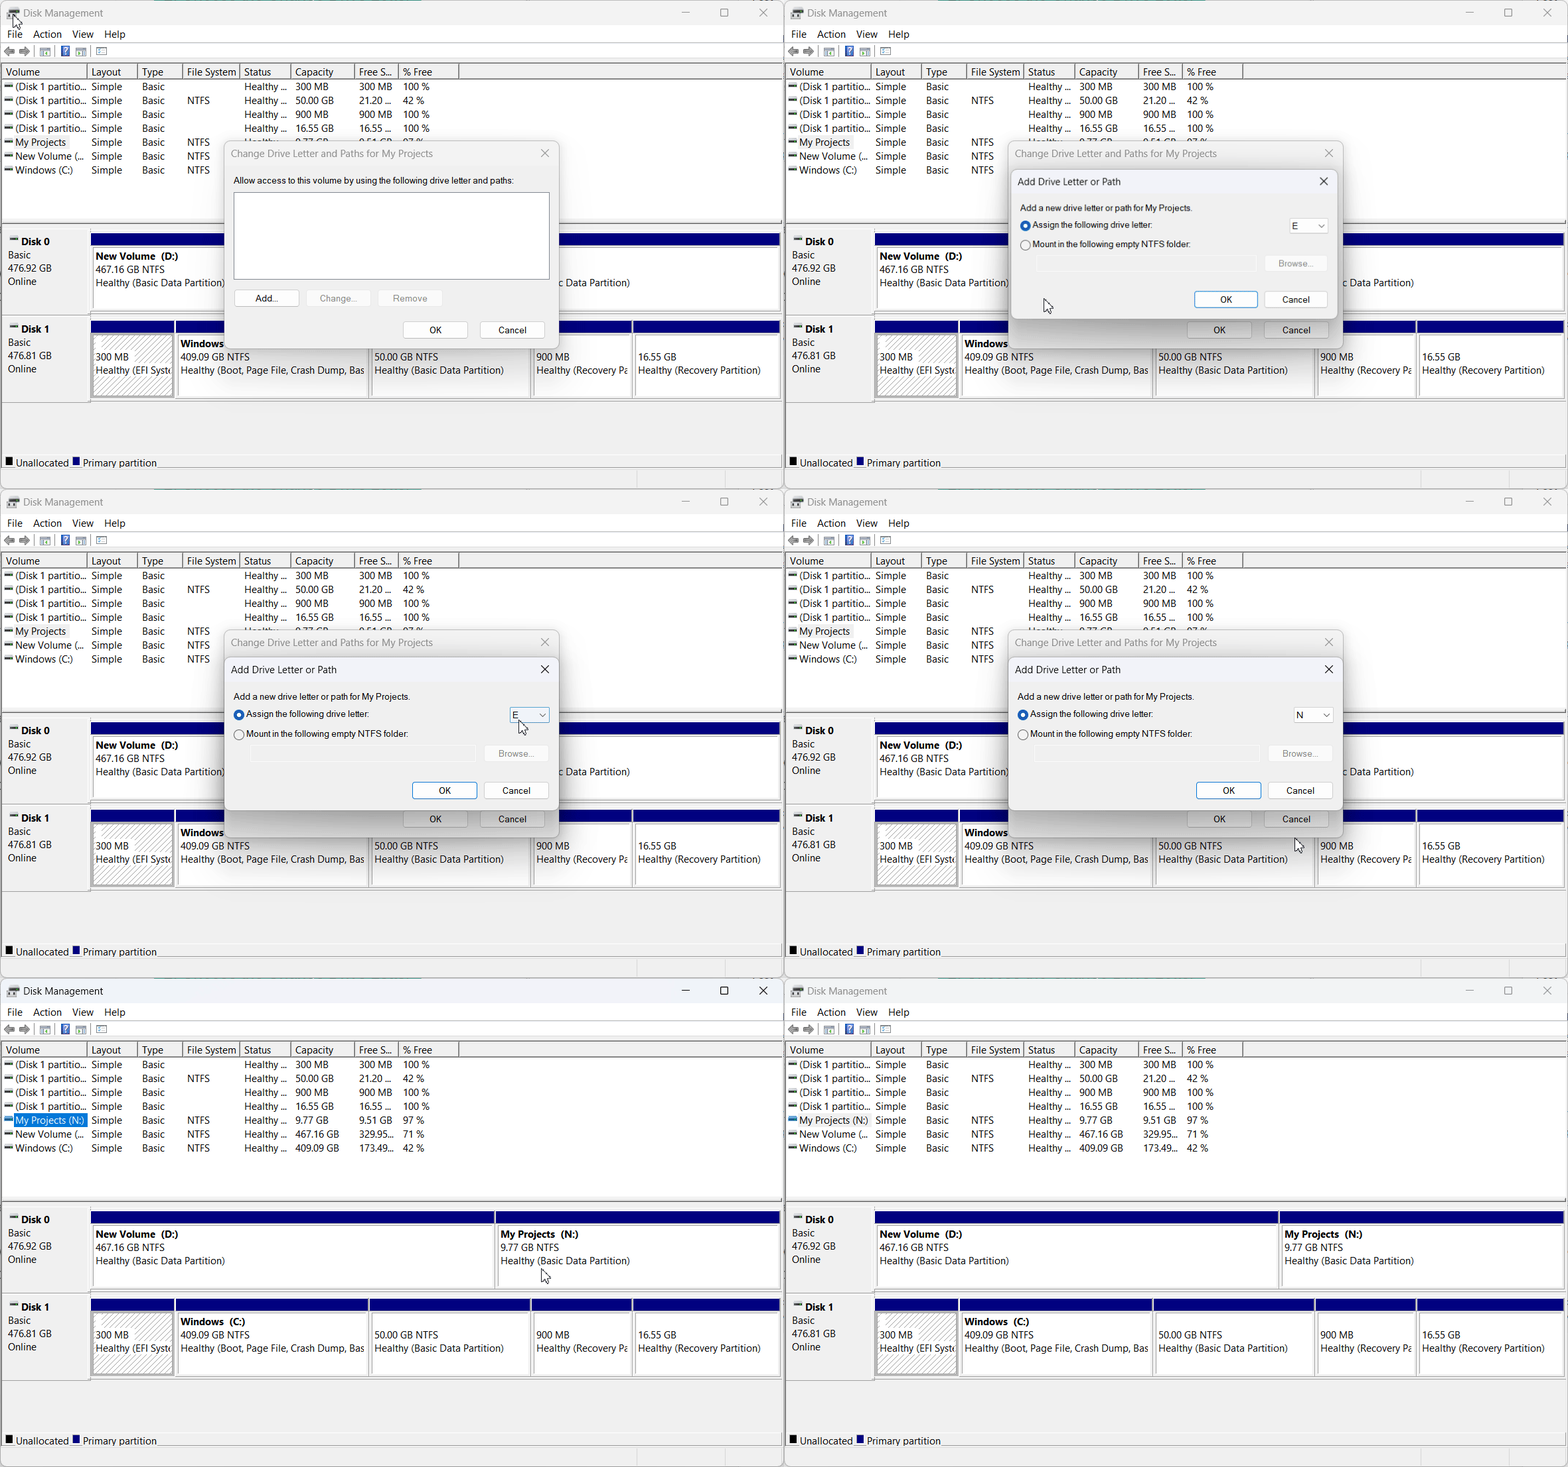
In this way, you unhide the drive using the Disk management tool. You can find the drive in the File Explorer, Based on the alphabetical order of the Drive Letter you chose will be appear.
Method 2a: Hide Drive keeping its Data Using Command Prompt:
- Click the Start Menu and search for Command Prompt
- You need to choose the “Run as Administrator” option to launch the command prompt in admin mode.
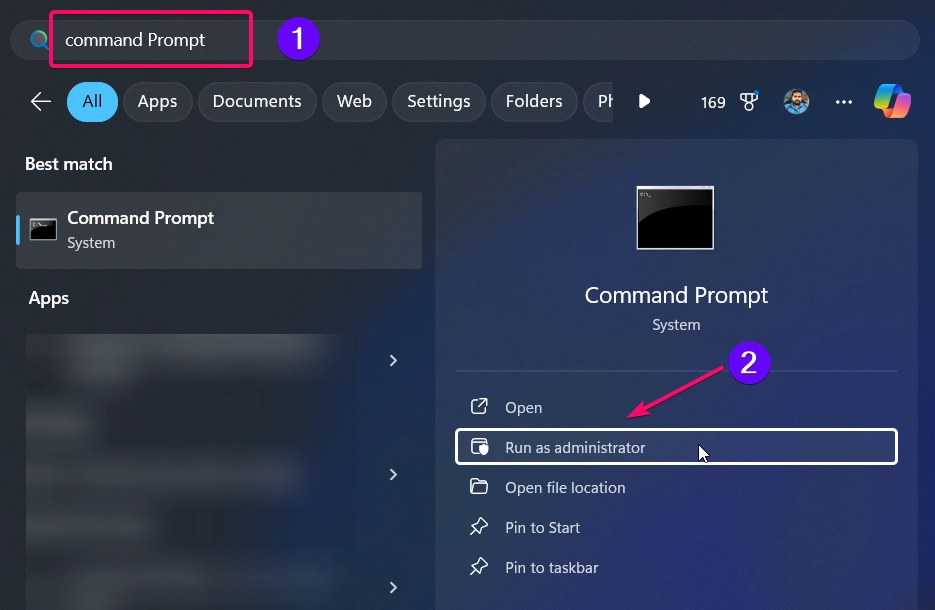
- Now you need to enter the following command:
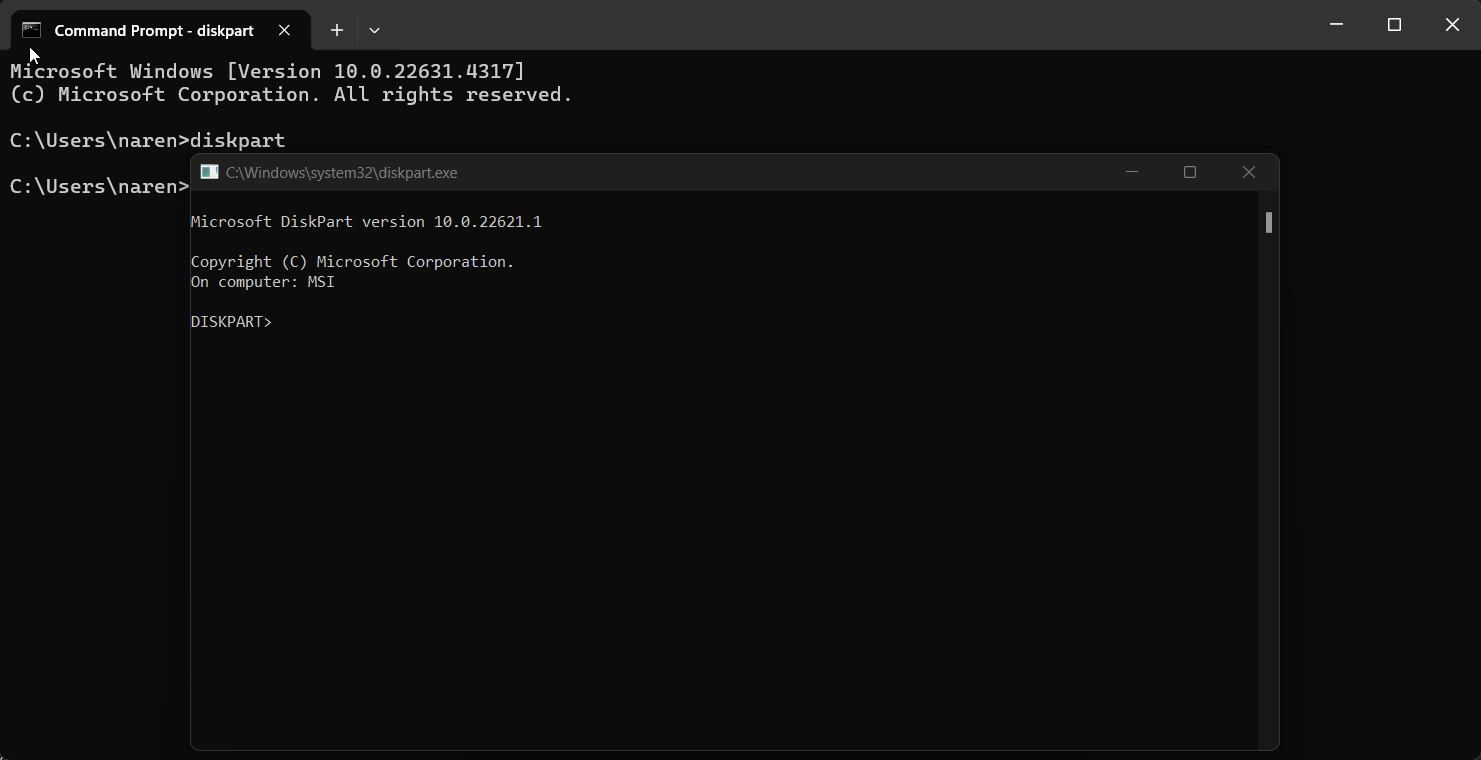
diskpart
- The command will launch the diskpart.exe application in the console as shown in the below image.
- Enter the following command which will list all the drives available in your device:
list volume
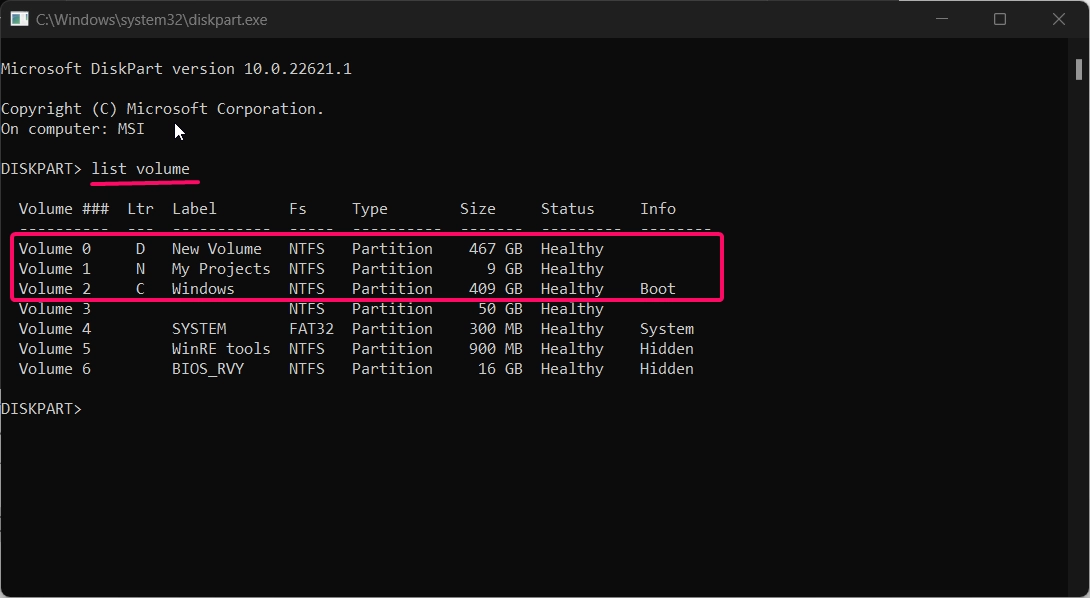
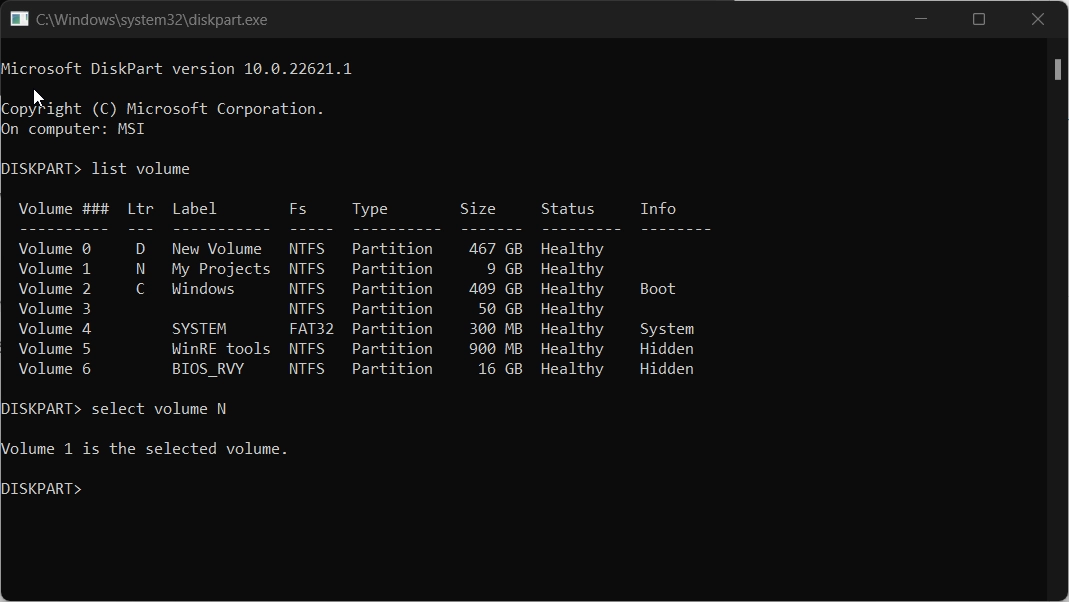
- You need to identify which drive you want to hide and execute following command:
select volume N
Note: I’m going to hide my N:\ Drive and so i’m using the letter D in the above command, Replace N:\ with the number of the volume you wish to hide.
- Now the drive that need to hidden is chosen, Execute the following command to hide it without losing its data from the file explorer.
remove letter=N
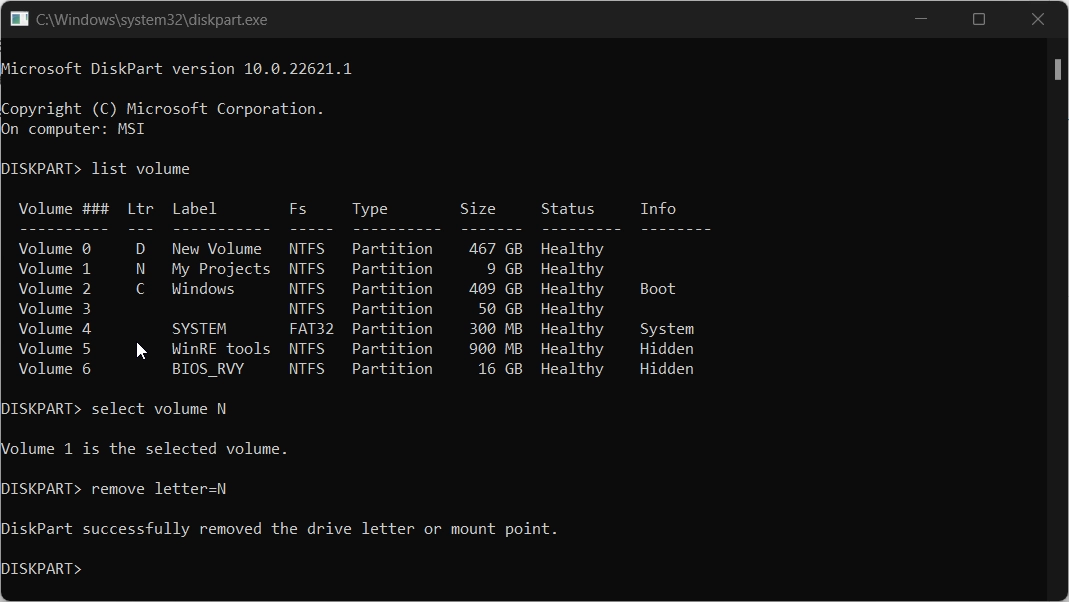
- Once you execute the above command, you will get the message saying “DiskPart successfully removed the drive letter or mount point.”
- In simple words, the drive is hidden from the file explorer without losing its data. You can find the drive has been hidden in the File Explorer.

Method 2b: Unhide Drive using DiskPart.exe tool:
To unhide the drive that has been hidden in your device:
- Open the command prompt with Admin Privileges
- Now you need to enter the following command:
diskpart

- Enter the following command which will list all the drives available in your device:
list volume
- Now, the list of volumes will be displayed including the hidden drives. Identify the volume that you want to unhide back again.
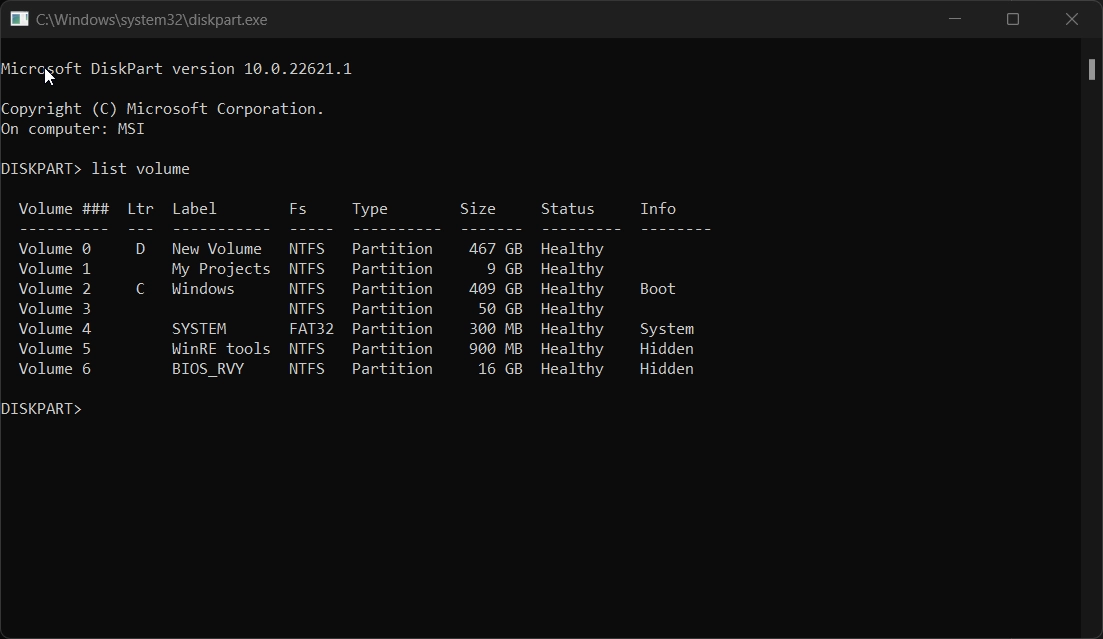
- To select the hidden drive, you need to execute the below command:
select volume 1
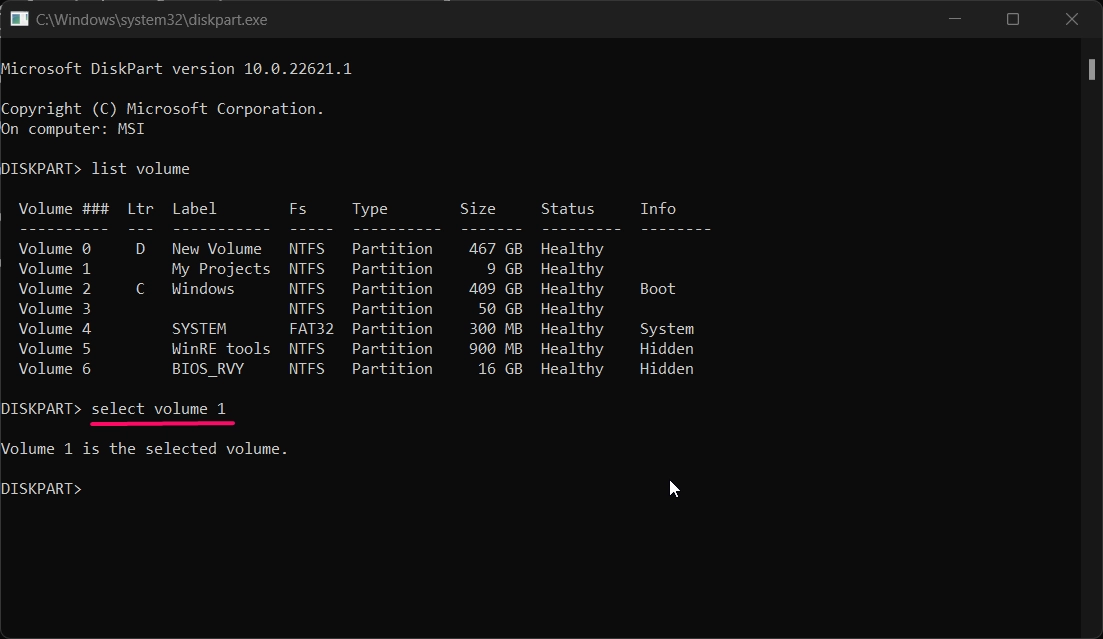
- Now, you need to execute the following command to assign the Path or Letter to the hidden volume:
assign letter=N
- You will receive the following message “DiskPart successfully assigned the drive letter or mount point.“
- The drive will be visible back again without losing its data and can be found in the File Explorer.
Method 3a: Hide Drive or Volume using PowerShell:
- Click the Start Menu and search for PowerShell
- You need to choose the “Run as Administrator” option to launch the powershell in admin mode.
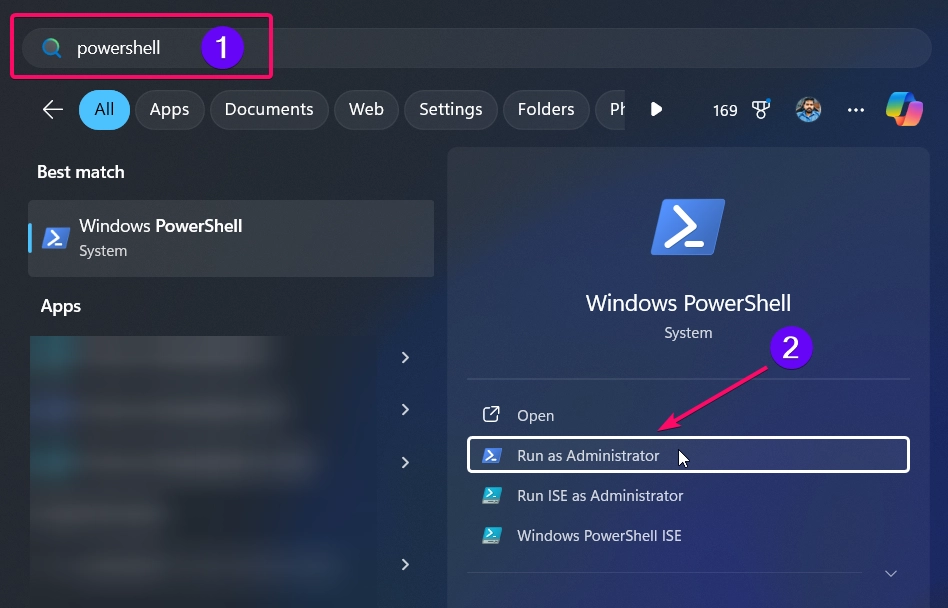
- To list all the available drives or volume in your device, use the following command:
Get-Volume
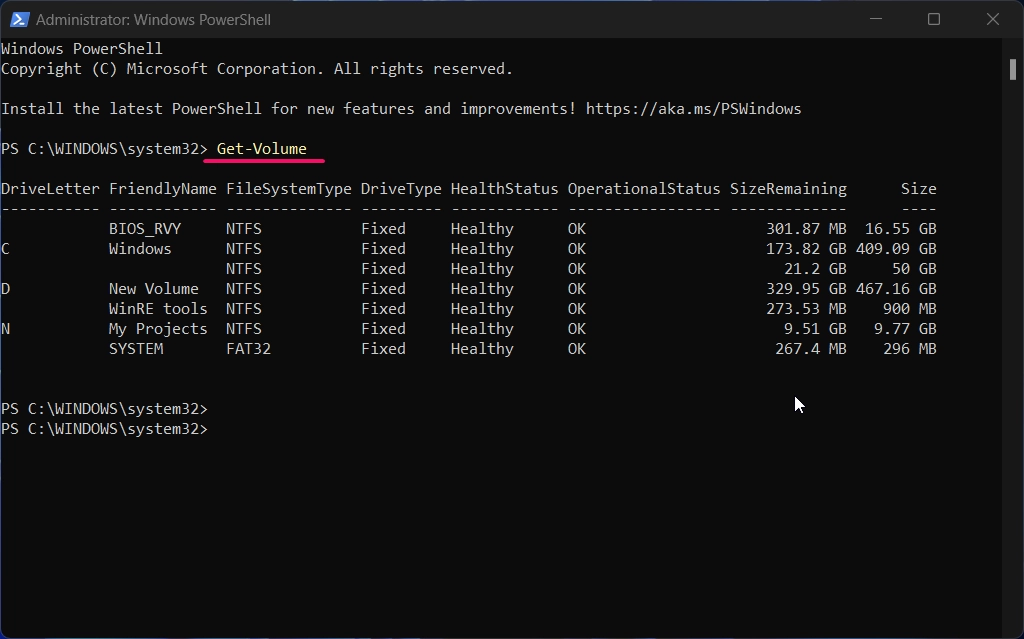
- Once you identified the drive, you need to execute the following command:
Set-Partition -DriveLetter N -IsHidden $true
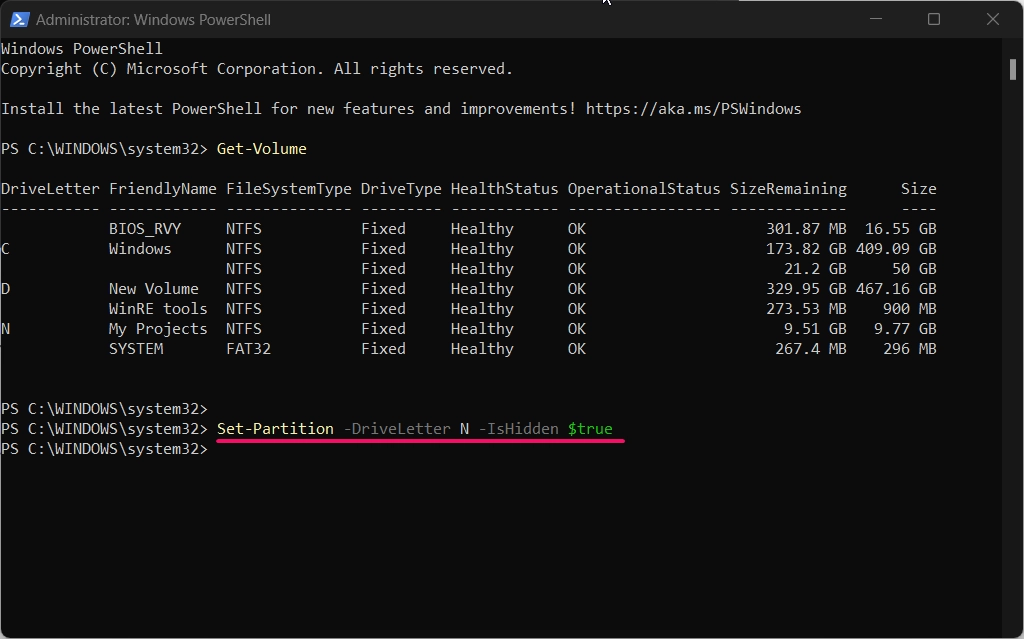
- That’s it, This is the quickest way to hide the drives using the PowerShell command.
Method 3a: Unhide Drives or Volumes using PowerShell:
- You cannot simply reverse the hidden process, you need to do some extra steps to unhide the hidden drives or volumes.
- Open the PowerShell with admin privileges and execute the following list of commands.
diskpartlist volume
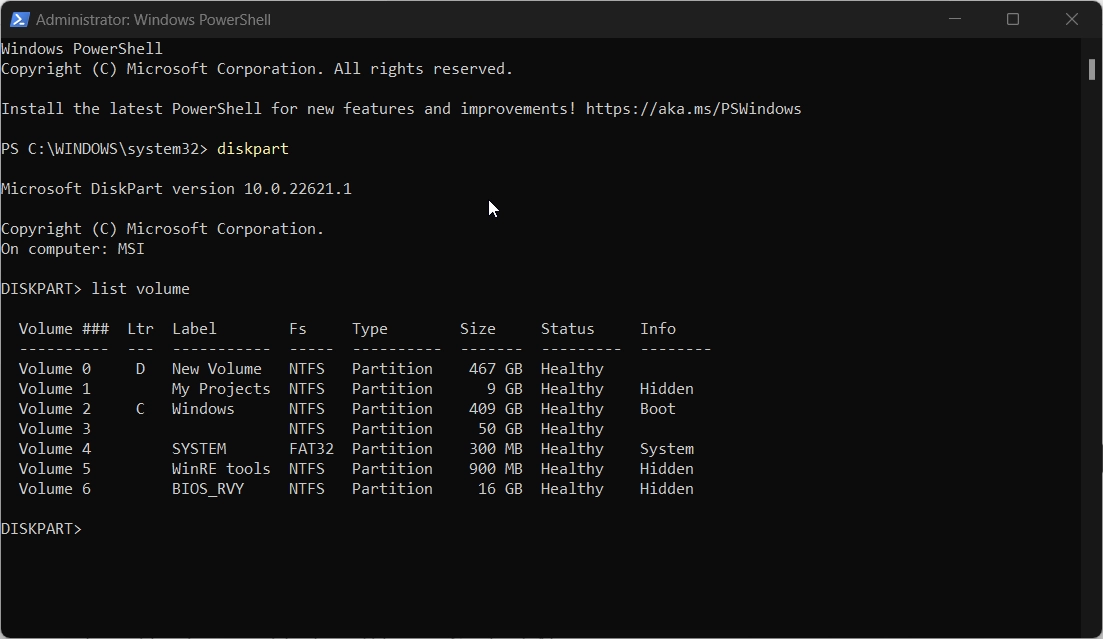
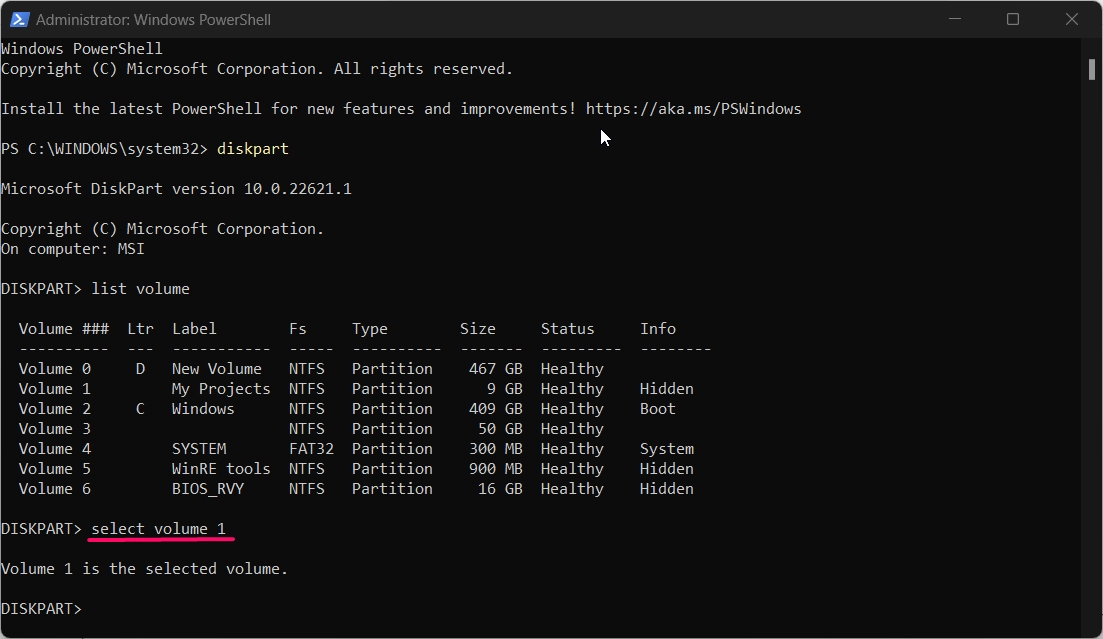
- You need to choose the hidden volume before unhiding it.
select volume 1
- Now, you need to assign the Drive Letter to the hidden drive using the following command:
assign letter=N
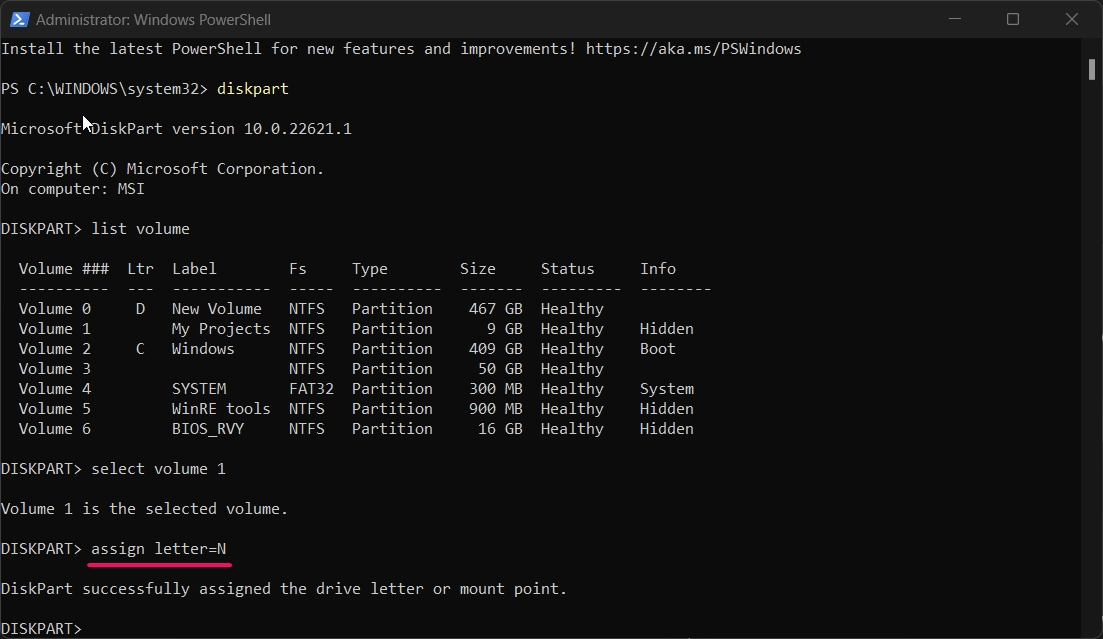
- Enter the
exitcommand to exit the diskpart.exe console from the PowerShell.
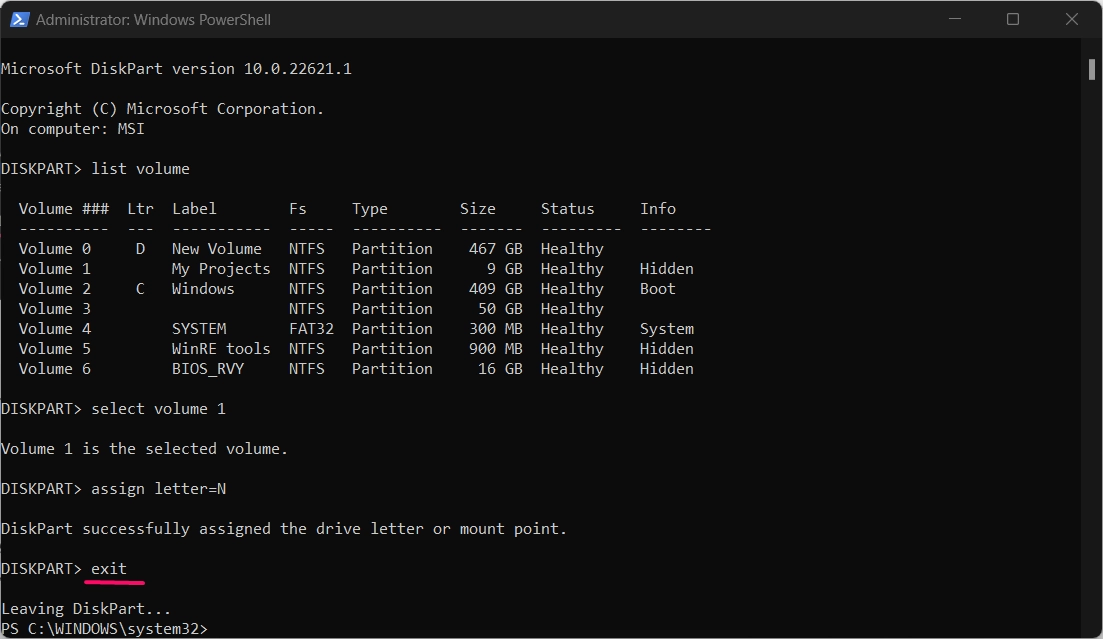
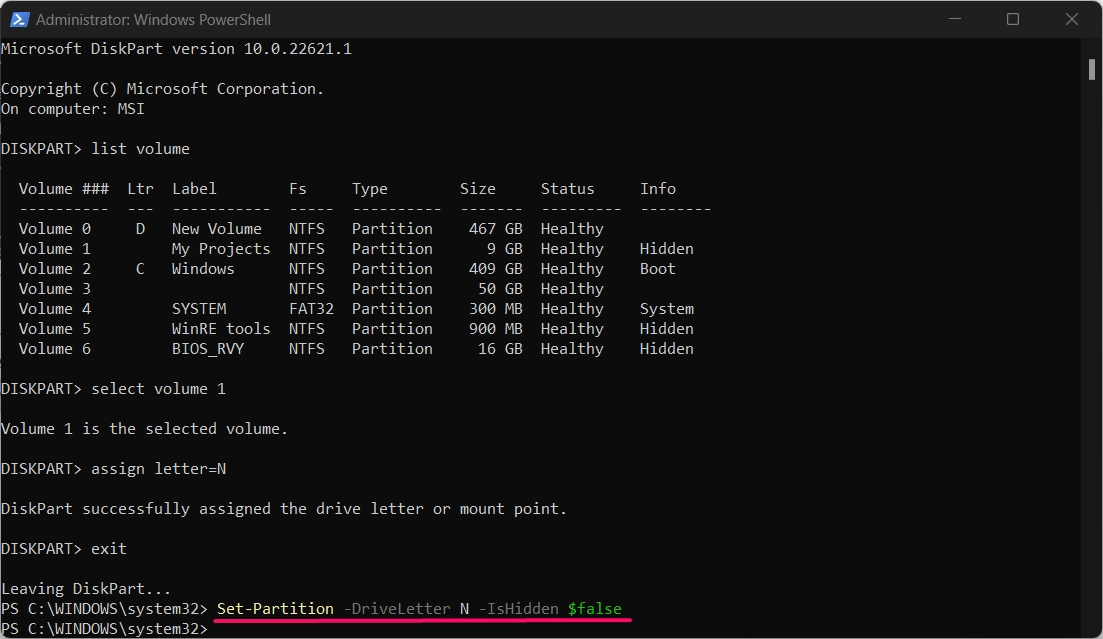
- To unhide the drive or volumes, executing the following command:
Set-Partition -DriveLetter N -IsHidden $false
Method 4a: Hiding Drives using Group Policy Editor:

This method required Group Policy Editor enabled in your device, if your device says “gpedit.msc Not Found“, download the gpedit.msc.bat file and execute it to enable the group policy editor on your device.
- You can launch the Group Policy Editor application using the Run Command, to launch the Run window use the following keyboard shortcut:
- Winkey + R
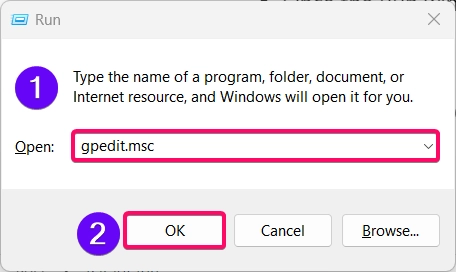
- Once the Run window is launched, use the Run Command to launch the Group Policy Editor:
gpedit.msc
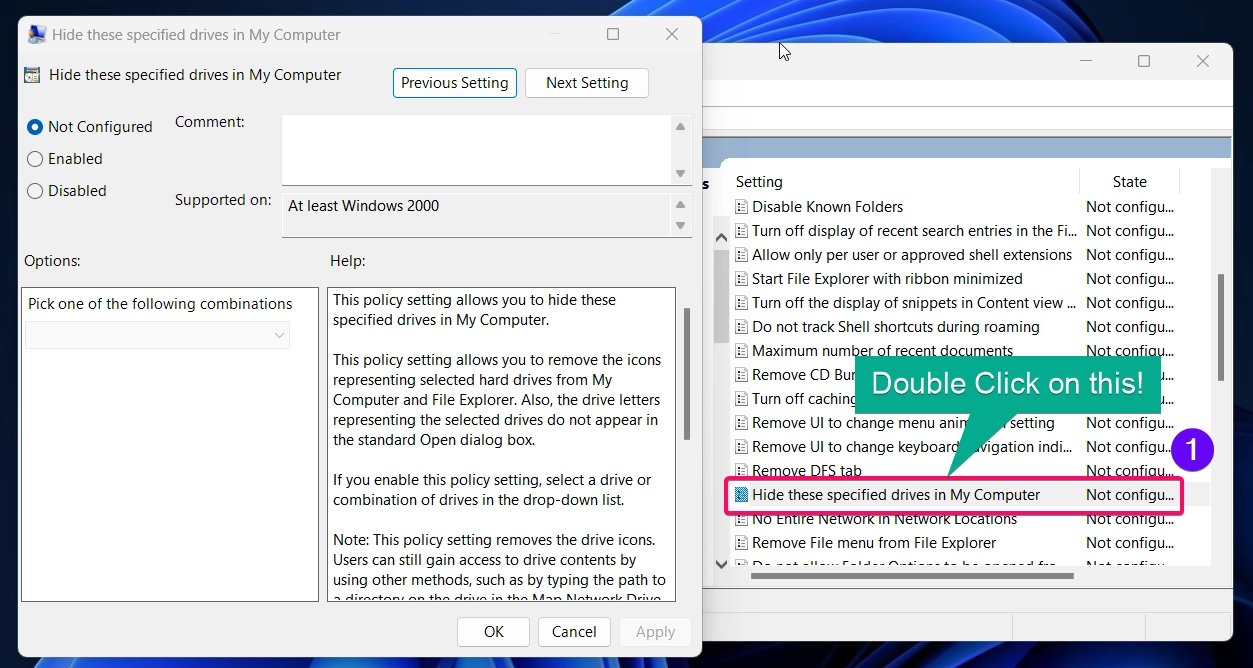
- Go to User Configuration > Administrative Templates > Windows Components > File Explorer.
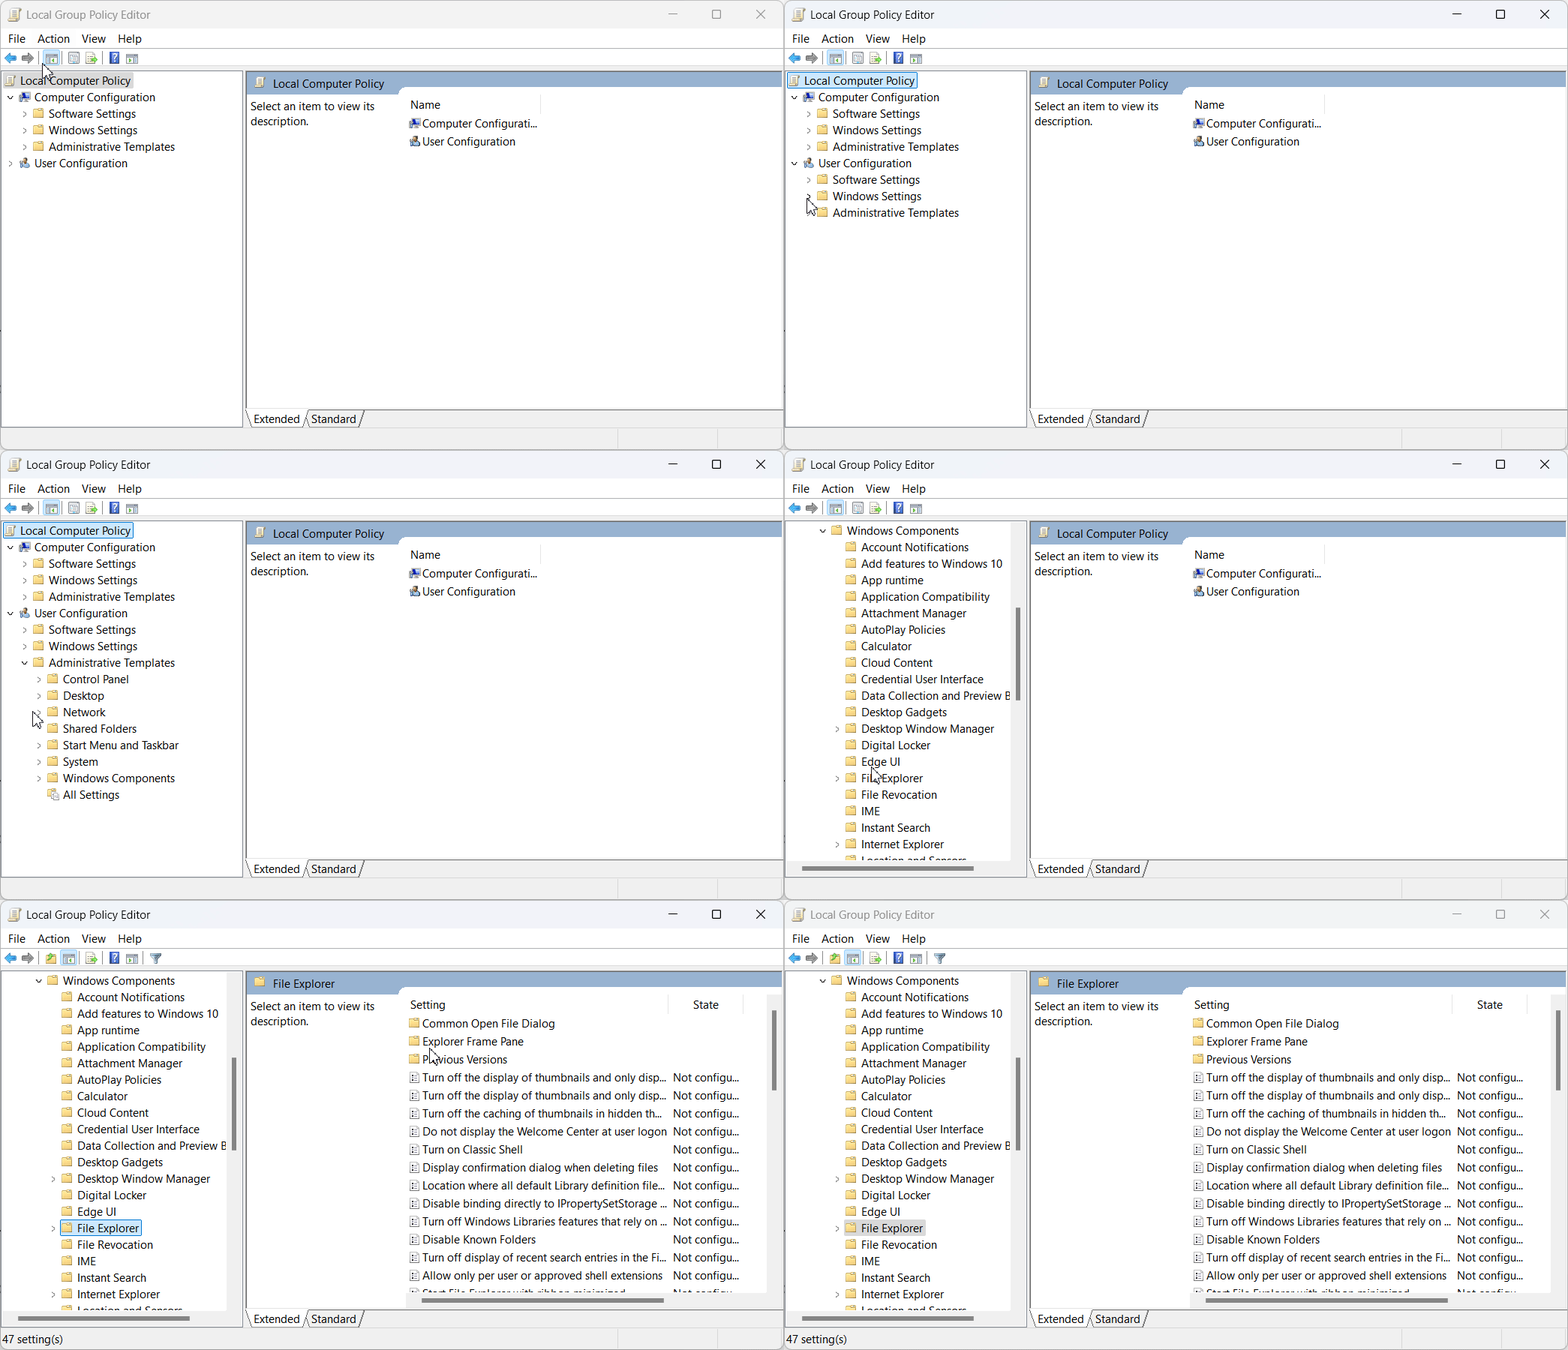
- You need to double-click Hide these specified drives in My Computer option.
- Now, you need to choose the Enabled option and choose the drive that you need to hide from the drop down.
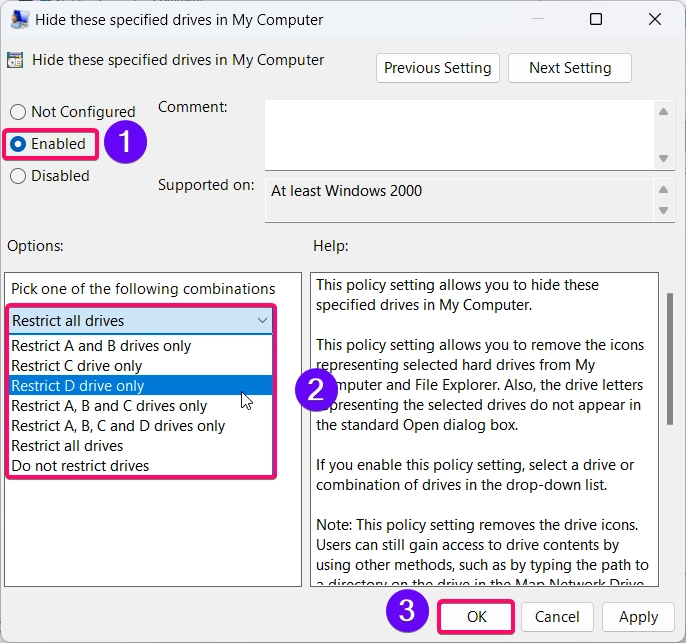
- Finally, click the Ok button to confirm the changes.
Note: The Group Policy Editor in Windows provides only a limited set of predefined options for hiding drives (such as restricting drives A, B, C, or D), which unfortunately does not allow you to directly select other drive letters like N or X.
Method 4b: Unhide Drives or Volumes using GP Editor:
- You can launch the Group Policy Editor application using the Run Command, to launch the Run window use the following keyboard shortcut:
- Winkey + R
- Once the Run window is launched, use the Run Command to launch the Group Policy Editor:
gpedit.msc

- Go to User Configuration > Administrative Templates > Windows Components > File Explorer.

- You need to double-click Hide these specified drives in My Computer option.
- Now, click the Not Configured option and click the OK button to confirm the changes.
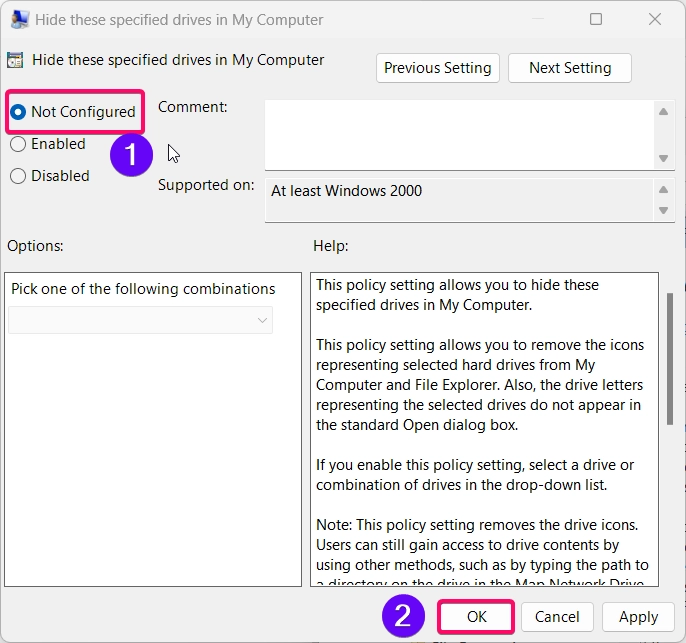
Method 5a: Hide Volumes or Drives using Registry Editor:
- You can launch the registry editor from Run Window but before that you can use the keyboard shortcut to launch the Run Window:
- Winkey + R
- Once the Run window is launched, use the Run Command to launch the Registry Editor:
regedit
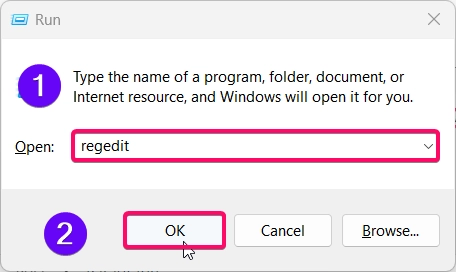
- In the registry editor, navigate to the following path:
HKEY_CURRENT_USER\Software\Microsoft\Windows\CurrentVersion\Policies\Explorer
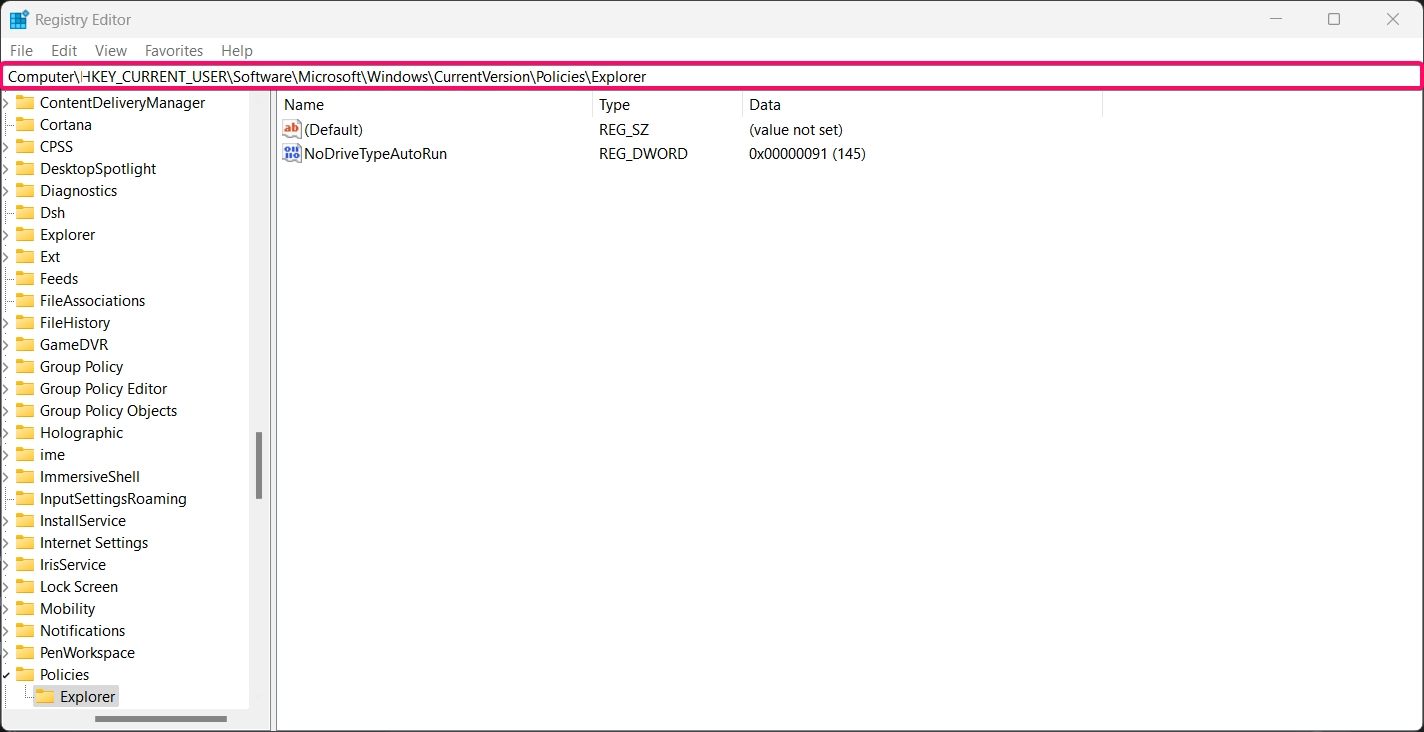
- Ignore the existing values and right click on the empty pane choose New > DWORD (32-bit) Value, and name it NoDrives.
- Once the key file has been created, double click on it and set its value to hide specific drives.
- For example, setting the value to
4hides drive D or (Use the binary sum if you need to hide multiple drives, e.g.,4+8for drives C and D.)
| Drive Letter | Decimal Value |
|---|---|
| A | 1 |
| B | 2 |
| C | 4 |
| D | 8 |
| E | 16 |
| F | 32 |
| G | 64 |
| H | 128 |
| I | 256 |
| J | 512 |
| K | 1024 |
| L | 2048 |
| M | 4096 |
| N | 8192 |
| O | 16384 |
| P | 32768 |
| Q | 65536 |
| R | 131072 |
| S | 262144 |
| T | 524288 |
| U | 1048576 |
| V | 2097152 |
| W | 4194304 |
| X | 8388608 |
| Y | 16777216 |
| Z | 33554432 |
- Click the OK button and restart your system for changes to take effect. This will hide your drive or volume.
Method 5b: Unhide Volumes or Drives using Registry Editor:
- You can launch the registry editor from Run Window but before that you can use the keyboard shortcut to launch the Run Window:
- Winkey + R
- Once the Run window is launched, use the Run Command to launch the Registry Editor:
regedit

- In the registry editor, navigate to the following path:
HKEY_CURRENT_USER\Software\Microsoft\Windows\CurrentVersion\Policies\Explorer

- Delete the DWORD file named as “NoDrives” if exist or else create the New DWORD File and name it as NoDrives.
- Once the NoDrives DWORD file has been created, double click and set the value to 0 to unhide all drives and volumes on your pc.
- Click the Ok button and restart your pc to take effect.
Conclusion:
By following these steps, you can effectively hide drives in Windows 11 to protect sensitive files from unauthorized access. Whether you’re concerned about privacy during repairs or simply want to keep personal files hidden, this method allows you to secure your data without deleting or moving anything.
I hope this tutorial has been helpful in enhancing your privacy and security on Windows 11. Feel free to revisit this tutorial whenever you need to hide or unhide drives on your system. Stay safe, and keep your important project files protected! Find more informational tutorial on our Home Page: WinSides.
We combine expert insights with user-friendly guidance. We thoroughly research and test everything to give you reliable and simple to understand tech guides. Please take a look at our publishing process to understand why you can trust Winsides.
