Properly Eject USB or External SSD/HDD in Windows 11!
What are the Safe way to remove the USB or External SSD/HDD connected to your Windows 11 PC.
Everyone tends to remove external devices such as USB drives or external disk drives without using the safe removal option on a Windows PC. However, this practice can harm your device in the long run. This is because your operating system constantly communicates with connected external drives to retrieve information. Even if you close all folders related to the external disk, it is still highly recommended to use the “Safely Remove Hardware” option when ejecting your device.
Check Out: Check Pc Specs Without Logging Into Windows 11
If you’re unfamiliar with the steps, this article, I will guide you through multiple methods to safely and properly eject USB drives or external disk drives from your Windows 11 PC.
In this tutorial, I will guide you through the steps to safely eject an external SSD from your Windows 11 PC. While this guide focuses on external SSDs, the same methods can also be used for external HDDs and USB drives. So, even though I’ll be referring to an external SSD, keep in mind that these steps are applicable to any external disk drive or USB device. My connected SSD to my pc is named as Expansion.
Method 1: Generic Way to Eject USB or Disk Drive From TaskBar:
- Once you connected the SSD or USB to your device, to eject it from your pc, You need to click the Show Hidden Items in the right corner of your taskbar.
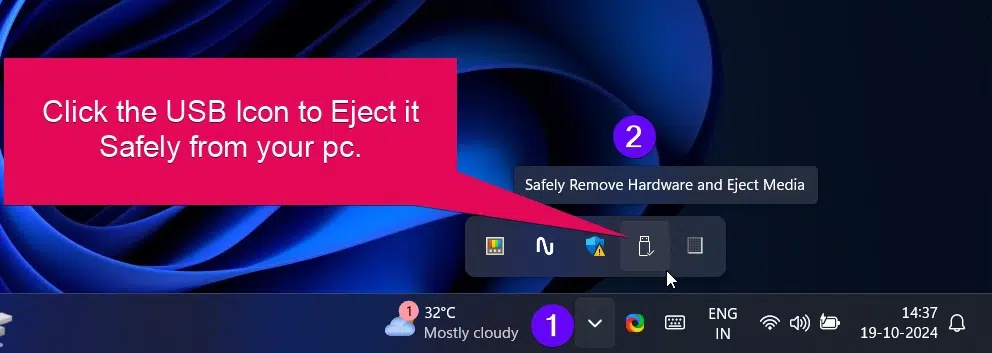
- Now, the popup option to eject the external device will appear. From this, you need to select the option named “Eject [Device Name]” for the connected external device.
- Note: If you have multiple external devices connected, the list will show all the connected devices. In this case, you should carefully choose the “Eject [Device Name]” for the specific external disk drive you want to eject.
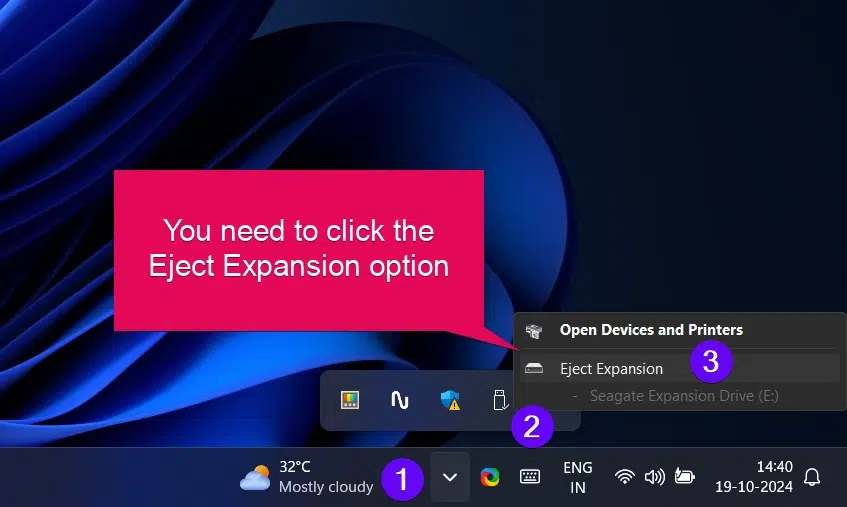
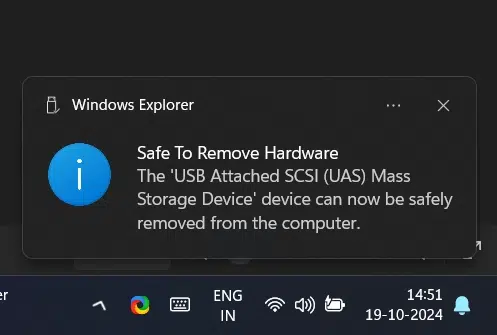
In this way, you can safely ejects any external disk drives connected to your windows 11 pc. You will get a popup message says “Your device is safe to remove”.
If you receive an error message saying “Problem Ejecting USB Attached SCSI (UAS) Mass Storage Device”, don’t worry. This is a common error message, but to fix it, simply follow the steps provided below.
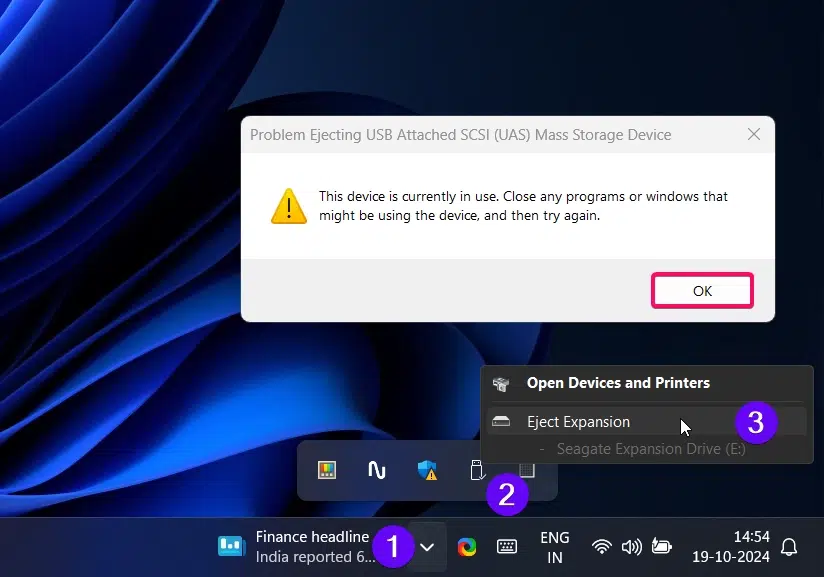
Fix for Problem Ejecting USB Attached SCSI (UAS) Mass Storage Device issue:
I have tried and tested the fixes listed below, and I’ve arranged them according to the level of difficulty in implementing each one. It’s recommended to backup your external device if necessary before attempting any of these fixes.
Fix 1: Using Task Manager:
The main cause of this error is usually not closing the external device’s folder or having some files from the external device open or running in the background. Additionally, you should check if OneDrive or Google Drive is backing up files from your external disk drive in the background. This can be identified by checking the Task Manager.
- Open the Task manager using the keyboard shortcut CTRL + SHIFT + ESC
- Look for any processes running in the background. If you find any, I recommend ending the process.
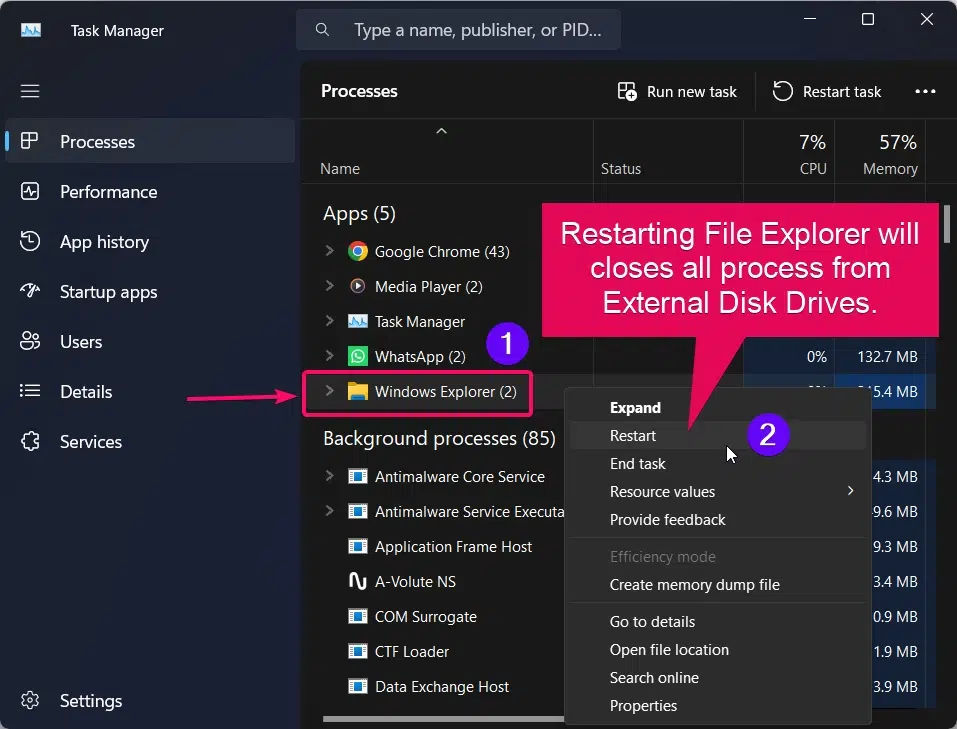
- Next, search for the File Explorer process in the Task Manager. Once you locate it, right-click on it and select the Restart option.
- This will restart the File Explorer process, which will close all folders related to the external disk drives.
- After this, you can use the generic method mentioned earlier to safely remove the external device, and you should no longer encounter this error when removing it from your PC.
Method 2: Eject External Disk Drives using Windows Settings:
If you want to try something different from the generic method, Windows 11 offers an option to remove connected external devices through Windows Settings. To learn how to do this, follow the instructions below.
- Use the keyboard shortcut Winkey + I to launch Windows Settings. Then, go to the Bluetooth & Devices section.
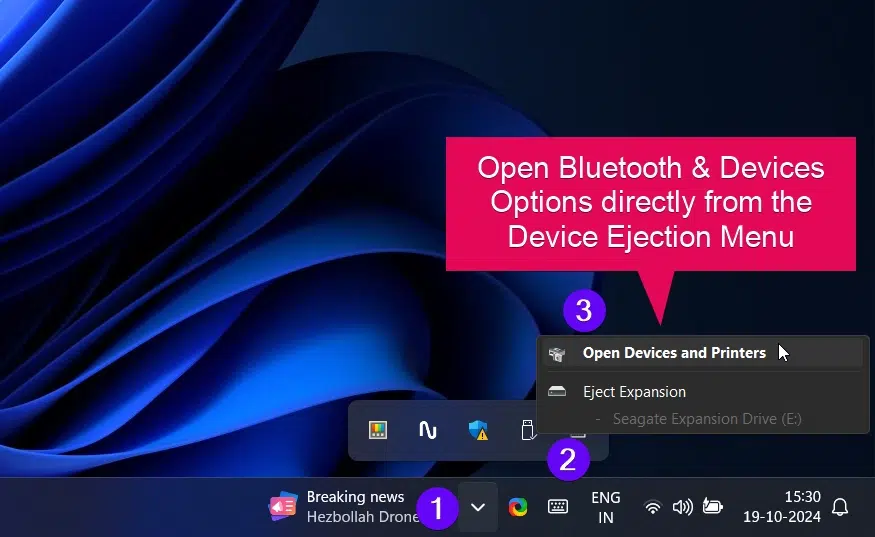
- Alternatively, you can directly access the Bluetooth & Devices options from the Device Ejection Menu.
- In the list of options, choose Devices. This will display all the connected external devices on your PC, such as USB mouse, USB disk drive, USB SSD disk drive, and many more.
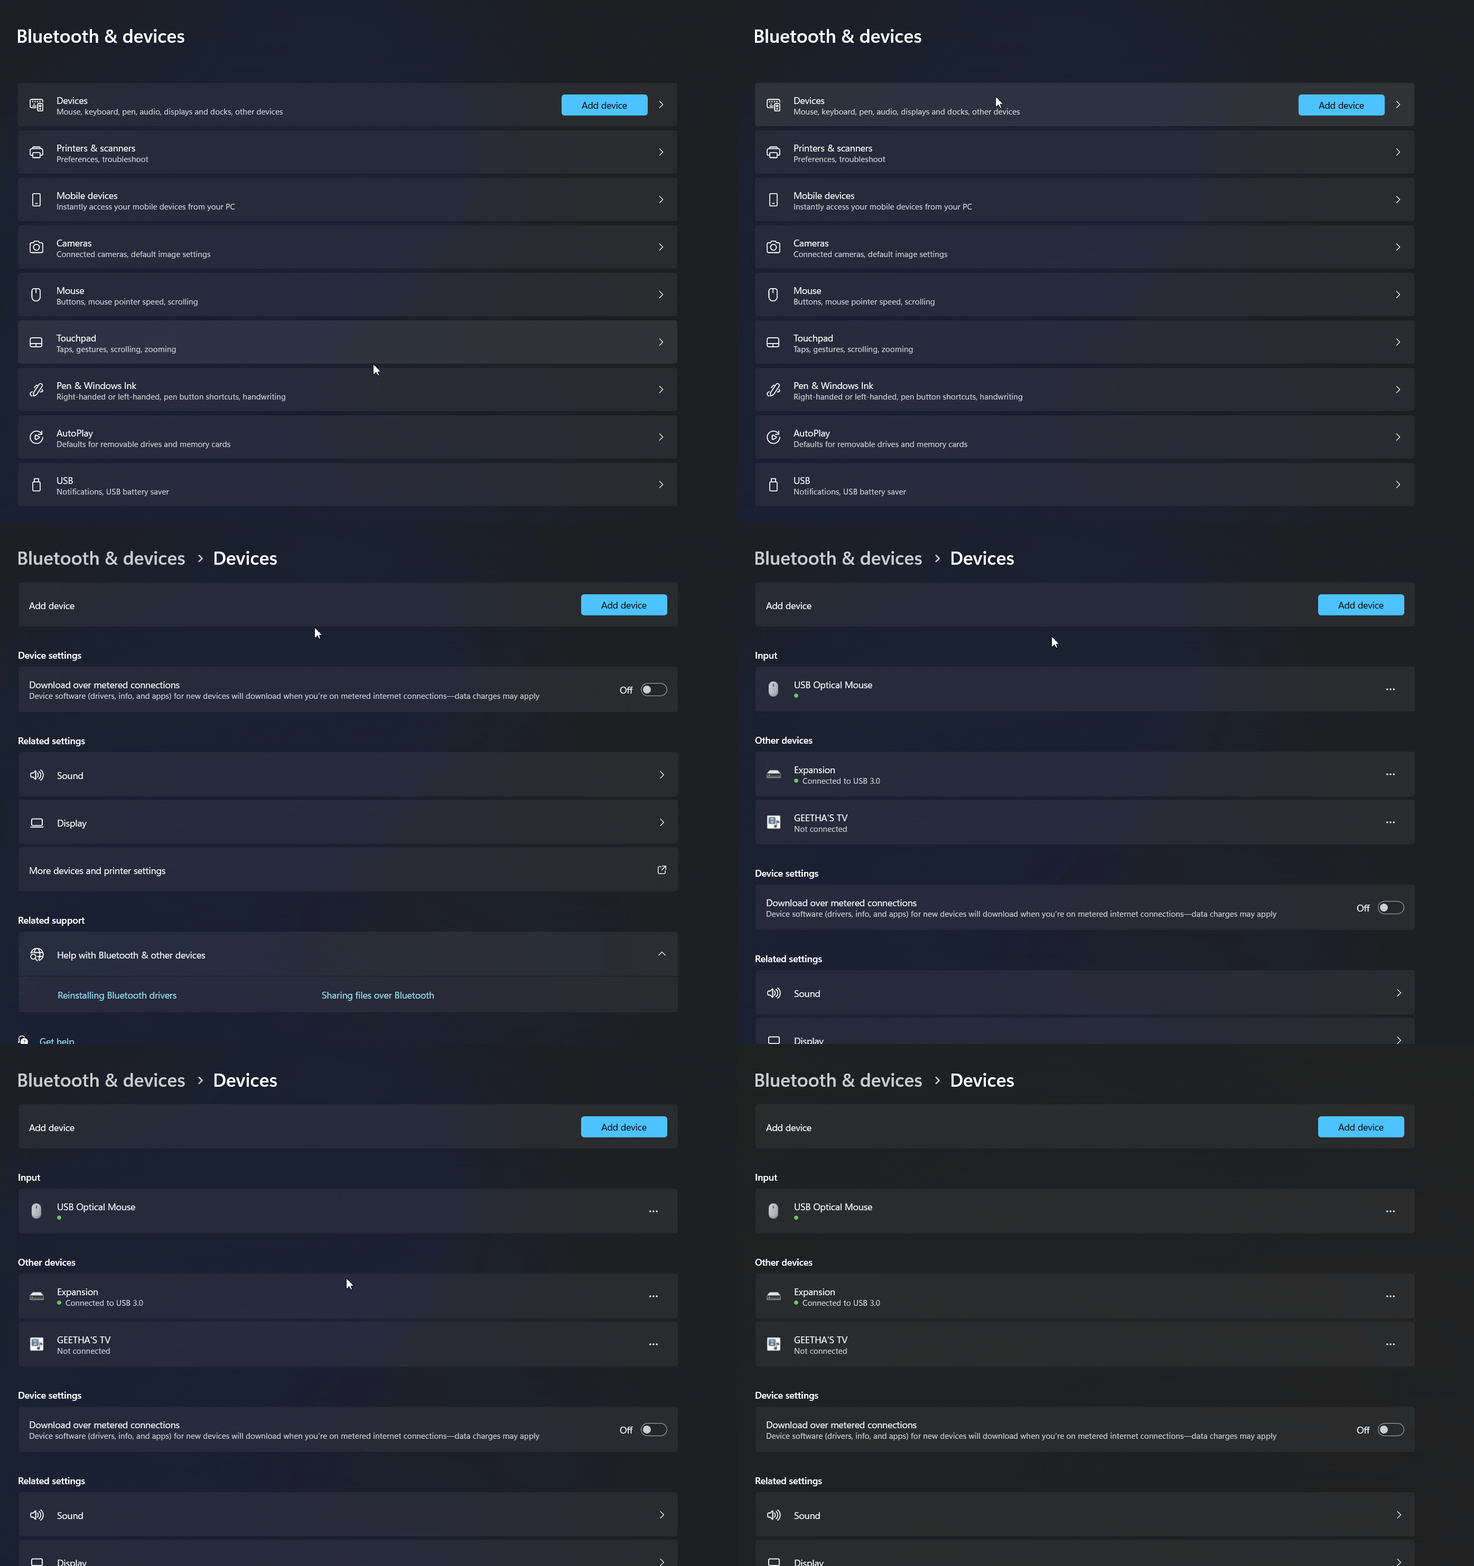
- Now, you can see the 3 horizontal dots (…) in the end of the connected external device and select Remove device option.
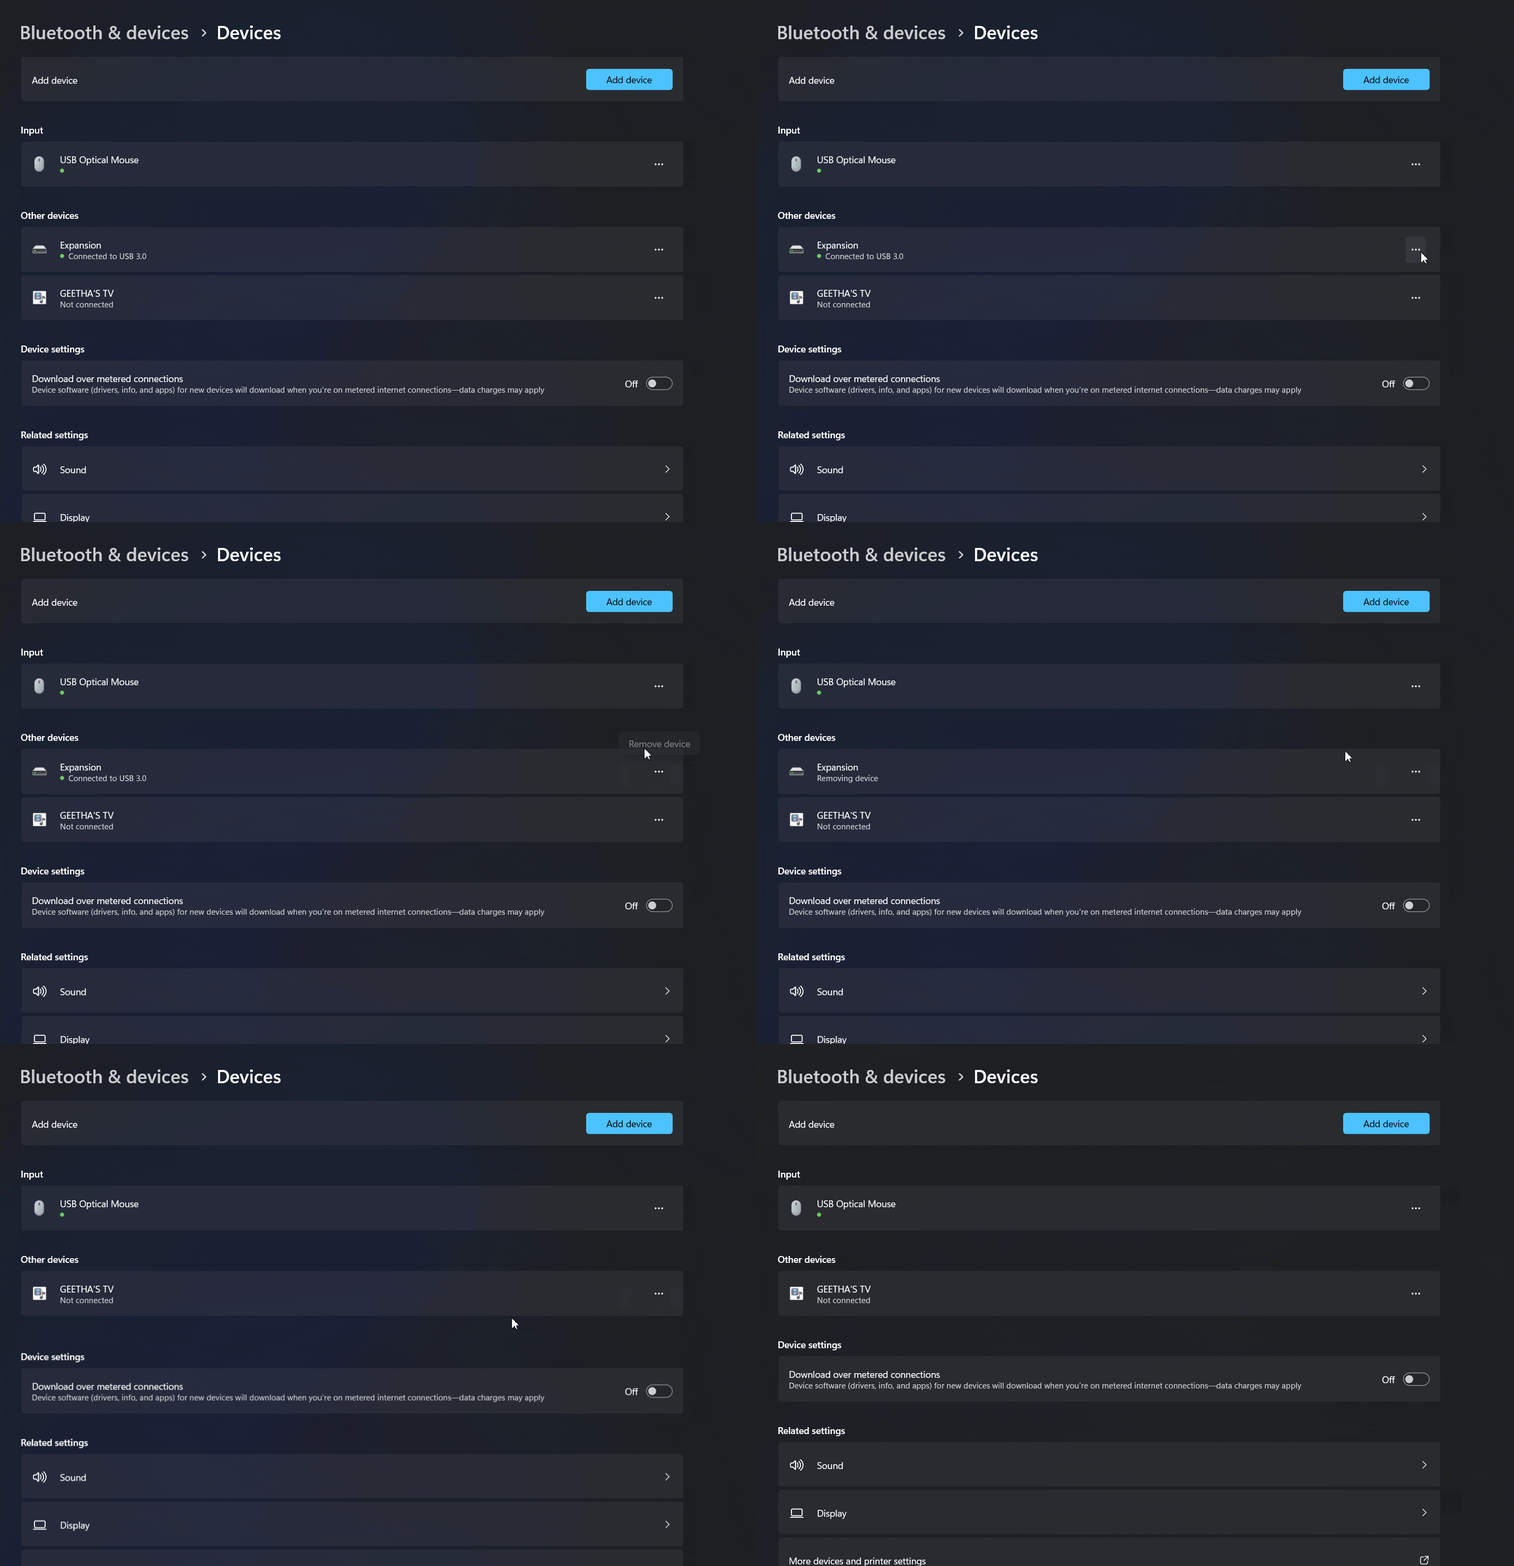
- This option will instantly remove the connected external device from your Windows 11 PC.
After doing this, you can directly remove or unplug the usb disk drive from your pc and it won’t affect both of your devices.
Method 3: Eject External USB or Disk drives from Device Manager:
You can use this method if your external devices become corrupted and Windows is unable to safely remove the external devices connected to your PC.
- Open Device Manager window using the keyboard shortcut: Winkey + X & choose the Device Manager from the list.
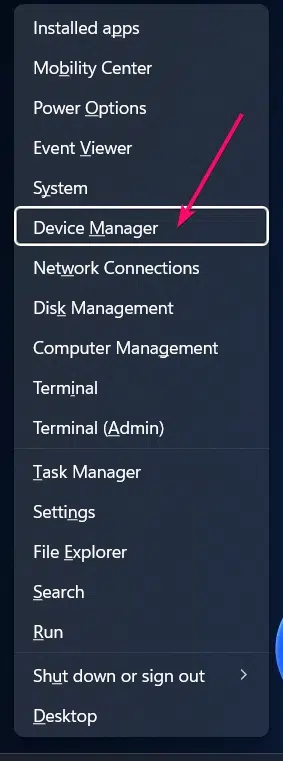
- Now, you need to expand the Disk Drives option from the list to view all the connected external disk drives.
- Choose the connected external device, in my case the device name is “Seagate Expansion SCSI Disk Device“
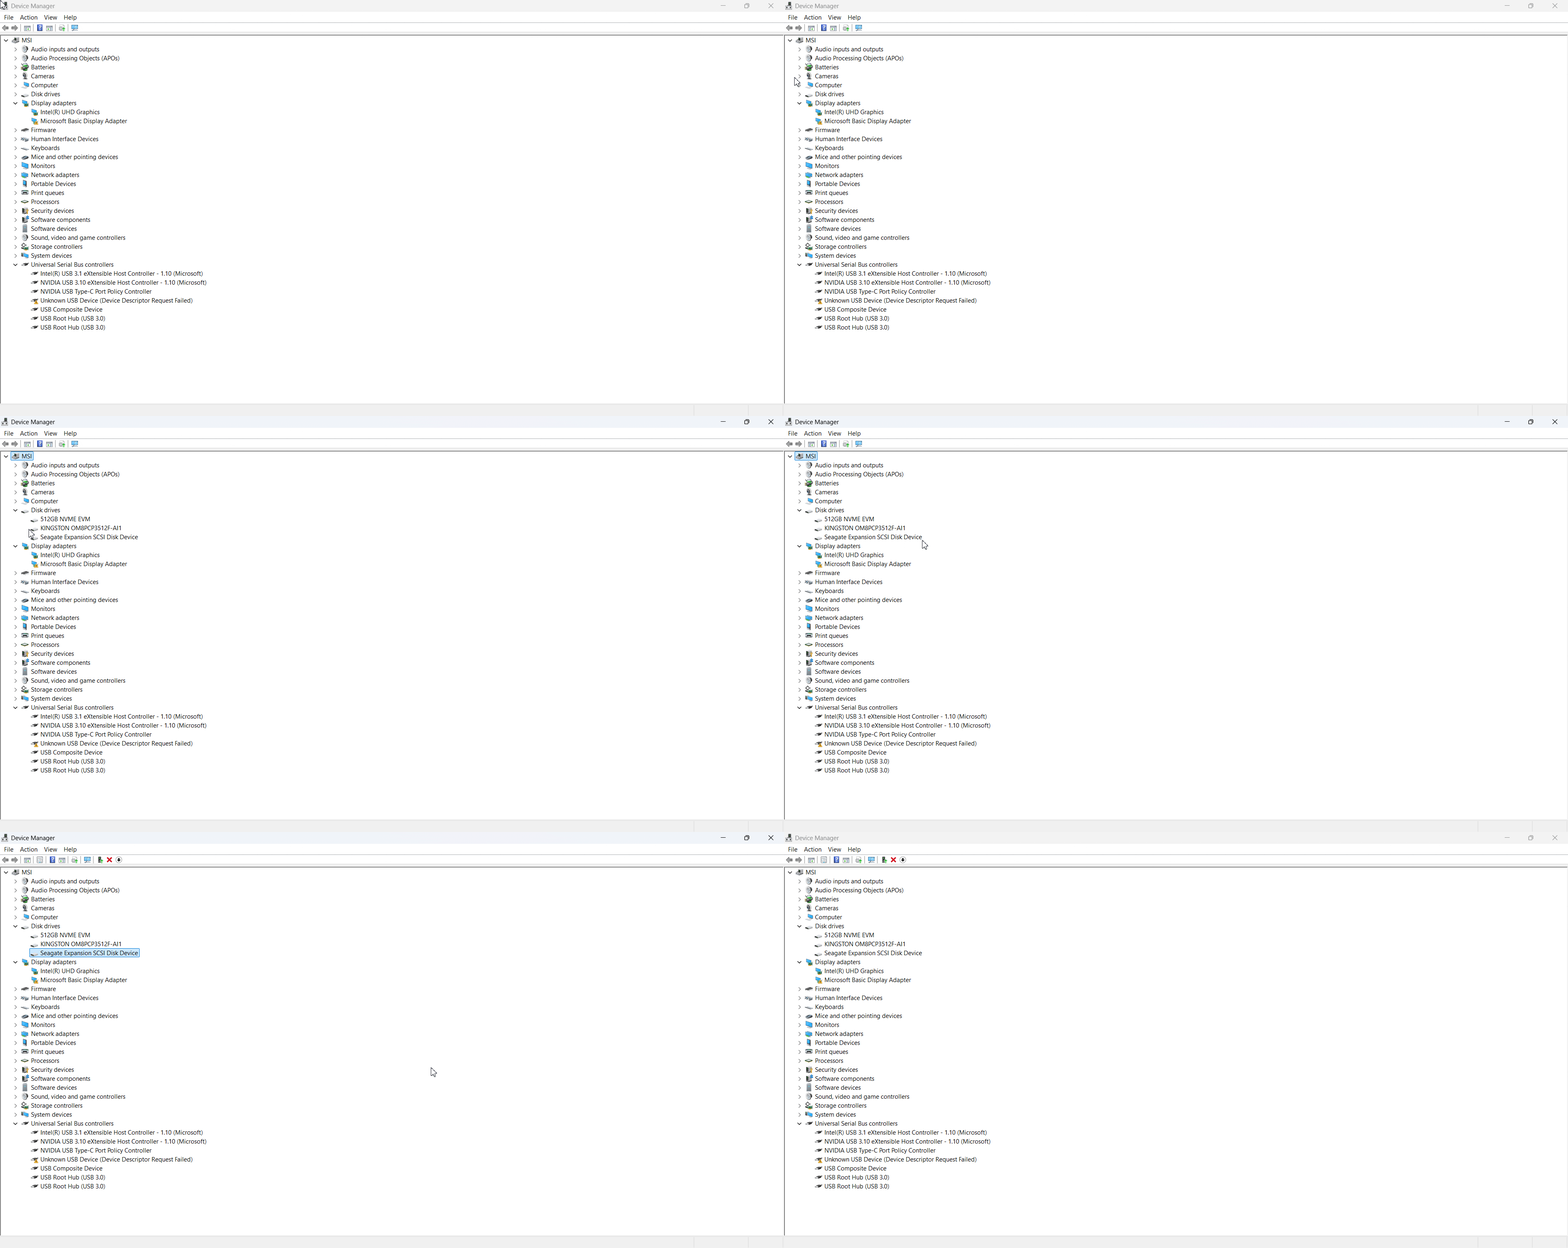
- Then, you need to right click on the device name and choose the option Uninstall Device.
- A prompt will appear on your screen, asking you to uninstall the connected external device, as shown in the gif below.
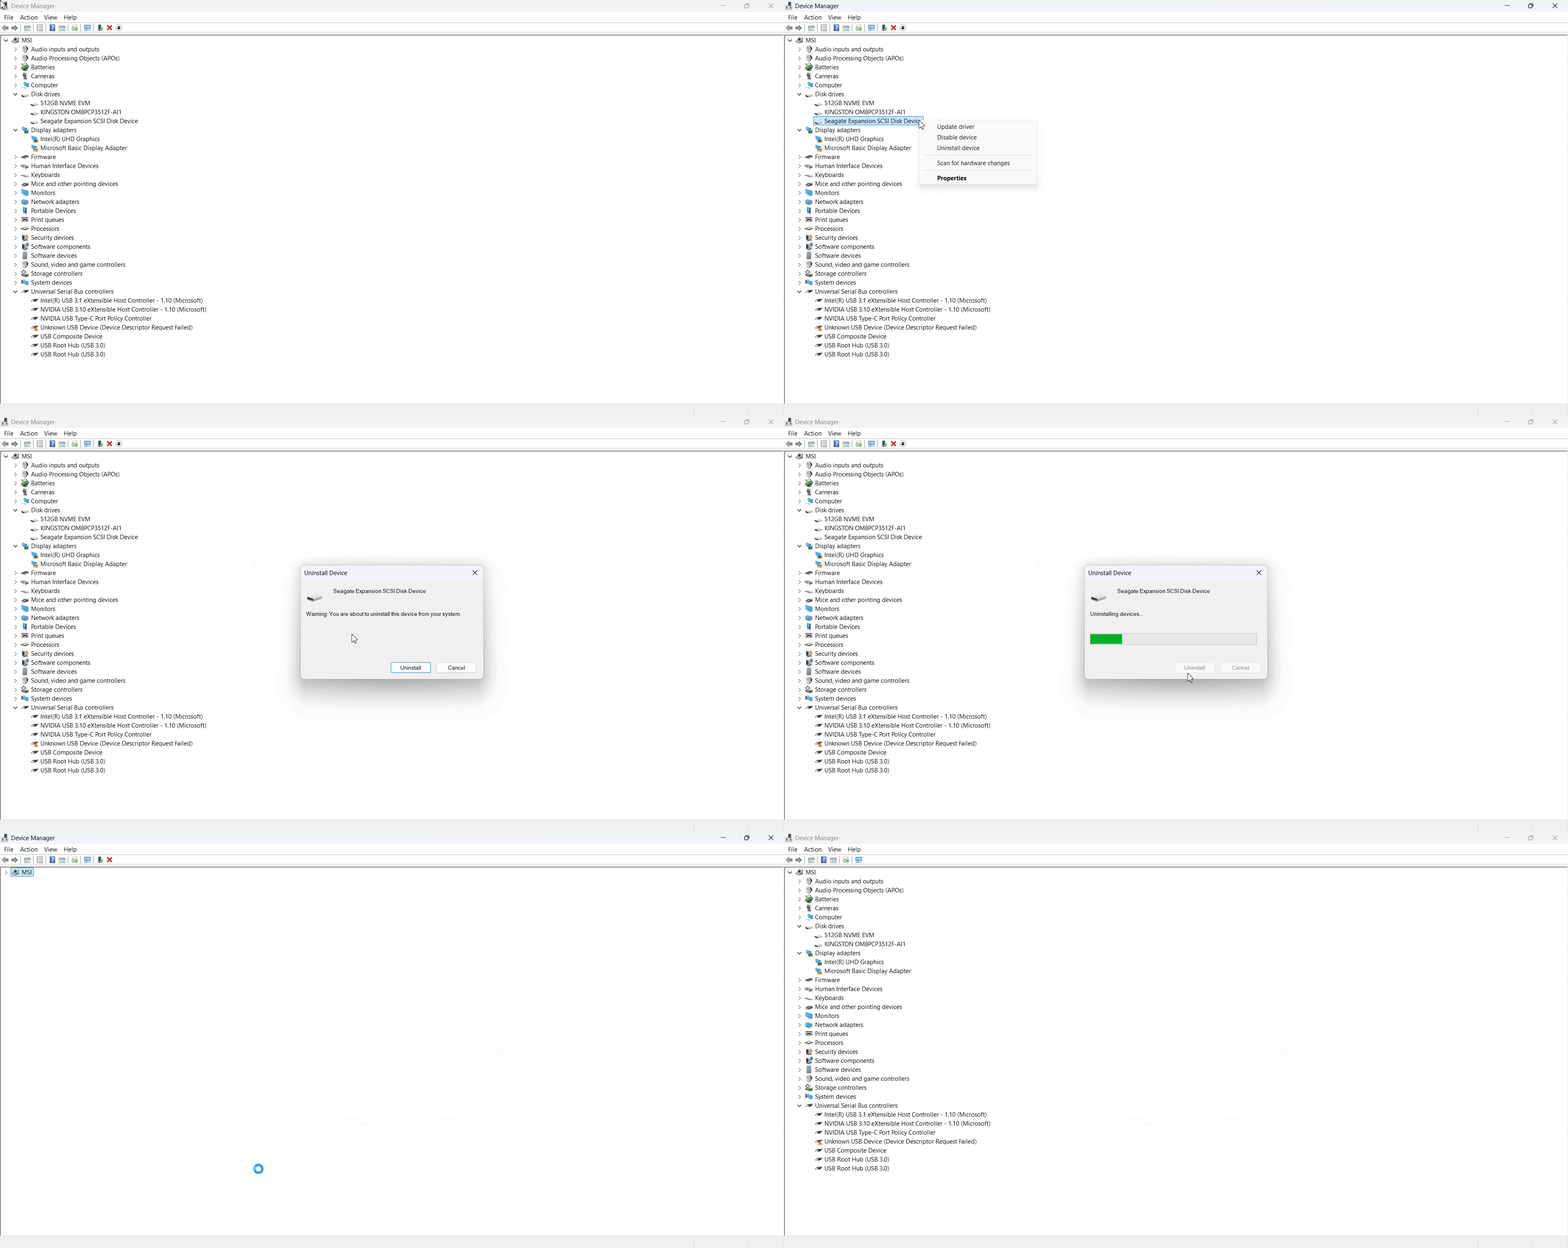
- Now, you can unplug the connected external devices.
Take Away:
By following the steps, you can ensure that your external SSD, HDD, or USB drive is safely removed from your Windows 11 PC without causing any potential damage. Whether you’re using the generic method or Windows Settings, it’s essential to properly eject your external devices to avoid errors or data corruption. Always remember to use the “Safely Remove Hardware” option for long term protection of your external drives and data. If you have any queries and then kindly let me know in comment section and find more interesting tutorials on our Home Page: WinSides.com.
Read More:
- How to stop apps opening at startup in Windows 11?
- How to Print Screen/ScreenShot Without PrintScreen Button in Windows 11?
- How to Enable No GUI Boot in Windows 11?
Related Articles:
- Enable Work Folders Client on Windows 11 using CMD & PowerShell
- Stellar Converter for OST: Our Honest Review
- How to Do an Advanced Startup on Windows 11?
We combine expert insights with user-friendly guidance. We thoroughly research and test everything to give you reliable and simple to understand tech guides. Please take a look at our publishing process to understand why you can trust Winsides.


