How to Batch Rename Files using PowerRename in Windows 11?
Using PowerRename tool to Rename Bulk Files in Windows 11
PowerToys is a collection of helpful tools made by Microsoft to make using Windows easier and more efficient. These tools allow you to manage windows, change keyboard shortcuts, pick colors, rename multiple/bulk files at once, and more. PowerToys is open source, which means anyone can use and improve it. It is especially useful for people who want to customize and make their Windows experience better and more productive.
Recommended: Enable Microsoft Print To Pdf In Windows 11
Renaming multiple files at once can be a tedious process, especially when dealing with hundreds of them. Fortunately, I found a way to make this much easier using the PowerToys utility from Microsoft! PowerToys includes a feature called “PowerRename” that allows us to rename batches of files instantly. In this tutorial, I will share all the possible methods to rename batch files using the PowerRename utility provided by Microsoft PowerToys.
What is Powertoys’ PowerRename?
PowerRename is a tool that enhances the standard file renaming capabilities in File Explorer. This utility allows you to perform complex renaming tasks using search and replace, bulk editing, and regular expressions (regex). It is designed to minimize the effort needed to manage and rename batches of multiple files efficiently.
Why Choose Powertoys’ PowerRename?
With PowerRename, you can able to do the following functions:
- Search and Replace Text: You can easily find specific text in file names and replace it with new text.
- Use Regular Expressions: You can apply complex patterns to rename files.
- Preview Changes: This option allows you to see how files will be renamed before finalizing the operation.
- Undo Renames: You can quickly reverse changes using the standard Windows Explorer undo feature.
- Filter Results: You can simply select which files to rename by filtering results based on various criteria.
You can download the latest version of PowerToys from the official GitHub repository. Alternatively, my brother wrote a helpful guide on how to download and install the PowerToys tool on your Windows 11 PC.
1: Batch Rename Files using PowerRename:
After installing PowerToys, open the application by searching for it in the Start Menu. Once it’s open, scroll down a bit until you find the “PowerRename” option in the list on the left side. Click on it and make sure the function is enabled, as shown in the image below.
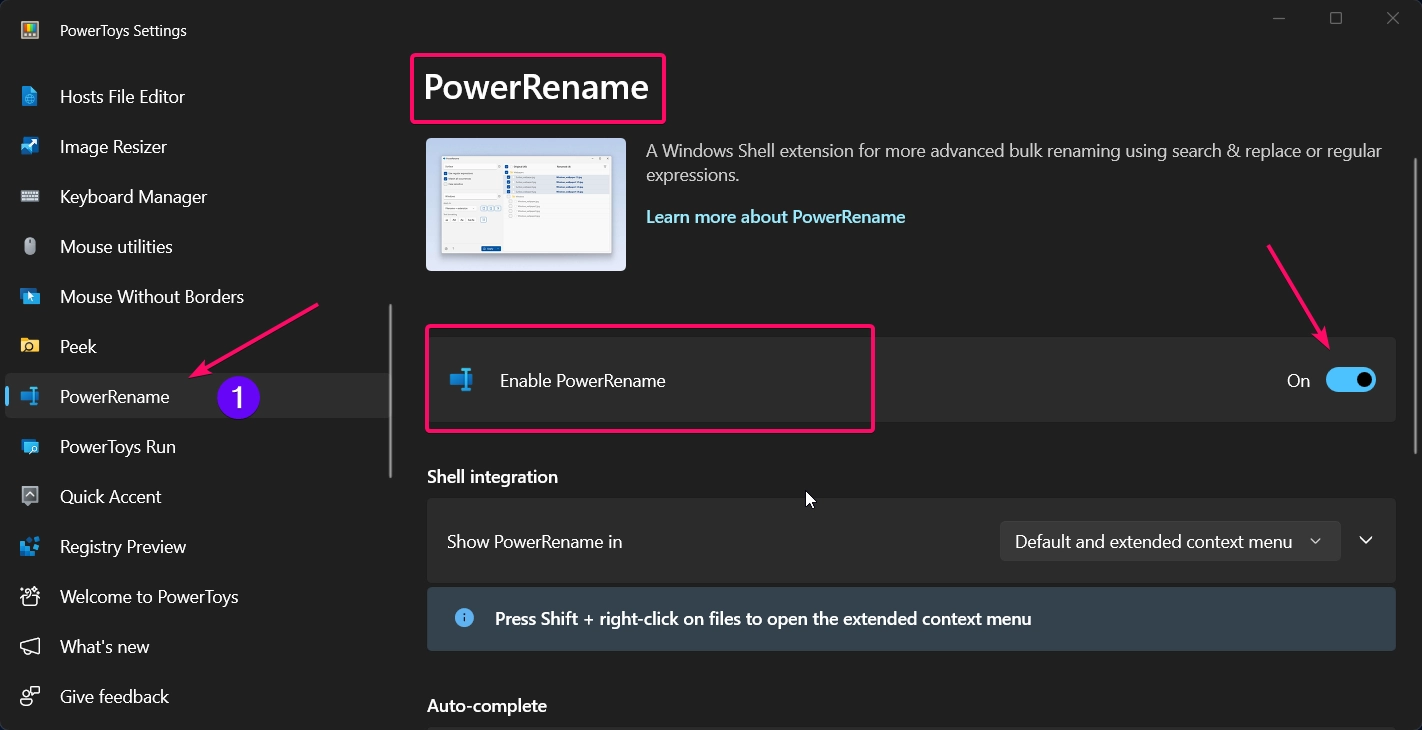
Below the “Enable PowerRename” option, you’ll see “Shell Integration“, which lets you choose how you want the PowerRename option to appear in the context menu. If you select “Default and extended context menu“, the PowerRename function will appear on both the regular context menu when you right click a file or folder. If you choose the “Extended Context Menu only” option, the function will only appear when you press Shift button and right click.
- First, open the folder that contains the files you want to rename in batches.
- Then, select all the files you want to rename, hold down the Shift key on your keyboard, and right click the selected files.

- Once you click the PowerRename option, the PowerRename window will appear on your screen.
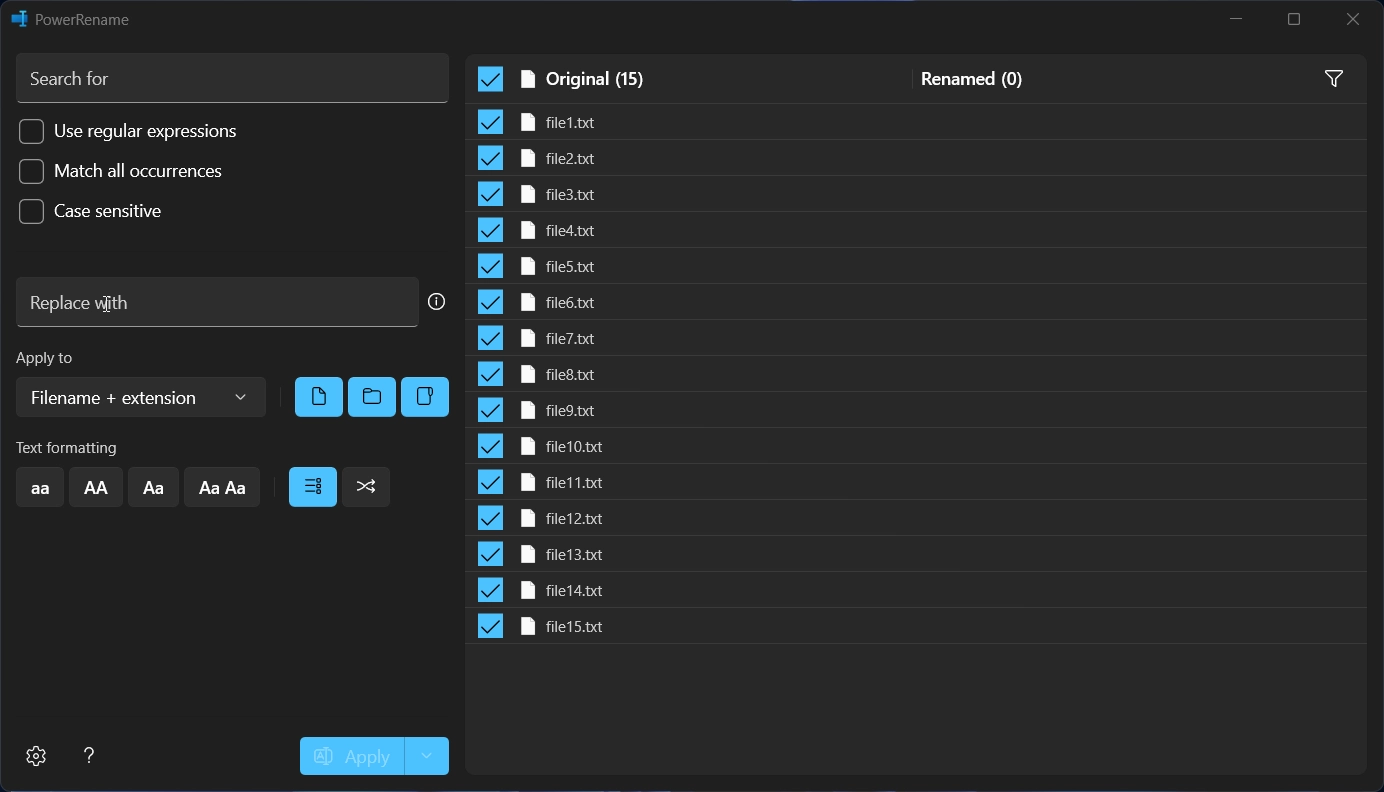
The PowerRename interface consists of several key components:
- Search For: Enter the text or pattern you want to find in the file names.
- Replace With: Enter the text you want to replace the search pattern with.
- Options Panel: Various checkboxes to customize your renaming, including:
- Case Sensitive: Match case exactly.
- Match All Occurrences: Replace all instances of the search text within the name.
- Use Regular Expressions: Enable regex patterns for advanced renaming.
- Files, Folders & Sub-Folder: Clearing causes files and folders to be excluded from the operation.
- Text Formatting: Convert items to all lowercase, all uppercase, title case (where the first character of each sentence is capitalized), or capitalize every word.
- Preview Window: Displays the before and after names of the files so you can review the changes.
When the window appears on your screen, you’ll see two input fields: “Search for” and “Replace with“. In the “Search for” field, enter the text you want to find in the selected files. In the “Replace with” field, enter the text you want to use as a replacement in the selected files.
- I entered “file” in the “Search for” field and “file-type” in the “Replace with” field, then clicked the Apply button. This instantly renamed all the selected files with the new text.
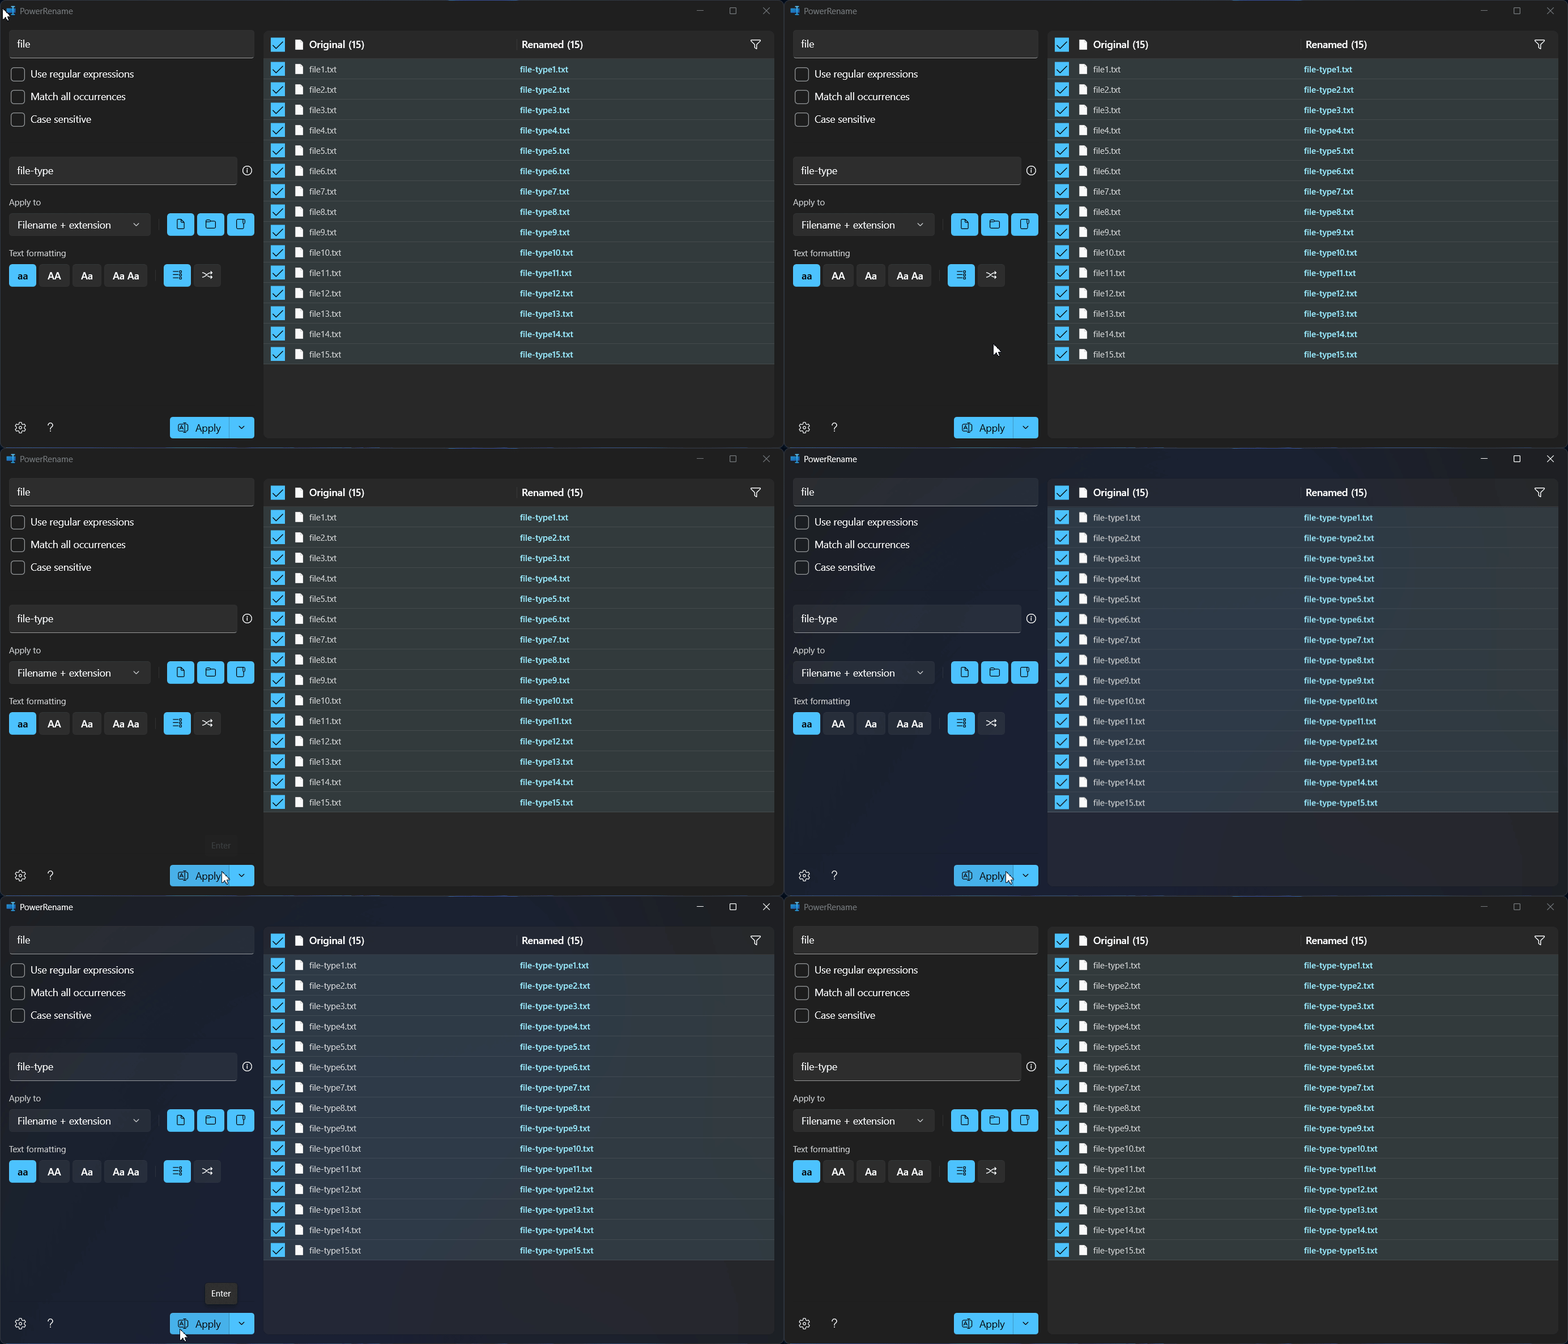
As you can see in the above image, the files have been renamed as file-type.txt.
1a: Replace Part of Filename in Multiple Selected files:
If you want to replace part of the filename in the selected files, just enter the text you want to find in the “Search for” field and the text you want to use as a replacement in the “Replace with” field. For example, PowerRename will search for “file” in the selected file names and replace it with “text” in all the chosen files.
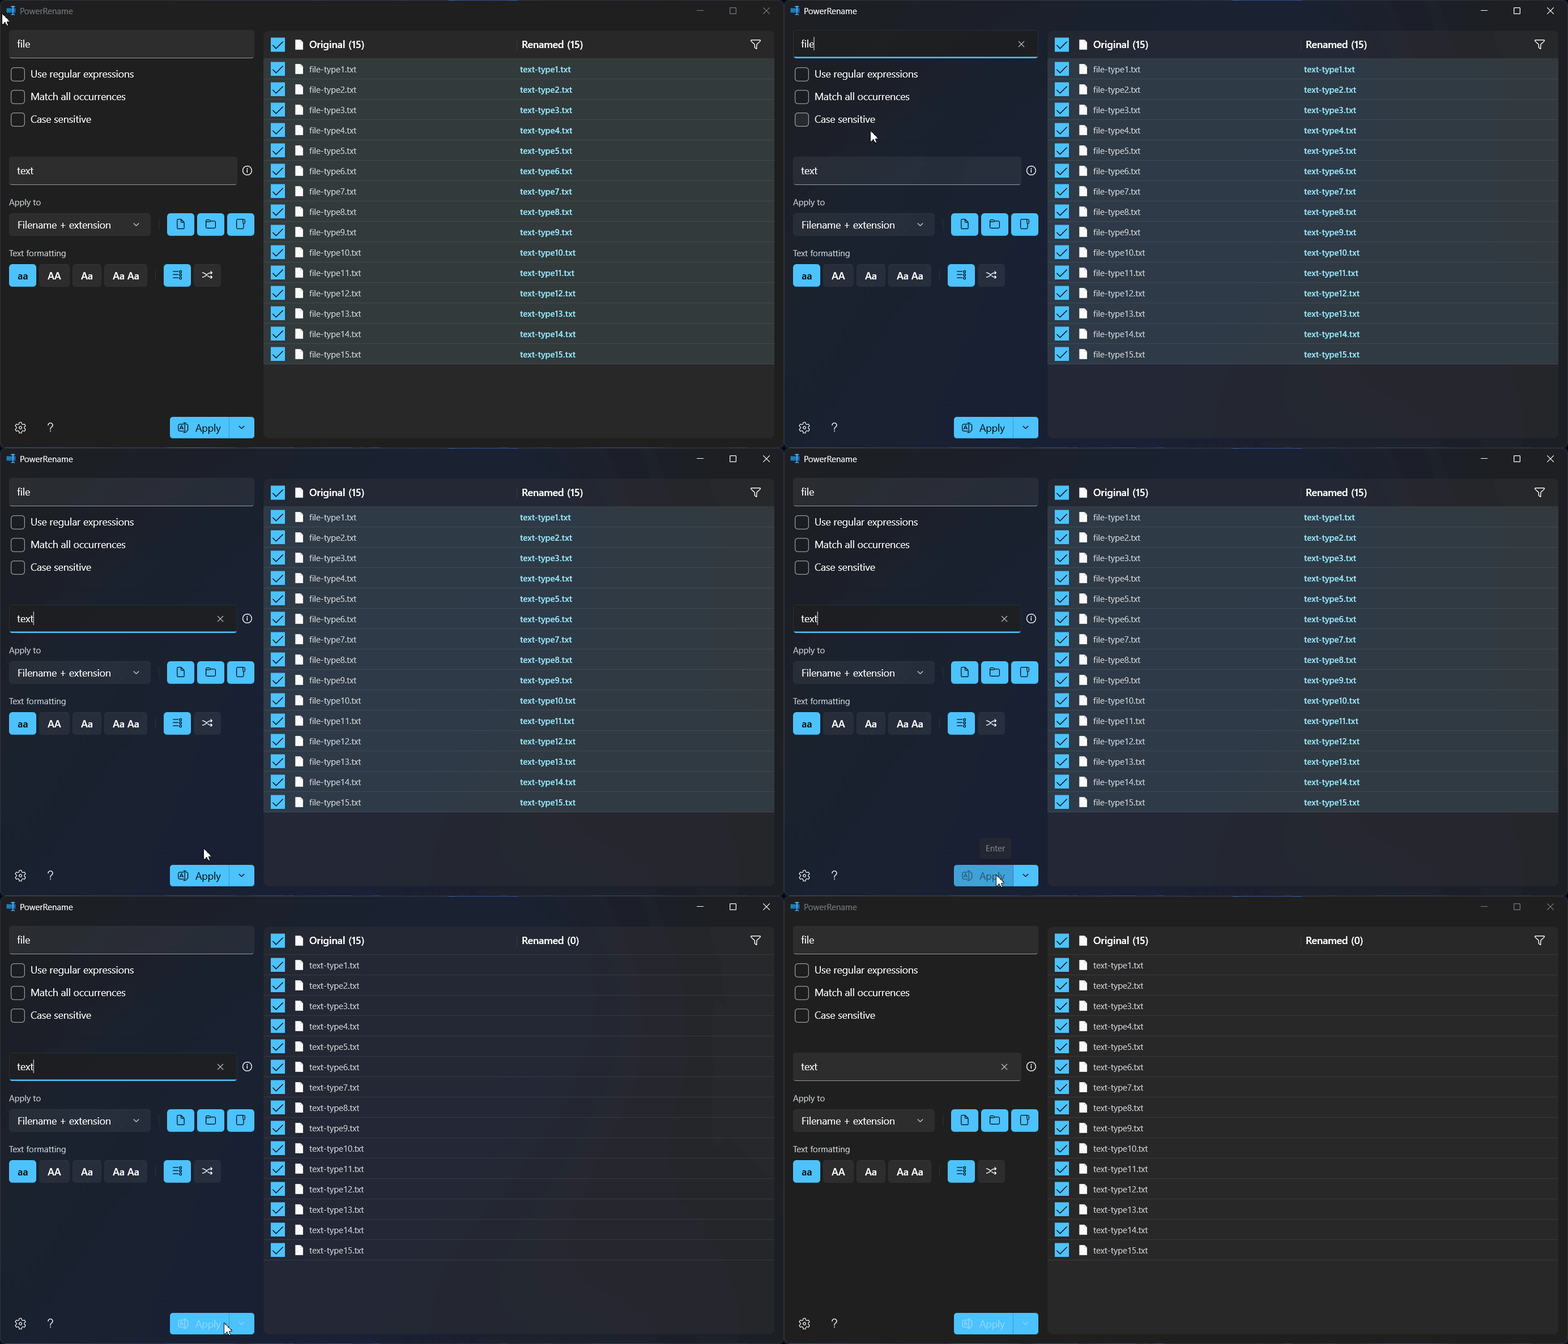
As shown in the image above, PowerRename instantly replaces and renames a part of the filename with the text entered in the “Replace with” field for all the selected files.
1b: Remove Part of Name from Multiple Selected Files:
With PowerRename, you can remove a part of the name from multiple selected files. To do this, enter the text you want to remove in the “Search for” field, and leave the “Replace with” field empty. Then, click the Apply button. This will replace the text with an empty string, effectively removing it from the filenames of the selected files.
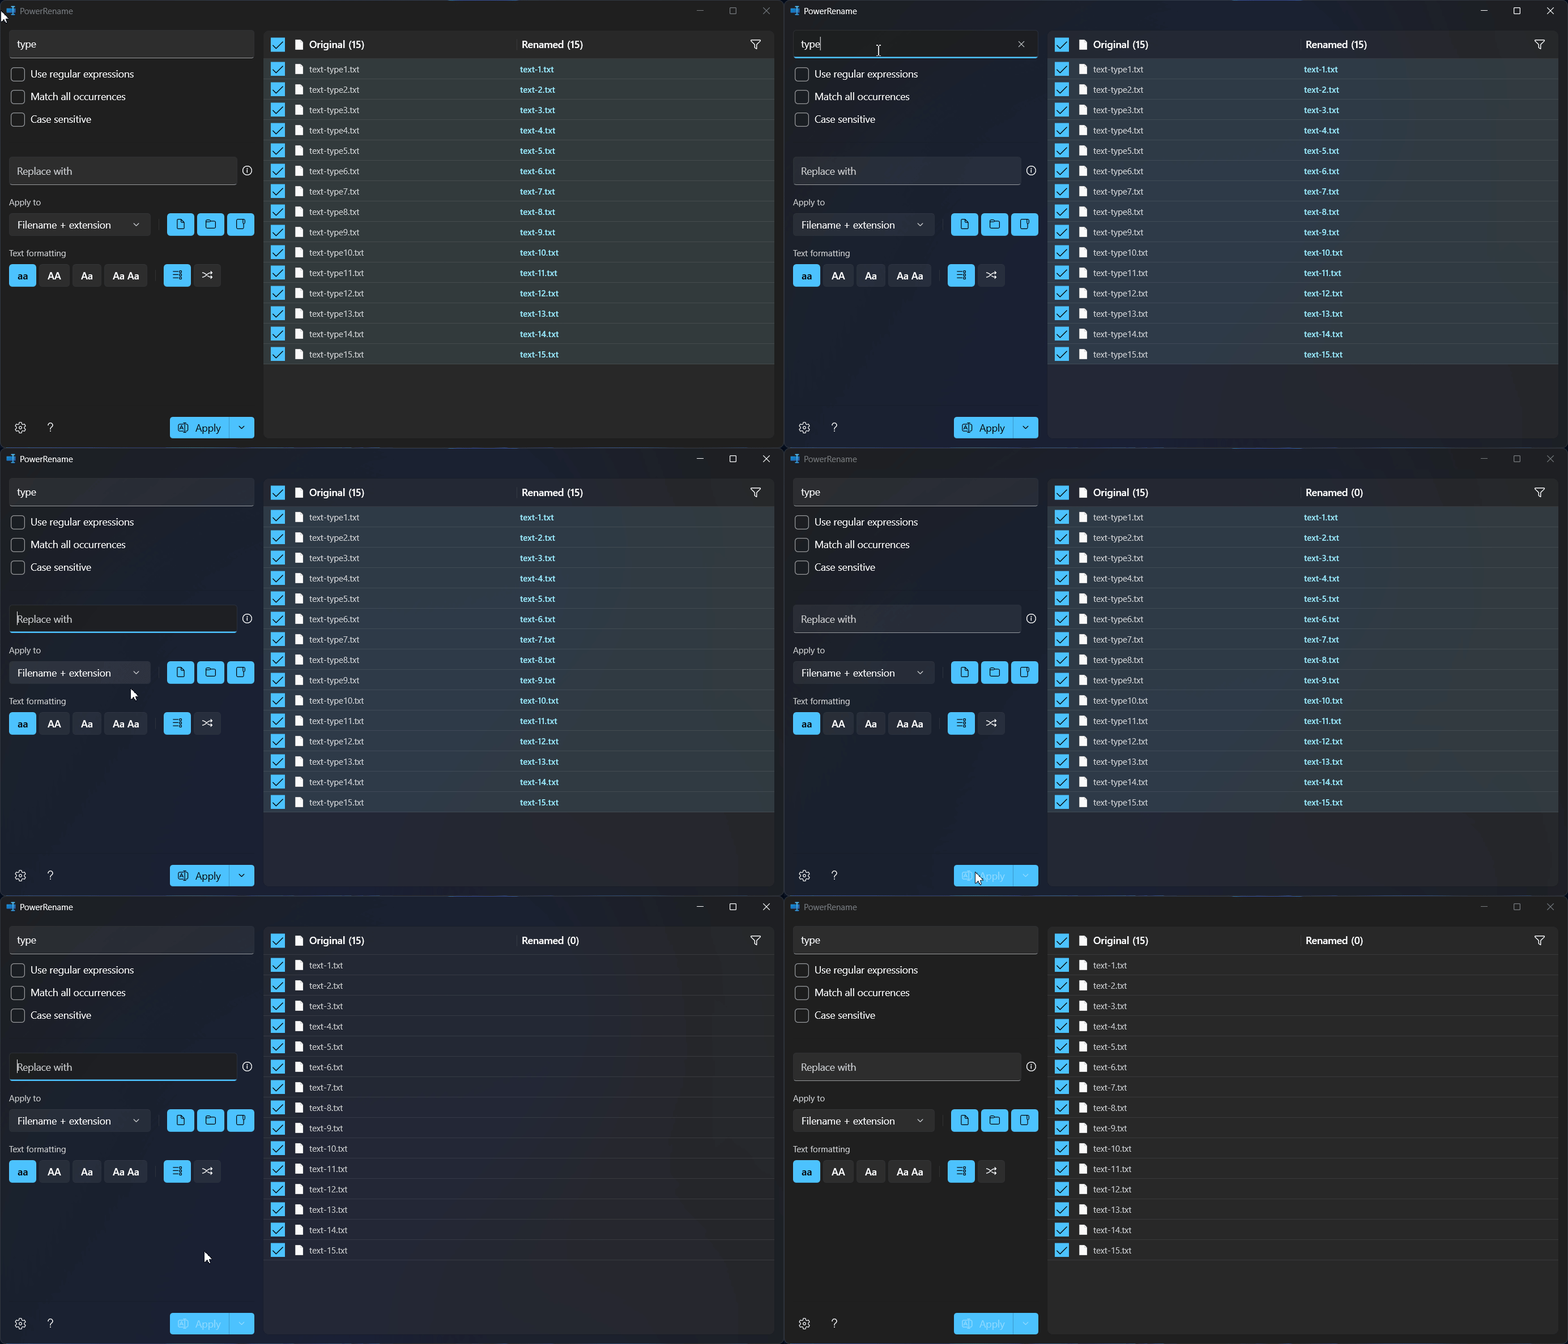
As shown in the image above, PowerRename instantly removes a part of the filename with the empty field in the “Replace with” field for all the selected files.
1c: Remove Spaces in Filename from Multiple Selected Files:
The PowerRename function lets you remove any empty spaces from the filenames of selected files. To do this, enter a space ” “ in the “Search for” field, leave the “Replace with” field empty, and click the Apply button. This will remove all the spaces in the filenames of the selected files.
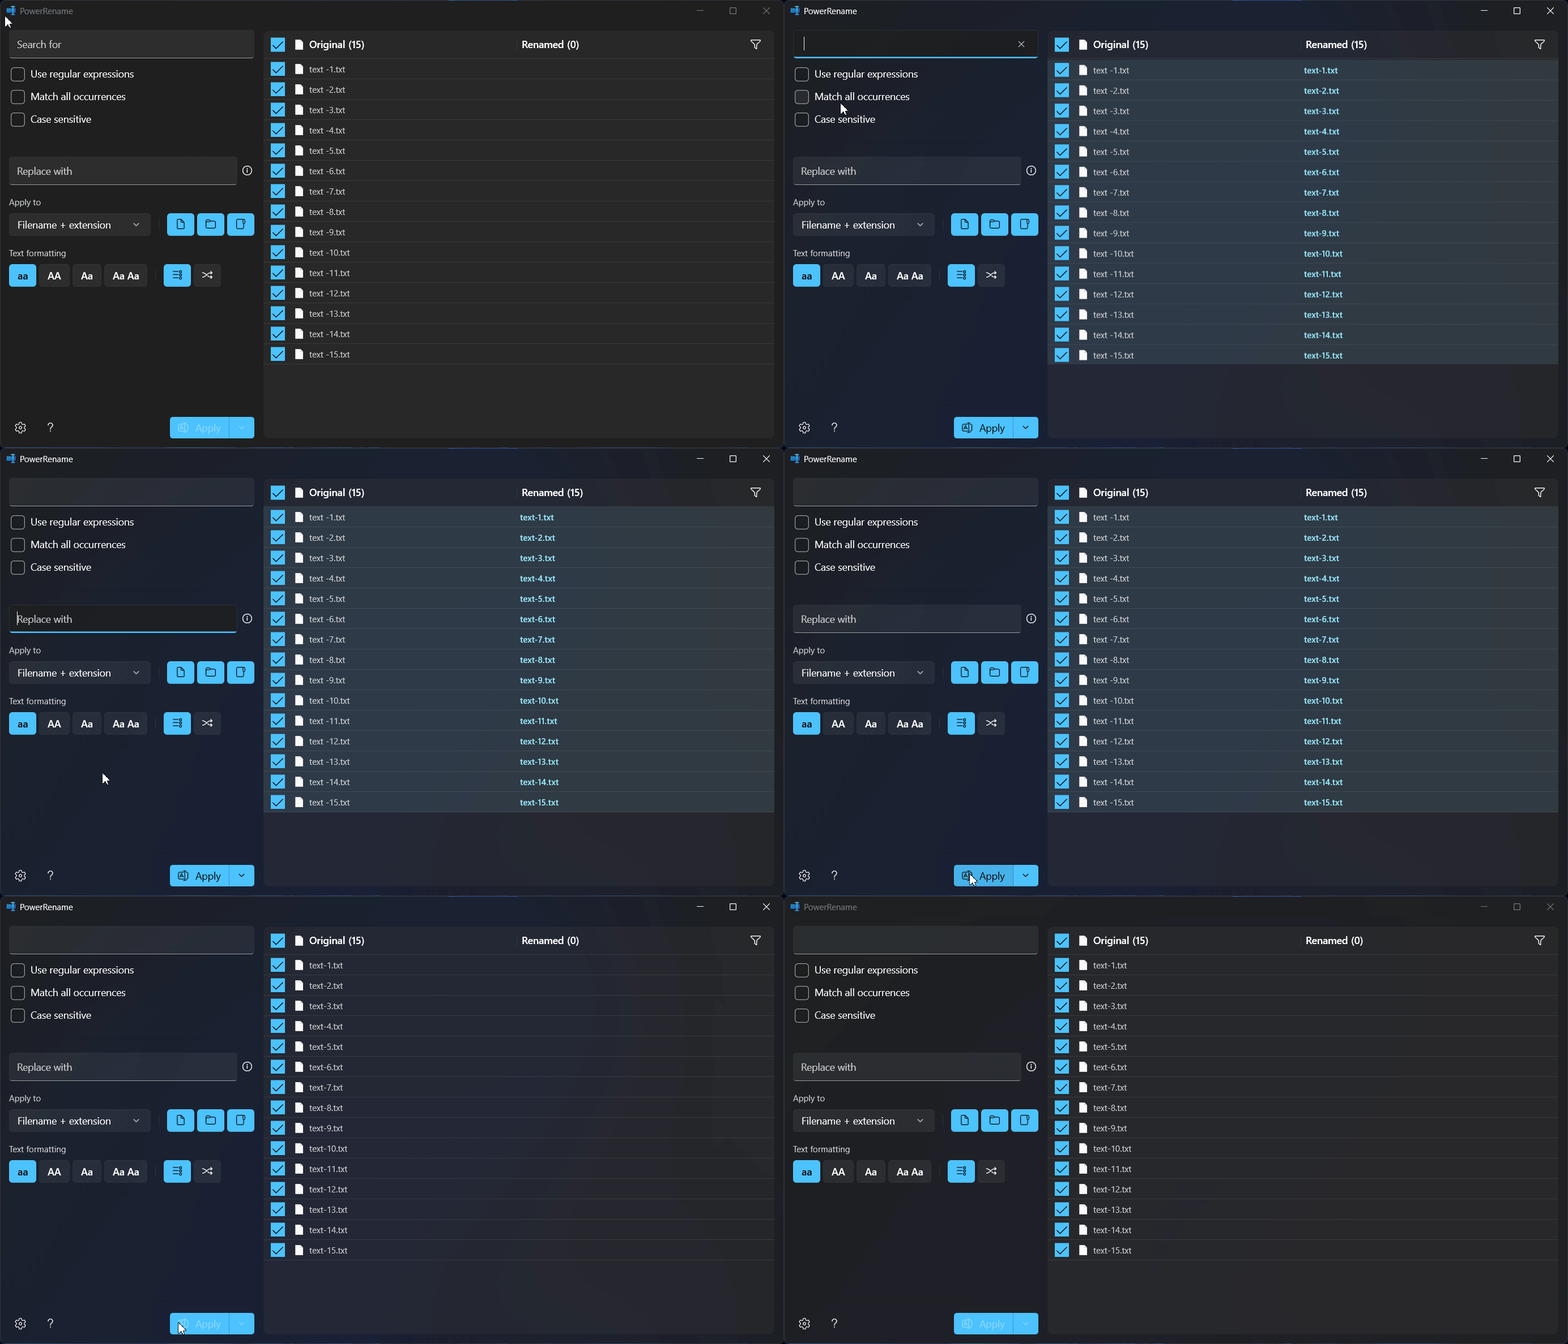
As shown in the image above, PowerRename instantly removes the spaces of the filename with the empty field in the “Replace with” field for all the selected files.
1d: Change File Extension in bulk Selected Files:
The PowerRename option allows you to change the extension of multiple selected files at once. Below the “Replace with” field, you’ll find an “Apply to” dropdown box. Click this dropdown, and you will see three options: “Filename + Extension,” “Filenames Only,” and “Extension Only.” You need to choose “Extension Only.” Then, in the “Search for” field, you need to enter the existing file extension, and in the “Replace with” field, enter the new extension you want to apply to all the selected files.
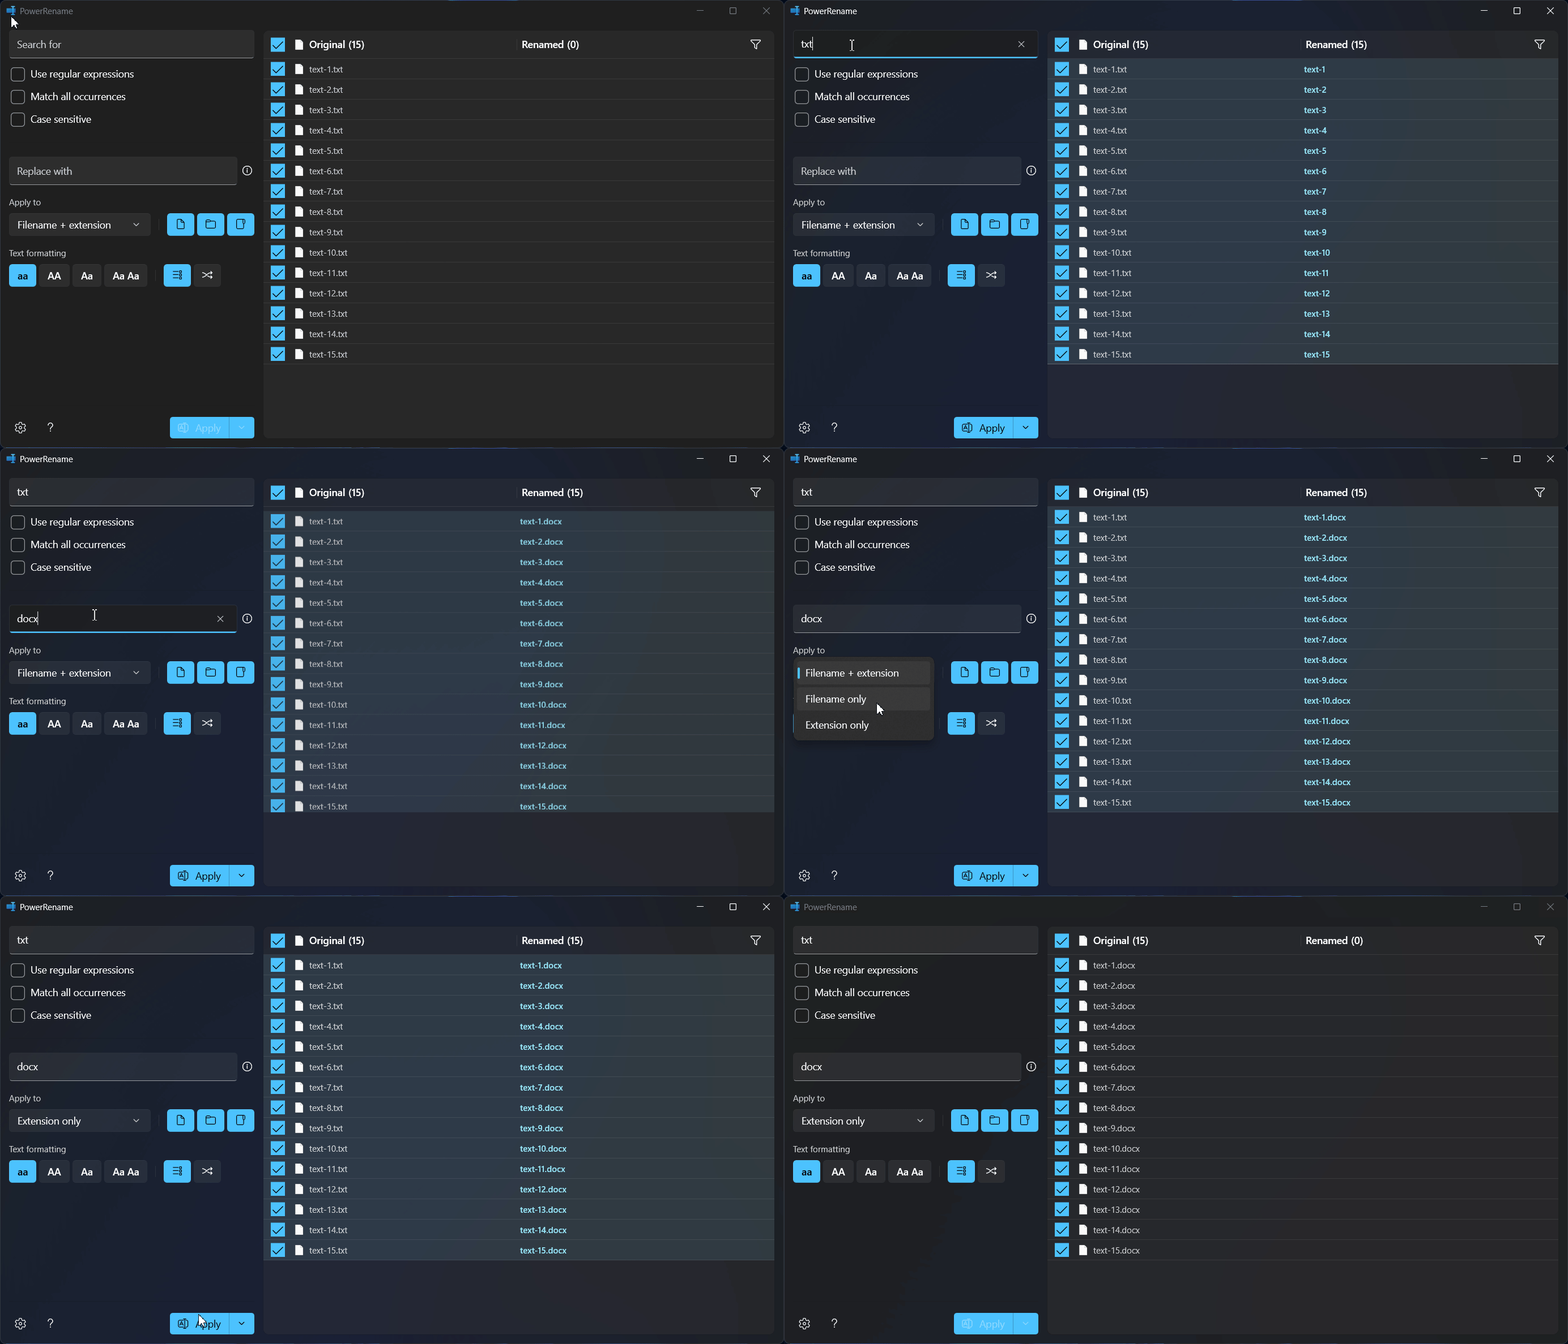
As shown in the image above, PowerRename instantly replaces the file extension (txt) of the filename with the extension (docx) in the “Replace with” field for all the selected files.
1e: Rename Files in Sequential Numbering to Selected Files:
With PowerRename, you can automatically add a sequential number to the end of each filename by using the “Enumerate items” option. This helps you rename the files in a sequential order.
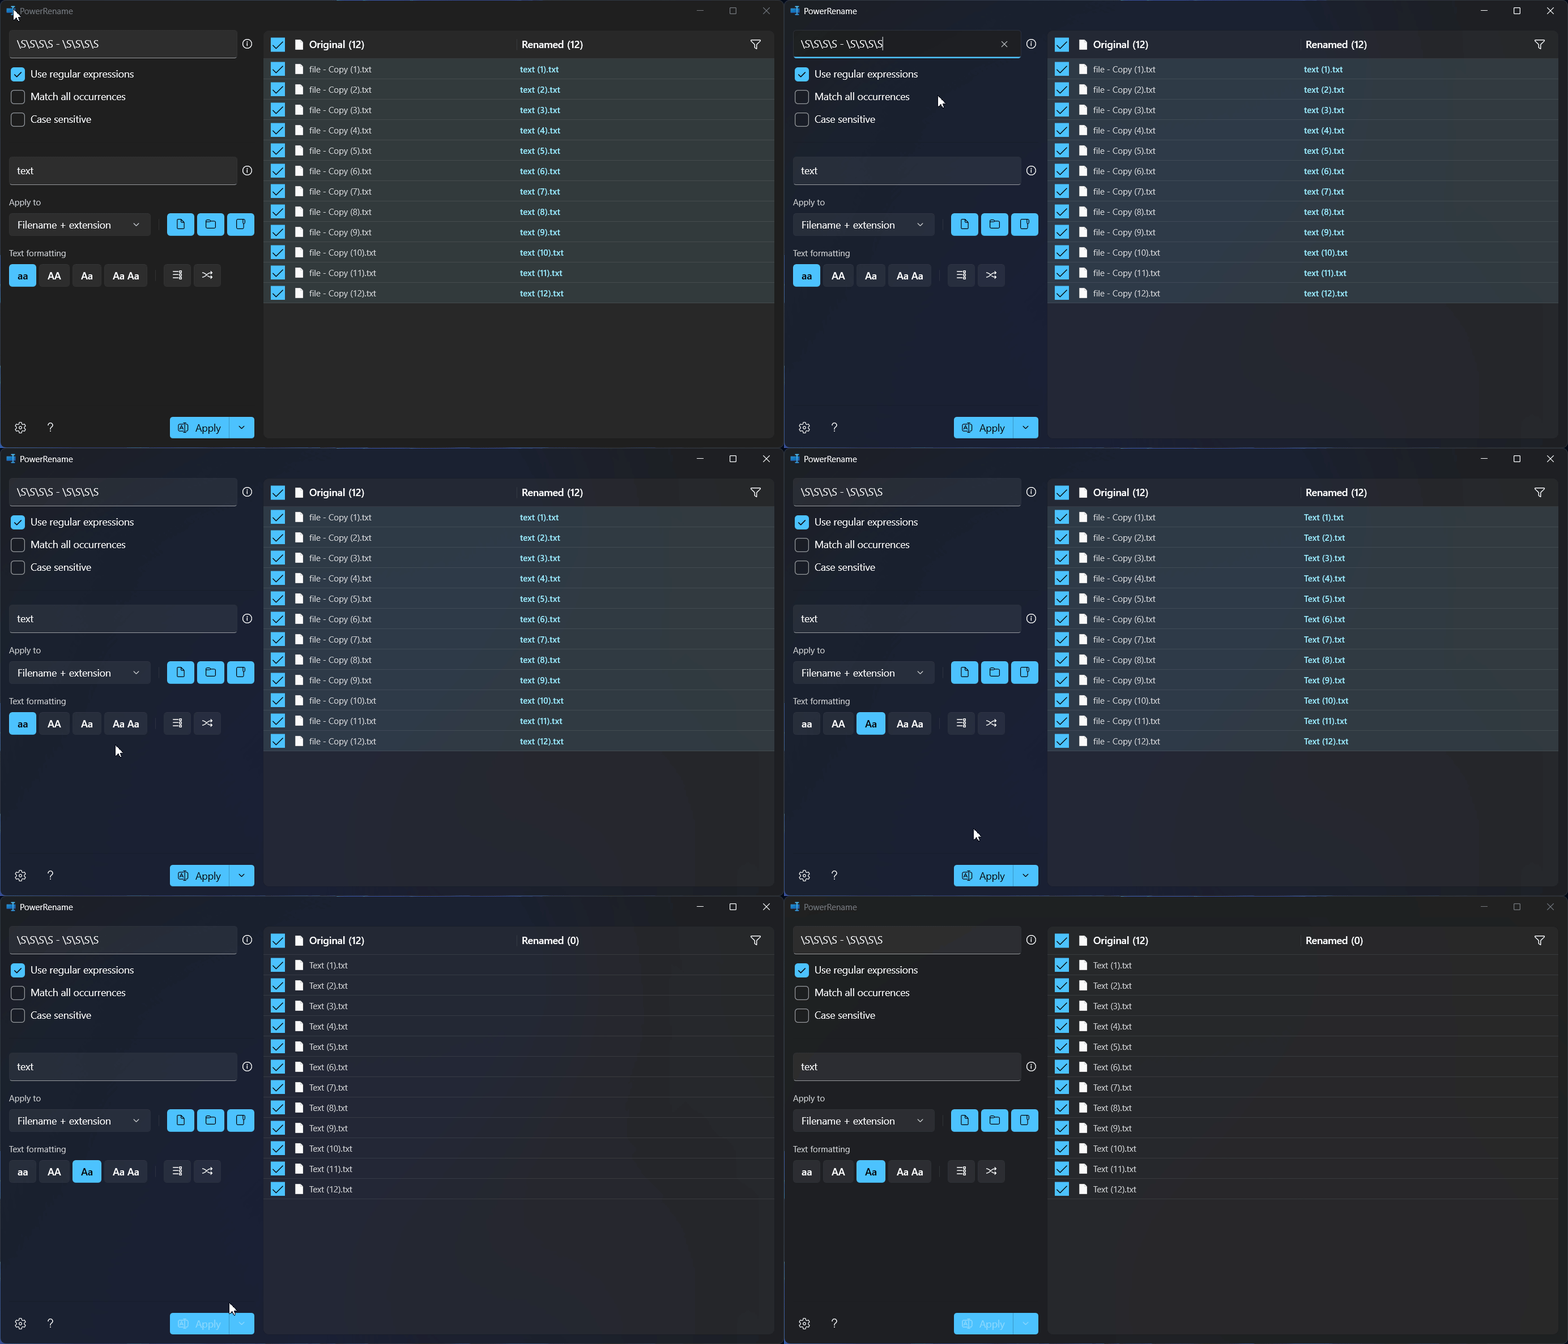
As shown in the image above, PowerRename instantly numbers using Enumerate Items option the selected files that match the “Search for” regex.
1f: Using Regular Expression to Rename Batch Files:
This is a unique and powerful way to rename batch files that match the given regex. If you are new to regex (Regular Expressions), click the info icon as shown in the below image to display the basic regex value and its functions.
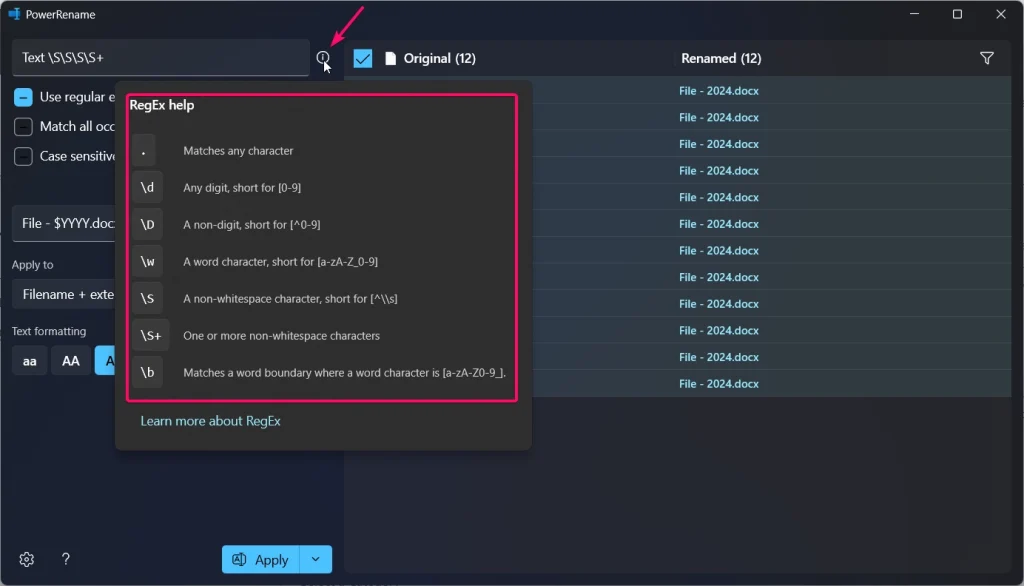
In the example, I’m going to use the regex method in both Search for and Replace with field to bulk modify and rename the selected file names.
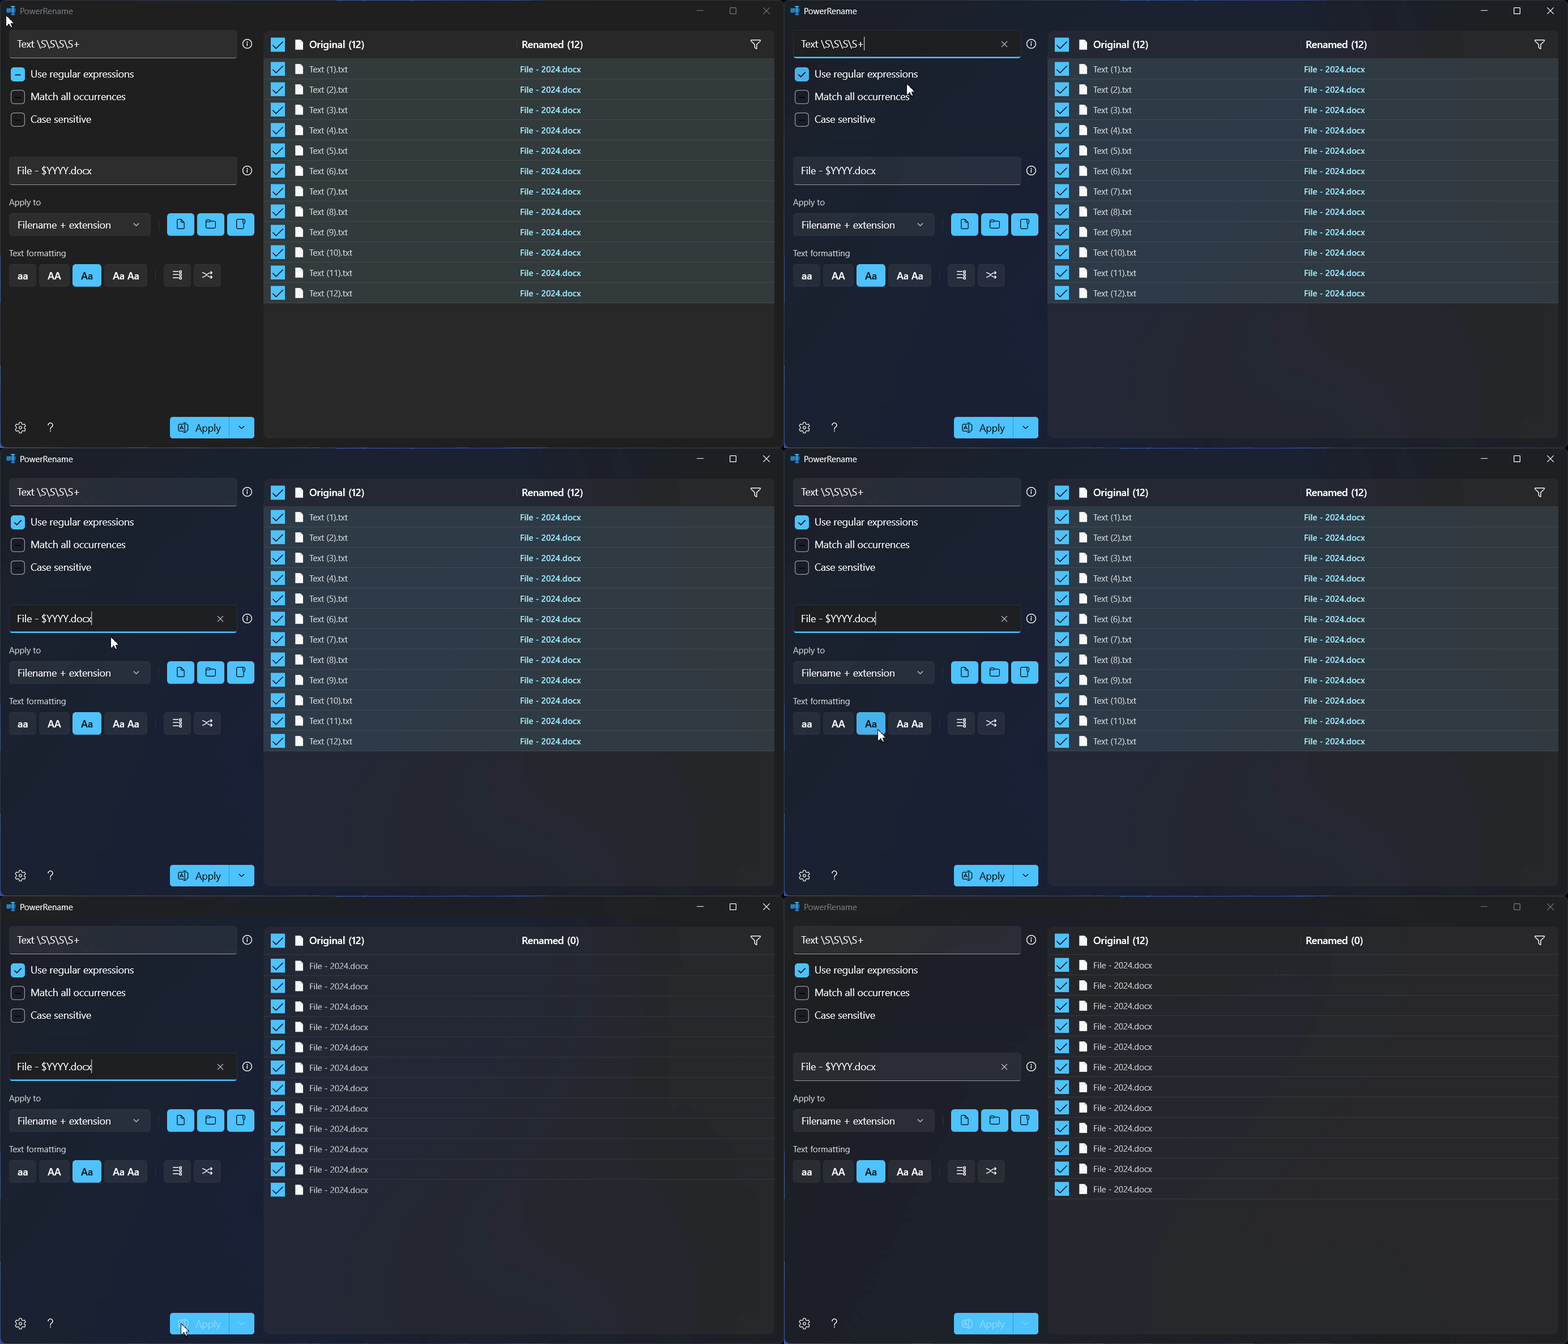
As shown in the image above, I entered “Text \S\S\S\S+” in the search field. Here, “Text” looks for the word “Text,” while “\S” searches for any non-whitespace character, and “\S+” matches one or more non-whitespace characters. In the “Replace with” field, I used “File – $YYYY.docx.” This replaces the word “Text” with “File,” and “$YYYY” adds the year, represented by four or five digits depending on the calendar used. When you click the Apply button, it renames the files based on the regex pattern.
If you don’t know any regex, don’t worry! I’ve included some basic regex patterns that might help you.
| Regex Pattern | Regex Explanation |
|---|---|
| $YYYY | The full year in four or five digits. |
| $YY | The last two digits of the year, adding a zero if needed. |
| $Y | The last digit of the year. |
| $MMMM | The full name of the month. |
| $MMM | The short form of the month name. |
| $MM | The month as numbers with a zero at the front if it’s a single-digit. |
| $M | The month as numbers without a zero at the front for single digits. |
| $DDDD | The full name of the day of the week. |
| $DDD | The short form of the day of the week. |
| $DD | The day of the month as numbers with a zero at the front if it’s a single-digit. |
| $D | The day of the month as numbers without a zero for single digits. |
| $hh | Hours with a zero in front if it’s a single-digit. |
| $h | Hours without a zero in front for single digits. |
| $mm | Minutes with a zero in front if it’s a single-digit. |
| $m | Minutes without a zero in front for single digits. |
| $ss | Seconds with a zero in front if it’s a single-digit. |
| $s | Seconds without a zero in front for single digits. |
| $fff | Milliseconds in three digits. |
| $ff | The first two digits of the milliseconds. |
| $f | The first digit of the milliseconds. |
I have added some commonly using Search For regex expressions:
| Search For | Description |
|---|---|
| ^ | Matches the beginning of the filename. |
| $ | Matches the end of the filename. |
| .* | Matches all the text in the filename. |
| ^foo | Matches text that starts with “foo.” |
| bar$ | Matches text that ends with “bar.” |
| ^foo.*bar$ | Matches text that starts with “foo” and ends with “bar.” |
| .+?(?=bar) | Matches everything up to “bar.” |
| foo[\s\S]*bar | Matches everything between and including “foo” and “bar.” |
| (.*).png → foo_$1.png | Adds “foo_” at the beginning of all PNG file names. |
| (.*).png → $1_foo.png | Adds “_foo” at the end of all PNG file names. |
| (.*) → $1.txt | Adds “.txt” to the end of all file names. |
| (^\w+.$)|(^\w+$) → $2.txt | Adds “.txt” to file names that do not already have an extension. |
| (\d\d)-(\d\d)-(\d\d\d\d) or (\d{2})-(\d{2})-(\d{4}) → $3-$2-$1 | Changes date format: “29-03-2020” becomes “2020-03-29.” |
| ^(.{n})(.) or (.)(.{n})$ → $1foo$2 | Inserts “foo” n characters from the start or end of the filename. |
| ^.{n} or .{n}$ → nothing | Removes n characters from the beginning or end of the filename. |
Using Boost Library:
The Boost library in PowerRename is a set of tools that help with complex text tasks, like finding patterns using regular expressions (regex). It makes it easier for PowerRename to search, find, and replace text in file names based on the patterns you set. This helps you rename multiple files quickly and easily.
You can simply enable by it from the PowerToys’ PowerRename function settings.
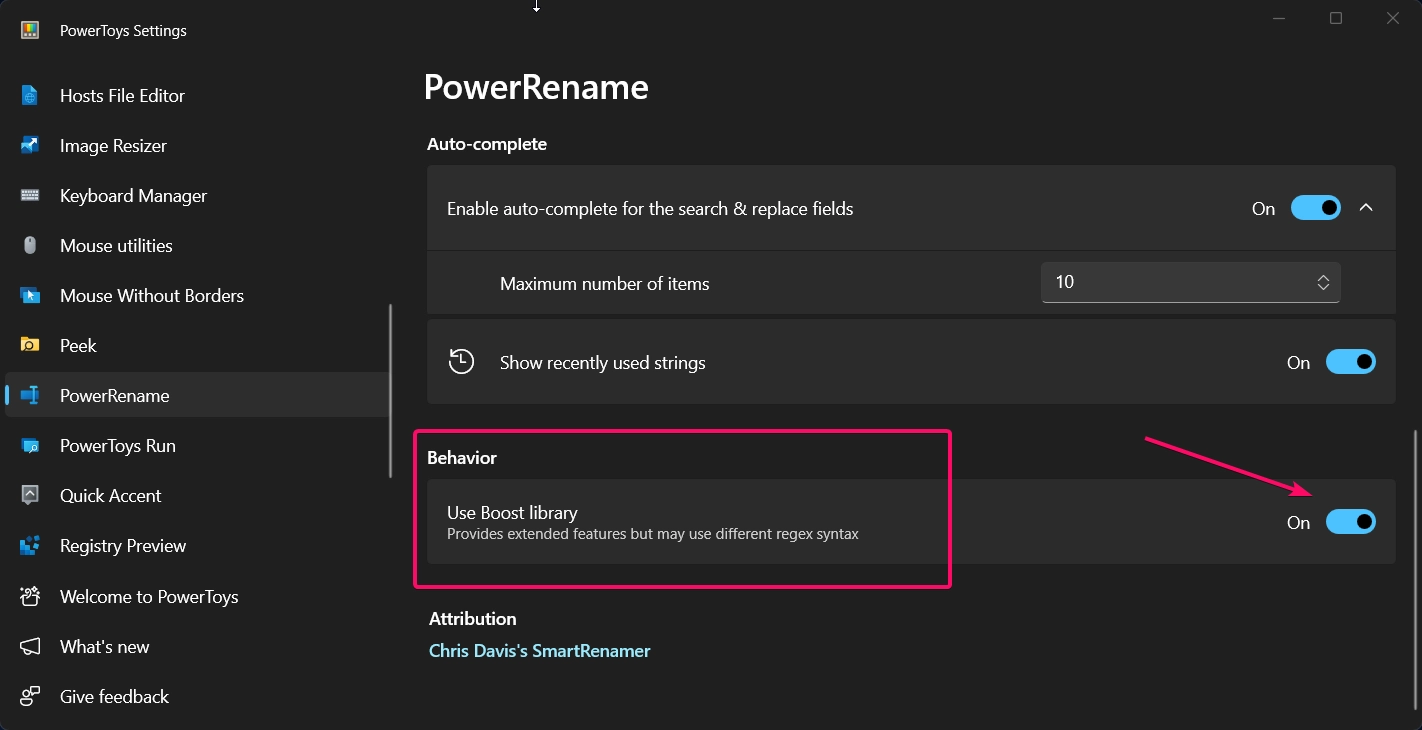
You can find more boost library regular expression here: https://www.boost.org/doc/libs/1_86_0/libs/regex/doc/html/boost_regex/syntax/perl_syntax.html
Conclusion:
That’s it, folks! I’ve shared everything I know about using the PowerRename tool to rename multiple files. I’ve explained each feature in the simplest way to help you learn quickly and use it for your needs. If you’re new to regex, I recommend using the table as a reference. If you have any questions or suggestions, please comment below. For more tutorials, visit WinSides.
Related Articles:
- Enable Microsoft XPS Document Writer using CMD & PowerShell
- How to Configure Touchpad Gestures on Windows 11?
- How to Auto Hide Taskbar on Windows 11?
We combine expert insights with user-friendly guidance. We thoroughly research and test everything to give you reliable and simple to understand tech guides. Please take a look at our publishing process to understand why you can trust Winsides.

