How to Enable Airplane Mode in Windows 11?- 4+ Best Ways
5 Easy methods to quickly enable/disable the Airplane mode in Windows 11
Recently, I was on a flight and needed to disable all wireless communications on my Windows 11 laptop to comply with airline regulations. I wasn’t sure how to enable Airplane mode, so I did some research. After finding multiple methods, I realized how useful this information could be for others in similar situations. Here, I’m sharing five different ways to enable Airplane mode in Windows 11, so you can easily manage your device’s wireless connections whenever you need to.
During my search, I found that enabling Airplane mode isn’t just useful for flights. It can also help when you’re in a meeting and want to avoid distractions, or if you’re trying to save battery life by turning off unnecessary wireless connections. Understanding these methods can be a real lifesaver in various scenarios. With this knowledge, you’ll be prepared to quickly and efficiently switch to Airplane mode on your Windows 11 pc device.
Key Points:
- Use the following keyboard shortcut Winkey + A.
- Quick Settings Panel or Action Center will be appear at your right bottom on your screen.
- Next to the WiFi & Bluetooth, you can see the Airplane Mode icon.
- Simply, click the icon to enable the Airplane Mode on Windows 11 easily.
5 Easy Ways to Enable Airplane Mode in Windows:
You can use any of the following methods. The methods include using keyboard shortcuts, Command Prompt, PowerShell, and more.
Method 1: Action Center:
- Step 1: Click on the network icon or the speaker icon located on the right side of the taskbar. This will open the Action Center.

- Step 2: In the Action Center, look for the “Airplane mode” tile.
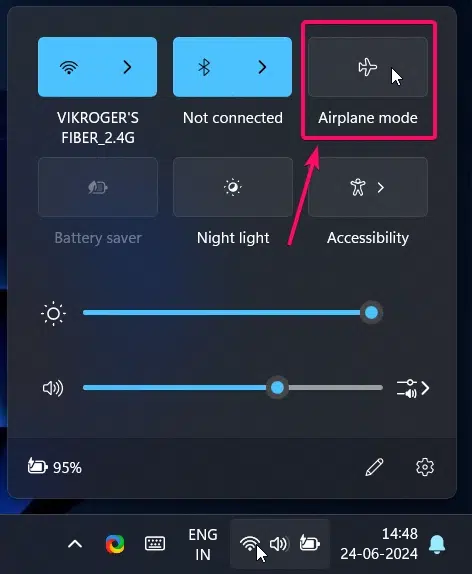
- Step 3: Click on the “Airplane mode” tile to toggle it on or off. When turned on, it disables all wireless communication such as WiFi and Bluetooth.
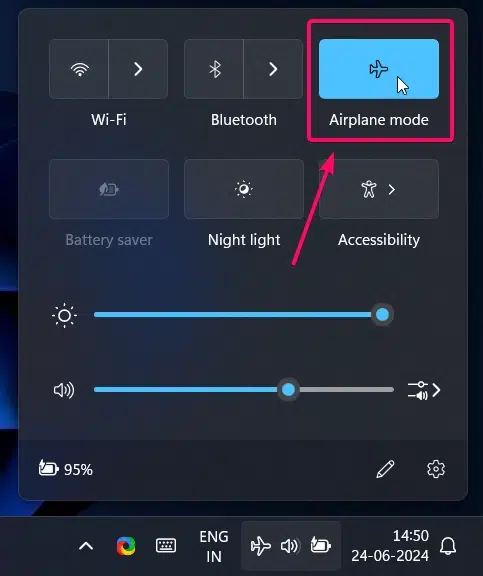
As you can see in the above image, the Airplane mode is enabled and it instantly disables the WiFi and bluetooth wireless communications systems on my pc.
Method 2: Settings App:
- Step 1: Press
Win + Ito open the Settings app.
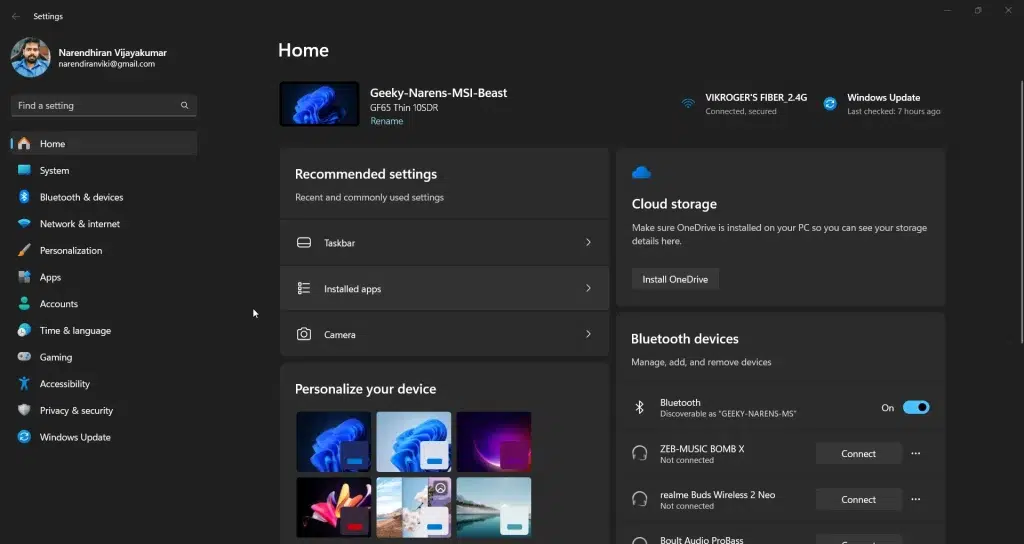
- Step 2: Goto “Network & internet” from the sidebar.

- Step 3: Click on “Airplane mode” in the left-hand menu.
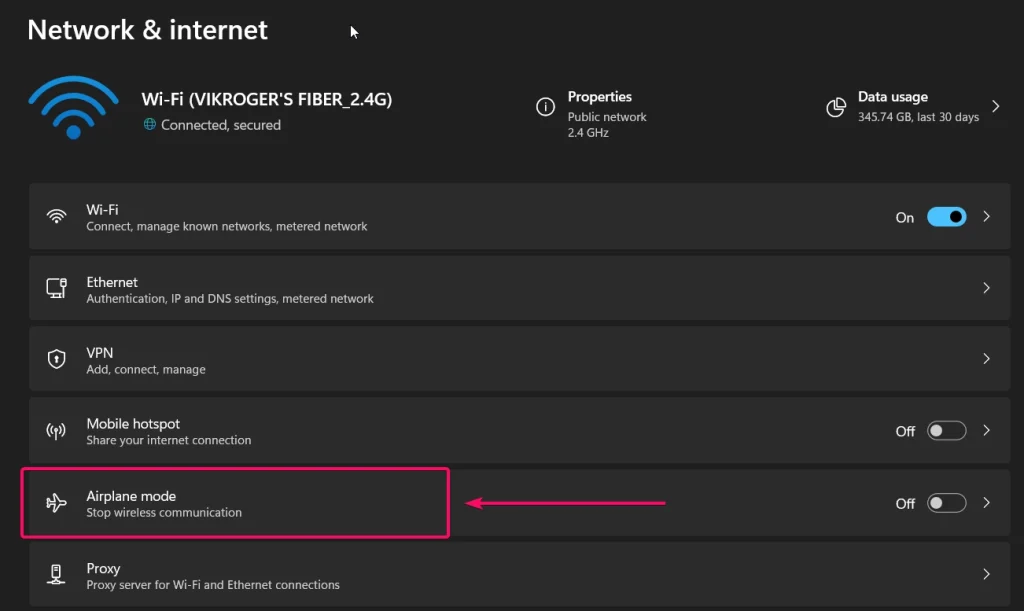
- Step 4: Toggle the switch under “Airplane mode” to turn it on. This will disable all wireless communications on your device.
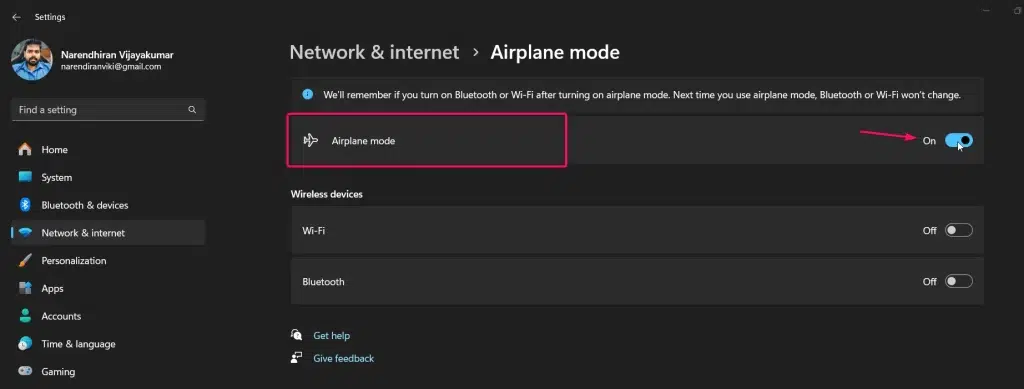
This is one of the easiest ways. You can also skip the 4th step. In the 3rd step, near the Airplane mode option, you will see the toggle switch. Click on it to enable Airplane mode right there.
Method 3: WinKey Shortcut:
- Use the keyboard shortcut
Winkey + A. This will open the Quick Settings Panel, also known as the Action Center, at the bottom right of your screen.
- In the Quick Settings Panel, next to the WiFi and Bluetooth icons, you will see the Airplane Mode icon.

- Simply click on the Airplane Mode icon. This will easily enable Airplane Mode on your Windows 11 device.

This method is one of the easiest compared to all the other methods. You can enable Airplane mode and disconnect all communication services instantly on your Windows device.
The upcoming methods involve using Command Prompt and PowerShell, which may require a bit of coding knowledge. The above methods use graphical user interfaces (GUI), while the following ones are coding interfaces. If you are willing to choose a slightly harder way, then proceed with the methods below.
Method 4: Command Prompt:
- Step 1: Open Command Prompt as an administrator. You can do this by typing “cmd” in the Start menu search bar, right clicking on Command Prompt, and selecting “Run as administrator“
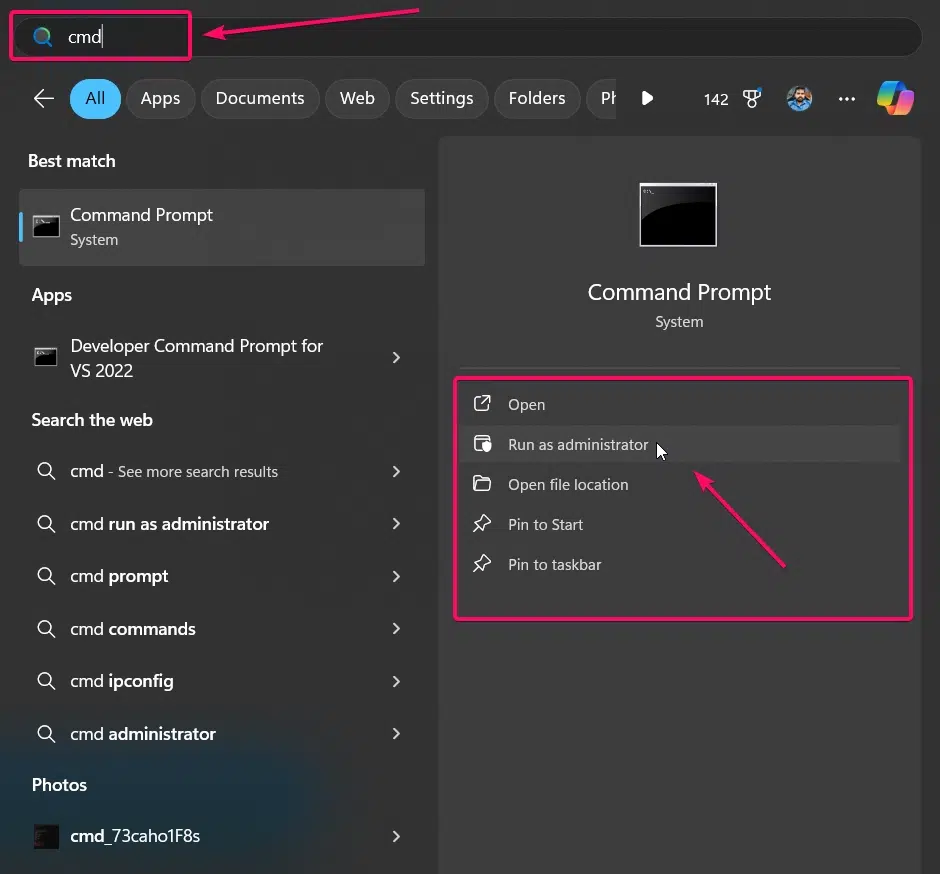
- Step 2: To disable WiFi, Bluetooth and enable Airplane mode, type the command:
netsh interface set interface name="Wi-Fi" admin=disableand click the Enter button.
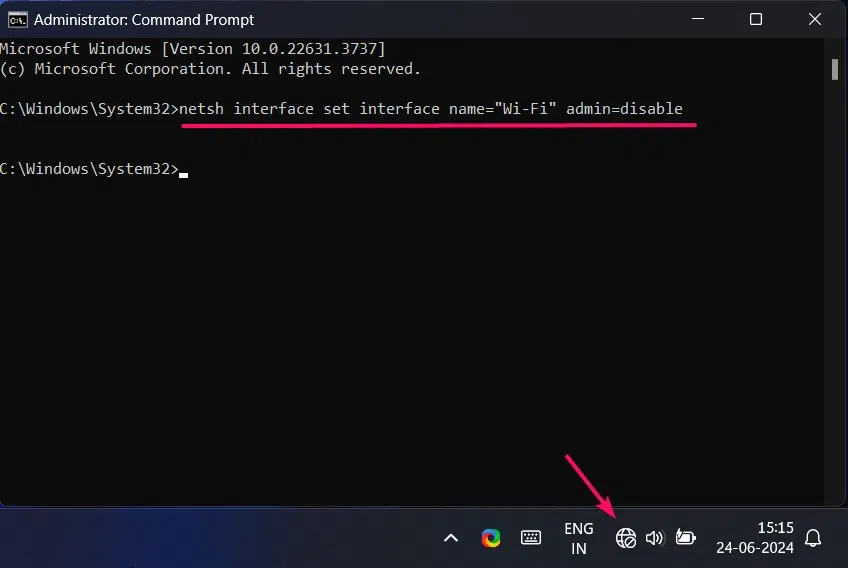
- Step 3: To re-enable Wi-Fi, type the command:
netsh interface set interface name="Wi-Fi" admin=enableand press Enter button. This will turn WiFi back on and disable Airplane mode.
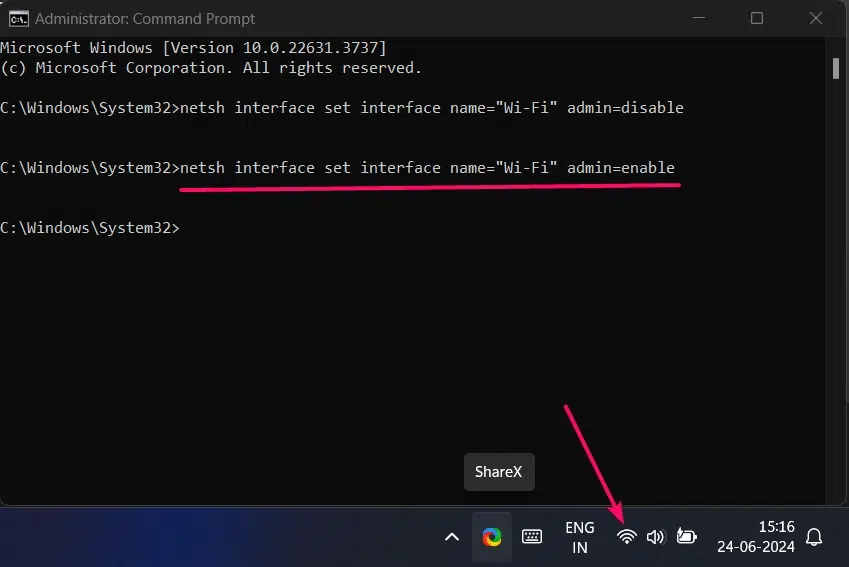
The above tips seem quite geeky, right? They may appear a little hard, but they are a fun way to disable your wireless communications from your PC.
Method 5: PowerShell:
- Step 1: Open PowerShell as an administrator. You can do this by typing “PowerShell” in the Start menu search bar, right-clicking on Windows PowerShell, and selecting “Run as administrator“
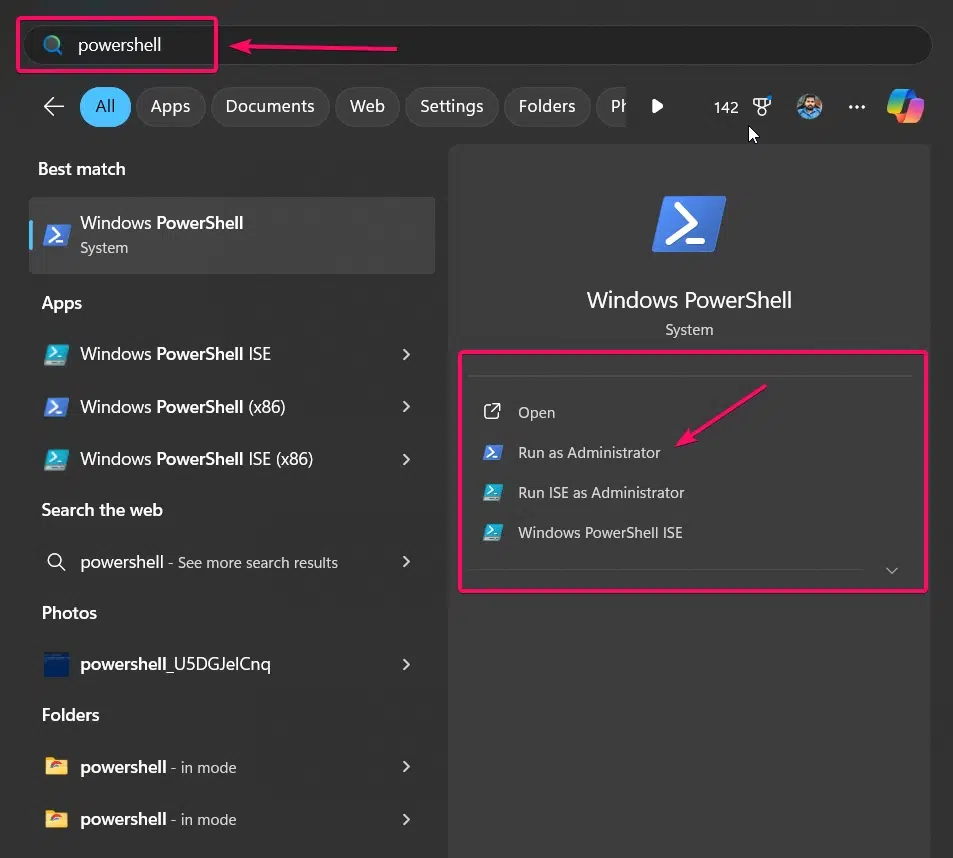
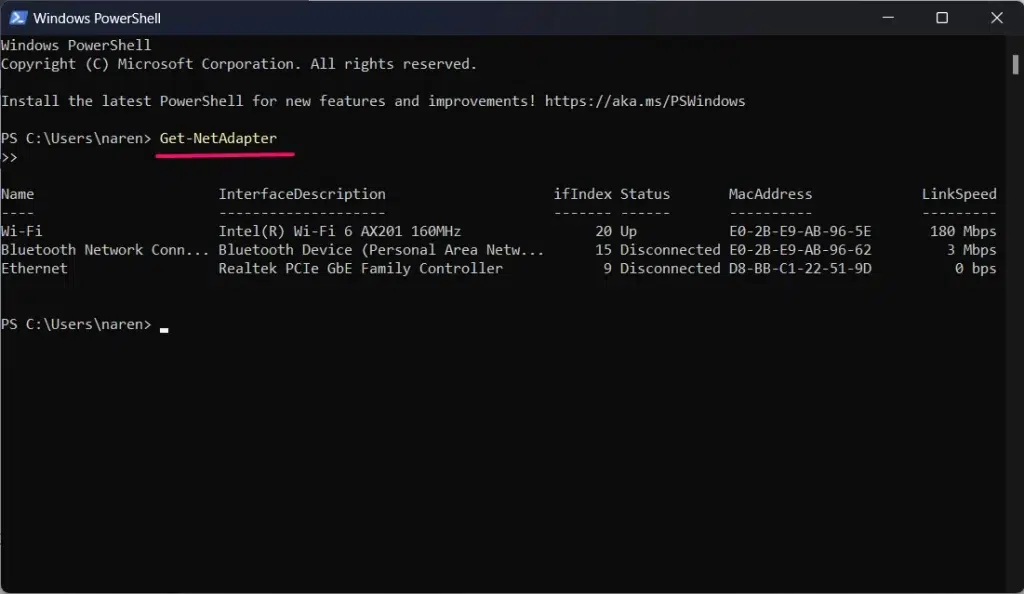
- First, list all network adapters to find the correct name use the command
Get-NetAdapter
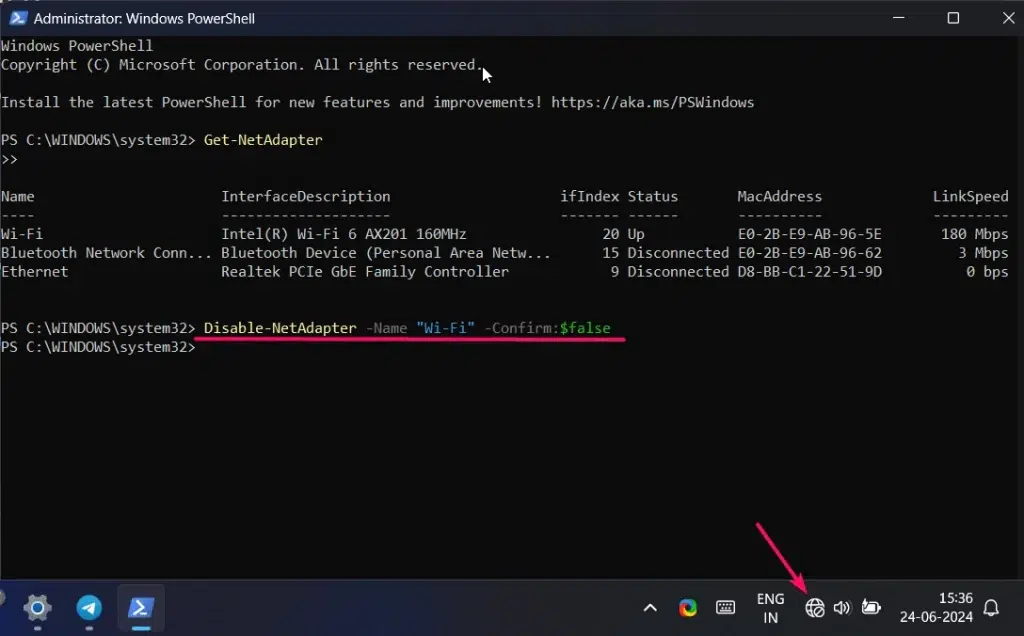
- Use the following command to disable the WiFi adapter
Disable-NetAdapter -Name "Wi-Fi" -Confirm:$false
- Use the following command to enable the Wi-Fi adapter
Enable-NetAdapter -Name "Wi-Fi" -Confirm:$false
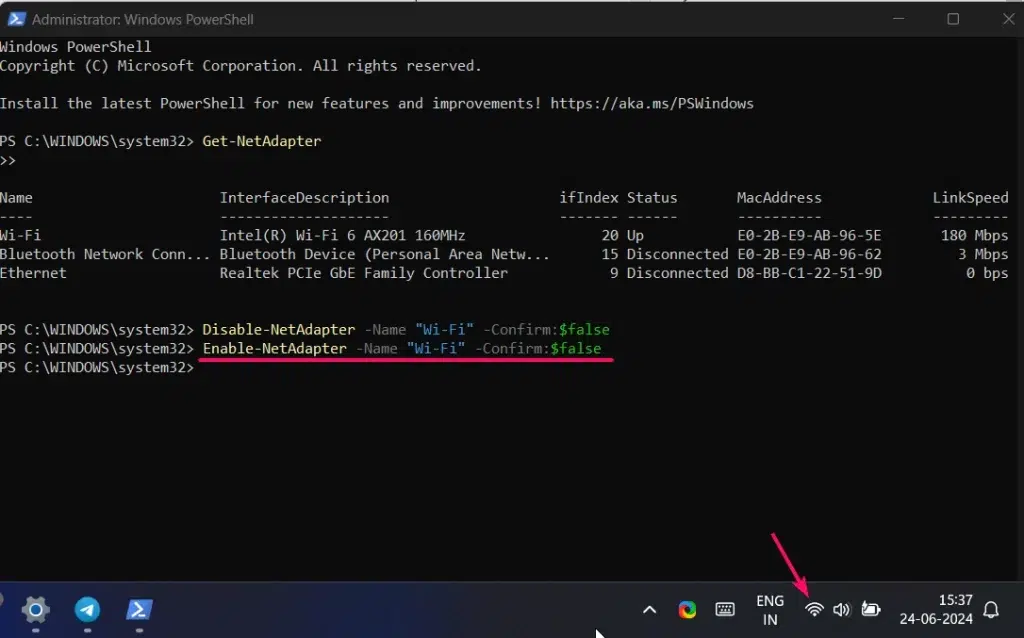
Note: You must access PowerShell in “Run as Administrator” mode. otherwise, you will encounter errors or the command will not work.
Conclusion:
Enabling Airplane mode on your Windows 11 device can be incredibly useful in various situations, from complying with airline regulations to avoiding interruptions during important meetings. By following the methods I’ve outlined whether using the Quick Settings Panel, Settings app, keyboard shortcuts, Command Prompt, or PowerShell you’ll be able to manage your wireless communications with ease. I hope these tips help you quickly and efficiently enable Airplane mode whenever you need it. Find more articles on Winsides.com.
Related Articles:
We combine expert insights with user-friendly guidance. We thoroughly research and test everything to give you reliable and simple to understand tech guides. Please take a look at our publishing process to understand why you can trust Winsides.


Your article helped me a lot, Thanks!
Hey Silvestrini,
Thank you for your feedback, Read more interesting tutorials on our blog: WinSides.com