Before getting into the tutorial, it’s important to understand a little about the font cache in Windows 11. Cache is a technology that stores temporary files essential for software to work quickly and efficiently. Font cache works similarly. The Windows 11 OS caches the installed and activated fonts in a temporary folder, which helps ensure that the Windows 11 interface remains fast and optimized.
Why Font Cache Needs to Be Deleted?
You might need to delete the font cache for the following reasons:
- Over a time of usage, the cache files may get corrupted and leads to a various issues such as missing fonts or distorted fonts.
- Newly installed fonts might not be reflected until the font cache is deleted.
Key Points:
- Press
Win + R, typeservices.msc, and pressEnter.- In the Services window, find and right-click on Windows Font Cache Service.
- Select Stop option.
Five Tested Methods to Delete Font Cache in Windows 11:
The methods described below are 100% effective and have been personally tested. I recommend using the method “Delete Font Cache via Font Cache Service” for a quick and efficient solution.
Method 1: Using the Services and File Explorer:
Stop the Windows Font Cache Service:
- Use the keyboard shortcut
Win + Rto open the Run dialog box.
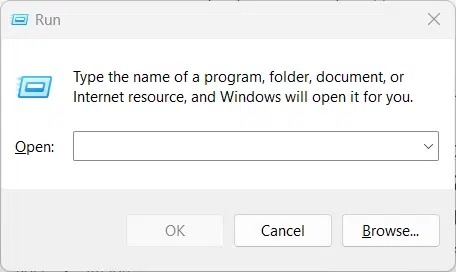
- Now you need to type
services.mscand pressEnterbutton to open the Services window.
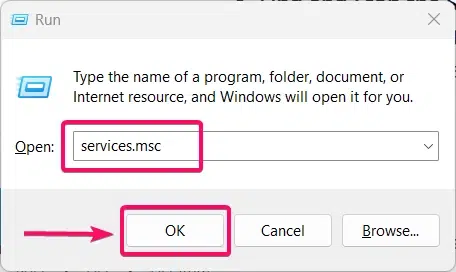
services.msc- In the Services window, you need to locate the Windows Font Cache Service. Right-click on it and select Stop.
- This action will temporarily disable the service, allowing you to delete the cache files without any issues.
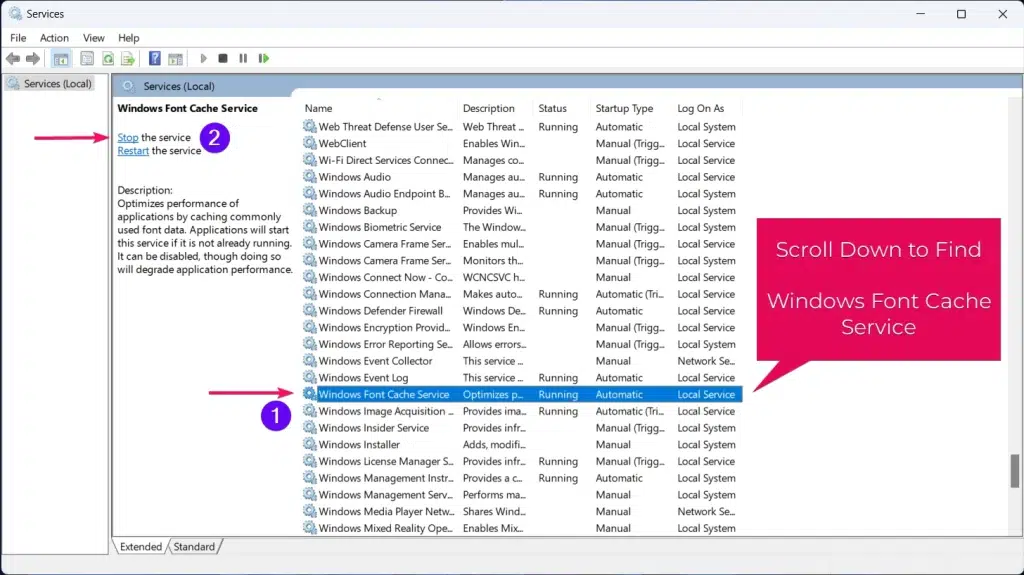
That’s it. Stopping or restarting the Windows Font Cache Service will temporarily clear the font cache on your Windows 11 PC. This is the quickest and easiest way to clear the font cache.
Method 2: Using File Explorer:
You can also remove the font cache from your PC using the File Explorer method. This is a fast and efficient method, but it requires some extra steps.
- Use the keyboard shortcut
Win + Rto open the Run dialog box.

- You need to access your pc’s app local data via the command
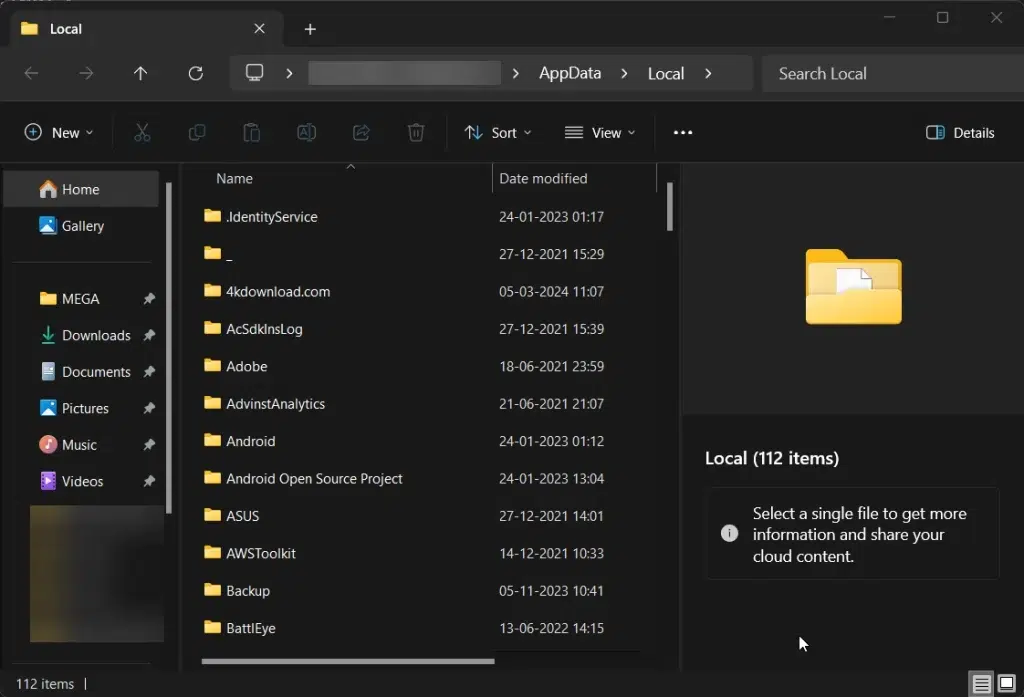
%localappdata%, Enter the command and hit the Enter button to launch the Local App Data file explorer menu.
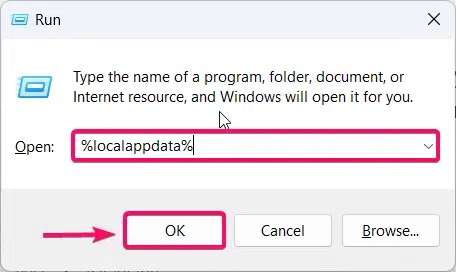
- Now Local App Data file explorer will be appear on your screen as shown in the below image.
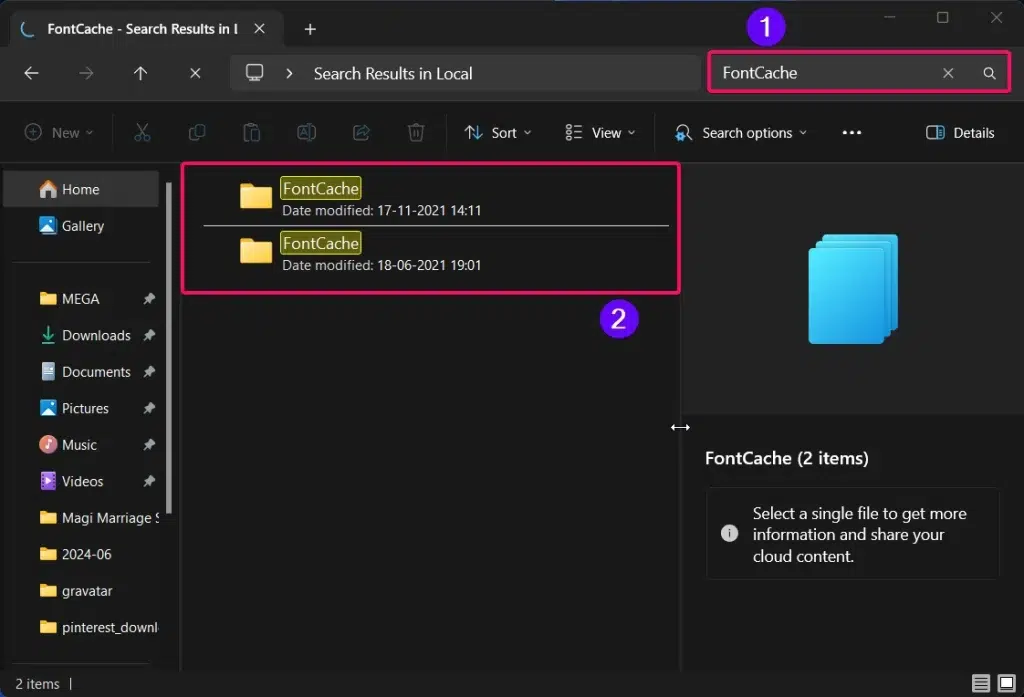
- Now in the Search Local bar in the right top of the file explorer, you need to enter the term
FontCacheand now the FontCache folders will appear on your file explorer as shown in the below image.
- Select all the FontCache Folders and delete it right away.
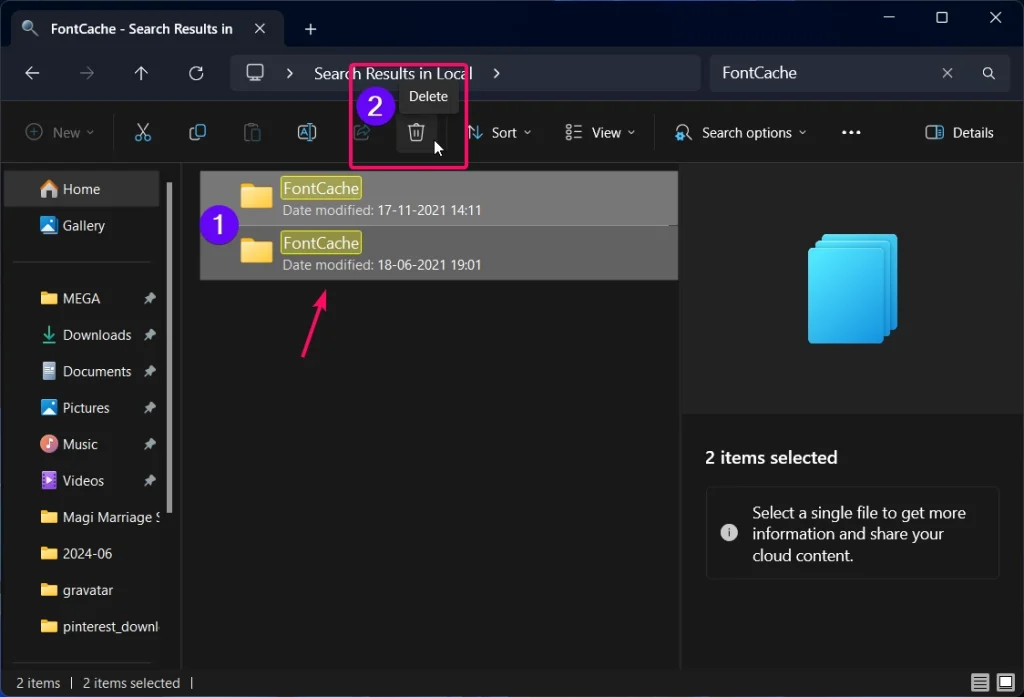
In this way, you can clear your font cache from your PC using the File Explorer method. The methods described below involve using Command Prompt, Disk Cleanup service, and batch files, which may be unfamiliar to many users. Therefore, I suggest you proceed with caution. If you are not willing to learn these new methods, I recommend using the methods mentioned above.
Method 3: Using Disk Cleanup:
Disk Cleanup is a built-in option that helps remove unnecessary files from your system, including font cache files.
- Use the keyboard shortcut
Win + Rto open the Run dialog box.

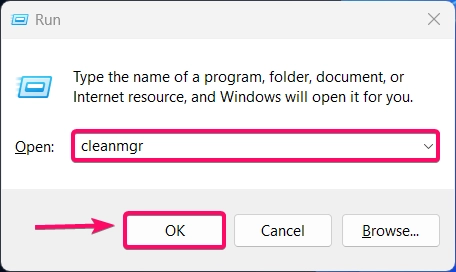
- You need to enter the command
cleanmgr, and pressEnterbutton to launch the Disk Cleanup Services.
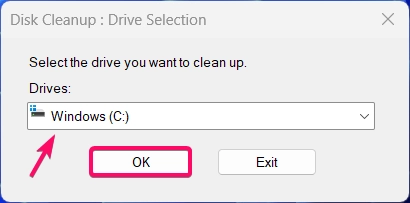
- Select the system drive (usually
C:) and click OK button.
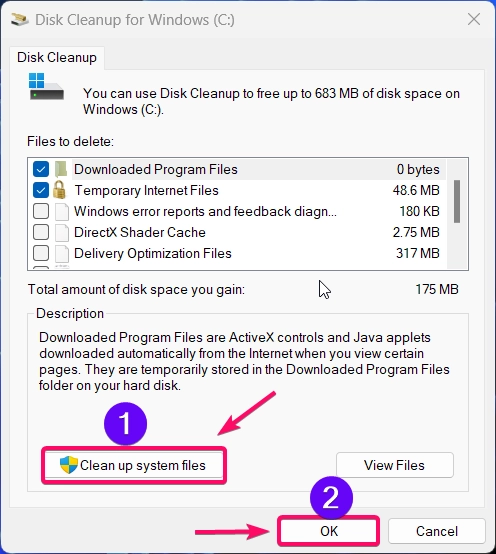
- Click on Clean up system files. Select the system drive again and click OK button.
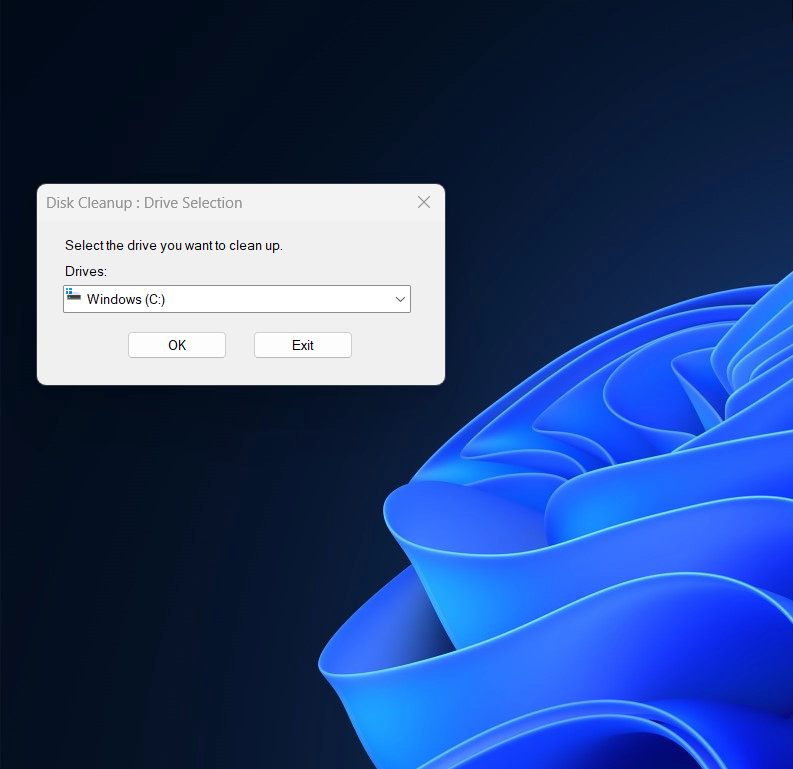
- Again you need to Select the system drive (usually
C:) and click OK button.

- Now it will launch the Disk Clean Up services and it may take upto a minutes as shown in the below image.
- Now you need to scroll down and check the options named as “Thumbnails” & “Temporary files” and click the OK button.
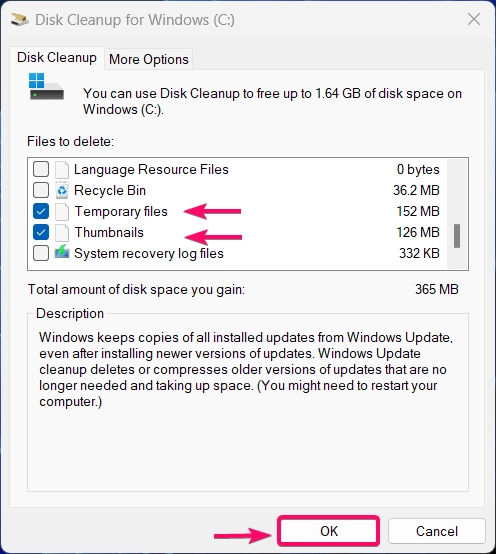
- It will remove all the temporary files and font cache files from your windows 11 pc.
Method 4: Using a Batch Script:
Creating a batch script automates the process of deleting the font cache, making it convenient for repeated use.
- You need to open Notepad and paste the following script
@echo off
net stop FontCache
net stop FontCache3.0.0.0
del /Q %windir%\ServiceProfiles\LocalService\AppData\Local\FontCache*.dat
del /Q %localappdata%\FontCache\*.dat
net start FontCache
net start FontCache3.0.0.0
pause- You need to save the file as
DeleteFontCache.bat - The file must be saved as .bat extension.
- Now you need to run the bat file as the “Run As Administrator”
- It will launch the bunch of process and end up removing all the font caches from your Windows pc.
Method 5: Using a Command Prompt:
Using Command Prompt offers a more direct method to delete the font cache.
- You need to use the keyboard shortcut
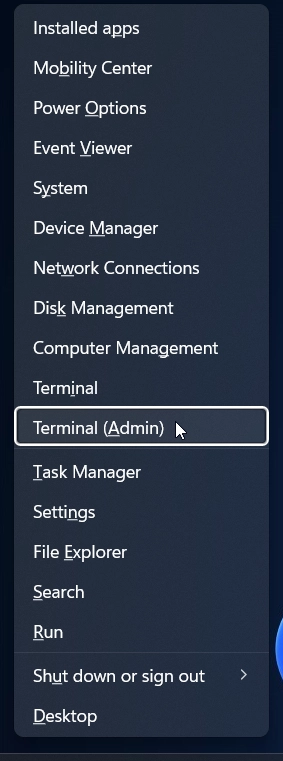
Win + Xand select Windows Terminal (Admin) or Command Prompt (Admin) from the menu
- You need to run the following commands one by one. The commands will remove the cache files,
net stop FontCache
net stop FontCache3.0.0.0- Alternatively, you can remove the fontcache files from your local app data folder using the below commands in terminal,
del /Q %windir%\ServiceProfiles\LocalService\AppData\Local\FontCache*.dat
del /Q %localappdata%\FontCache\*.dat- Restart your font cache service, for fix the cache corruption or loading the new fonts in your pc using the following commands in the terminal,
net start FontCache
net start FontCache3.0.0.0
That’s it. These are the ways to stop and restarting font cache service using Windows Terminal in your pc.
Conclusion:
In this way, you can clear your font cache from your PC using the File Explorer method. The methods below involve using Command Prompt, Disk Cleanup, and batch files. These might be new to many users who are not familiar with them, so proceed with caution. If you are not interested in learning these new methods, I recommend using the methods mentioned above instead. For more articles, i recommend you to visit our Homepage Winsides.com
Related Posts:
- Download & Install Google App for Windows 11
- What is Volume Shadow Copy on Windows 11?
- Windows 10 officially ends on October 14, 2025
- How to Uninstall Updates on Windows 11?
- DxDiag Windows 11 – What is it & How to use it for Troubleshooting?
We combine expert insights with user-friendly guidance. We thoroughly research and test everything to give you reliable and simple to understand tech guides. Please take a look at our publishing process to understand why you can trust Winsides.


