How to Run Telnet Client as Administrator on Windows 11? 4 Easy Ways!
It Enables Users to Access Remote Devices such as Servers, Network Devices, Etc, via CLI
The telnet client is a Command line Interface tool, which helps the users to communicate between the remote servers or remote devices with users around the globe. This telnet commands are widely used by IT professionals and network administrators for the advanced users needing to access remote systems via the command-line interface. This command will executed most on standard user privileges but for performing some crucial tasks you may need to run the telnet client command with elevated admin rights. You need to Run Telnet Client as Administrator for using command and its execution more effective. Follow the steps mentioned in the tutorial.
Recommended: Run Firefox As Administrator On Windows 11? 5+ Best Ways!
Prerequisites

Windows 11 comes with a lot of useful optional features. Telnet Client is one among them. Before using Telnet Client on Windows 11, kindly make sure that the feature is enabled. Otherwise, you may get the error “Windows cannot find ‘telnet’. Make sure you typed the name correctly, and then try again“. To avoid this error, we have detailed article, explaining How to Enable Telnet Client on Windows 11. Kindly refer to it.
Different Ways to run Telnet Client with Administrative Privileges on Windows 11
There are several ways to access Telnet Client with Elevated Permissions. The following are the different methods.
- Use the Start Menu and open Telnet Client as Administrator.
- Access Run Command to open Telnet Client with Administrative Privileges.
- Run New Task using Task Manager to run Telnet Client with Elevated Permissions.
- Always open Telnet Client as Administrator by creating a Dedicated Shortcut.
- Open Command Prompt or Windows PowerShell with Administrative Privileges and then open Telnet Client.
IMPORTANT: Running applications as an administrator grants elevated privileges that can significantly affect your system. Please use caution when doing so, as it can lead to Unintended System Modifications, Security Vulnerabilities, Accidental Data Loss, Unauthorized Access, Irreversible Changes, etc.
1. How to Run Telnet Client as Administrator using the Start menu on Windows 11?
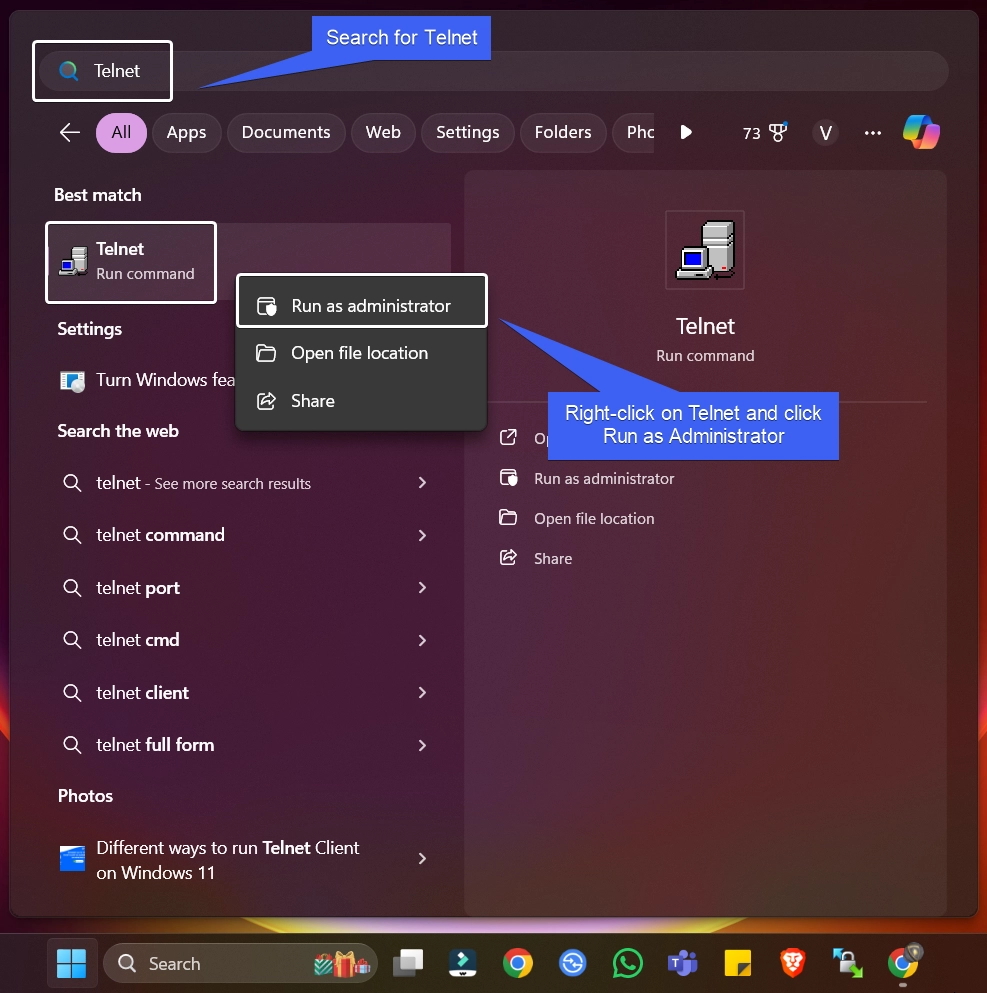
- Go to the Start menu and search for Telnet. You can also use the shortcut WinKey + S. Once you find the app, right-click on it and click “Run as Administrator“.
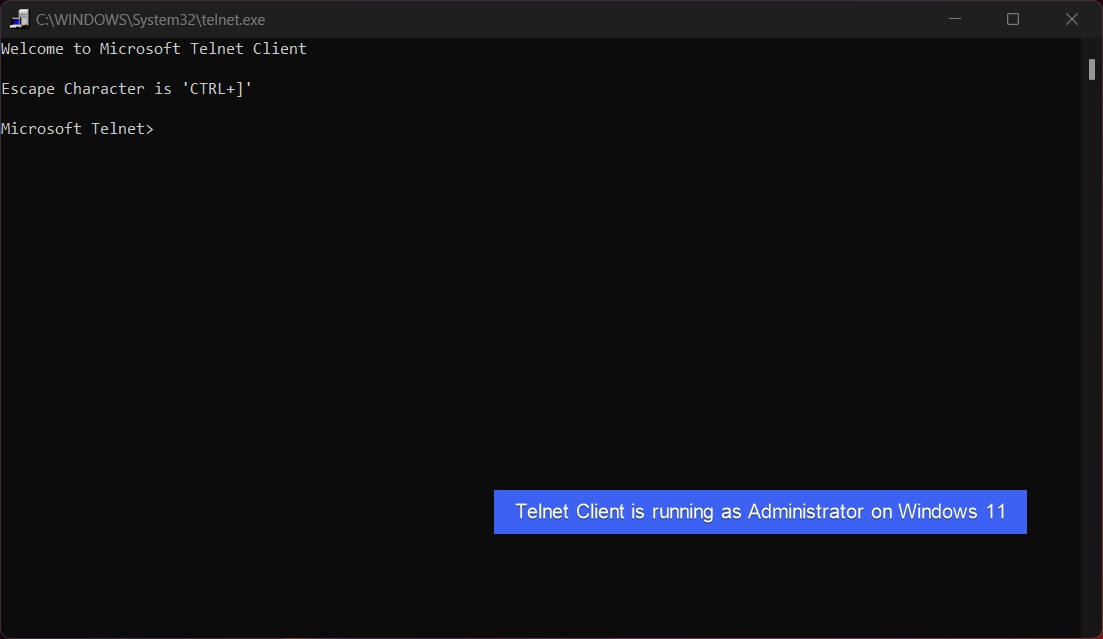
- The User Account Control will prompt your confirmation and open Telnet Client with Administrative Privileges.
2. Access the Run Command and open Telnet Client with Elevated Privileges
In this method, we will use the Run Command. The following are the steps.
- Go to The Run Command. You can either use the Start menu or you can just use the key combination WinKey + R.
- In the Run Command, type the following command
telnetand press CTRL + SHIFT + ENTER.
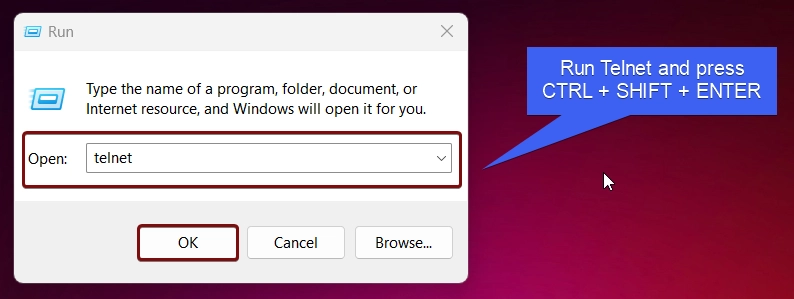
- The Syste will prompt for your confirmation and then open Telnet Client with Elevated Permissions.
3. Create New Task to run Telnet Client with Administrative Privileges using the Task Manager
- Right-click on the Taskbar and click Task Manager. You can also use the shortcut CTRL + SHIFT + ESC. This combination will open Task Manager directly.
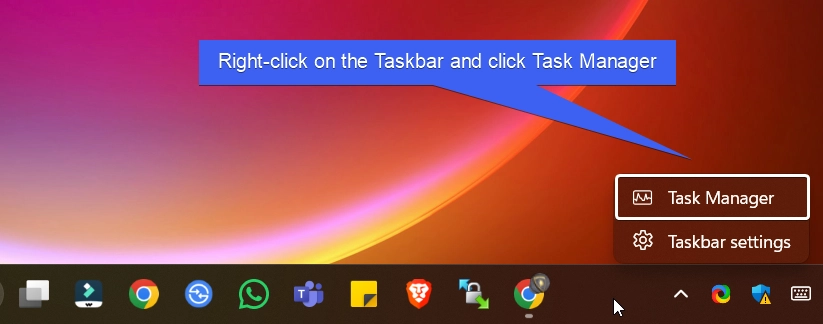
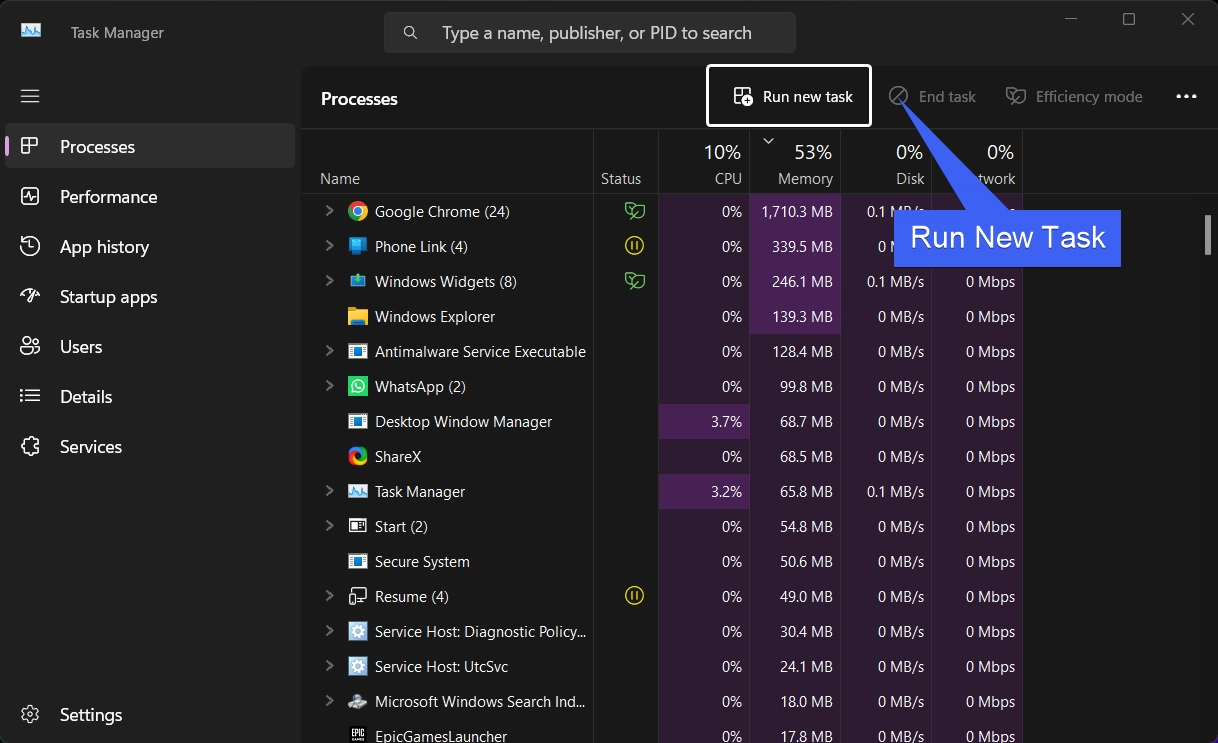
- In the Task Manager, under Processes, click on Run New Task. Create New Task dialog will pop up now.
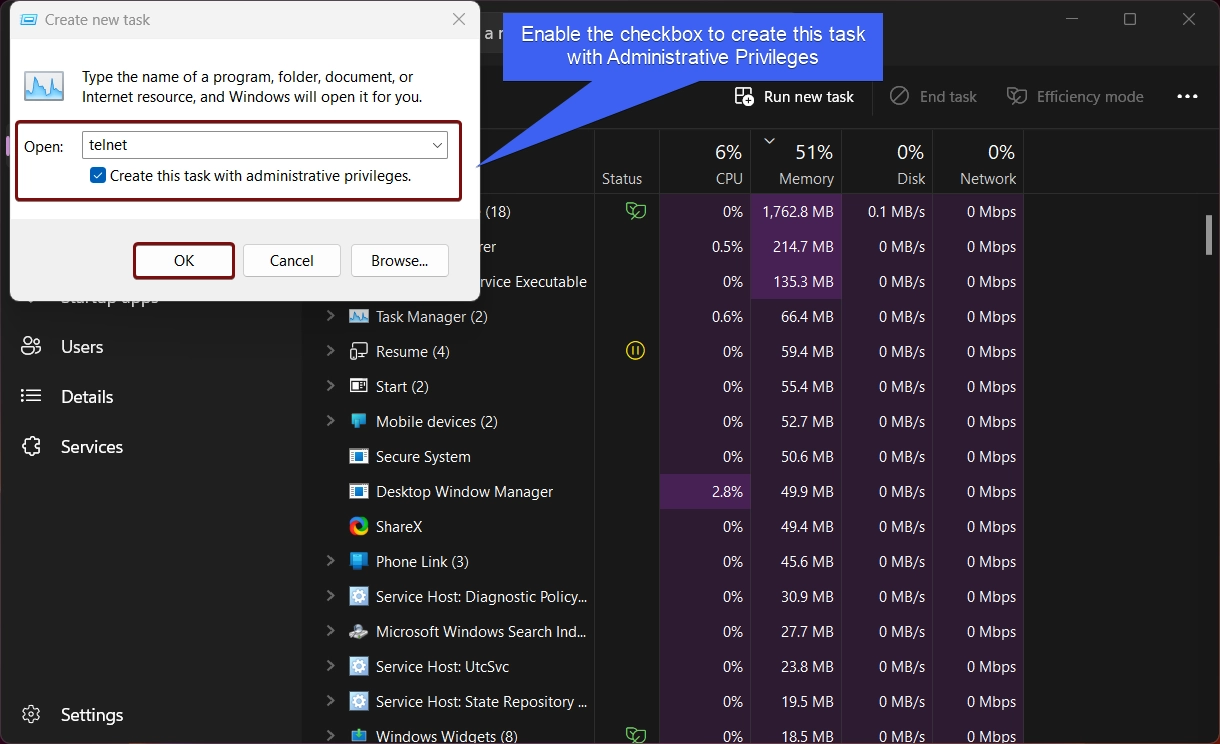
- Type the command
telnetand enable the checkbox “Create this Task with Administrative Privileges“. Finally, click OK.
4. Always Run Telnet Client as Administrator by creating a Desktop Shortcut
This method is useful for users who frequently use Telnet Client with Administrative Privileges. We will create a dedicated Desktop Shortcut for Telnet Client and set it to run with Administrative Privileges.
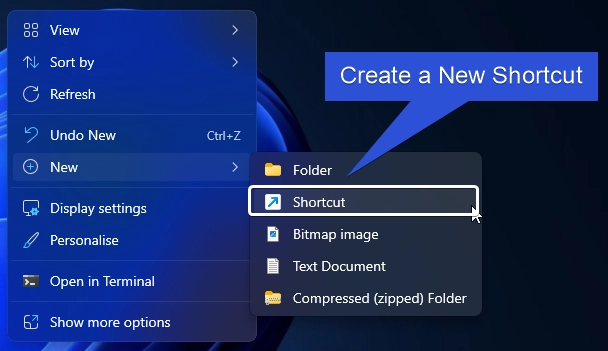
- Right-click on the Empty space of the Desktop, and click New > Shortcut.
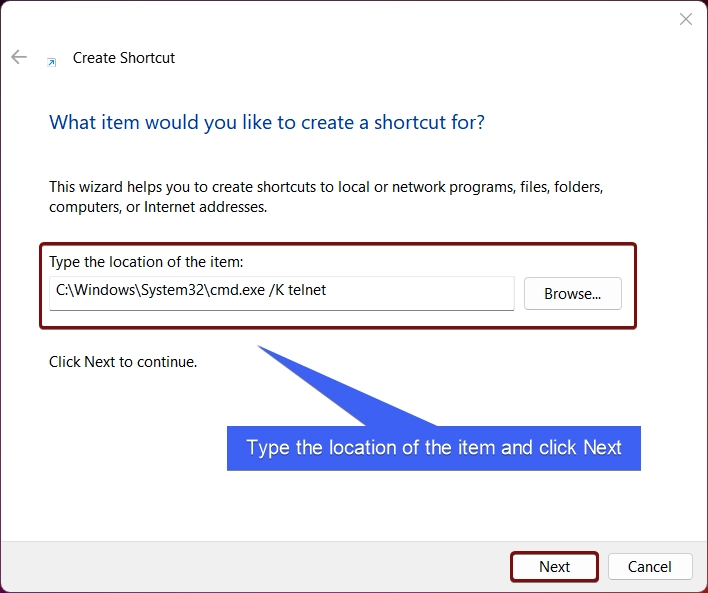
- The Create Shortcut dialog box will open now. In “Type the Location of the Item“, enter the command
C:\Windows\System32\cmd.exe /K telnetand click Next.
- By default, the system will assign the shortcut name cmd. Kindly change it to Telnet Client. Finally, click Finish.
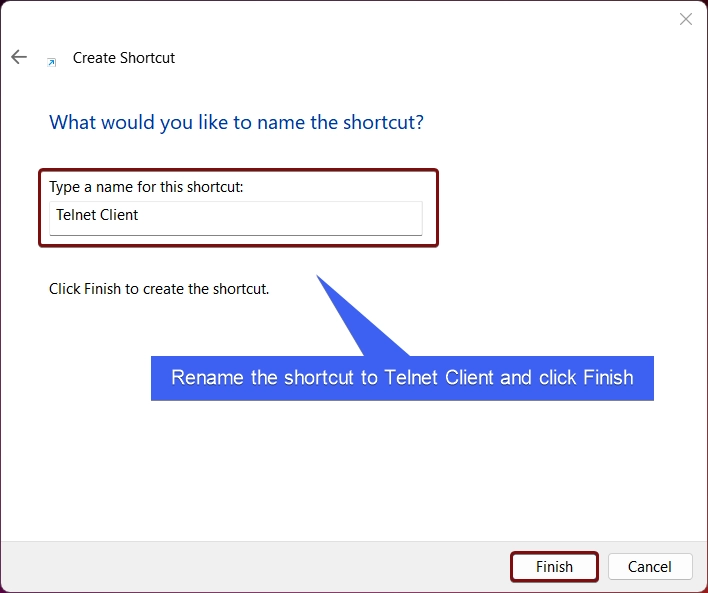
- Telnet Client Desktop Shortcut will be created.

- Right-click on the Telnet Client Shortcut and click on Properties.
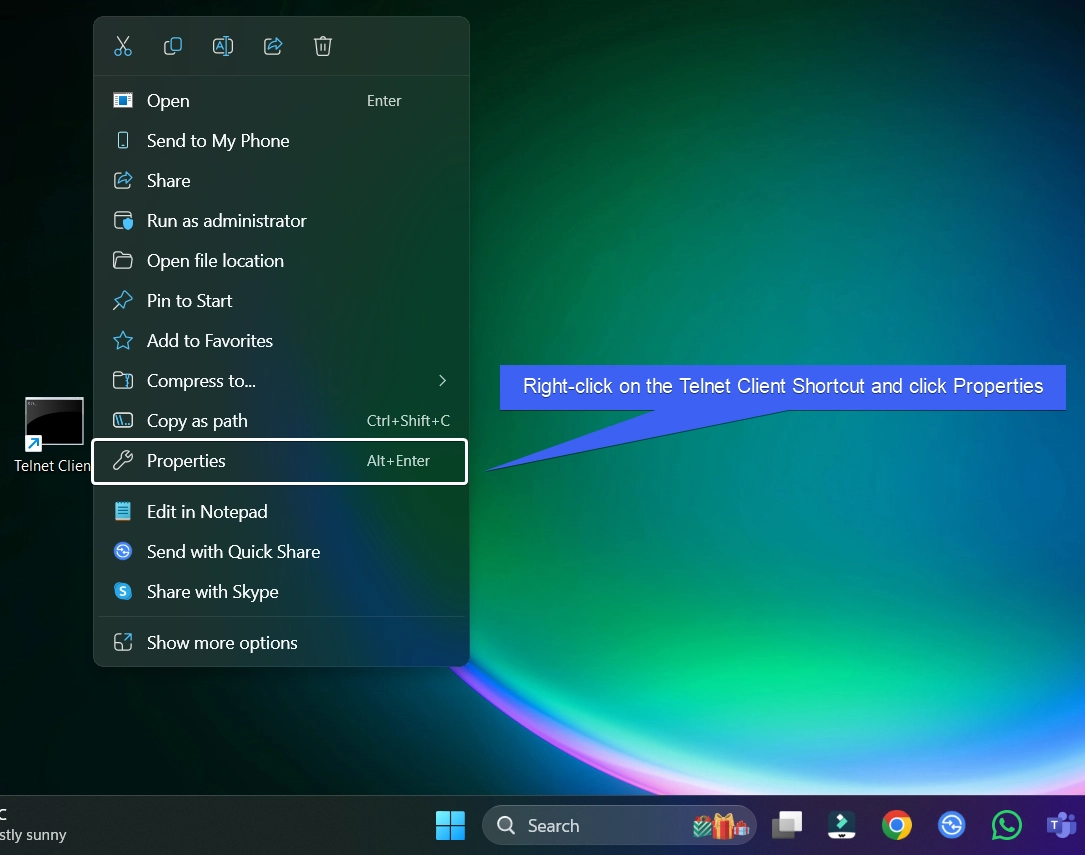
- Telnet Client Shortcut Properties will open now. Click Advanced.
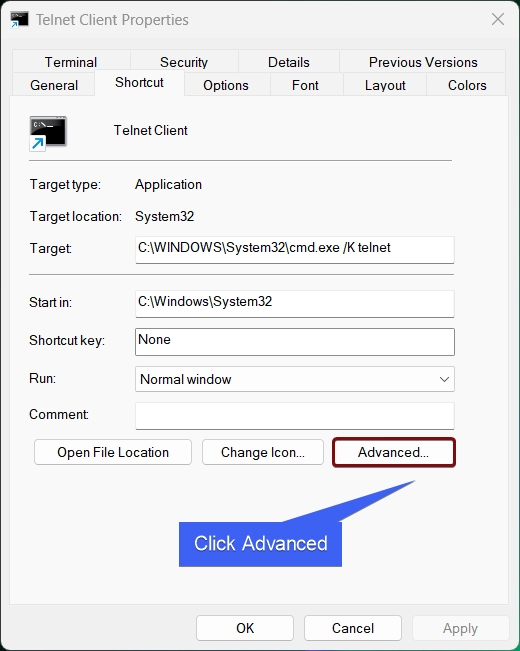
- In Advanced Properties, make sure to enable the checkbox “Run as Administrator“. Finally, click OK, and then Apply.
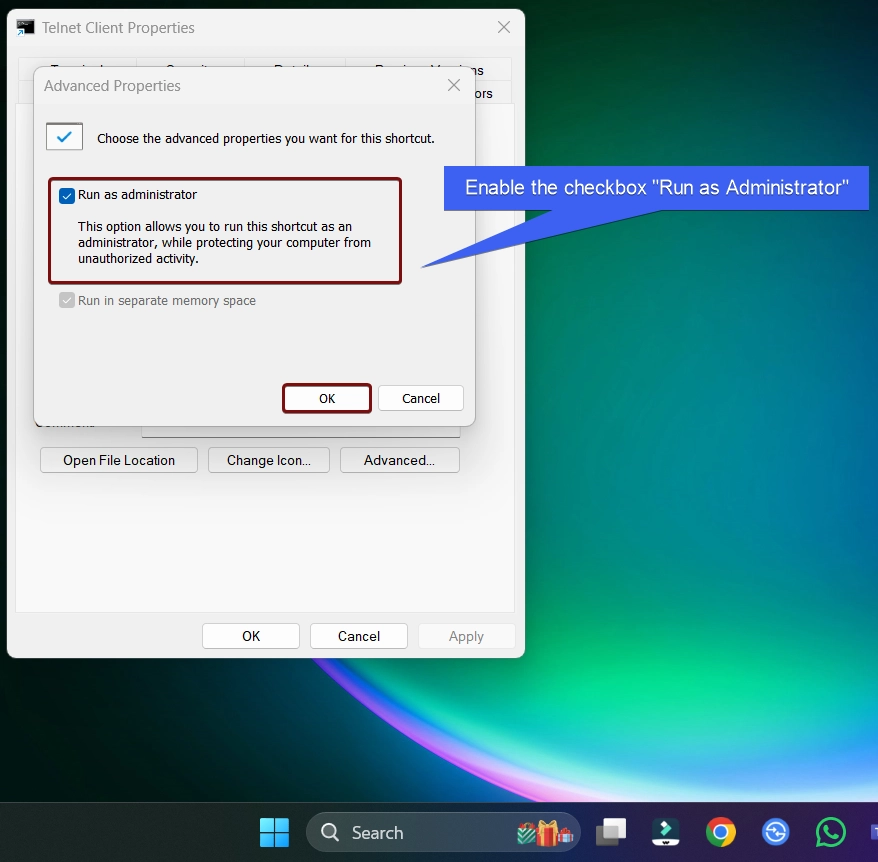
- This option allows you to run this shortcut as an administrator, while protecting your computer from unathorized activity.
- Whenever you open Telnet Client via this Desktop Shortcut, UAC will confirm and open this application as Administrator.
5. Run Command Prompt or Windows PowerShell as Administrator and open Telnet Client with Elevated Privileges
We will run Command Prompt or Windows PowerShell as Admin, and then open Telnet Client via them. By this way, we can open this app with Elevated Permissions. Here, we will use the Command Prompt for explanation, you can also use Windows PowerShell.
Recommended: Run Google Chrome As Administrator On Windows 11! {6+} Best Ways
- Go to the Run Command and type
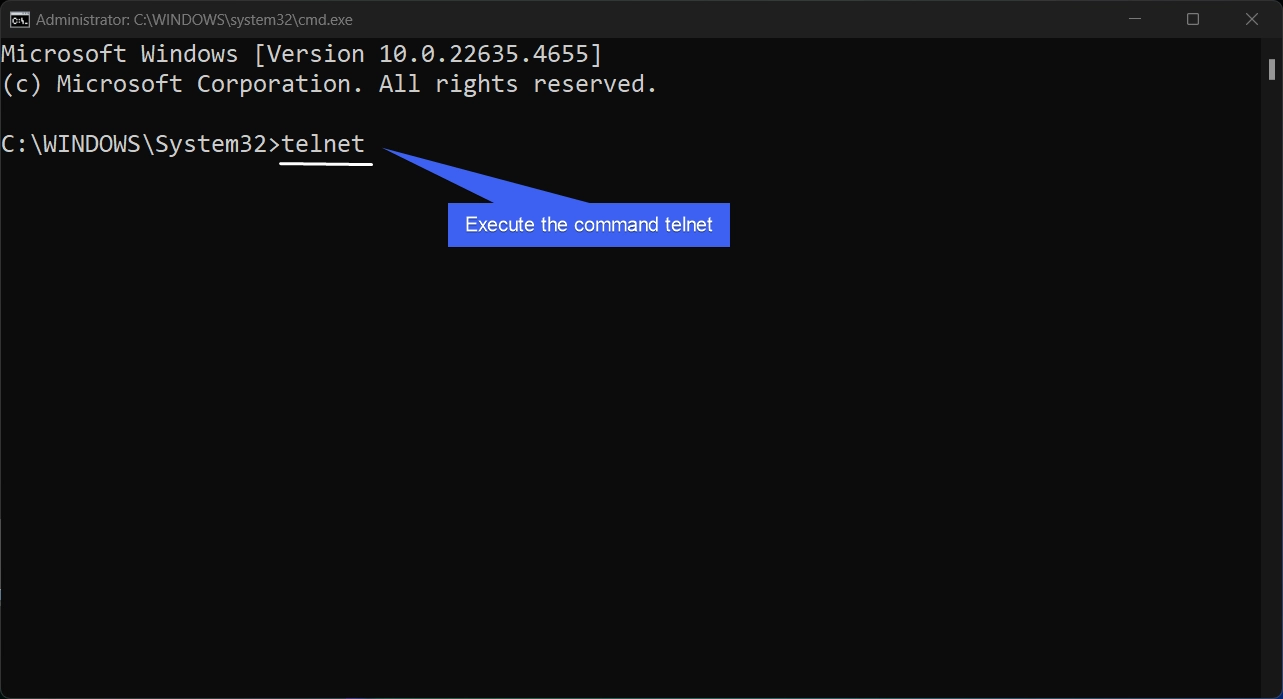
cmdand press CTRL + SHIFT + ENTER. This will open the Run Command with Administrative Privileges. - Now, the Command Prompt is open with Administrative Privileges. Execute the following Command.
telnet
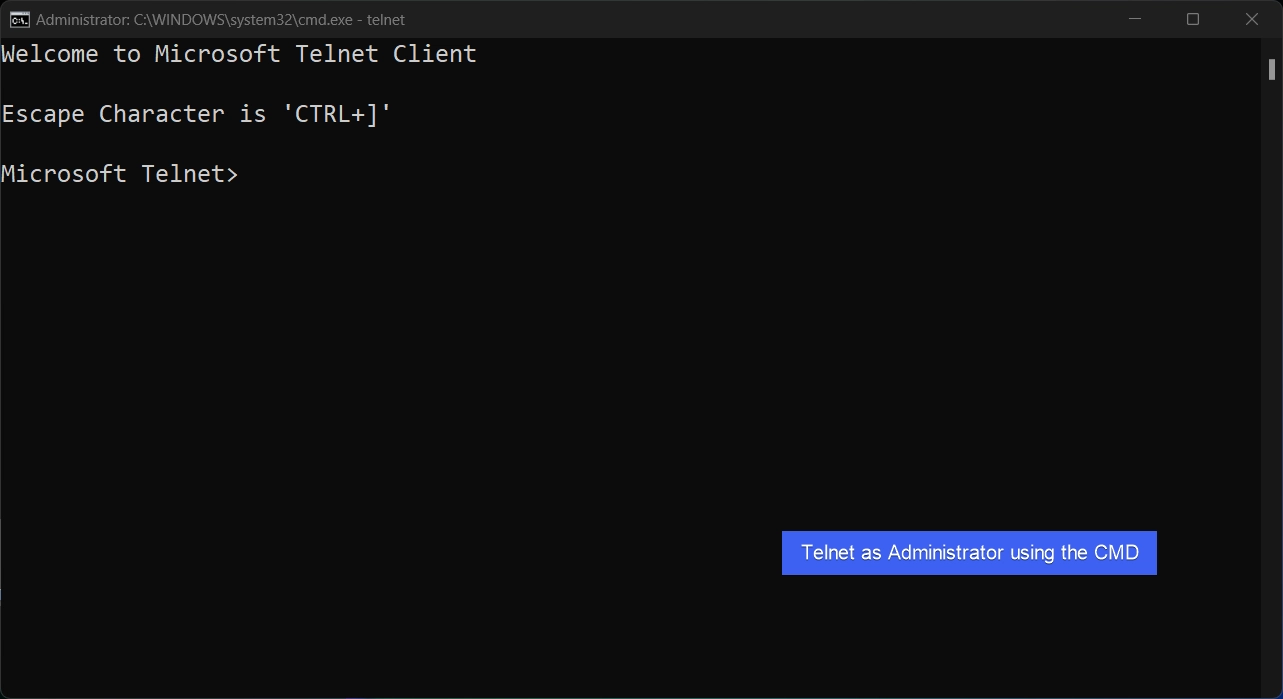
- Now, Telnet Client will run with Administrative Privileges.
Kindly be Cautious while running an App as Administrator
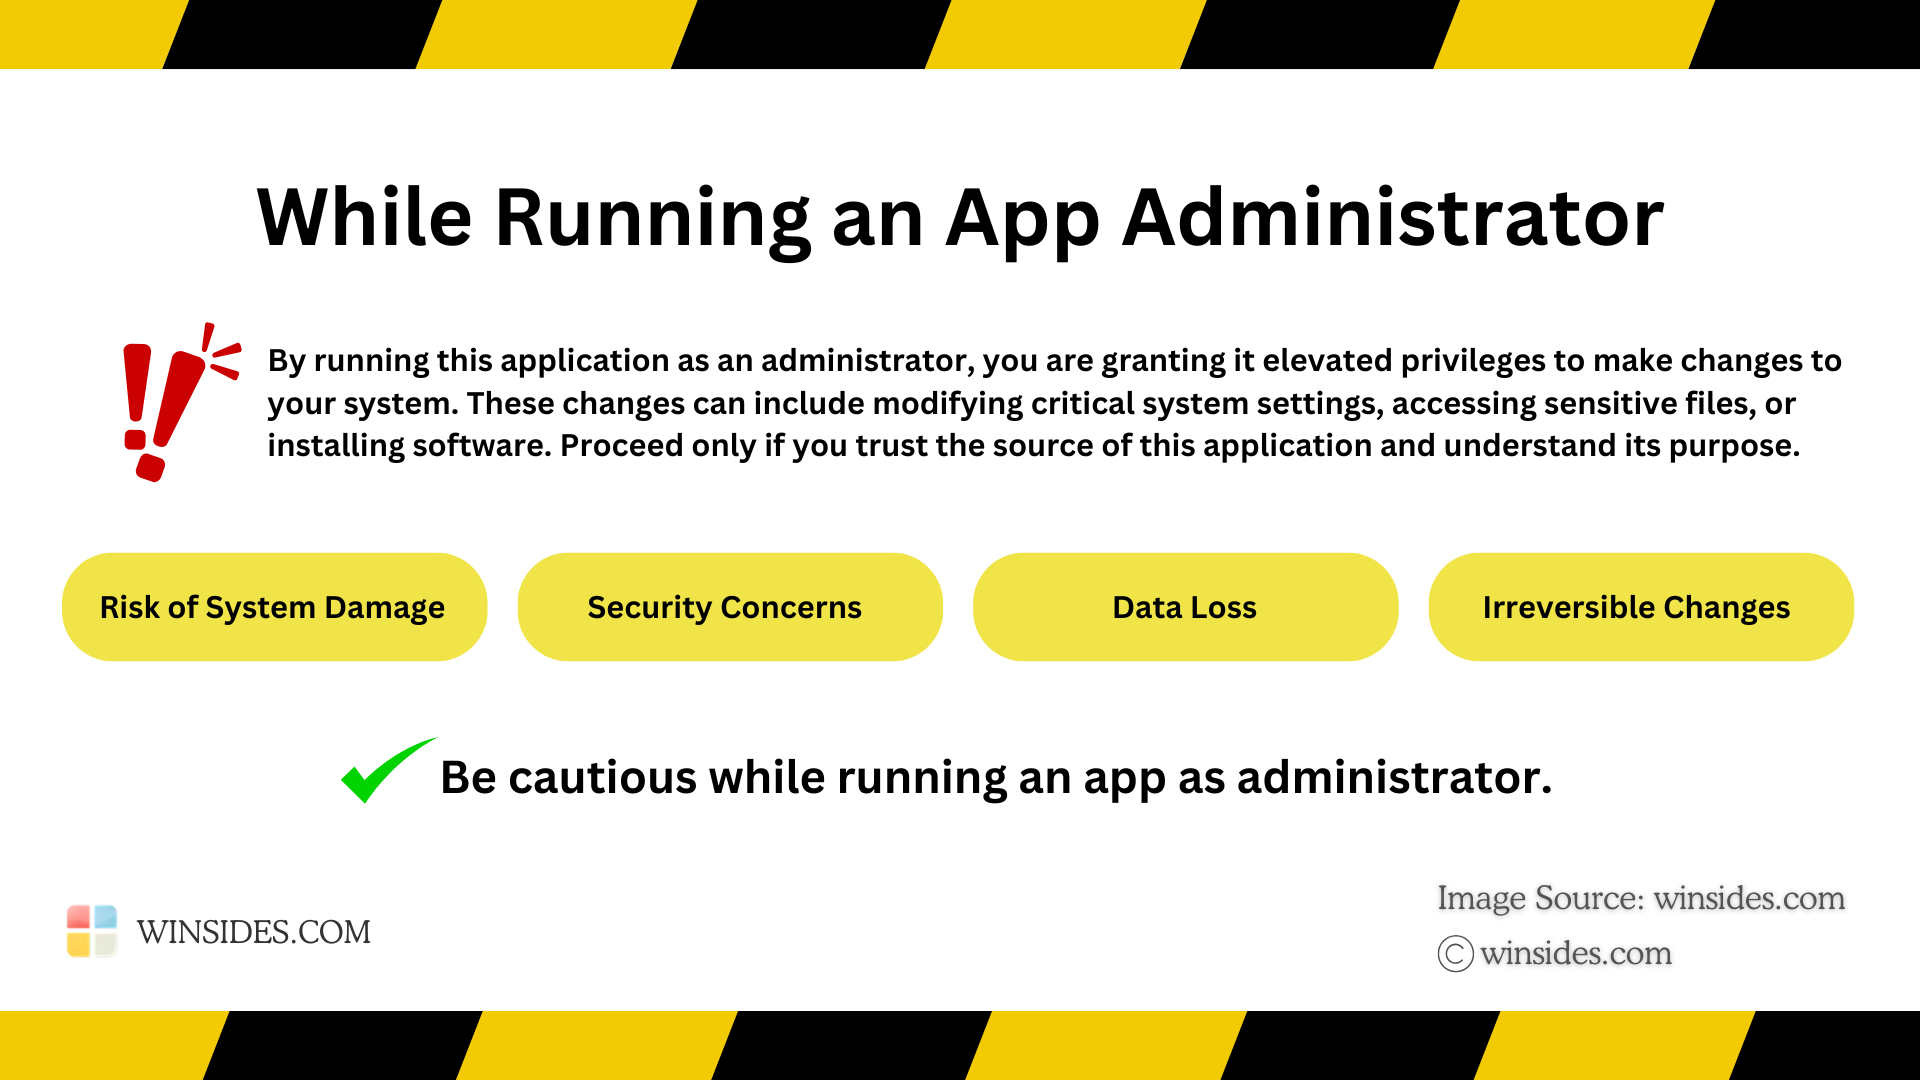
Telnet Client as Administrator on Windows 11 grants it elevated privileges, which can potentially bypass system security restrictions. Please proceed with care and only run trusted applications in this mode. At Winsides.com, we advise our users to use Administrator privileges only when absolutely necessary to perform tasks requiring elevated rights. Misuse of administrative privileges may lead to System Vulnerabilities, Data Loss, System Instability, Security Concerns, Irreversible Changes, etc.
Related Articles:
- How to Check PC Specs without Logging into Windows 11?
- Microsoft’s Majorana 1 Chip – The Future of Quantum Computing?
- How to Change Font Size on Windows 11?
We combine expert insights with user-friendly guidance. We thoroughly research and test everything to give you reliable and simple to understand tech guides. Please take a look at our publishing process to understand why you can trust Winsides.


