

Introduction to nvlddmkm Errors on Windows 11
Few things are as frustrating for a Windows 11 user as a sudden, inexplicable graphics driver crash. One moment you’re immersed in a game or working on an important project, and the next, your screen goes black, flickers erratically, or your system freezes completely. This unwelcome interruption is often accompanied by an error message referencing nvlddmkm.sys in the Event Viewer, a cryptic identifier that points directly to NVIDIA’s display driver. For additional context, see NVIDIA Driver Downloads, Windows 11 Media Creation Tool, TDR Registry Keys, and Display Driver Uninstaller (DDU).
The nvlddmkm error on Windows 11 is a notorious issue that has plagued NVIDIA graphics card users for years, manifesting in various disruptive ways. It signifies a critical problem with how your graphics card communicates with your operating system, leading to instability and a significant degradation of your computing experience.
Understanding this error is the first step towards resolving it. This comprehensive guide aims to demystify the nvlddmkm issue, providing you with the knowledge and practical steps needed to diagnose, troubleshoot, and ultimately prevent these frustrating occurrences. We’ll delve into the technical aspects, offer actionable solutions, and help you restore stability to your Windows 11 system.
Table of contents
Key Takeaways
Before we dive deep into the intricacies of the nvlddmkm error, here are the essential points you’ll gain from this article:
- Understanding the Core Problem: You’ll learn what nvlddmkm.sys is and why its malfunction leads to severe system instability on Windows 11.
- Effective Diagnosis Techniques: Master the use of Event Viewer to pinpoint the specific triggers and characteristics of your nvlddmkm errors.
- Clean Driver Management: Discover the importance of a thorough driver uninstallation and reinstallation process, often the most critical step in resolving these issues.
- System Optimization Strategies: Learn how adjusting graphics card settings, power management, and even TDR values can prevent future crashes.
- Hardware vs. Software Distinction: Gain the ability to differentiate between driver-related software conflicts and potential underlying hardware problems.
- Proactive Prevention: Implement best practices for regular maintenance, driver updates, and system cooling to maintain a stable graphics environment.
- Knowing When to Escalate: Understand when your troubleshooting efforts have reached their limit and professional assistance might be necessary.
Understanding the nvlddmkm.sys File and Its Role
To effectively combat the nvlddmkm error, it’s crucial to understand what this file represents and its function within your Windows 11 operating system. This knowledge forms the foundation for informed troubleshooting.
What is nvlddmkm.sys?
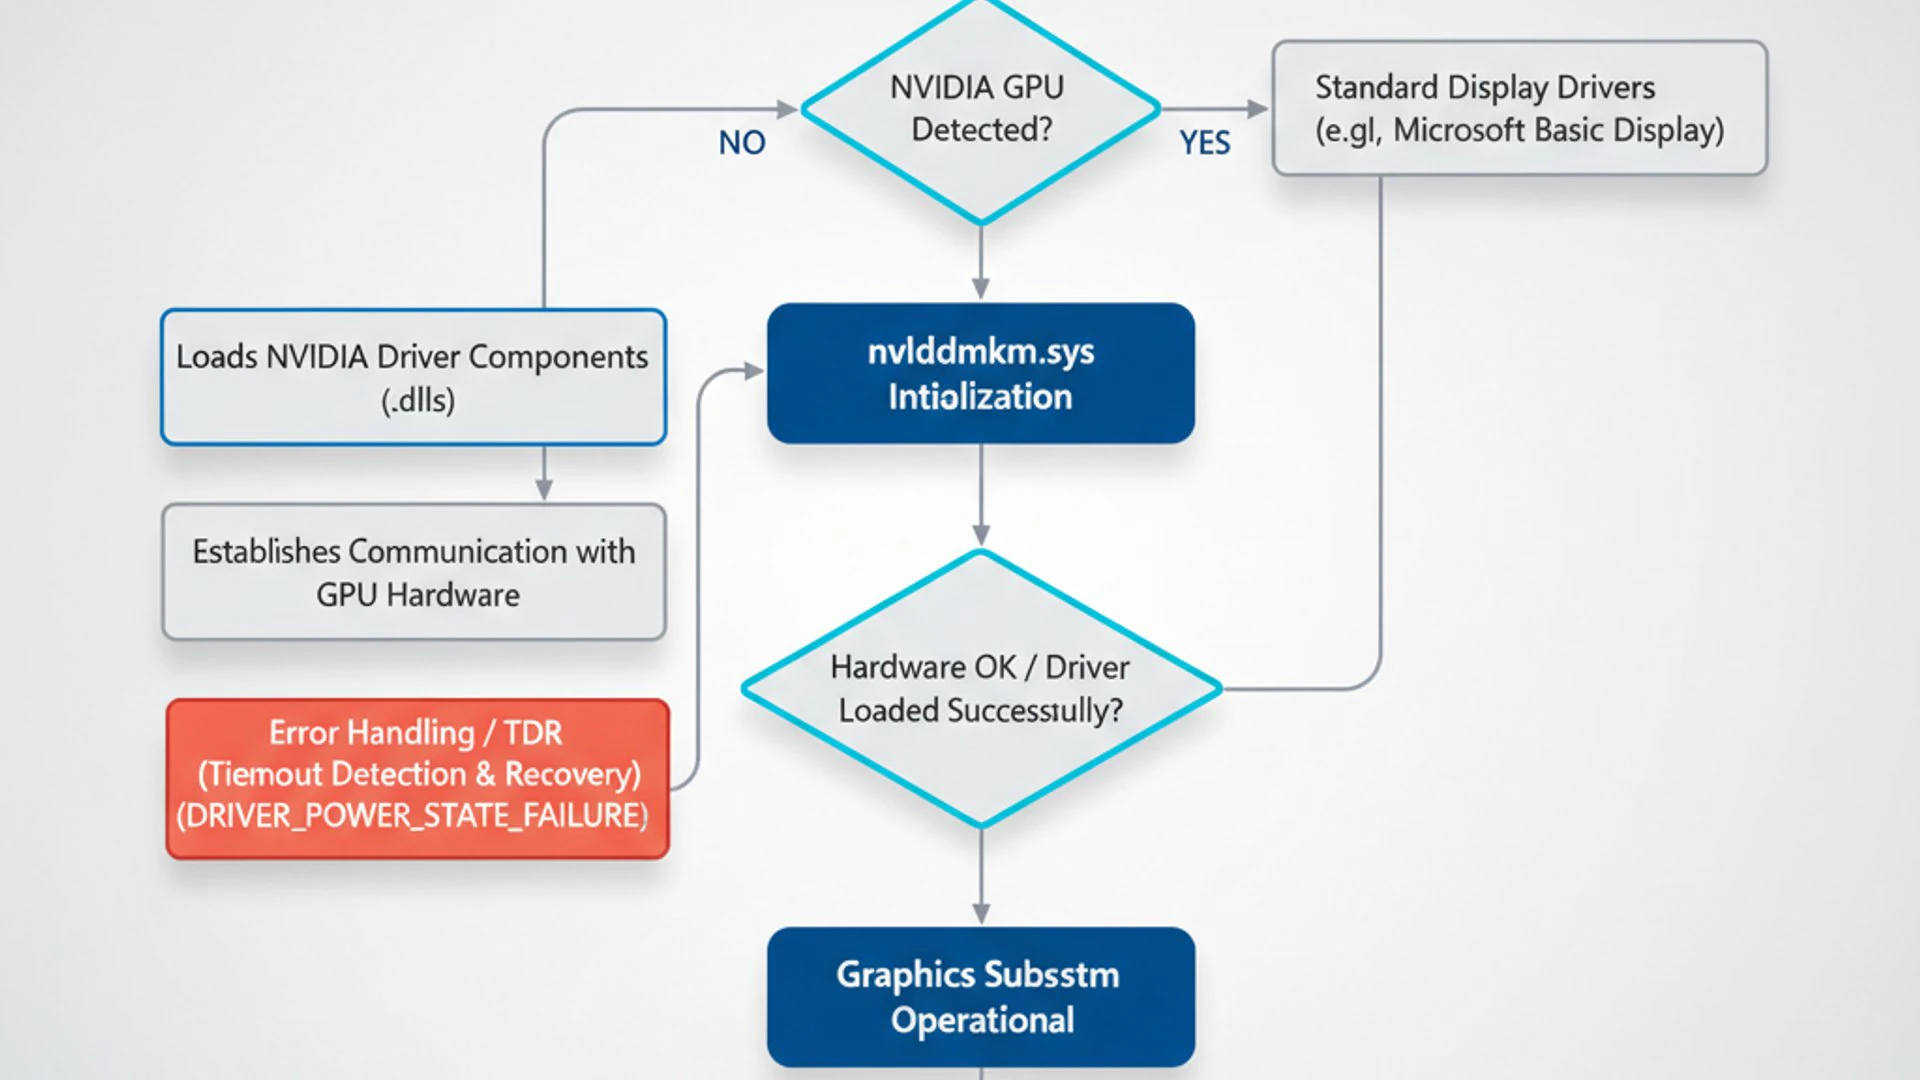
The file nvlddmkm.sys stands for NVIDIA Windows Kernel Mode Driver. It is a critical component of your NVIDIA graphics card driver package. Essentially, it acts as a bridge, allowing your Windows 11 operating system to communicate directly with your NVIDIA GPU at a very low level.
This kernel-mode driver is responsible for managing various aspects of your graphics card’s operation. It handles everything from rendering graphics and processing visual data to managing memory and power states for the GPU. When this driver encounters an issue, the consequences can be severe, as it directly impacts the display and overall system stability.
Because it operates in kernel mode, any instability or corruption within nvlddmkm.sys can lead to system-wide problems, not just graphical glitches. This is why you often see blue screens of death (BSODs), system freezes, or complete display loss when this error occurs.
Common Symptoms of nvlddmkm Errors
The manifestation of an nvlddmkm error can vary, but certain symptoms are commonly reported by users. Recognizing these signs is key to identifying that you are indeed dealing with this specific issue on your Windows 11 PC.
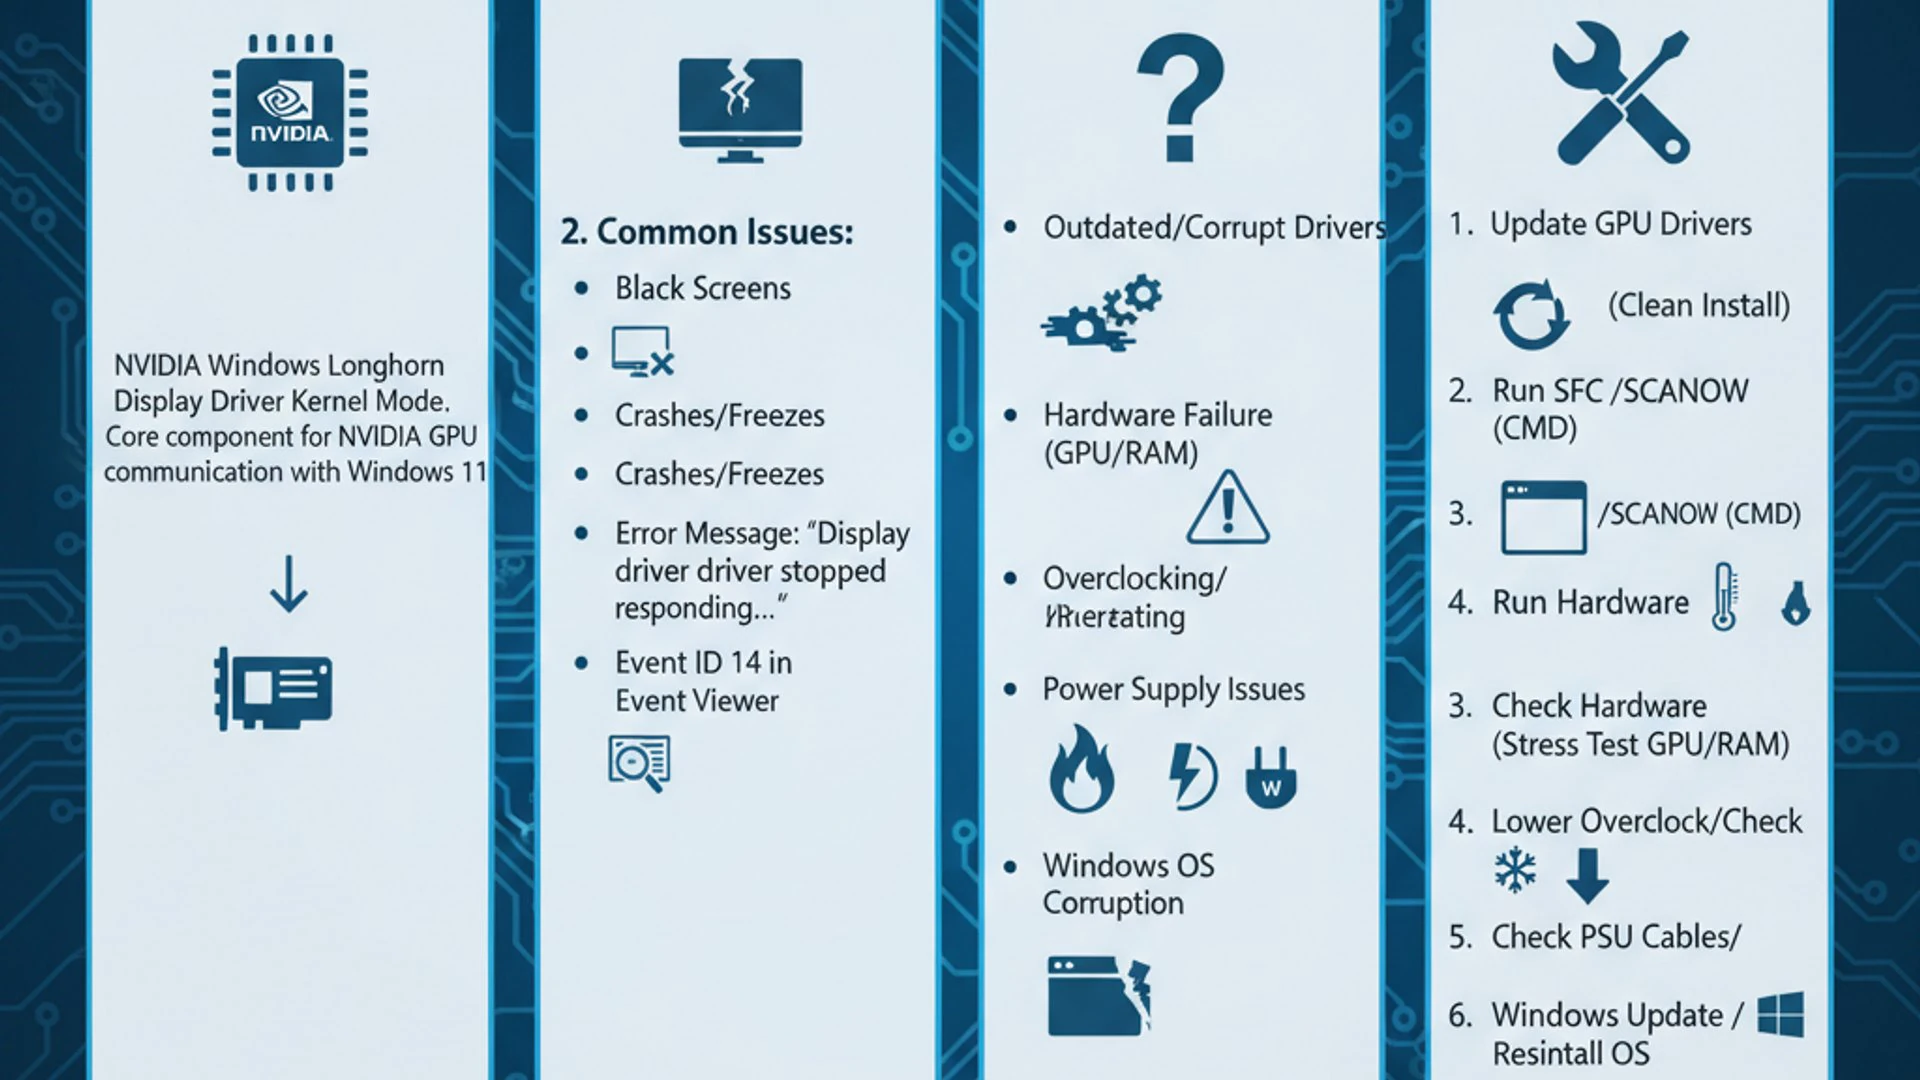
- Black Screen or Display Loss: Your monitor suddenly goes black, often requiring a hard reboot. Sometimes, the display might return after a few seconds, but the system remains unstable.
- System Freezes or Stutters: Your entire computer becomes unresponsive, with the mouse cursor freezing and applications failing to respond. This can happen during gaming, video playback, or even general web browsing.
- Blue Screen of Death (BSOD): The infamous blue screen appears, displaying an error code that often references VIDEO_TDR_FAILURE or similar messages, pointing to a graphics driver issue.
- Display Driver Stopped Responding: A notification might pop up stating, “Display driver stopped responding and has recovered.” While seemingly benign, this often precedes more severe crashes.
- Artifacts or Graphical Glitches: You might observe strange patterns, distorted images, or flickering on your screen, indicating that the GPU is not rendering correctly.
- Event Viewer Logs: Crucially, the Windows Event Viewer will log errors related to nvlddmkm, often with Event ID 14, 13, or 4101, indicating a display driver crash.
“Identifying the precise symptoms is half the battle. A black screen might be a power issue, but a black screen followed by an nvlddmkm error in Event Viewer points directly to your NVIDIA driver.”
If you’re experiencing one or more of these symptoms, especially in conjunction with an NVIDIA graphics card, it’s highly probable that you’re dealing with an nvlddmkm error on Windows 11. The next step is to diagnose the root cause.
Diagnosing the Root Cause of nvlddmkm Issues
Before attempting any solutions, a thorough diagnosis is paramount. Understanding why the nvlddmkm error is occurring can save you a lot of time and effort. This section will guide you through the process of gathering crucial information.
Checking Event Viewer for Error Details
The Windows Event Viewer is an invaluable tool for troubleshooting system issues, and the nvlddmkm error is no exception. It logs detailed information about system events, including driver crashes.
- Press Windows Key + R, type
eventvwr.msc, and press Enter to open Event Viewer. - In the left pane, navigate to Windows Logs > System.
- Look for error entries (marked with a red exclamation mark) that occurred around the time of your crash or freeze.
- Specifically, search for entries where the Source is “Display” or “nvlddmkm” and the Event ID is 14, 13, or 4101.
Double-click on these entries to view the full details. Pay close attention to the General tab, which often provides a description of the error, and the Details tab for more technical information. This information can sometimes hint at a specific component or process that triggered the crash, such as a particular game or application.
For instance, an error might state “Display driver nvlddmkm stopped responding and has successfully recovered.” While this indicates recovery, it still points to an underlying instability that needs addressing. Repeated occurrences of this message are a strong indicator of an ongoing problem with nvlddmkm on Windows 11.
Identifying Hardware vs. Software Conflicts
Distinguishing between a software-related driver issue and a hardware malfunction is critical. While nvlddmkm errors are primarily driver-centric, underlying hardware problems can trigger them.
- Software Conflicts: These are often caused by corrupted driver files, incompatible driver versions, conflicts with other software (e.g., antivirus, monitoring tools), or incorrect system settings. If the error occurs after a driver update, a Windows update, or installing new software, it’s likely software-related.
- Hardware Issues: Overheating GPU, insufficient power supply, faulty RAM, or a dying graphics card itself can manifest as nvlddmkm errors. If the errors persist even after clean driver installations and software troubleshooting, or if they are accompanied by strange noises, burning smells, or physical damage, hardware is a strong suspect.
A good way to test for hardware issues is to see if the problem persists in a different operating system environment, such as a Linux live USB, or if you can test your GPU in another PC. If the issue disappears in a different OS, it strongly points to a Windows 11 or driver-specific software problem. Conversely, if the problem persists across different environments, hardware is more likely the culprit.
Essential Pre-Troubleshooting Steps
Before diving into more complex solutions, there are a few fundamental steps that can often resolve minor issues or provide a stable baseline for further troubleshooting. These steps are quick, easy, and can prevent unnecessary effort.
Updating Windows 11 to the Latest Version
Microsoft frequently releases updates for Windows 11 that include bug fixes, security patches, and crucially, updated driver components. An outdated operating system can sometimes lead to compatibility issues with newer graphics drivers or introduce instabilities that manifest as nvlddmkm errors.
- Go to Settings > Windows Update.
- Click Check for updates.
- Install any pending updates, including optional updates that might contain driver improvements.
- Restart your computer after the updates are installed.
Ensuring your Windows 11 installation is current helps rule out operating system-level conflicts. Sometimes, simply updating Windows can resolve underlying issues that were causing your NVIDIA driver to crash.
Performing a System Restore
If the nvlddmkm error started occurring recently, particularly after a new software installation, driver update, or Windows update, a system restore can be a lifesaver. This feature allows you to revert your system’s state to a previous point in time when it was functioning correctly, without affecting your personal files.
- Search for “Create a restore point” in the Windows search bar and open System Properties.
- In the System Protection tab, click System Restore…
- Click Next and choose a restore point dated before the onset of the nvlddmkm errors.
- Follow the on-screen prompts to complete the restoration.
This process can undo recent changes that might have introduced the instability. It’s an excellent preliminary step, especially if you have system image backup on Windows 11 or restore points enabled, as it provides a safe way to roll back problematic configurations. Remember, a system restore will uninstall programs installed after the chosen restore point, but your documents and personal files will remain untouched.
Comprehensive Solutions for Resolving nvlddmkm Errors
With the diagnostic information in hand and pre-troubleshooting steps completed, it’s time to tackle the core solutions. These methods address the most common causes of the nvlddmkm error on Windows 11, ranging from driver management to system configuration.
Reinstalling NVIDIA Graphics Drivers Cleanly
A corrupted or improperly installed graphics driver is the most frequent culprit behind nvlddmkm errors. A simple reinstallation often isn’t enough; a clean reinstallation is crucial to remove all traces of previous, potentially problematic driver files.
Using Display Driver Uninstaller (DDU)
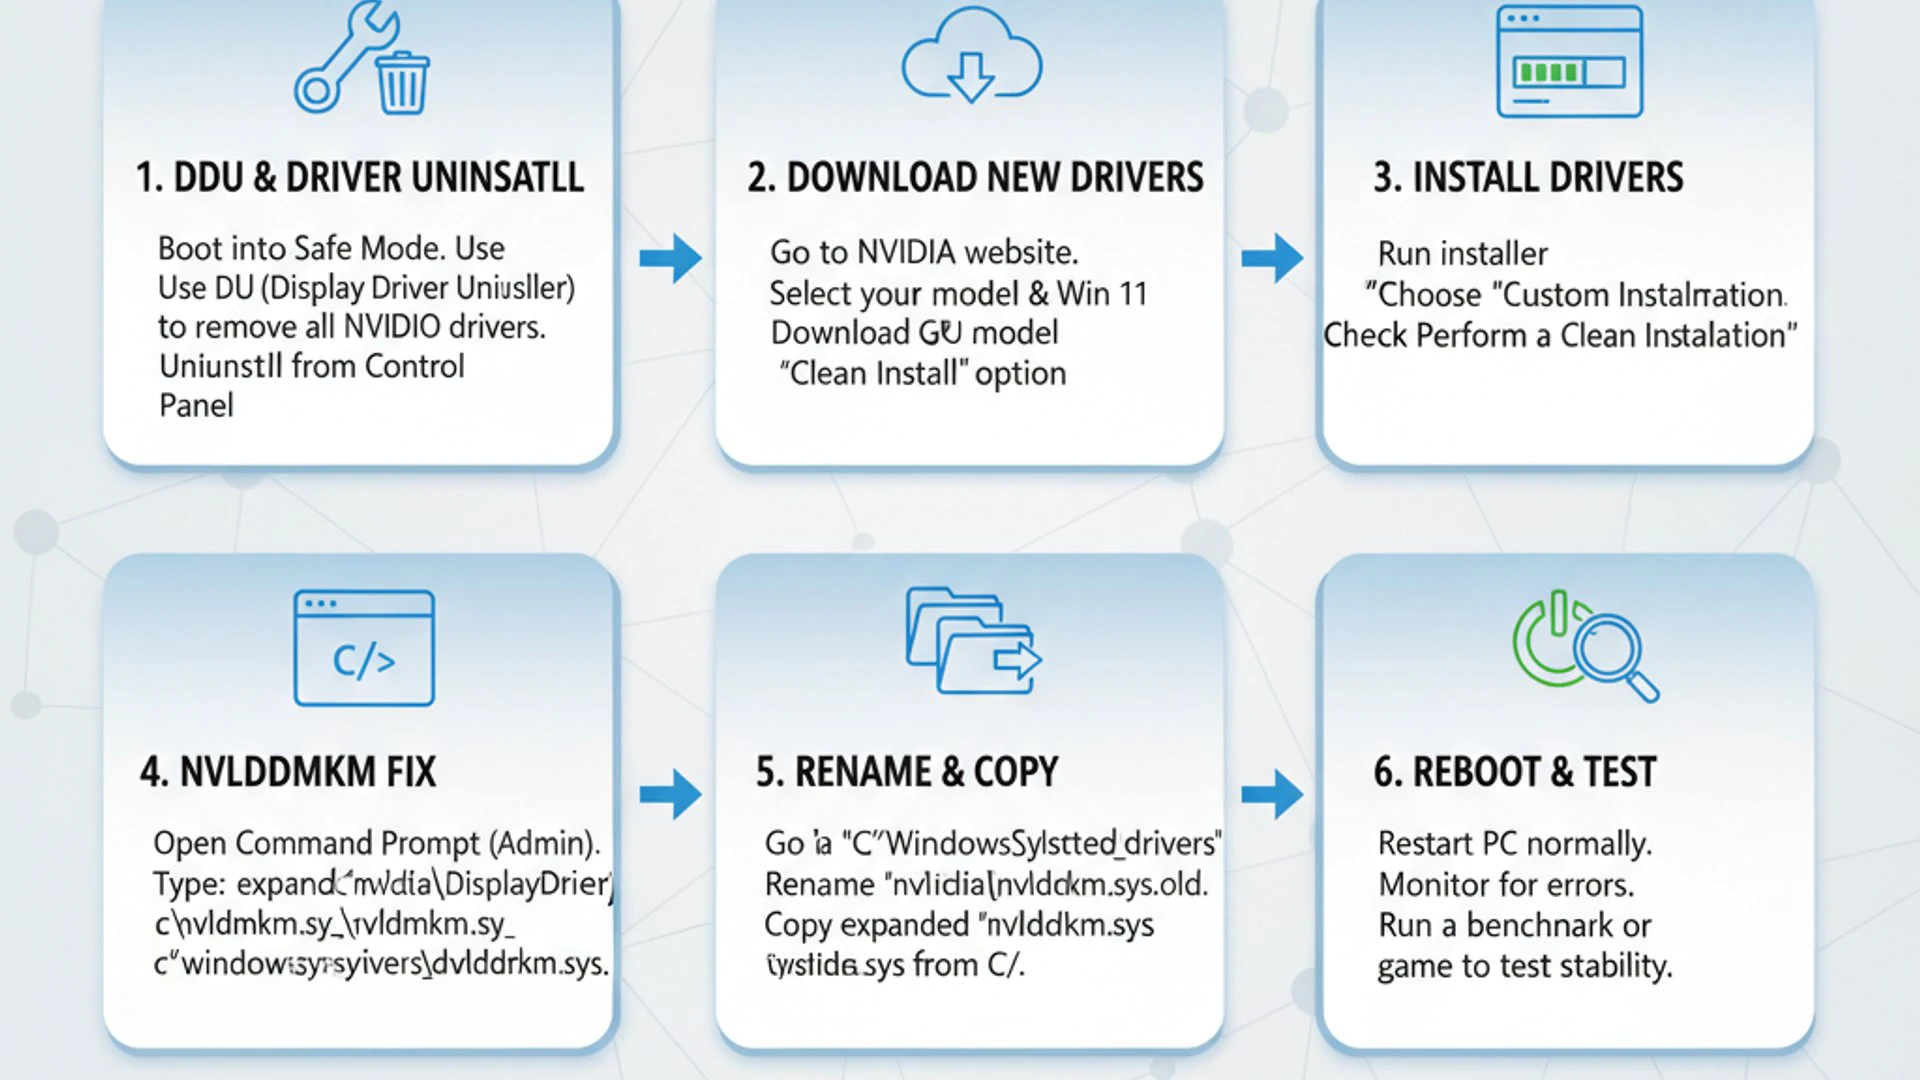
DDU is a third-party utility designed to thoroughly remove graphics card drivers from your system, including all associated registry entries, folders, and files. This ensures a fresh slate for new driver installation.
- Download the latest version of Display Driver Uninstaller (DDU) from a reputable source like Guru3D.
- Download the latest stable NVIDIA graphics driver for your specific GPU and Windows 11 version from the official NVIDIA website. Do NOT install it yet.
- Disconnect your computer from the internet to prevent Windows from automatically installing a generic driver.
- Reboot your PC into Safe Mode. To do this, go to Settings > System > Recovery > Advanced startup > Restart now. Then, Troubleshoot > Advanced options > Startup Settings > Restart, and press F4 for Safe Mode.
- Once in Safe Mode, run DDU. Select “GPU” and then “NVIDIA” from the dropdown menus.
- Click Clean and restart. DDU will remove all NVIDIA driver components and restart your system in normal mode.
This meticulous process ensures that no lingering corrupted files interfere with the new driver installation. It’s a critical step that often resolves persistent nvlddmkm issues.
Installing the Latest Stable Driver
After a clean uninstall, it’s time to install the fresh driver package you downloaded earlier. Always prioritize drivers directly from NVIDIA’s website, as they are usually the most up-to-date and stable.
- Once your system has restarted from the DDU process, locate the NVIDIA driver installer you downloaded.
- Run the installer as an administrator.
- Choose the Custom (Advanced) installation option.
- On the next screen, ensure that Perform a clean installation is checked. This option, even after DDU, provides an extra layer of cleanliness.
- Proceed with the installation and restart your computer when prompted.
After this, reconnect to the internet. Monitor your system for a few days to see if the nvlddmkm errors reappear. This clean driver installation is often the most effective solution for many users.
Adjusting Graphics Card Settings
Sometimes, the default settings of your graphics card or certain features can contribute to instability, especially in specific scenarios. Modifying these settings can often mitigate the nvlddmkm error.
Disabling Hardware Acceleration
Hardware acceleration offloads graphics processing from the CPU to the GPU, which is generally beneficial. However, if your GPU driver is unstable, this feature can sometimes trigger crashes, particularly in web browsers or applications that heavily utilize it.
You can often disable hardware acceleration within individual applications:
- Web Browsers (Chrome, Edge, Firefox): Go to settings, search for “hardware acceleration,” and toggle off the option to “Use hardware acceleration when available.”
- Discord: In User Settings > App Settings > Voice & Video, scroll down to “Advanced” and disable “Hardware Acceleration.”
- Other Applications: Check the settings of any application that frequently crashes or triggers the nvlddmkm error for a similar hardware acceleration option.
While not a permanent fix for the underlying driver issue, disabling hardware acceleration can help identify if a specific application’s interaction with your GPU is causing the problem. If the errors stop, you might have found a temporary workaround while you further troubleshoot the driver.
Modifying Power Management Mode
NVIDIA drivers include various power management modes to optimize performance and energy consumption. In some cases, the “Optimal power” or “Adaptive” modes can lead to instability, especially if the GPU isn’t receiving consistent power or if it’s rapidly switching power states.
- Right-click on your desktop and select NVIDIA Control Panel.
- In the left pane, navigate to 3D Settings > Manage 3D settings.
- Under the “Global Settings” tab, find the option for Power management mode.
- Change this setting from “Optimal power” or “Adaptive” to Prefer maximum performance.
- Click Apply at the bottom right.
This setting forces the GPU to operate at its highest performance state, potentially providing more stable power delivery and preventing rapid clock speed fluctuations that can trigger driver crashes. While it might slightly increase power consumption and heat, it often resolves instability issues related to power management.
Updating or Rolling Back Other Drivers
While the NVIDIA driver is the primary suspect, conflicts with other system drivers can also trigger nvlddmkm errors. This includes chipset drivers, audio drivers, or even drivers for peripherals.
- Chipset Drivers: Visit your motherboard manufacturer’s website and download the latest chipset drivers for your specific model and Windows 11. Outdated chipset drivers can affect how your CPU communicates with other components, including the GPU.
- Audio Drivers: Sometimes, audio drivers, especially those for integrated audio or specific sound cards, can conflict with graphics drivers. Consider updating these from your motherboard or sound card manufacturer’s website.
- Other Peripheral Drivers: If the error occurs only when a specific peripheral (e.g., a capture card, VR headset) is connected, ensure its drivers are up to date.
Conversely, if the nvlddmkm error started after updating a non-NVIDIA driver, consider rolling back that specific driver to a previous stable version. You can do this via Device Manager: right-click the device, select Properties, go to the Driver tab, and click “Roll Back Driver.”
Checking for Hardware Issues
Even with meticulous software troubleshooting, persistent nvlddmkm errors might indicate an underlying hardware problem. It’s essential to investigate potential physical component failures that could be triggering the driver crashes.
Testing RAM for Stability
Faulty or unstable RAM can cause a myriad of system issues, including graphics driver crashes, as the GPU relies on system memory for various operations. Testing your RAM is a crucial diagnostic step.
- Search for “Windows Memory Diagnostic” in the Windows search bar and run the application.
- Choose Restart now and check for problems (recommended).
- Your computer will restart and run a memory test. This process can take several minutes.
- After the test, Windows will boot back up, and the results will be displayed in a notification or in the Event Viewer (under Windows Logs > System, look for “MemoryDiagnostic” entries).
If the diagnostic reports errors, it indicates a problem with your RAM. You might need to reseat your RAM modules or replace faulty sticks. If you have multiple RAM sticks, try testing them individually to pinpoint the problematic one.
Monitoring GPU Temperatures
Overheating is a common cause of hardware instability and can force the graphics driver to crash to prevent damage. Monitoring your GPU temperatures, especially under load, is vital.
- Download and install a GPU monitoring tool like HWMonitor or MSI Afterburner.
- Run the monitoring tool and observe your GPU temperature while performing tasks that usually trigger the nvlddmkm error (e.g., gaming, video editing).
- Typical safe operating temperatures for GPUs are generally below 80-85°C under heavy load. If your GPU consistently hits 90°C or higher, overheating is a strong possibility.
If overheating is detected, ensure your PC case has adequate airflow, clean dust from your GPU heatsink and fans, and consider reapplying thermal paste if comfortable doing so. Extreme temperatures can severely impact the stability of nvlddmkm on Windows 11.
Verifying System File Integrity
Corrupted system files can sometimes interfere with driver operations, leading to unexpected crashes. Windows 11 includes built-in tools to check and repair these files.
- Open Command Prompt as an administrator. You can search for “cmd,” right-click, and select “Run as administrator.”
- Type
sfc /scannowand press Enter. The System File Checker (SFC) will scan for and attempt to repair corrupted system files. This process can take some time. - After SFC completes, restart your computer.
- If SFC finds issues it cannot fix, or if the problem persists, run the Deployment Image Servicing and Management (DISM) tool. In an administrator Command Prompt, type:
DISM /Online /Cleanup-Image /CheckHealthDISM /Online /Cleanup-Image /ScanHealthDISM /Online /Cleanup-Image /RestoreHealth
- Restart your PC after DISM completes.
These tools ensure that your core Windows 11 files are intact and not contributing to the nvlddmkm error. A healthy operating system environment is fundamental for stable driver performance.
Adjusting TDR (Timeout Detection and Recovery) Settings
TDR is a Windows feature designed to detect when a graphics card is unresponsive and attempts to reset it. If the GPU doesn’t respond within a certain timeout period, Windows will try to recover the driver. If it fails, it can result in a BSOD with a VIDEO_TDR_FAILURE message, often linked to nvlddmkm.sys.
While not a solution to the root cause, increasing the TDR delay can sometimes prevent crashes by giving the GPU more time to respond. This is a registry modification and should be done with caution.
- Press Windows Key + R, type
regedit, and press Enter to open the Registry Editor. - Navigate to
HKEY_LOCAL_MACHINE\SYSTEM\CurrentControlSet\Control\GraphicsDrivers. - Right-click in the right pane, select New > DWORD (32-bit) Value, and name it
TdrDelay. - Double-click
TdrDelayand set its Value data to8or10(the default is 2 seconds). This increases the timeout to 8 or 10 seconds. - Right-click in the right pane again, select New > QWORD (64-bit) Value (if you have a 64-bit system), and name it
TdrDdiDelay. - Double-click
TdrDdiDelayand set its Value data to8or10. - Restart your computer.
“Modifying registry settings requires care. Always back up your registry before making changes, or create a system restore point. Incorrect edits can cause system instability.”
This adjustment can sometimes alleviate crashes caused by temporary GPU unresponsiveness, giving the driver more time to recover. However, if the GPU is truly unstable, this might only delay the inevitable crash rather than solving the underlying problem.
Preventing Future nvlddmkm Errors
Once you’ve resolved the immediate nvlddmkm error, implementing preventative measures is key to maintaining a stable and smooth graphics experience on Windows 11. Proactive maintenance can significantly reduce the likelihood of recurrence.
Regular Driver Maintenance
Keeping your graphics drivers updated, but not necessarily always on the bleeding edge, is crucial. NVIDIA frequently releases new drivers, some of which are “Game Ready” drivers optimized for new titles, while others are “Studio” drivers focused on stability for creative professionals.
- Choose Wisely: For general use and gaming, stick to the latest Game Ready drivers. If you use your PC for professional graphics work, consider Studio drivers. Avoid beta drivers unless you’re comfortable with potential instability.
- Monitor Updates: Periodically check the NVIDIA website or use the GeForce Experience application to see if new drivers are available. Read release notes to understand what issues they address.
- Clean Installation Periodically: Even without issues, performing a clean driver installation using DDU every few major driver updates (e.g., once every 6-12 months) can help prevent accumulated corruption.
- Backup Drivers: Keep a copy of a known stable driver version on hand. If a new driver causes issues, you can quickly roll back.
A disciplined approach to driver management is your best defense against the nvlddmkm on Windows 11 error. It’s about finding the balance between having the latest features and maintaining rock-solid stability.
Optimal System Cooling and Power Supply
Hardware health plays a significant role in driver stability. Ensuring your system components, especially your GPU, are adequately cooled and powered can prevent many issues.
- Maintain Good Airflow: Ensure your PC case has good airflow. Keep intake and exhaust fans clean and unobstructed. Consider adding more case fans if temperatures are consistently high.
- Clean Dust Regularly: Dust acts as an insulator, trapping heat. Regularly clean your GPU fans, heatsink, and case filters with compressed air.
- Check PSU Wattage: Verify that your power supply unit (PSU) has sufficient wattage for your graphics card and other components. An underpowered PSU can lead to instability and crashes under load. Use a PSU calculator if unsure.
- Monitor PSU Health: If your PSU is old, it might not be delivering stable power. While difficult to diagnose without specialized equipment, a consistently unstable system despite all other troubleshooting points to a potential PSU issue.
A well-maintained and adequately powered system provides a stable foundation for your graphics card, minimizing stress on the driver and reducing the chances of the nvlddmkm error rearing its head again.
When to Seek Professional Help
While this guide covers a comprehensive range of troubleshooting steps for the nvlddmkm error on Windows 11, there are instances when it’s best to consult a professional. Knowing when to escalate can save you further frustration and potential damage to your system.
- Persistent Hardware Suspicions: If you’ve exhausted all software solutions and suspect a faulty GPU, RAM, or PSU, but lack the tools or expertise to confirm, a professional can perform thorough diagnostics.
- No Resolution After Extensive Troubleshooting: If you’ve diligently followed every step in this guide and the nvlddmkm errors continue, it indicates a deeper, more complex issue that requires specialized knowledge.
- Lack of Confidence: If you’re uncomfortable performing advanced steps like registry edits, opening your PC case, or replacing components, a professional can handle these tasks safely.
- Warranty Considerations: If your graphics card or PC is still under warranty, attempting repairs yourself might void it. A professional repair service can often handle warranty claims.
A qualified technician has access to advanced diagnostic tools and experience with a wide array of hardware and software configurations. They can accurately pinpoint the problem and implement a lasting solution, ensuring your system returns to optimal performance.
Conclusion: Restoring Graphics Stability on Windows 11
The nvlddmkm on Windows 11 error can be a deeply unsettling and disruptive experience, turning a powerful PC into an unreliable machine. However, as we’ve explored, it’s an issue that is often solvable with a systematic approach to diagnosis and troubleshooting.
By understanding the role of the nvlddmkm.sys file, meticulously checking Event Viewer for clues, and applying the comprehensive solutions outlined in this guide—from clean driver installations with DDU to adjusting power settings and verifying hardware integrity—you equip yourself with the knowledge to tackle this problem head-on.
Remember that prevention is as important as the cure. Regular driver maintenance, ensuring optimal system cooling, and providing adequate power supply are crucial habits for maintaining a stable graphics environment. While the process may seem daunting at first, each step brings you closer to a smooth, uninterrupted computing experience.
Ultimately, your goal is to restore the reliability and performance of your NVIDIA graphics card on Windows 11. By patiently working through these solutions, you can overcome the nvlddmkm error and enjoy your system as it was meant to be.
For more interesting articles, stay tuned to Winsides.com!









Community
Comments (0)