

Introduction to VIDEO_DXGKRNL_FATAL_ERROR
Encountering a Blue Screen of Death (BSoD) on your Windows 11 system can be a profoundly frustrating experience, often halting your work or entertainment without warning. Among the myriad of BSoD errors, the VIDEO_DXGKRNL_FATAL_ERROR stands out as a particularly vexing issue, directly pointing to critical problems within your system’s graphics subsystem. This error signifies a fundamental failure in the DirectX Graphics Kernel (DXGKRNL), which is a core component responsible for managing communication between your operating system and your graphics hardware. For additional context, see troubleshoot blue screen errors, Bug Check 0x113: VIDEO_DXGKRNL_FATAL_ERROR, NVIDIA driver downloads, and AMD support and drivers.
When this error appears, it’s not just a minor glitch; it indicates a severe instability that could stem from corrupted drivers, faulty hardware, or even system file inconsistencies. Ignoring this BSoD can lead to repeated crashes, data loss, and a significantly degraded user experience. Therefore, understanding its nature and implementing effective troubleshooting steps is paramount for restoring your Windows 11 system to a stable and reliable state.
This comprehensive guide will walk you through the common causes of the VIDEO_DXGKRNL_FATAL_ERROR and provide a structured, step-by-step approach to diagnose and resolve it. We’ll cover everything from simple driver updates to more advanced hardware diagnostics and system repairs, ensuring you have all the tools necessary to tackle this critical issue head-on. Our goal is to empower you with the knowledge to not only fix the error but also to prevent its recurrence, safeguarding your digital environment.
Understanding the Blue Screen of Death (BSoD)
The Blue Screen of Death, or BSoD, is Windows’ way of signaling a critical system error from which it cannot recover gracefully. When a BSoD occurs, the operating system halts all operations to prevent potential data corruption or further damage to hardware. Instead of a normal shutdown, you’re presented with a blue screen displaying an error message, often accompanied by a stop code.
These stop codes, like VIDEO_DXGKRNL_FATAL_ERROR, are crucial diagnostic clues. They provide a high-level indication of what went wrong, helping users and technicians narrow down the potential causes. While intimidating, a BSoD is essentially a protective measure, albeit an abrupt one, designed to maintain system integrity when faced with an unrecoverable fault.
On Windows 11, the BSoD screen has a slightly modernized look compared to previous versions, but its core function remains the same. It typically includes the error code, a brief description, and a QR code that can be scanned for more information. Understanding that this is a system-level alert, rather than just a random crash, is the first step towards effective troubleshooting.
Common Symptoms and Impact on Windows 11
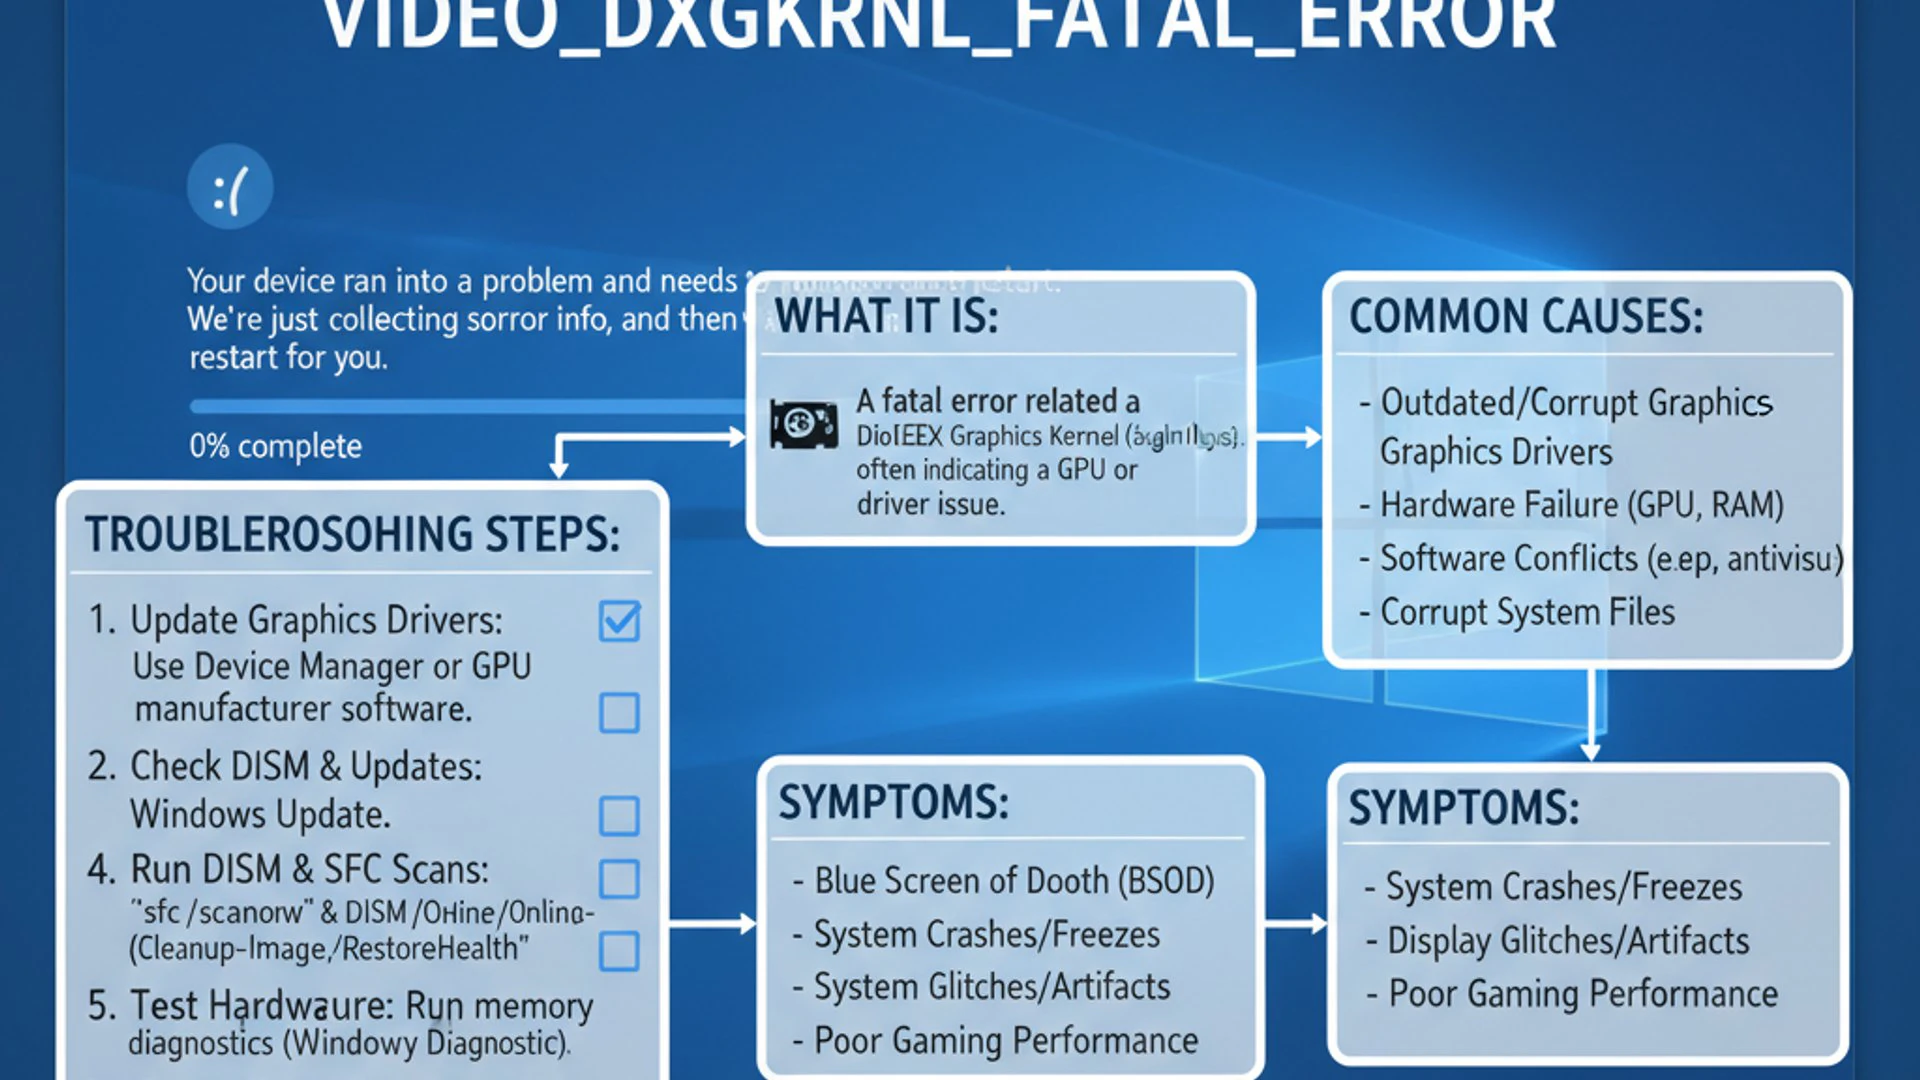
The most obvious symptom of the VIDEO_DXGKRNL_FATAL_ERROR on Windows 11 is the sudden appearance of the blue screen itself, forcing a system restart. However, leading up to this critical failure, users might experience a range of other indicators that suggest underlying graphics-related problems.
These symptoms can include frequent application crashes, especially when launching graphics-intensive programs or games. You might also notice screen flickering, visual artifacts, or unusual display behavior. Performance degradation, such as slow frame rates or general system sluggishness, can also precede the full-blown BSoD error.
The impact of this error can be significant. Repeated crashes disrupt workflow, lead to unsaved data loss, and can even prevent your system from booting properly, trapping you in a restart loop. Prolonged exposure to instability can also put undue stress on hardware components, potentially shortening their lifespan. Addressing this error promptly is crucial for maintaining system stability and data integrity.
Table of contents
Key Takeaways for Resolving the Error
Before diving into the detailed troubleshooting methods, here’s a quick summary of the most effective solutions for the VIDEO_DXGKRNL_FATAL_ERROR on Windows 11:
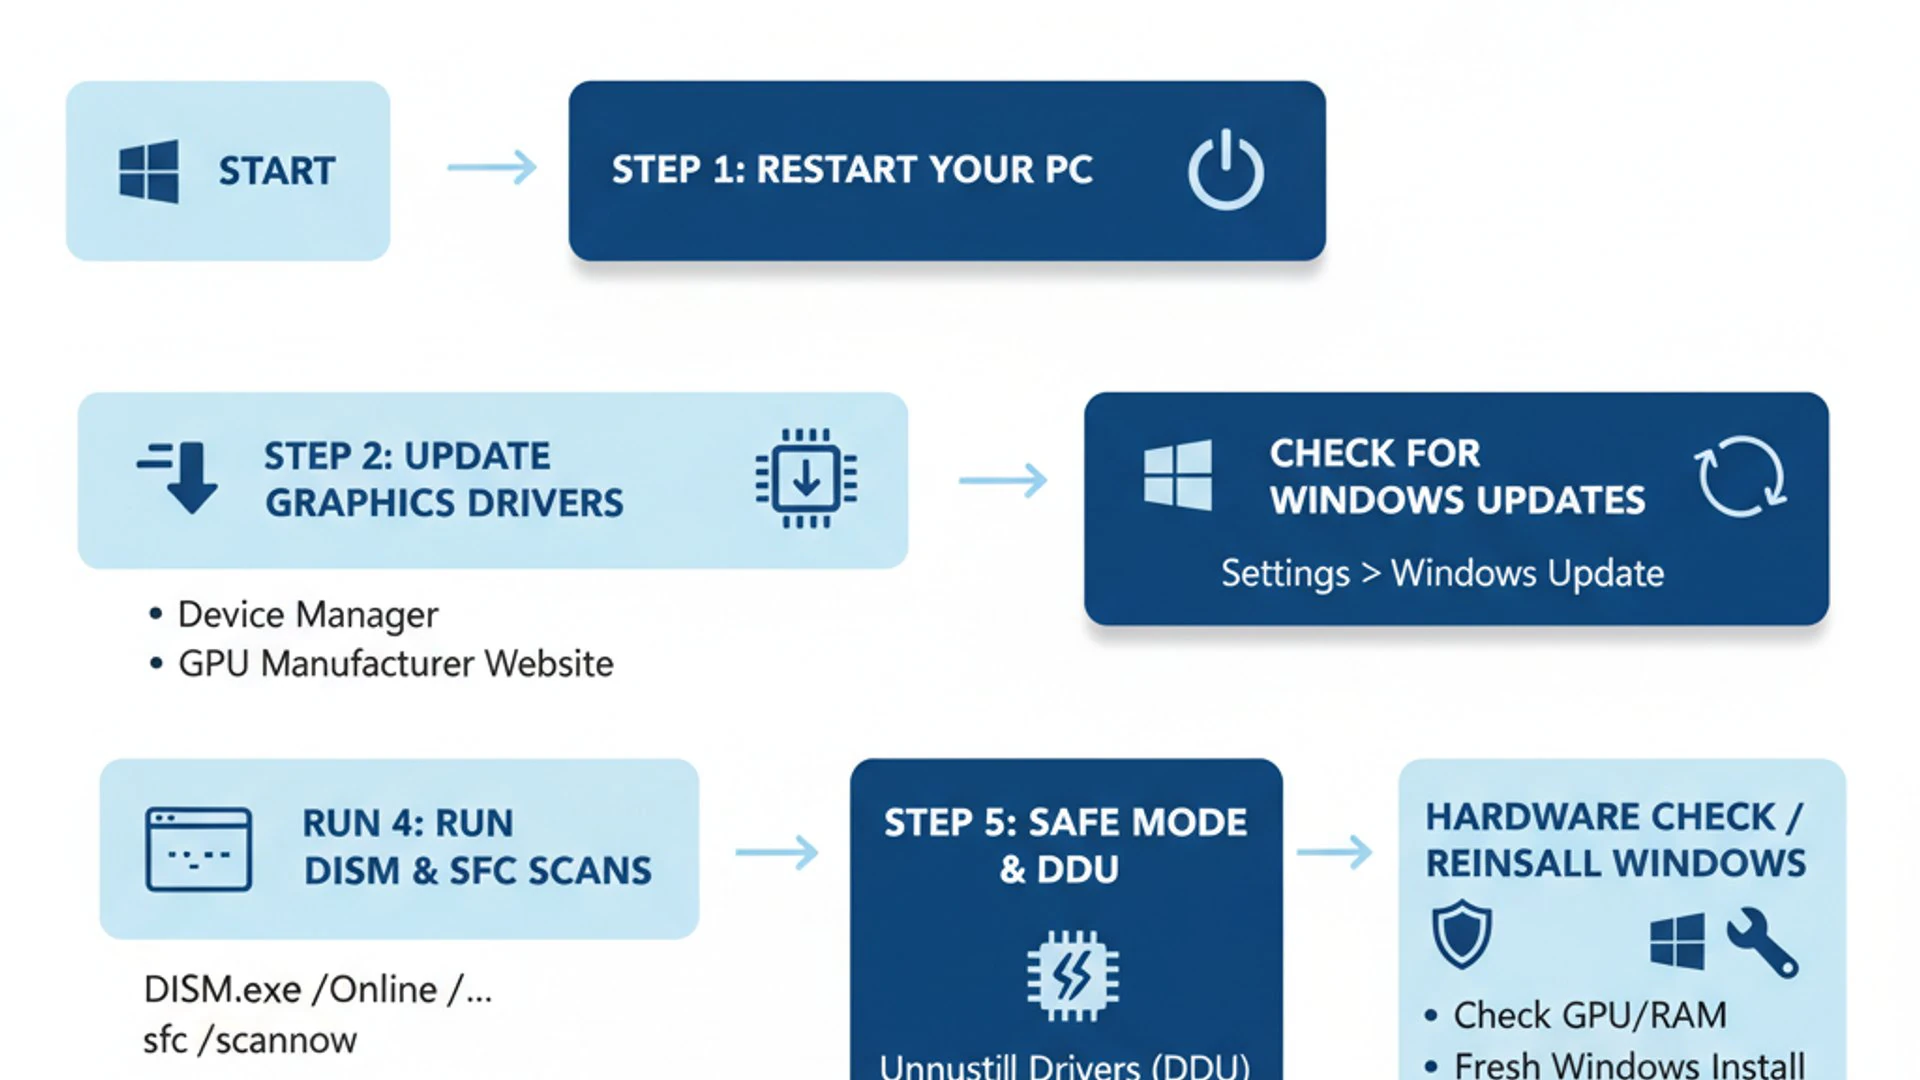
- Update Graphics Drivers: Outdated or corrupted display drivers are the most common culprits. Perform a clean installation using tools like DDU.
- System File Integrity: Use SFC and DISM commands to repair any corrupted Windows system files that might be interfering with graphics kernel operations.
- Windows Updates: Ensure your operating system is fully updated, as Microsoft frequently releases patches that address stability issues and driver compatibility.
- Hardware Check: Diagnose your GPU and RAM for physical defects or overheating. Faulty hardware is a significant cause of fatal errors.
- Power Settings: Adjust power management options to ensure your graphics card receives adequate and consistent power.
- Malware Scan: Malicious software can corrupt system files or interfere with drivers, so a thorough scan is always recommended.
What Causes VIDEO_DXGKRNL_FATAL_ERROR?
Understanding the root causes of the VIDEO_DXGKRNL_FATAL_ERROR on Windows 11 is the first step toward effective troubleshooting. This particular BSoD error, as its name suggests, points to a fatal issue within the DirectX Graphics Kernel (DXGKRNL), which is the core component managing communication between your operating system and your graphics processing unit (GPU).
Several factors can trigger this critical failure, ranging from software conflicts to hardware malfunctions. Pinpointing the exact cause can sometimes be challenging, but by systematically examining the most common culprits, you can significantly narrow down the possibilities. We’ll categorize these causes to help you better understand where to focus your diagnostic efforts.
Each potential cause requires a different approach to resolution, emphasizing the importance of a structured troubleshooting process. Whether it’s a simple driver update or a more complex hardware diagnosis, identifying the underlying problem is key to restoring your system’s stability.
Graphics Driver Issues
By far, the most frequent cause of the VIDEO_DXGKRNL_FATAL_ERROR is related to graphics drivers. These software components are essential for your operating system to interact correctly with your graphics card. When drivers become outdated, corrupted, or incompatible, they can lead to severe instability.
An outdated driver might not fully support the latest Windows 11 features or game optimizations, leading to crashes. Conversely, a newly installed driver might be buggy or improperly installed, causing conflicts. Sometimes, remnants of old drivers can interfere with new installations, creating a chaotic environment for the graphics kernel.
Furthermore, corrupted driver files, perhaps due to an incomplete update or a sudden system shutdown, can render the graphics subsystem inoperable. This makes driver management, including regular updates and clean installations, a critical aspect of preventing and resolving this BSoD error.
Hardware Malfunctions
While software issues are common, hardware problems can also trigger the VIDEO_DXGKRNL_FATAL_ERROR. Your graphics processing unit (GPU) is a complex piece of hardware, and any defect or instability within it can lead to fatal errors. This could be due to manufacturing defects, physical damage, or simply old age.
Overheating is another significant hardware-related culprit. If your GPU or other system components are not adequately cooled, they can become unstable and fail under load, leading to a BSoD. Dust buildup in fans, poor airflow, or a failing thermal paste application can all contribute to excessive temperatures.
Beyond the GPU, issues with your system’s Random Access Memory (RAM) can also manifest as graphics-related errors. Faulty RAM modules can lead to data corruption when information is passed between the CPU, GPU, and memory, resulting in system crashes. Therefore, diagnosing hardware health is an essential step.
System File Corruption
Windows 11 relies on a vast array of system files to function correctly. If any of these critical files become corrupted, they can interfere with the operation of various system components, including the DirectX Graphics Kernel. Malware infections, improper shutdowns, disk errors, or even faulty updates can lead to system file corruption.
When the operating system attempts to access a corrupted file that is vital for graphics operations, it can trigger a fatal error. The DXGKRNL, being a core part of the OS, is particularly vulnerable to such corruption. This is why tools like System File Checker (SFC) and Deployment Image Servicing and Management (DISM) are invaluable for diagnosing and repairing these underlying issues.
Ensuring the integrity of your Windows system files is a fundamental aspect of maintaining a stable computing environment. Regular checks and repairs can prevent many BSoD errors, including the VIDEO_DXGKRNL_FATAL_ERROR, from occurring in the first place.
Software Conflicts and Updates
The interaction between various software applications and the operating system can sometimes lead to conflicts that trigger the VIDEO_DXGKRNL_FATAL_ERROR. This is particularly true for programs that heavily utilize graphics resources, such as games, video editing software, or even certain browser extensions.
Antivirus software, system optimization tools, or even other drivers (like audio drivers) can sometimes clash with graphics drivers or the DXGKRNL, leading to instability. Identifying such conflicts often involves recalling any recently installed software or updates that preceded the error’s appearance.
Furthermore, Windows updates, while generally beneficial, can occasionally introduce bugs or compatibility issues with specific hardware or software configurations. If the error started appearing immediately after a Windows update, rolling back the update or waiting for a patch might be necessary. This highlights the delicate balance required for a stable system.
Essential Pre-Troubleshooting Steps
Before you dive into complex troubleshooting methods for the VIDEO_DXGKRNL_FATAL_ERROR on Windows 11, it’s crucial to take a few preparatory steps. These actions can safeguard your data and provide a more stable environment for diagnosis and repair. Skipping these initial stages can lead to further frustration or even data loss.
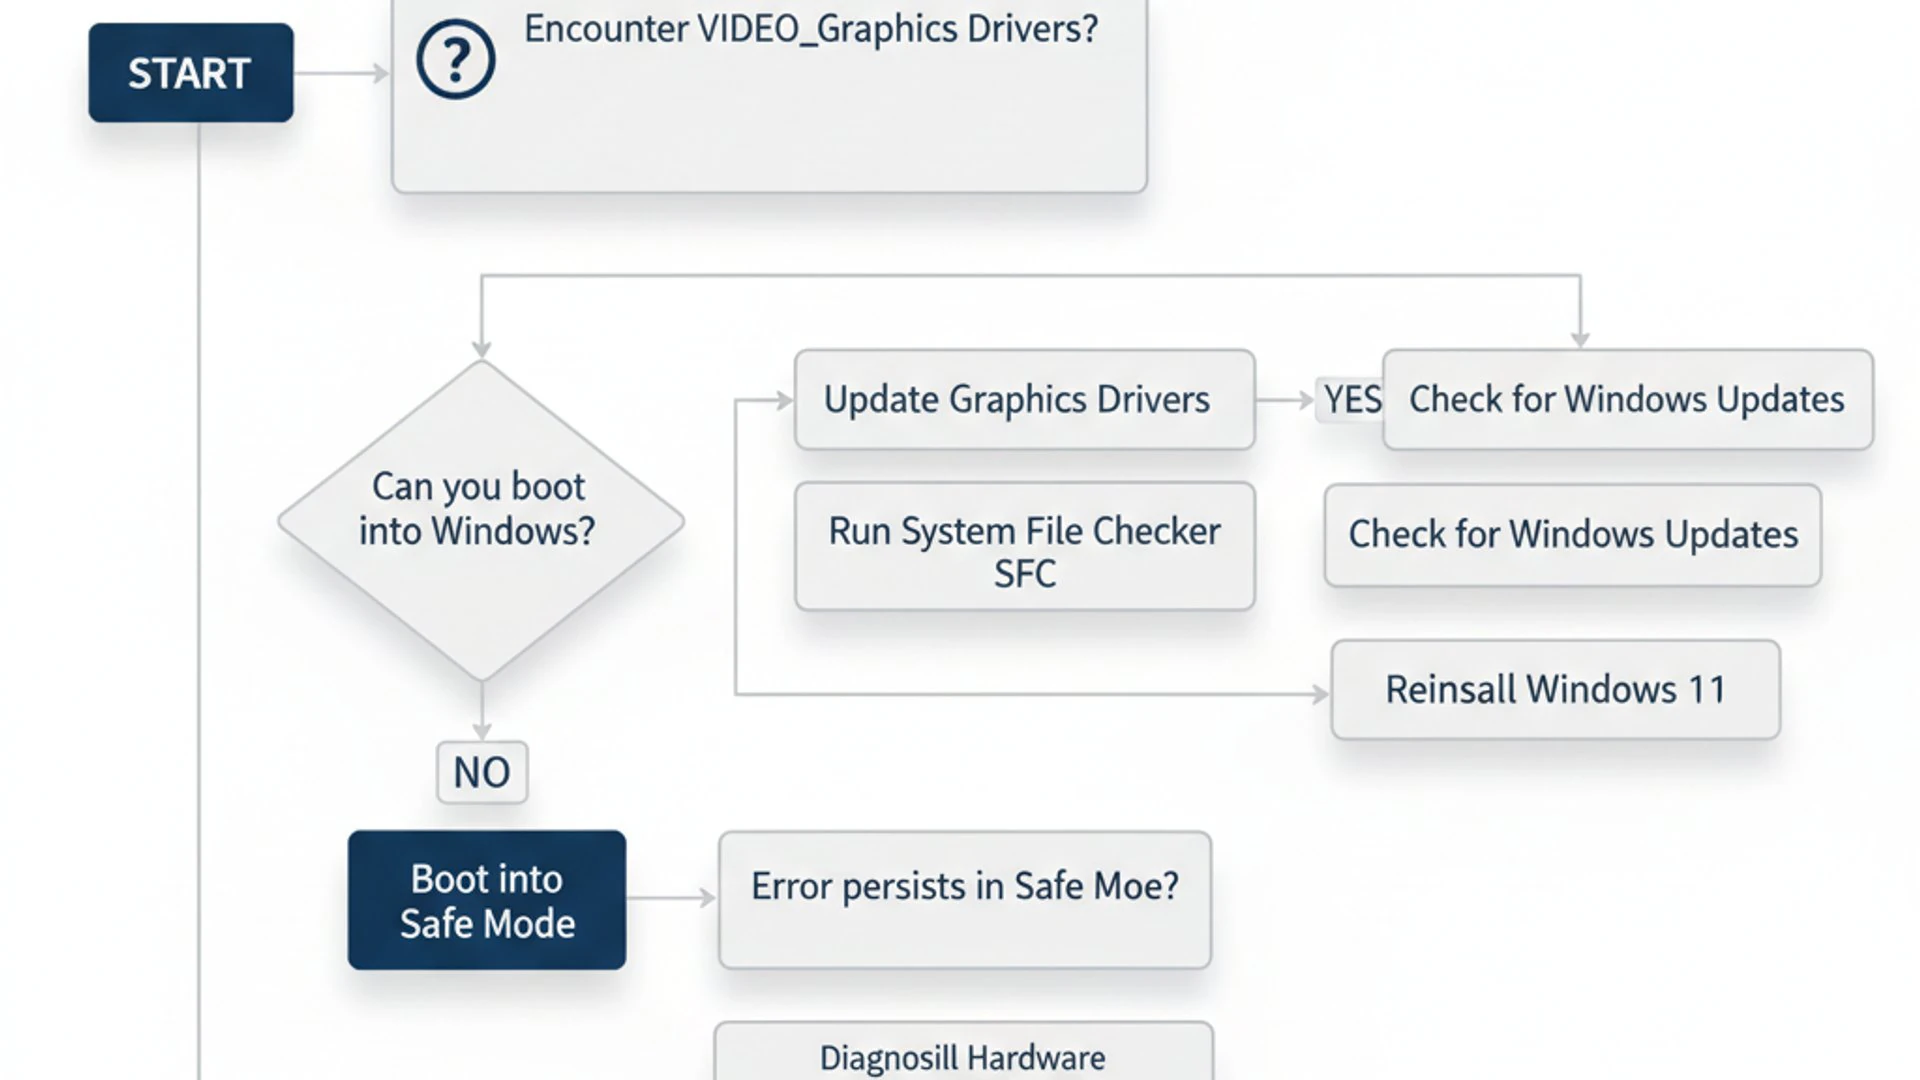
The primary goals of pre-troubleshooting are to ensure your important files are secure and to provide a clean, minimal operating environment. This helps in isolating the problem and prevents potential complications during the repair process. Always prioritize data safety before making significant system changes.
These steps are foundational and should not be overlooked, regardless of how urgent the error seems. A little preparation can save a lot of headaches down the line, ensuring a smoother and more successful resolution to your BSoD problem.
Backing Up Important Data
The first and most critical pre-troubleshooting step is to back up all your important data. When dealing with a BSoD error, especially one that indicates system instability, there’s always a risk of further system corruption or even a complete inability to boot. Losing personal documents, photos, or work files can be devastating.
You can use external hard drives, cloud storage services like OneDrive or Google Drive, or network-attached storage (NAS) to secure your files. If your system can still boot into Windows, even intermittently, transfer your most critical data immediately. For more comprehensive protection, consider creating a system image backup on Windows 11.
If your system is stuck in a boot loop or cannot access Windows normally, you might need to boot from a Windows installation media or a recovery drive to access your files. Tools available in the Windows Recovery Environment can sometimes help you copy data to an external drive. Always assume the worst-case scenario when facing critical system errors.
Booting into Safe Mode
Safe Mode is a diagnostic startup option for Windows that starts your computer in a limited state. Only essential system programs and services are loaded, and most third-party drivers and applications are disabled. This minimal environment is invaluable for troubleshooting the VIDEO_DXGKRNL_FATAL_ERROR on Windows 11.
If the error is caused by a third-party driver or application, your system might boot successfully into Safe Mode, allowing you to perform diagnostics, uninstall problematic software, or update drivers without encountering the BSoD. It essentially bypasses many potential conflict points.
To boot into Safe Mode:
- Restart your computer. As it starts, repeatedly press the F8 key or Shift + F8 (timing can be tricky) to access the Advanced Boot Options. If this doesn’t work, you might need to use a Windows installation media to access the recovery environment.
- Alternatively, if you can get into Windows, navigate to Settings > System > Recovery > Advanced startup, and click Restart now.
- After restarting, select Troubleshoot > Advanced options > Startup Settings > Restart.
- Once your computer restarts again, you’ll see a list of options. Select 4 or F4 to Enable Safe Mode, or 5 or F5 for Safe Mode with Networking (if you need internet access for downloads).
Once in Safe Mode, you can proceed with many of the troubleshooting steps outlined below, such as updating drivers or running system scans, with a reduced risk of immediate crashes.
Method 1: Update or Reinstall Graphics Drivers
As established, graphics driver issues are the leading cause of the VIDEO_DXGKRNL_FATAL_ERROR on Windows 11. Therefore, addressing your display drivers should be your top priority. This involves not just updating them, but often performing a complete, clean reinstallation to eliminate any lingering corrupted files or conflicts.
Outdated drivers may lack compatibility with the latest Windows 11 updates or new software, while corrupted drivers can lead to direct communication failures with the graphics kernel. A clean installation ensures that all old driver components are removed before new, stable ones are installed, providing a fresh slate for your graphics subsystem.
This method is often the most effective first step, as it resolves a significant percentage of graphics-related BSoD errors. Pay close attention to the steps for a clean installation, as it’s more thorough than a simple update.
Using Device Manager to Update Drivers
The simplest way to update a driver is through Windows Device Manager. While this method is convenient, it doesn’t always perform a clean installation and might not find the very latest driver versions available from the manufacturer.
- Press Windows key + X and select Device Manager from the menu.
- Expand the Display adapters section.
- Right-click on your graphics card (e.g., NVIDIA GeForce RTX 3080 or AMD Radeon RX 6800 XT) and select Update driver.
- Choose Search automatically for drivers. Windows will attempt to find and install the best available driver.
- If Windows reports that the best drivers are already installed, you can also try selecting Search for updated drivers on Windows Update, which will direct you to the Windows Update settings.
After updating, restart your computer to see if the VIDEO_DXGKRNL_FATAL_ERROR persists. If it does, or if Windows couldn’t find a newer driver, a clean installation is the next logical step.
Performing a Clean Driver Installation with DDU
A clean driver installation is often more effective than a simple update because it completely removes all traces of previous driver versions, preventing potential conflicts. For this, we recommend using a tool called Display Driver Uninstaller (DDU).
- First, download the latest graphics drivers for your specific GPU directly from the manufacturer’s website (NVIDIA, AMD, or Intel). Save them to a location you can easily find, like your Downloads folder.
- Next, download Display Driver Uninstaller (DDU) from its official source (e.g., Wagnardsoft’s Guru3D page) and extract it.
- Boot your computer into Safe Mode (refer to the “Booting into Safe Mode” section if needed). This is crucial for DDU to work effectively without interference from active drivers.
- Once in Safe Mode, run DDU. Select your GPU manufacturer from the dropdown menu (e.g., NVIDIA, AMD, Intel).
- Click on Clean and restart. DDU will meticulously remove all graphics driver components and then restart your computer in normal mode.
- After your system restarts, install the fresh drivers you downloaded in step 1. Follow the on-screen instructions, opting for a “Custom” or “Clean” installation if available within the driver installer itself.
- Restart your computer once more after the new drivers are installed.
Important Tip: Always download drivers directly from the GPU manufacturer’s official website. Avoid third-party driver update utilities, as they can sometimes install incorrect or outdated drivers, exacerbating the problem. Ensure you select the correct driver for your specific GPU model and Windows 11 version.
This thorough process significantly reduces the chances of driver-related conflicts causing the VIDEO_DXGKRNL_FATAL_ERROR on Windows 11.
Method 2: Run System File Checker and DISM
If graphics driver updates don’t resolve the VIDEO_DXGKRNL_FATAL_ERROR, the next logical step is to investigate the integrity of your Windows system files. Corrupted system files can lead to a wide range of stability issues, including BSoDs, by interfering with core operating system functions, such as those handled by the DirectX Graphics Kernel.
Windows provides built-in command-line tools, System File Checker (SFC) and Deployment Image Servicing and Management (DISM), specifically designed to scan for and repair corrupted system files. These tools are powerful diagnostics that can often fix underlying OS issues that might not be immediately apparent.
Running both SFC and DISM in sequence is a best practice, as DISM can repair the Windows image that SFC uses, allowing SFC to then perform a more effective scan and repair of individual system files. This two-pronged approach ensures a comprehensive check of your operating system’s health.
Checking for Corrupt System Files with SFC
The System File Checker (SFC) utility scans for and restores corrupted Windows system files. It compares your current system files with the original, correct versions and replaces any that have been altered or damaged. This can resolve issues where the operating system’s core components are compromised.
- Press Windows key + S, type cmd, right-click on Command Prompt, and select Run as administrator.
- In the Command Prompt window, type the following command and press Enter:
sfc /scannow - The scan will take some time to complete. Do not close the Command Prompt window until the verification is 100% finished.
- Once completed, you will see a message indicating whether integrity violations were found and if they were successfully repaired.
If SFC reports that it found corrupted files but couldn’t repair them, or if the VIDEO_DXGKRNL_FATAL_ERROR on Windows 11 persists, proceed to run the DISM tool.
Repairing Windows Image with DISM
The Deployment Image Servicing and Management (DISM) tool is more advanced than SFC. It’s used to repair the Windows image itself, which SFC relies upon. If the source files SFC uses are corrupted, DISM can fix them, allowing SFC to then perform its job more effectively. This is particularly useful for deeper system integrity issues.
- Open Command Prompt as administrator, just as you did for SFC.
- Type the following commands one by one, pressing Enter after each. Allow each command to complete before typing the next (this can take several minutes):
DISM /Online /Cleanup-Image /CheckHealth(Checks for corruption)DISM /Online /Cleanup-Image /ScanHealth(Performs a more advanced scan)DISM /Online /Cleanup-Image /RestoreHealth(Repairs the Windows image using Windows Update as a source)
- After the DISM commands complete, it’s a good idea to run
sfc /scannowagain to ensure all system files are now in their correct state. - Restart your computer after running both SFC and DISM.
These two tools combined offer a powerful way to address underlying system file corruption that could be contributing to the VIDEO_DXGKRNL_FATAL_ERROR.
Method 3: Check for Windows Updates
Microsoft regularly releases updates for Windows 11 that include bug fixes, security patches, and performance improvements. These updates often address system stability issues, driver incompatibilities, and even specific BSoD errors. An outdated operating system can therefore be a contributing factor to the VIDEO_DXGKRNL_FATAL_ERROR.
Ensuring your Windows 11 installation is fully up-to-date is a crucial and relatively simple troubleshooting step. Microsoft actively works to resolve known issues, and a patch for your specific problem might already be available. This method is particularly important if the error started appearing after a period of not updating your system.
While sometimes updates can introduce new issues, more often they resolve existing ones. It’s always recommended to keep your system current, especially when experiencing critical errors like a BSoD.
Ensuring Your System is Up-to-Date
Checking for and installing Windows updates is a straightforward process:
- Press Windows key + I to open Settings.
- Click on Windows Update in the left-hand pane.
- Click the Check for updates button.
- If updates are available, Windows will download and install them. You may be prompted to restart your computer.
- After restarting, go back to Windows Update and check for updates again, as some updates are cumulative and require previous ones to be installed first.
Allow all pending updates to install and restart your system as required. After your system is fully updated, monitor for the recurrence of the VIDEO_DXGKRNL_FATAL_ERROR on Windows 11. If the error persists, you can rule out outdated OS components as the primary cause.
Method 4: Test and Update Other Drivers
While graphics drivers are often the primary suspect for the VIDEO_DXGKRNL_FATAL_ERROR, other system drivers can also play a role in overall system stability. Chipset drivers, for instance, manage the communication between your CPU, RAM, and various peripherals. Outdated or corrupted chipset drivers can indirectly affect how your graphics card interacts with the rest of the system, leading to unexpected errors.
Similarly, drivers for sound cards, network adapters, or even USB controllers can sometimes conflict with other system components, manifesting as a BSoD. It’s a good practice to ensure all critical system drivers are up-to-date, especially if the graphics driver update alone didn’t resolve the issue.
This method expands your driver troubleshooting beyond just the GPU, taking a more holistic approach to system stability. It’s about ensuring all foundational software components are functioning correctly and harmoniously.
Verifying Chipset and Other Essential Drivers
To check and update other critical drivers:
- Open Device Manager (Windows key + X, then select Device Manager).
- Look for categories like System devices, Sound, video and game controllers, and Network adapters.
- For chipset drivers, you’ll typically find them under System devices. Look for entries related to your motherboard’s chipset (e.g., Intel Management Engine Interface, AMD SMBus).
- Right-click on each device and select Update driver. Choose Search automatically for drivers.
- For the most critical drivers, especially chipset drivers, it’s often best to visit your motherboard manufacturer’s website (for custom-built PCs) or your PC manufacturer’s support page (for pre-built systems like Dell, HP, Lenovo). Download and install the latest drivers specifically for your model and Windows 11.
After updating any non-graphics drivers, restart your computer. This ensures that the new drivers are properly loaded and integrated into the system. Monitor your system for any further occurrences of the VIDEO_DXGKRNL_FATAL_ERROR on Windows 11. This comprehensive driver check helps eliminate a broader range of software-related conflicts.
Method 5: Adjust Power Management Settings
Insufficient or inconsistent power delivery to your graphics card can cause it to become unstable, leading to crashes and the VIDEO_DXGKRNL_FATAL_ERROR. Windows power management settings, while designed to optimize energy consumption, can sometimes be overly aggressive, cutting power to components when they are under fluctuating loads.
This is particularly relevant for high-performance graphics cards that demand a significant and stable power supply. If your power plan is set to a power-saving mode, it might inadvertently starve your GPU of the necessary power, especially during demanding tasks like gaming or video editing.
Adjusting these settings to ensure maximum performance can sometimes resolve power-related instability issues. It’s a relatively simple change that can have a profound impact on your system’s reliability, especially if your power supply unit (PSU) is borderline or aging.
Preventing Graphics Card Power Issues
To adjust your power management settings:
- Press Windows key + S, type power plan, and select Choose a power plan.
- In the Power Options window, select the High performance or Ultimate Performance power plan if available. If not, click Create a power plan and choose High performance.
- Next, click Change plan settings next to your selected power plan.
- Click Change advanced power settings.
- Scroll down and expand PCI Express, then expand Link State Power Management.
- Set the “Setting” to Off for both “On battery” and “Plugged in.” This prevents the PCIe bus from entering a low-power state, which can sometimes cause issues with graphics cards.
- Expand Display, then Turn off display after and set it to a reasonable time or “Never” if you prefer. More importantly, check Adaptive display and ensure it’s not aggressively dimming your screen.
- Finally, expand Graphics Settings (if present, often for Intel graphics) and ensure it’s set to Maximum Performance.
- Click Apply and then OK.
Restart your computer after making these changes. By ensuring your system provides consistent and ample power, you might mitigate the conditions that lead to the VIDEO_DXGKRNL_FATAL_ERROR on Windows 11. This is especially important for systems with powerful GPUs or older power supply units.
Method 6: Scan for Malware and Viruses
Malicious software, including viruses, worms, and ransomware, can wreak havoc on a Windows system. Beyond stealing data or disrupting privacy, malware can corrupt system files, interfere with driver operations, and introduce instabilities that lead to critical errors like the VIDEO_DXGKRNL_FATAL_ERROR. Some sophisticated malware can even directly target and corrupt critical kernel components.
Even if you have antivirus software installed, it’s possible for new or evasive threats to slip through. A thorough scan is always a prudent step when experiencing unexplained system crashes or BSoDs, as malware can often be the hidden culprit behind seemingly hardware or driver-related issues.
This method ensures that your troubleshooting efforts aren’t undermined by an ongoing infection. A clean system is a prerequisite for effective diagnosis and repair of other issues.
Utilizing Windows Security for Comprehensive Scans
Windows 11 comes with a robust built-in security suite called Windows Security (formerly Windows Defender). It provides real-time protection and comprehensive scanning capabilities.
- Press Windows key + I to open Settings.
- Click on Privacy & security in the left-hand pane, then select Windows Security.
- Click on Open Windows Security.
- In the Windows Security dashboard, click on Virus & threat protection.
- Under “Current threats,” click on Scan options.
- Select Full scan and then click Scan now. A full scan can take a significant amount of time, sometimes several hours, depending on the size of your hard drive and the number of files.
- Allow the scan to complete. If any threats are found, follow the prompts to quarantine or remove them.
For an even more thorough check, consider performing an offline scan within Windows Security. This allows the scanner to run before Windows fully boots, making it more effective against rootkits and other persistent malware. To do this, select “Microsoft Defender Offline scan” from the scan options. Your PC will restart and perform the scan.
Pro Tip: While Windows Security is excellent, a second opinion from a reputable third-party anti-malware tool (like Malwarebytes) can sometimes catch threats that Windows Security might miss, especially if you suspect a persistent infection. Run these scans in Safe Mode for best results.
After cleaning any detected threats and restarting your computer, observe if the VIDEO_DXGKRNL_FATAL_ERROR on Windows 11 continues to appear.
Method 7: Perform a System Restore
If the VIDEO_DXGKRNL_FATAL_ERROR on Windows 11 started occurring recently, particularly after installing new software, updating drivers, or making significant system changes, performing a System Restore can be an invaluable troubleshooting step. System Restore allows you to revert your computer’s system files, installed applications, Windows Registry, and system settings to an earlier point in time, known as a restore point.
This process does not affect your personal files, such as documents, pictures, or emails. It’s designed to undo system-level changes that might have introduced instability. If you have a restore point created before the error began, this method can often quickly resolve the issue by rolling back problematic configurations.
System Restore is a powerful recovery option that can save you from having to perform more drastic measures like a full Windows reinstallation. It’s particularly useful when you can identify a specific event that triggered the BSoD.
Reverting to a Stable System State
To perform a System Restore:
- Press Windows key + S, type create a restore point, and select the corresponding option from the search results. This will open the System Properties window.
- In the System Protection tab, click the System Restore… button.
- Click Next on the System Restore wizard.
- You will see a list of available restore points. Select a restore point that was created before you started experiencing the VIDEO_DXGKRNL_FATAL_ERROR. If you don’t see any, check the box that says Show more restore points.
- Click Next, then Finish to confirm your choice.
- Your computer will restart and begin the restoration process. Do not interrupt this process once it has started.
Once the System Restore is complete, your computer will boot back into Windows 11, and you’ll receive a notification indicating whether the restore was successful. Check if the VIDEO_DXGKRNL_FATAL_ERROR has been resolved. If the error returns, or if no suitable restore points are available, you’ll need to explore other solutions.
Note: System Restore needs to be enabled for restore points to be created automatically. It’s a good practice to ensure system protection is turned on for your primary drive. You can also manually create a restore point before making significant changes to your system.
This method effectively rolls back your system to a healthier state, undoing any recent changes that might have introduced the BSoD error.
Method 8: Check for Hardware Issues
If software-based solutions haven’t resolved the VIDEO_DXGKRNL_FATAL_ERROR on Windows 11, it’s time to consider potential hardware malfunctions. The “VIDEO” part of the error code strongly implicates the graphics card, but other components like RAM can also cause graphics-related instability. Hardware issues are often more challenging to diagnose and fix, sometimes requiring component replacement.
Diagnosing hardware involves testing individual components and monitoring system parameters like temperature. This step is crucial because a faulty piece of hardware will continue to cause errors regardless of how many software fixes you apply. It’s important to approach this method systematically to pinpoint the exact failing component.
While some diagnostics can be done with software, physical inspection and sometimes even swapping components are necessary for definitive answers. Always ensure your system is powered off and unplugged before performing any internal hardware checks.
Diagnosing RAM and GPU Problems
1. Test Your RAM:
Faulty RAM can cause a myriad of system instabilities, including BSoDs. Windows has a built-in memory diagnostic tool:
- Press Windows key + S, type Windows Memory Diagnostic, and open it.
- Select Restart now and check for problems (recommended).
- Your computer will restart and run a memory test. This can take some time.
- After the test, Windows will boot normally, and the results will be displayed in a notification or can be found in the Event Viewer (under Windows Logs > System, look for MemoryDiagnostic entries).
If the test indicates RAM problems, try removing and reseating your RAM modules. If you have multiple sticks, test them one by one to identify the faulty module. Replace any defective RAM. For more advanced testing, consider using tools like MemTest86.
2. Test Your GPU:
Diagnosing a faulty GPU can be more complex. If you have a spare graphics card, try swapping it out to see if the error disappears. If not, consider these steps:
- Reseat the GPU: Power off your PC, unplug it, open the case, and carefully remove your graphics card. Clean the PCIe slot and the card’s contacts with compressed air, then firmly reseat it. Ensure all power cables are securely connected.
- Integrated Graphics: If your CPU has integrated graphics (e.g., Intel CPUs with “F” suffix don’t, most AMD APUs do), remove your dedicated GPU and connect your monitor to the motherboard’s video output. If the system runs stably, your dedicated GPU is likely the problem.
- Stress Test: Use a GPU stress testing tool like FurMark or Heaven Benchmark. If the error occurs rapidly during a stress test, it strongly suggests a GPU hardware issue or overheating.
If these tests point to a faulty GPU, replacement might be necessary. This is a critical step in resolving the VIDEO_DXGKRNL_FATAL_ERROR on Windows 11 when all software solutions have failed.
Checking for Overheating
Overheating is a common cause of hardware instability and BSoDs. Your GPU, CPU, and other components generate heat, and if this heat isn’t dissipated effectively, performance degrades, and components can fail. The VIDEO_DXGKRNL_FATAL_ERROR is often temperature-sensitive.
- Monitor Temperatures: Use monitoring software like HWMonitor, MSI Afterburner, or Speccy to check your CPU and GPU temperatures, especially while running demanding applications or games. Note the temperatures before a crash.
- Clean Your PC: Dust buildup is a major culprit for overheating. Power off and unplug your PC, open the case, and use compressed air to thoroughly clean all fans (CPU, GPU, case fans) and heatsinks. Pay special attention to the GPU’s heatsink fins.
- Check Fan Operation: Ensure all fans in your system (CPU, GPU, case) are spinning freely and quietly. A failing fan can lead to rapid temperature spikes.
- Improve Airflow: Ensure your PC case has adequate airflow. Make sure intake and exhaust fans are correctly oriented and that cables aren’t obstructing airflow.
If temperatures are consistently high (e.g., GPU reaching 85-90°C or higher under load), improving cooling is essential. This might involve cleaning, adding more case fans, or even reapplying thermal paste to your CPU or GPU (an advanced task). Addressing overheating can often prevent the VIDEO_DXGKRNL_FATAL_ERROR by keeping your hardware within safe operating limits.
Method 9: Disable Fast Startup
Windows 11 features Fast Startup, a hybrid shutdown mode designed to make your computer boot up more quickly. When you shut down your PC with Fast Startup enabled, Windows saves a small hibernation file that includes the state of your kernel and drivers. This allows for a faster resume when you power on the machine.
However, this feature can sometimes lead to issues, especially with drivers. If a driver, particularly the graphics driver, is not properly initialized or shut down during the Fast Startup process, it can lead to conflicts and errors upon the next boot, potentially triggering the VIDEO_DXGKRNL_FATAL_ERROR. Disabling it can resolve these boot-related instabilities.
While it might slightly increase your boot time, disabling Fast Startup ensures a complete shutdown and fresh boot each time, which can eliminate certain driver-related BSoDs.
Resolving Potential Boot Conflicts
To disable Fast Startup:
- Press Windows key + S, type control panel, and open the Control Panel.
- Change the “View by” option to Large icons or Small icons, then click on Power Options.
- In the Power Options window, click on Choose what the power buttons do in the left-hand pane.
- Click on Change settings that are currently unavailable (you may need administrator privileges).
- Under “Shutdown settings,” uncheck the box next to Turn on fast startup (recommended).
- Click Save changes.
After disabling Fast Startup, perform a full shutdown (not just a restart) and then power on your computer. Monitor your system to see if the VIDEO_DXGKRNL_FATAL_ERROR on Windows 11 still occurs. If the error was related to an improper driver state during boot, this step should help resolve it by ensuring a clean boot cycle every time.
Method 10: Reset or Reinstall Windows 11
When all other troubleshooting methods have failed to resolve the persistent VIDEO_DXGKRNL_FATAL_ERROR on Windows 11, a fresh start for your operating system becomes the most effective, albeit drastic, solution. This involves either resetting Windows 11 while keeping your files or performing a complete clean reinstallation.
A reset or reinstallation eliminates all software conflicts, corrupted system files, and problematic drivers, providing a pristine operating environment. It’s the ultimate troubleshooting step, as it addresses virtually all software-related causes of BSoDs. However, it requires careful preparation, especially regarding data backup.
While it might seem daunting, a fresh Windows installation often resolves deep-seated issues that are otherwise impossible to pinpoint. It ensures that the operating system itself is not the source of the persistent fatal error.
Performing a Fresh Installation
Before proceeding, ensure you have backed up all your important data (refer to “Backing Up Important Data”).
Option 1: Reset This PC (Keep my files)
This option reinstalls Windows 11 but retains your personal files. It removes apps and settings, but your documents and photos remain. This is less disruptive than a full clean install.
- Press Windows key + I to open Settings.
- Go to System > Recovery.
- Under “Recovery options,” next to “Reset this PC,” click Get started.
- Choose Keep my files.
- Select either Cloud download (downloads a fresh copy of Windows) or Local reinstall (uses existing system files). Cloud download is generally recommended for a cleaner installation.
- Follow the on-screen prompts to complete the reset.
Option 2: Clean Reinstallation (Remove everything)
This is the most thorough option, completely wiping your drive and installing a fresh copy of Windows 11. It’s the best way to eliminate all software-related issues.
- You’ll need a Windows 11 installation media (USB drive or DVD) created using the Windows 11 Media Creation Tool.
- Boot your computer from the installation media (you might need to change your BIOS/UEFI boot order).
- Follow the on-screen instructions to install Windows 11. When prompted, choose the custom installation option and delete all existing partitions on your primary drive before creating a new one. This ensures a truly clean slate.
- Complete the Windows 11 setup process.
- After installation, install all necessary drivers (especially graphics and chipset drivers) from your hardware manufacturers’ websites and run Windows Updates.
While a fresh installation takes time, it is highly effective in resolving persistent BSoD errors like the VIDEO_DXGKRNL_FATAL_ERROR on Windows 11 by eliminating all software-related variables. After reinstalling, carefully install software and drivers one by one to identify any potential conflicts if the error somehow returns.
Preventing Future VIDEO_DXGKRNL_FATAL_ERRORs
Resolving the VIDEO_DXGKRNL_FATAL_ERROR on Windows 11 is a significant achievement, but preventing its recurrence is equally important. A proactive approach to system maintenance and careful management of your software and hardware can greatly enhance your system’s stability and longevity. It’s about building good habits that contribute to a healthy computing environment.
Prevention involves a combination of regular updates, diligent monitoring, and cautious installation practices. By understanding what typically causes these errors, you can take steps to mitigate those risks before they manifest as critical system failures. This section outlines best practices to keep your Windows 11 system running smoothly and reliably.
Adopting these habits will not only help prevent the VIDEO_DXGKRNL_FATAL_ERROR but also safeguard your system against a wide array of other potential issues, ensuring a more pleasant and productive computing experience.
Regular Maintenance and Best Practices
To keep your Windows 11 system stable and avoid the VIDEO_DXGKRNL_FATAL_ERROR:
- Keep Drivers Updated: Regularly check for and install the latest graphics drivers from your GPU manufacturer’s website (NVIDIA, AMD, Intel). Also, keep your chipset and other critical drivers current.
- Install Windows Updates: Ensure Windows Update is active and install all available updates promptly. These often include stability fixes and driver compatibility improvements.
- Monitor Temperatures: Use monitoring software to keep an eye on your CPU and GPU temperatures. Clean your PC regularly to prevent dust buildup, which can lead to overheating. Ensure good airflow within your case.
- Maintain System Files: Periodically run
sfc /scannowand DISM commands to check and repair any corrupted system files. This helps maintain the integrity of your operating system. - Scan for Malware: Conduct regular full scans with Windows Security or a reputable third-party antivirus to detect and remove any malicious software that could corrupt files or interfere with system operations.
- Use Reliable Software: Only download and install software from trusted sources. Be wary of freeware or shareware from unknown developers, as they can sometimes bundle unwanted programs or malware.
- Power Supply Health: Ensure your power supply unit (PSU) is adequate for your components, especially your graphics card. An aging or underpowered PSU can lead to instability.
- Create Restore Points: Enable System Protection and regularly create system restore points, especially before installing new hardware or major software. This provides a quick rollback option.
- Backup Data: Continue to back up your important data regularly to an external drive or cloud service. This is your ultimate safeguard against any unforeseen system failures. For comprehensive backup solutions, consider resources like System Image Backup on Windows 11: Comprehensive Guide.
By consistently following these best practices, you can significantly reduce the likelihood of encountering the VIDEO_DXGKRNL_FATAL_ERROR on Windows 11 and enjoy a more stable and reliable computing experience.
Conclusion: Restoring Stability to Your Windows 11 System
The VIDEO_DXGKRNL_FATAL_ERROR on Windows 11 is undoubtedly a disruptive and concerning Blue Screen of Death. However, as this comprehensive guide has demonstrated, it is an error that can often be resolved with a systematic and patient approach to troubleshooting. From the most common culprits like outdated graphics drivers to more complex hardware diagnostics and system file repairs, we’ve covered a wide array of solutions designed to restore your system’s stability.
The key to successfully overcoming this error lies in understanding its potential causes and methodically working through the troubleshooting steps. Remember to always start with the least invasive solutions, such as driver updates and system file checks, before moving on to more drastic measures like a Windows reinstallation. Prioritizing data backup throughout this process is paramount, ensuring your valuable information remains secure regardless of the outcome.
By implementing the practical advice and actionable steps outlined in this article, you are well-equipped to diagnose and fix the VIDEO_DXGKRNL_FATAL_ERROR. Furthermore, by adopting the suggested best practices for regular maintenance and cautious system management, you can significantly reduce the chances of encountering this or other critical errors in the future. A stable and reliable Windows 11 environment is within reach, allowing you to focus on your tasks without the constant worry of unexpected crashes.
For more interesting articles, stay tuned to Winsides.com!









Community
Comments (0)