

Introduction to PAGE_FAULT_IN_NONPAGED_AREA (0x00000050)
Encountering a Blue Screen of Death (BSOD) on your Windows 11 system can be a profoundly frustrating experience. Among the myriad of error codes, 0x00000050 PAGE_FAULT_IN_NONPAGED_AREA stands out as a particularly common and often perplexing one. This error signifies that your system has attempted to access a page of memory that was not present in the non-paged area of the kernel’s memory space. Essentially, it’s a critical memory management issue that Windows cannot recover from, leading to an abrupt system shutdown. For additional context, see create a restore point in Windows and MemTest86.
This comprehensive guide will delve deep into the causes behind the 0x00000050 PAGE_FAULT_IN_NONPAGED_AREA on Windows 11 and, more importantly, equip you with a structured approach to diagnose and resolve it. From basic checks to advanced troubleshooting, we’ll cover every potential angle, ensuring you have the knowledge to restore your system’s stability. Understanding this error is the first step towards a stable, reliable computing experience.
Understanding the Blue Screen of Death (BSOD)
A Blue Screen of Death, or BSOD, is Windows’ way of telling you that it has encountered a critical system error from which it cannot recover gracefully. These errors are often indicative of severe hardware malfunctions, corrupted drivers, or critical software conflicts. When a BSOD appears, Windows typically collects diagnostic information and then restarts, sometimes entering a repair environment.
The specific code, like 0x00000050, provides a crucial hint about the nature of the problem. While intimidating, these error messages are designed to help users and technicians pinpoint the root cause. Ignoring recurring BSODs can lead to data loss or further hardware damage, making prompt investigation essential for maintaining system health.
Why the Nonpaged Area is Critical
To grasp the severity of the 0x00000050 error, it’s important to understand the concept of the nonpaged area of memory. In a nutshell, computer memory (RAM) is divided into different regions. The nonpaged pool is a section of kernel memory that cannot be swapped out to the hard disk (paged out) when physical RAM runs low.
This area holds critical data structures and code that the operating system and device drivers need to access at all times, without any delay. If the system tries to access data in this nonpaged area and finds it missing or corrupted, it’s a catastrophic failure. This is precisely what the 0x00000050 PAGE_FAULT_IN_NONPAGED_AREA error indicates, highlighting a fundamental problem with how your Windows 11 system is managing its most vital memory resources.
Table of contents
Key Takeaways for Resolving Error 0x00000050
Before diving into detailed troubleshooting, here’s a quick summary of the most effective solutions for the 0x00000050 PAGE_FAULT_IN_NONPAGED_AREA Windows 11 error. These points represent the core actions you should consider taking to address the issue promptly.
- Update Device Drivers: Outdated or corrupted drivers are a leading cause. Focus on graphics, network, and storage drivers.
- Check RAM Health: Memory issues are frequently behind this error. Run the Windows Memory Diagnostic Tool and physically inspect your RAM modules.
- Scan for System File Corruption: Use SFC and DISM to repair any damaged Windows system files that might be causing memory access problems.
- Adjust Virtual Memory: Incorrect paging file settings can sometimes trigger this error. Resetting virtual memory to system-managed can help.
- Eliminate Software Conflicts: Perform a clean boot to identify third-party applications or services that might be interfering with memory management.
- Scan for Malware: Malicious software can corrupt system files and interfere with memory operations, leading to critical errors.
- Update BIOS/UEFI Firmware: An outdated BIOS/UEFI can sometimes cause hardware compatibility issues that manifest as memory errors.
Initial Troubleshooting Steps and System Diagnostics
When faced with the 0x00000050 PAGE_FAULT_IN_NONPAGED_AREA error, a systematic approach is key. Before diving into complex solutions, it’s always wise to start with basic checks. Often, recent changes to your system are the culprits, and reverting them can quickly resolve the problem. This section will guide you through these initial yet crucial diagnostic steps.
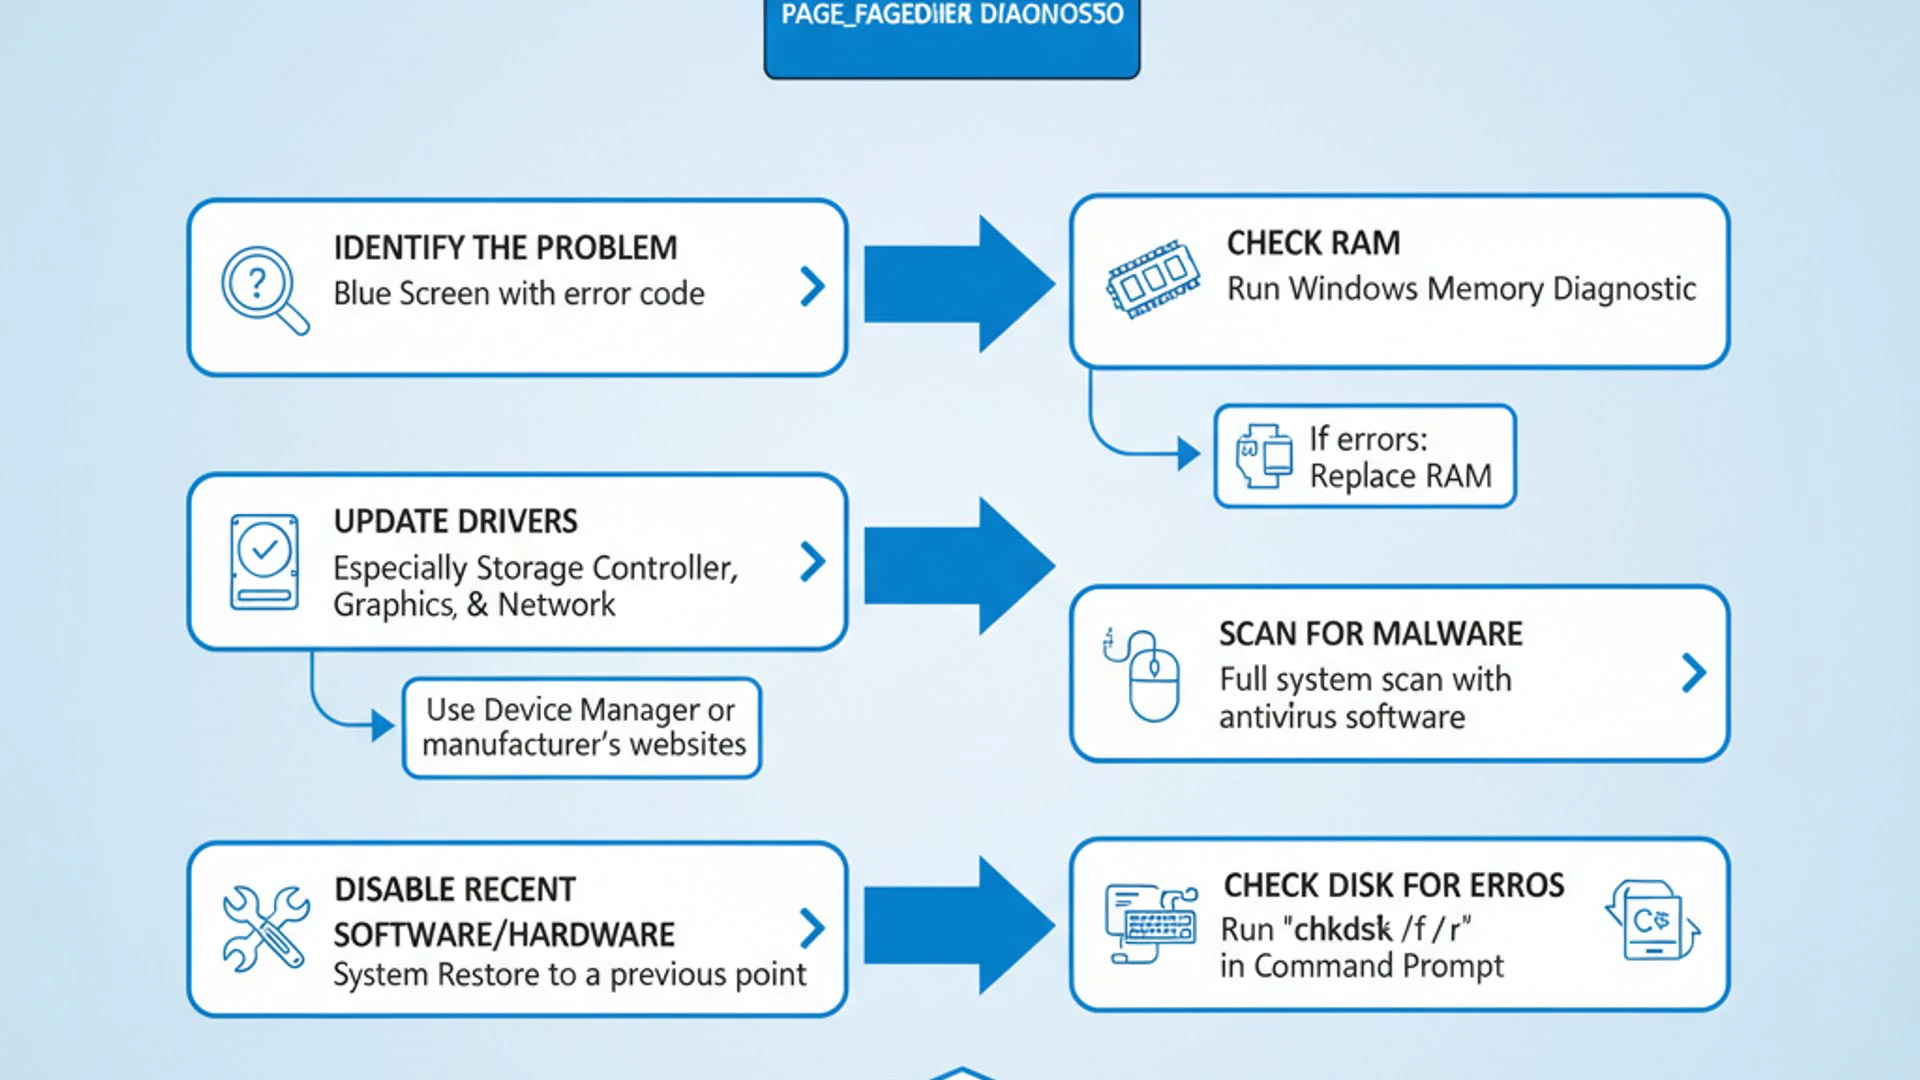
These preliminary actions are designed to identify and rectify common, easily fixable issues. They serve as a foundation for more advanced troubleshooting if the problem persists. Remember, patience and methodical execution are your best tools when dealing with BSOD errors.
Checking for Recent Hardware or Software Changes
One of the first questions to ask yourself when a BSOD appears is: “What did I change recently?” New hardware installations, software updates, or even newly installed applications can introduce conflicts or instabilities that lead to the 0x00000050 PAGE_FAULT_IN_NONPAGED_AREA Windows 11 error. This is a common trigger for many system failures.
If you’ve recently installed a new peripheral, updated a driver, or installed a significant software package, try uninstalling or reverting that change. For hardware, physically disconnect it. For software, use the “Apps & features” settings to uninstall. If the error disappears, you’ve found your culprit.
Performing a System Restore
If identifying a specific recent change is difficult, or if uninstalling doesn’t help, System Restore can be a lifesaver. This Windows feature allows you to revert your system’s configuration to an earlier point in time when it was functioning correctly. It primarily affects system files, installed applications, and drivers, leaving your personal files untouched.
Using a restore point can effectively undo problematic updates or installations that are causing the 0x00000050 PAGE_FAULT_IN_NONPAGED_AREA error. It’s a powerful tool for rolling back to a known good state without having to reinstall Windows entirely. Ensure you have restore points enabled and created regularly.
How to Access System Restore in Windows 11
Accessing System Restore might require a few steps, especially if your system is unstable. You might need to boot into Safe Mode or the Windows Recovery Environment (WinRE).
- Search for “Create a restore point”: Type this into the Windows search bar and select the relevant result. This opens the System Properties window.
- Click “System Restore”: In the System Protection tab, click the “System Restore…” button.
- Follow the Wizard: Click “Next” and choose a restore point from the list. Ideally, select one created before the 0x00000050 error started appearing.
- Confirm and Finish: Review your selection and click “Finish” to start the restore process. Your computer will restart.
Pro Tip: If your PC won’t boot normally, repeatedly press F8 or Shift + F8 during startup to access advanced boot options. From there, navigate to “Troubleshoot” > “Advanced options” > “System Restore.”
Updating and Verifying Device Drivers
Device drivers are essential software components that allow your operating system to communicate with your hardware. Outdated, corrupted, or incompatible drivers are a very common cause of the 0x00000050 PAGE_FAULT_IN_NONPAGED_AREA error on Windows 11. When a driver attempts to access a memory location incorrectly, it can trigger this specific BSOD.
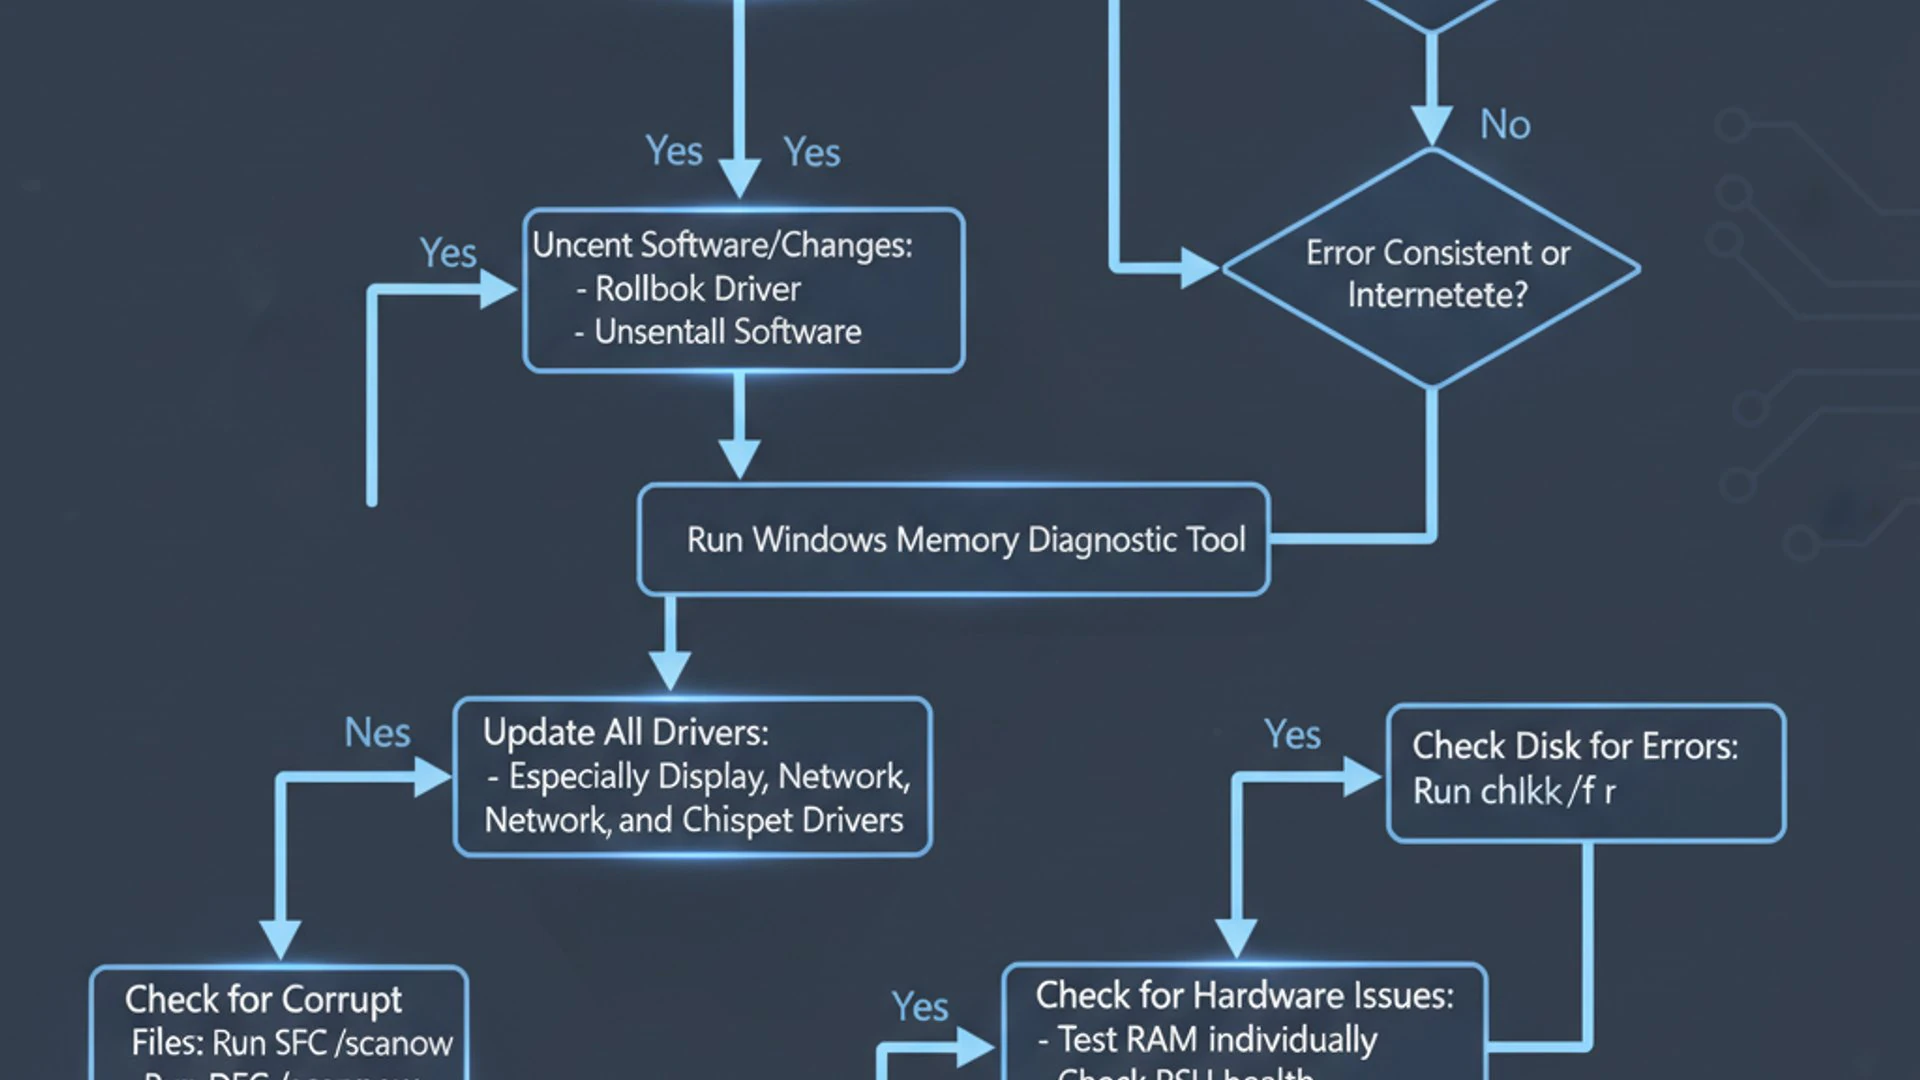
Ensuring all your drivers are up-to-date and correctly installed is a critical step in troubleshooting. This section will guide you through identifying problematic drivers and the best methods for updating them, helping to resolve the underlying memory access issues.
Identifying Problematic Drivers
Sometimes, the BSOD message itself might point to a specific driver file (e.g., nvlddmkm.sys for NVIDIA graphics, ntoskrnl.exe for the Windows kernel). If you can catch this detail, it narrows down your search significantly. Otherwise, you’ll need to use tools to help.
The Event Viewer is an invaluable tool for this. After a BSOD, Windows logs critical errors. Open Event Viewer (search for it in Windows), navigate to “Windows Logs” > “System,” and look for “Error” or “Critical” events around the time of the crash. These entries often provide clues about the faulty driver or hardware component that led to the 0x00000050 PAGE_FAULT_IN_NONPAGED_AREA error.
Using Device Manager to Update Drivers
The Device Manager is the primary tool within Windows for managing your hardware and their associated drivers. It allows you to update, roll back, or uninstall drivers directly.
- Open Device Manager: Right-click the Start button and select “Device Manager.”
- Locate Devices: Expand categories like “Display adapters,” “Network adapters,” “Sound, video and game controllers,” and “Storage controllers.”
- Update Driver: Right-click on a device, select “Update driver,” then “Search automatically for drivers.” Windows will attempt to find the latest compatible driver online.
- Reboot: After updating, restart your computer to ensure the changes take effect.
Pay special attention to drivers for your graphics card, network adapter, and chipset, as these are frequent culprits for memory-related BSODs. Repeating this process for all critical components can help resolve the 0x00000050 PAGE_FAULT_IN_NONPAGED_AREA Windows 11 error.
Manually Installing Drivers from Manufacturer Websites
While Device Manager is convenient, it doesn’t always find the absolute latest or most optimized drivers. For critical components, it’s often best to download drivers directly from the hardware manufacturer’s website. This ensures you get drivers specifically designed for your hardware model and operating system.
- Identify Hardware: Note down the make and model of your graphics card, motherboard (for chipset drivers), network adapter, etc.
- Visit Manufacturer’s Website: Go to the support or download section of websites like NVIDIA, AMD, Intel, Realtek, or your motherboard manufacturer (e.g., ASUS, MSI, Gigabyte).
- Download Drivers: Find the latest drivers compatible with Windows 11 and your specific hardware model.
- Install Manually: Run the downloaded installer. It’s often recommended to perform a “clean installation” if the option is available, especially for graphics drivers, to remove old driver files completely.
This manual approach is particularly effective if you suspect a specific driver is causing the 0x00000050 PAGE_FAULT_IN_NONPAGED_AREA error. Always download from official sources to avoid malware.
Diagnosing and Repairing RAM Issues
Given that the 0x00000050 PAGE_FAULT_IN_NONPAGED_AREA error is fundamentally a memory access violation, issues with your system’s Random Access Memory (RAM) are a prime suspect. Faulty RAM modules, incorrectly seated RAM, or even incompatible RAM can all lead to this critical error. Diagnosing RAM problems involves both software tools and physical inspection.
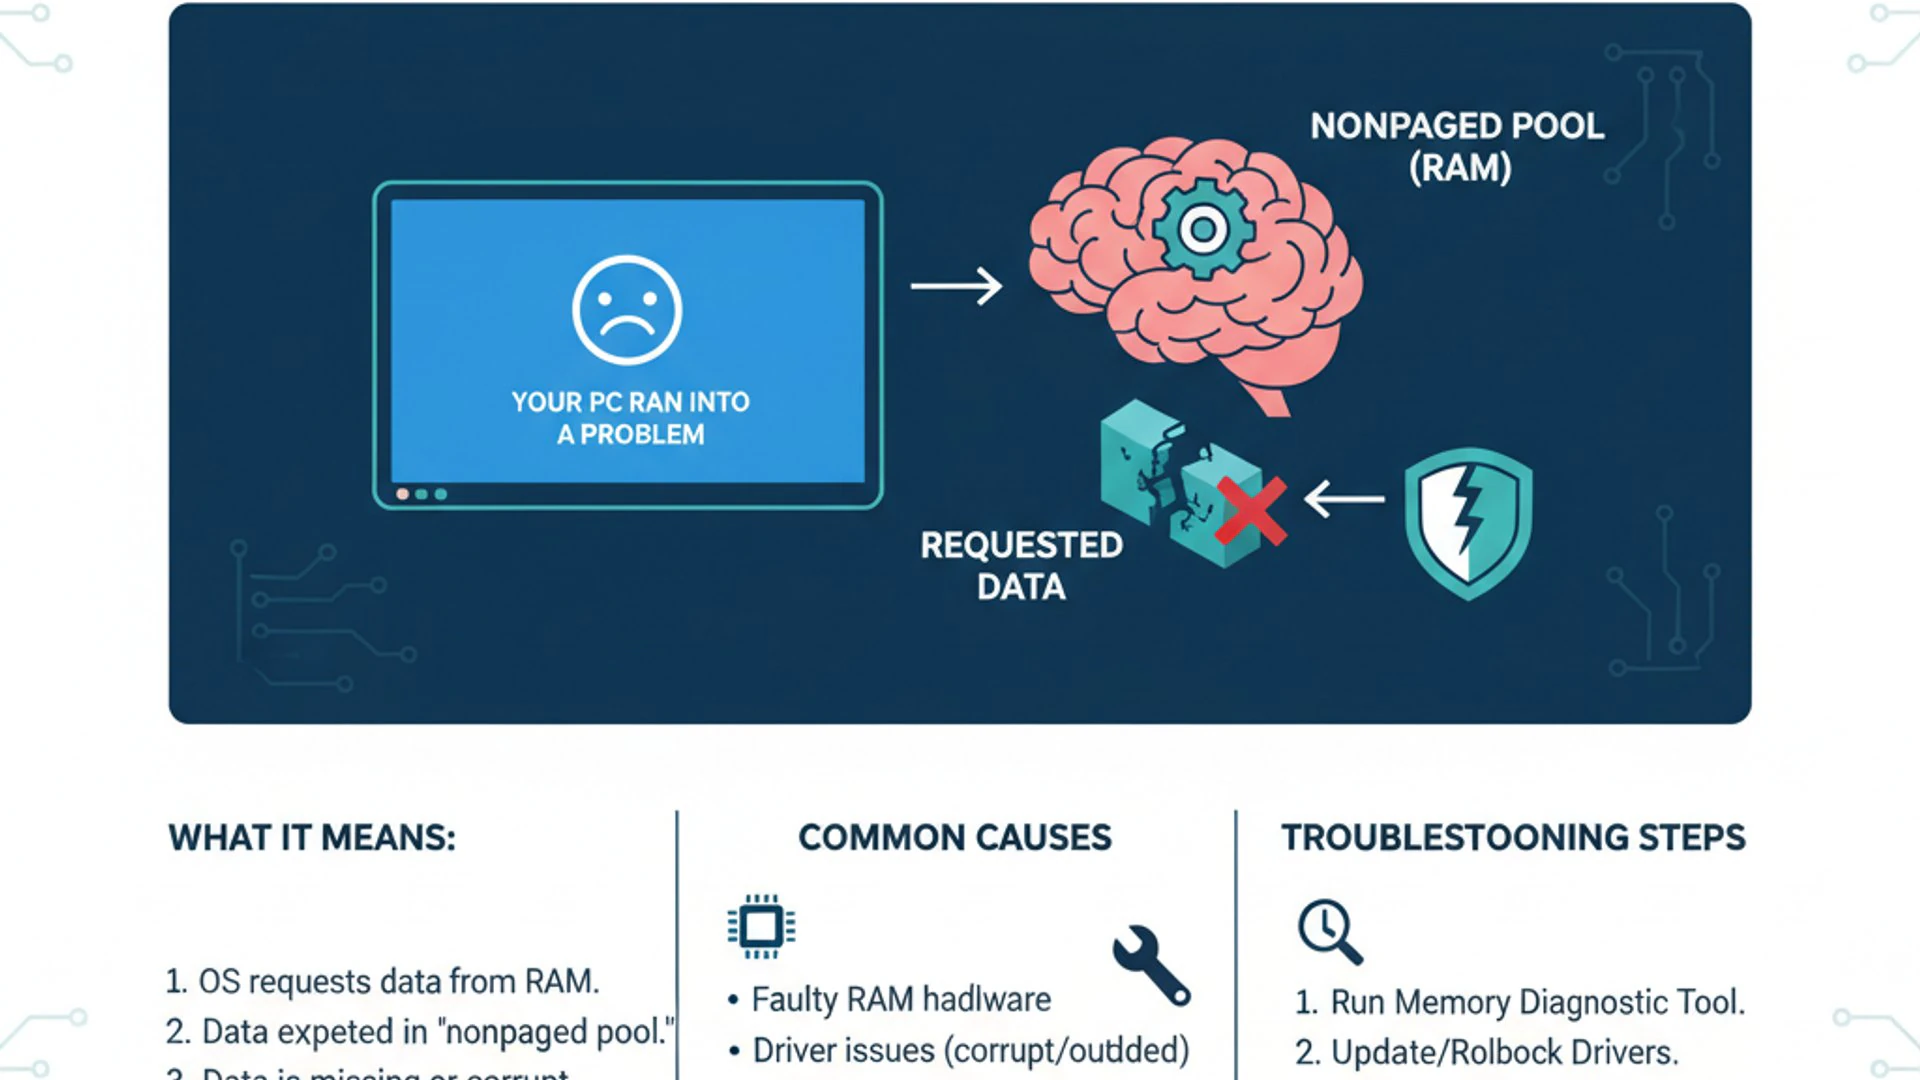
Addressing RAM issues directly is often one of the most effective ways to eliminate the 0x00000050 PAGE_FAULT_IN_NONPAGED_AREA Windows 11 error. This section will guide you through the steps to test your memory and ensure it’s properly installed and functioning.
Running Windows Memory Diagnostic Tool
Windows 11 includes a built-in tool specifically designed to check your RAM for errors: the Windows Memory Diagnostic Tool. This utility performs a series of tests on your memory to identify any potential hardware faults.
- Open Diagnostic Tool: Type “Windows Memory Diagnostic” into the Windows search bar and open the application.
- Choose Restart Option: You’ll be given two options: “Restart now and check for problems (recommended)” or “Check for problems the next time I start my computer.” Choose the first option.
- System Restart and Scan: Your computer will restart and run the diagnostic tests. This process can take several minutes.
- Review Results: After the scan, your computer will restart again. The results will usually be displayed upon logging back into Windows. If not, you can find them in the Event Viewer under “Windows Logs” > “System,” searching for “MemoryDiagnostic” entries.
If the tool reports errors, it’s a strong indication that one or more of your RAM modules are faulty and may need to be replaced. This is a direct cause of the 0x00000050 PAGE_FAULT_IN_NONPAGED_AREA error.
Physical Inspection and Reseating RAM Modules
Even if the diagnostic tool doesn’t find errors, physical issues with RAM can still cause problems. Incorrectly seated modules or dust accumulation can disrupt the connection between the RAM and the motherboard, leading to intermittent memory errors.
- Power Down and Unplug: Completely shut down your computer and unplug it from the power source. If it’s a laptop, remove the battery if possible.
- Open Case: Open your computer’s case to access the motherboard and RAM slots.
- Locate RAM: Identify the RAM sticks, typically long, thin modules clipped into slots.
- Reseat RAM: Gently unclip each RAM module by pushing down the small levers on either side of the slot. Carefully remove the module, blow any dust out of the slot and off the module (using compressed air), and then firmly reinsert the module until the clips snap back into place. Ensure it’s seated evenly.
- Test Individually (if multiple sticks): If you have multiple RAM sticks, try testing them one by one. Remove all but one stick, then boot your PC. If the 0x00000050 error persists, swap that stick for another. This helps pinpoint a faulty module.
- Close Case and Restart: Once done, close the case, reconnect power, and restart your computer to see if the 0x00000050 PAGE_FAULT_IN_NONPAGED_AREA Windows 11 error is resolved.
This physical check is a crucial step that often goes overlooked but can provide a simple solution to complex memory problems.
Scanning for Corrupt System Files and Disk Errors
Corrupted system files or errors on your hard drive can severely impact Windows 11’s stability and lead to various BSODs, including the 0x00000050 PAGE_FAULT_IN_NONPAGED_AREA error. These issues can prevent the operating system from properly accessing critical data, including memory management components. Fortunately, Windows provides powerful built-in tools to scan for and repair such problems.
Regularly checking your system’s integrity is a good practice, and it becomes essential when troubleshooting persistent errors. This section details how to use SFC, DISM, and CHKDSK to ensure your system files and disk are in optimal condition.
Utilizing System File Checker (SFC)
The System File Checker (SFC) is a command-line utility that scans for and restores corrupted Windows system files. If critical system files related to memory management are damaged, SFC can often repair them, potentially resolving the 0x00000050 PAGE_FAULT_IN_NONPAGED_AREA error.
- Open Command Prompt as Administrator: Search for “cmd,” right-click “Command Prompt,” and select “Run as administrator.”
- Run SFC Scan: Type
sfc /scannowand press Enter. - Wait for Completion: The scan will take some time. Do not close the window until it’s finished.
- Review Results: SFC will report if it found and repaired any corrupted files. If it found issues it couldn’t fix, proceed to DISM.
- Restart: Reboot your PC after the scan.
This simple command can often fix a surprising number of system-level issues that contribute to instability.
Running Deployment Image Servicing and Management (DISM)
If SFC fails to repair corrupted files, the Deployment Image Servicing and Management (DISM) tool is the next step. DISM can repair the Windows system image itself, which SFC relies upon. A healthy Windows image is crucial for the proper functioning of all system components and can prevent the 0x00000050 PAGE_FAULT_IN_NONPAGED_AREA Windows 11 error.
- Open Command Prompt as Administrator: As before, open an elevated Command Prompt.
- Run DISM Commands: Execute the following commands one by one, pressing Enter after each. These commands check the health of your Windows image and repair it if necessary.
DISM /Online /Cleanup-Image /CheckHealth(checks for corruption)DISM /Online /Cleanup-Image /ScanHealth(performs a more thorough scan)DISM /Online /Cleanup-Image /RestoreHealth(repairs detected issues using Windows Update files)
- Wait and Restart: Each command can take a while to complete. Once all are done, restart your computer.
After running DISM, it’s a good idea to run sfc /scannow again to ensure all system files are now properly repaired.
Checking Disk Health with CHKDSK
Hard drive or SSD errors can also lead to data corruption, including system files, which can manifest as the 0x00000050 PAGE_FAULT_IN_NONPAGED_AREA error. The CHKDSK (Check Disk) utility scans your hard drive for bad sectors and file system errors and attempts to repair them.
- Open Command Prompt as Administrator: Launch an elevated Command Prompt.
- Run CHKDSK: Type
chkdsk /f /rand press Enter. - Schedule Scan: You’ll likely be prompted that CHKDSK cannot run because the volume is in use. Type
Yand press Enter to schedule the scan for the next restart. - Restart PC: Reboot your computer. CHKDSK will run before Windows loads, scanning your disk for errors. This can take a significant amount of time, depending on your drive size and speed.
A healthy storage drive is fundamental to a stable operating system. Resolving disk errors can eliminate a potential source of the 0x00000050 PAGE_FAULT_IN_NONPAGED_AREA error.
Managing Virtual Memory (Paging File) Settings
Virtual memory, also known as the paging file, is a crucial component of Windows’ memory management system. It uses a portion of your hard drive as if it were RAM, allowing your system to handle more data than your physical RAM can hold. Incorrectly configured virtual memory settings can lead to memory access violations, potentially triggering the 0x00000050 PAGE_FAULT_IN_NONPAGED_AREA error.
While Windows typically manages virtual memory automatically, manual adjustments or corrupted settings can sometimes cause problems. This section will guide you through checking and resetting these settings to their optimal configuration, helping to mitigate the 0x00000050 PAGE_FAULT_IN_NONPAGED_AREA Windows 11 error.
Adjusting Paging File Size
If your paging file is too small or improperly configured, your system might struggle to manage memory efficiently, leading to errors. While manual adjustment is possible, it’s often best to let Windows handle it.
- Open System Properties: Search for “View advanced system settings” and open it.
- Access Performance Settings: In the “Advanced” tab, under “Performance,” click “Settings.”
- Virtual Memory: Go to the “Advanced” tab in the Performance Options window, then click “Change…” under “Virtual memory.”
- Uncheck Automatic Management: Uncheck “Automatically manage paging file size for all drives.”
- Set Custom Size (Optional, Use with Caution): Select the drive where Windows is installed (usually C:). You can set a “Custom size” for the initial and maximum size. A common recommendation is to set the initial size to 1.5 times your RAM and the maximum size to 3 times your RAM. For example, if you have 8GB RAM, initial size could be 12288 MB (8192 * 1.5) and maximum 24576 MB (8192 * 3).
- Click “Set” and “OK”: Apply the changes and restart your computer.
Be cautious when manually setting these values; incorrect settings can lead to other performance issues. For most users, allowing Windows to manage it is the safest bet.
Resetting Virtual Memory to System Managed
The most straightforward and often most effective solution for virtual memory-related 0x00000050 errors is to simply let Windows manage the paging file automatically. This ensures optimal settings based on your system’s needs and available disk space.
- Navigate to Virtual Memory Settings: Follow steps 1-3 from the “Adjusting Paging File Size” section above.
- Enable Automatic Management: Check the box for “Automatically manage paging file size for all drives.”
- Click “OK” and Restart: Click “OK” on all open windows and then restart your computer.
Important: Resetting virtual memory to system-managed can often resolve memory allocation conflicts that contribute to the 0x00000050 PAGE_FAULT_IN_NONPAGED_AREA Windows 11 error, as it allows the OS to dynamically adjust resources as needed.
This action reverts any potentially problematic manual configurations and allows Windows to optimize its memory usage, which can significantly improve system stability and prevent memory-related BSODs.
Resolving Software Conflicts and Malware Infections
Beyond hardware and driver issues, software conflicts and malicious software are significant contributors to system instability and can directly cause the 0x00000050 PAGE_FAULT_IN_NONPAGED_AREA error. Conflicting applications might try to access the same memory regions, leading to clashes, while malware can corrupt system files or interfere with memory management processes.
Identifying and eliminating these software-related issues is crucial for restoring your Windows 11 system’s health. This section will guide you through isolating problematic software and thoroughly scanning for and removing any malware that might be lurking on your system.
Performing a Clean Boot
A clean boot starts Windows with a minimal set of drivers and startup programs. This helps you determine if a background program or service is causing the 0x00000050 PAGE_FAULT_IN_NONPAGED_AREA Windows 11 error. If the error doesn’t occur in a clean boot state, you can then systematically enable services and startup items to pinpoint the culprit.
- Open System Configuration: Search for “msconfig” and open “System Configuration.”
- Disable Startup Items: Go to the “Services” tab, check “Hide all Microsoft services,” and then click “Disable all.”
- Disable Startup Programs: Go to the “Startup” tab and click “Open Task Manager.” In Task Manager, disable each startup item one by one.
- Restart: Close Task Manager, click “OK” in System Configuration, and restart your computer.
- Test: If the error is gone, re-enable services and startup items in small groups, restarting after each group, until the error reappears. This identifies the conflicting software.
Once you’ve identified the problematic software, you can choose to uninstall it, update it, or seek an alternative. Remember to revert to a normal startup after troubleshooting.
Running a Full System Malware Scan
Malware can deeply embed itself into your system, corrupting files and interfering with core Windows processes, including memory management. This interference can easily trigger the 0x00000050 PAGE_FAULT_IN_NONPAGED_AREA error. A thorough malware scan is essential to rule out this possibility.
- Use Windows Security: Open “Windows Security” (search for it), go to “Virus & threat protection,” and click “Scan options.”
- Select Full Scan: Choose “Full scan” and click “Scan now.” This can take several hours, so be prepared for a long wait.
- Consider Third-Party Scanners: For a second opinion, consider using reputable third-party anti-malware tools like Malwarebytes (malwarebytes.com) or Avast (avast.com). Run a full scan with these as well.
- Remove Threats: Follow the instructions of your antivirus software to quarantine or remove any detected threats.
Keeping your antivirus software up-to-date and performing regular scans is a fundamental practice for preventing not only malware infections but also many system stability issues, including the 0x00000050 PAGE_FAULT_IN_NONPAGED_AREA Windows 11 error.
Advanced Troubleshooting: BIOS/UEFI Settings and Hardware Compatibility
When the more common solutions fail to resolve the 0x00000050 PAGE_FAULT_IN_NONPAGED_AREA error, it’s time to delve into more advanced areas, specifically your system’s BIOS/UEFI firmware and certain Windows features that can sometimes interfere with hardware or memory management. These steps require a bit more technical comfort, but they can be crucial for resolving persistent issues.
Understanding and correctly configuring your BIOS/UEFI settings can significantly impact system stability and hardware compatibility. Similarly, certain power management features in Windows, while designed for efficiency, can sometimes cause conflicts that manifest as memory errors. Approaching these advanced steps methodically is key to success.
Updating BIOS/UEFI Firmware
The BIOS (Basic Input/Output System) or its modern successor, UEFI (Unified Extensible Firmware Interface), is the firmware that initializes your hardware before Windows starts. An outdated or buggy BIOS/UEFI can lead to compatibility issues with newer hardware, drivers, or even Windows 11 itself, potentially causing the 0x00000050 PAGE_FAULT_IN_NONPAGED_AREA error.
- Identify Motherboard: Determine your motherboard’s make and model. You can use tools like CPU-Z or simply check your system information (search for “System Information” in Windows).
- Visit Manufacturer’s Website: Go to the support section of your motherboard manufacturer’s website (e.g., ASUS, MSI, Gigabyte, ASRock).
- Download Latest Firmware: Find the latest BIOS/UEFI update for your specific motherboard model. Carefully read the instructions provided by the manufacturer, as the update process varies significantly between brands and models.
- Perform Update: Follow the manufacturer’s instructions precisely. This usually involves putting the firmware file on a USB drive and flashing it from within the BIOS/UEFI environment. Warning: A power interruption during a BIOS/UEFI update can permanently damage your motherboard. Proceed with extreme caution.
Updating BIOS/UEFI can introduce better hardware support, bug fixes, and improved stability, which might resolve the 0x00000050 PAGE_FAULT_IN_NONPAGED_AREA Windows 11 error.
Disabling Fast Startup and Other Advanced Features
Windows 11 includes features designed to improve user experience, but sometimes these can inadvertently cause conflicts. Fast Startup, for instance, is a hybrid shutdown mode that saves the system state to disk to speed up boot times. However, it can sometimes lead to driver issues or memory corruption, as drivers aren’t fully reinitialized.
- Disable Fast Startup:
- Search for “Control Panel” and open it.
- Go to “Hardware and Sound” > “Power Options.”
- Click “Choose what the power buttons do” on the left pane.
- Click “Change settings that are currently unavailable.”
- Uncheck “Turn on fast startup (recommended)” and click “Save changes.”
- Check for Overclocking: If you have overclocked your CPU or RAM, revert to default settings in your BIOS/UEFI. Overclocking can destabilize memory operations and lead to the 0x00000050 error.
- Disable XMP/DOCP Profile for RAM: In BIOS/UEFI, if you’re using an XMP (Intel) or DOCP (AMD) profile for your RAM, try disabling it or manually setting the RAM frequency and timings to default JEDEC standards. While XMP/DOCP is common, some systems can be unstable with it, especially if the RAM or motherboard is not perfectly compatible.
These advanced adjustments can sometimes uncover underlying compatibility or stability issues that contribute to the 0x00000050 PAGE_FAULT_IN_NONPAGED_AREA Windows 11 error, especially in custom-built systems.
When All Else Fails: Reinstalling Windows 11
If you’ve exhausted all the troubleshooting steps above and the 0x00000050 PAGE_FAULT_IN_NONPAGED_AREA error persists, a clean reinstallation of Windows 11 might be your last resort. This step effectively wipes your primary drive and installs a fresh copy of the operating system, eliminating any deep-seated software corruption, driver conflicts, or malware that might be impossible to remove otherwise.
While a clean install is a drastic measure, it often resolves persistent and unidentifiable system issues. However, it’s critical to prepare thoroughly, as it will erase all data on your system drive. This section will guide you through the essential preparations and the reinstallation process.
Backing Up Important Data
Before proceeding with a clean installation, backing up your important data is absolutely paramount. A clean install will delete everything on your primary drive, including documents, photos, videos, and installed applications. Failing to back up your data will result in permanent loss.
- External Drive: Copy essential files to an external hard drive, USB stick, or network-attached storage (NAS).
- Cloud Storage: Utilize cloud services like OneDrive, Google Drive, or Dropbox to sync your important files.
- System Image Backup: For a more comprehensive backup, consider creating a system image backup if your system is stable enough to do so. This captures the entire state of your drive.
Double-check that all critical files are securely backed up before you begin the reinstallation process. This step cannot be emphasized enough when dealing with the 0x00000050 PAGE_FAULT_IN_NONPAGED_AREA Windows 11 error.
Performing a Clean Installation
A clean installation involves creating bootable installation media and then using it to install Windows 11 from scratch. This process ensures that your operating system is free from previous errors and conflicts.
- Create Installation Media: Download the Windows 11 Media Creation Tool from the official Microsoft website (microsoft.com/software-download/windows11). Use it to create a bootable USB drive (at least 8GB).
- Boot from USB: Insert the USB drive, restart your computer, and enter your BIOS/UEFI settings (usually by pressing Del, F2, F10, or F12 during startup). Set your computer to boot from the USB drive.
- Follow Installation Wizard:
- Select your language, time, and keyboard preferences.
- Click “Install now.”
- Enter your product key or click “I don’t have a product key” (Windows will activate automatically if it was previously activated on the same hardware).
- Choose “Custom: Install Windows only (advanced).”
- Delete Partitions: Select each partition on your primary drive (usually Drive 0) and click “Delete.” This ensures a truly clean slate.
- Select the unallocated space and click “Next” to begin the installation.
- Complete Setup: Follow the on-screen prompts to complete the Windows 11 setup, including creating a user account and configuring initial settings.
After a clean installation, you’ll need to reinstall your applications and restore your backed-up data. This fresh start often resolves even the most stubborn instances of the 0x00000050 PAGE_FAULT_IN_NONPAGED_AREA error, providing a stable and responsive system.
Preventing Future 0x00000050 Errors
Once you’ve successfully resolved the 0x00000050 PAGE_FAULT_IN_NONPAGED_AREA error, the next crucial step is to implement practices that prevent its recurrence. Proactive maintenance and adherence to best practices can significantly reduce the likelihood of encountering this or other critical system errors again. A stable system is a well-maintained system.
Prevention is always better than cure, especially when dealing with frustrating BSODs. By adopting a few simple habits and regularly checking your system’s health, you can ensure your Windows 11 environment remains robust and reliable, free from the disruptions caused by the 0x00000050 PAGE_FAULT_IN_NONPAGED_AREA Windows 11 error.
Regular Maintenance and Best Practices
Maintaining a healthy Windows 11 system involves a combination of software management, hardware care, and vigilant monitoring.
- Keep Drivers Updated: Regularly check for and install the latest drivers for your hardware, especially graphics cards, chipsets, and network adapters. Use official manufacturer websites.
- Windows Updates: Ensure Windows Update is active and install cumulative updates and feature updates promptly. These often include critical bug fixes and security patches.
- Monitor RAM Health: Periodically run the Windows Memory Diagnostic Tool, especially after adding new RAM or if you notice any unusual system behavior.
- Keep Software Updated: Update all your applications regularly. Outdated software can have bugs or security vulnerabilities that lead to conflicts.
- Maintain Good Airflow and Cleanliness: Dust buildup can lead to overheating, which can stress components like RAM and lead to instability. Regularly clean your PC’s internals with compressed air.
- Use Reliable Antivirus: Keep your antivirus software up-to-date and perform regular full system scans to detect and remove malware.
- Avoid Overclocking (Unless Experienced): While tempting for performance, overclocking can destabilize your system. If you do overclock, do so cautiously and ensure thorough stability testing.
- Create System Restore Points: Make it a habit to create a system restore point before installing new hardware, major software, or significant updates.
- Backup Data Regularly: Even with the best prevention, issues can arise. Regular data backups are your ultimate safeguard against data loss.
By following these best practices, you significantly reduce the chances of encountering the 0x00000050 PAGE_FAULT_IN_NONPAGED_AREA error and ensure a smoother computing experience on your Windows 11 machine.
Conclusion: Restoring Stability to Your Windows 11 System
The 0x00000050 PAGE_FAULT_IN_NONPAGED_AREA error on Windows 11 is a formidable challenge, often signaling deep-seated issues related to memory, drivers, or system integrity. However, by systematically following the troubleshooting steps outlined in this comprehensive guide, you are well-equipped to diagnose and resolve this frustrating Blue Screen of Death. We’ve covered everything from basic checks like driver updates and system restore to advanced diagnostics involving RAM testing, system file repairs, and even BIOS/UEFI adjustments.
Remember that patience and a methodical approach are your greatest assets when tackling such complex errors. Each step brings you closer to identifying the root cause, whether it’s a faulty RAM stick, an outdated driver, or a corrupted system file. By diligently working through these solutions, you can restore your Windows 11 system to a state of stability and reliability. Furthermore, by adopting the recommended preventive measures, you can significantly reduce the likelihood of encountering the 0x00000050 PAGE_FAULT_IN_NONPAGED_AREA Windows 11 error again, ensuring a smoother and more secure computing experience for the long term. Your commitment to system health is the best defense against future disruptions.
For more interesting articles, stay tuned to Winsides.com!









Community
Comments (0)