How to Allow an App through Windows Firewall?
Windows Firewall helps protect your computer from unauthorized access, malware, and other security threats
Windows Firewall: It is a network security system designed to monitor and control incoming and outgoing network traffic based on predetermined security rules. It acts as a barrier between your computer and potential threats from the internet or other networks, helping to protect your system from unauthorized access and cyber-attacks. Windows Firewall was first introduced in Windows XP in 2001 as part of Service Pack 2 (SP2), released in August 2004. Initially named “Internet Connection Firewall,” it was rebranded to “Windows Firewall” and significantly enhanced in functionality and ease of use. Windows Firewall blocks apps by default to maintain a secure environment, and there may be instances where we trust an app and want to allow it through Windows Firewall. This article will cruise through the steps of How to Allow an App through Windows Firewall in Windows 11.
IMPORTANT: Ensure the app comes from a trusted source and is not malicious. Only allow apps that are necessary and verified to be safe.
Key Steps:
- Go to Windows Securiy and then to Virus & Threat Protection.
- Navigate to Firewall & Network Protection.
- Click on Allow an App through firewall.
- Select the App that you want to allow.
- Open Windows Settings via WinKey + I.
- You can find the option Privacy & Security on the left pane. Click on that.
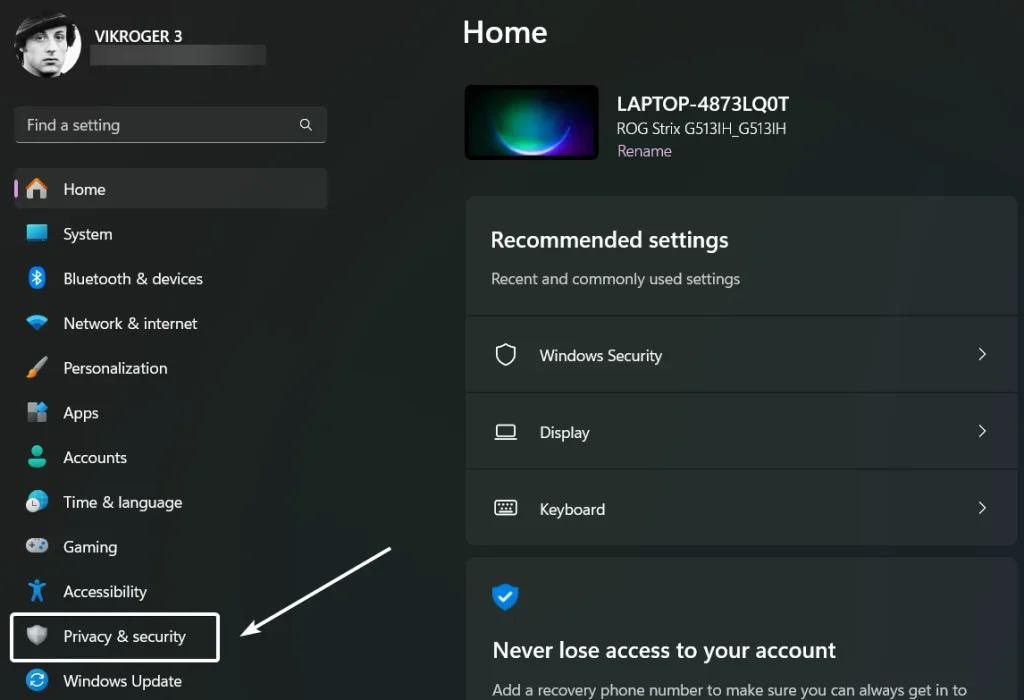
- Under Security, click on Windows Security.

- Now, click on Virus & Threat Protection which is available under Protection areas.
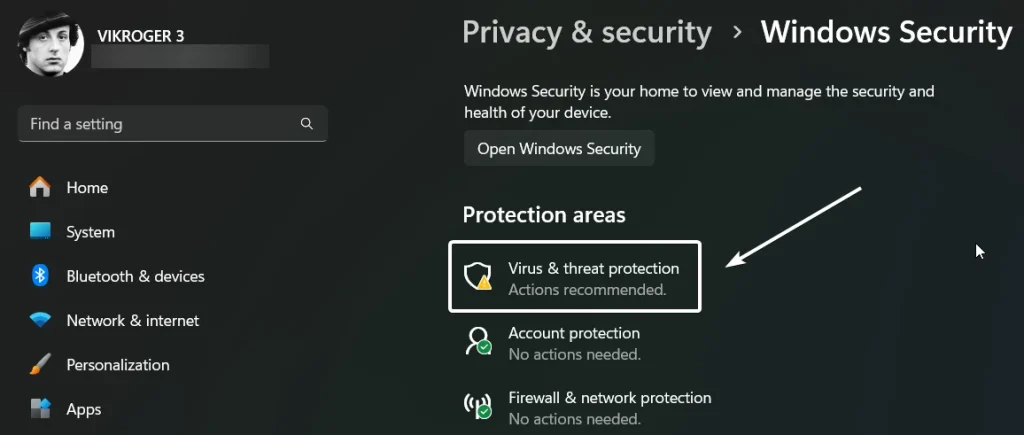
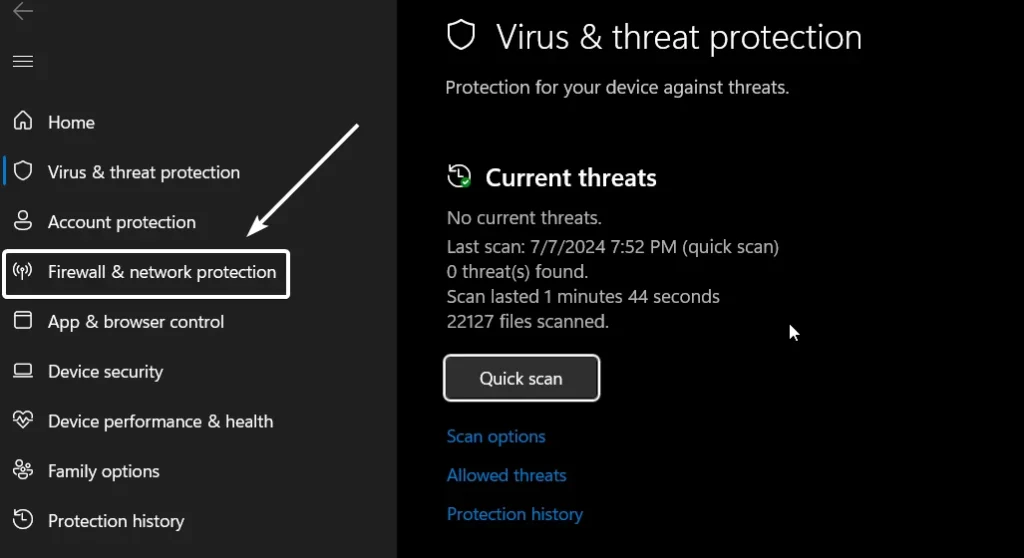
- Windows Security will open now. Click on Firewall & Network Protection.
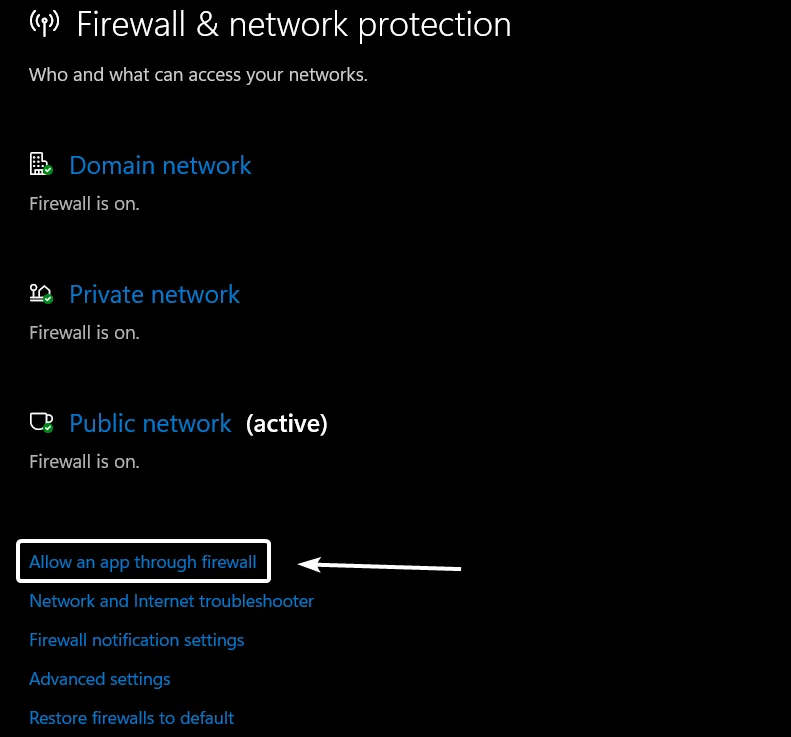
- Click on Allow an app through firewall.
- Windows Firewall Allowed Apps will open now. Click on Change Settings so that the system will allow you to make changes to the Allowed Apps. You might be prompted to enter an Administrator password or confirm your choice.
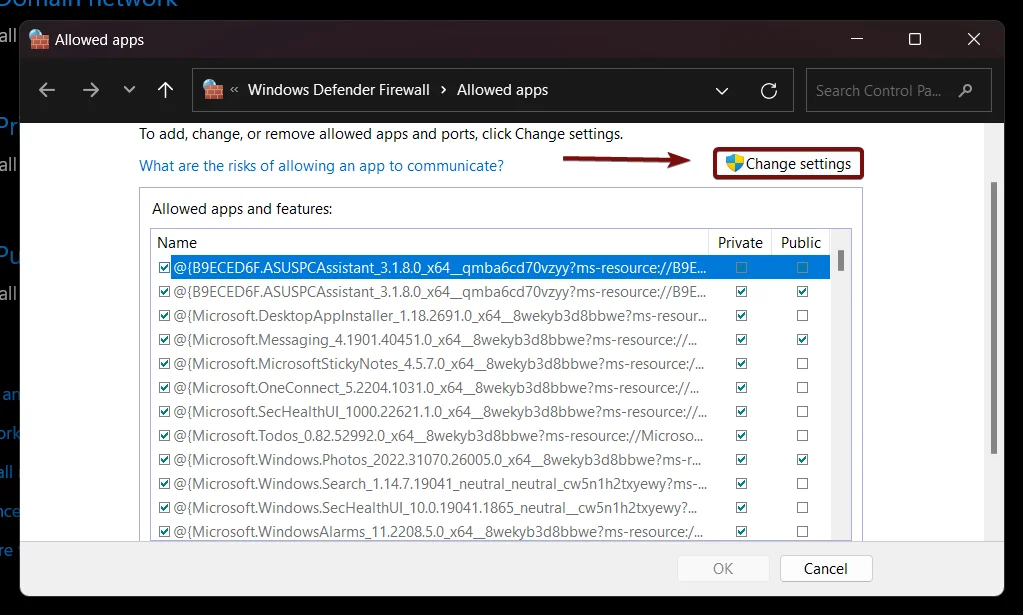
- Scroll through the list of apps available, and locate the app that you want to allow through Windows Firewall.
- Once you find your app, you can find two check boxes next to it, Private and Public. Private networks are networks that you trust, such as your home or office network. Public networks are networks that you do not trust or not familiar with, such as a public Wi-Fi at a mall or airport. Choose accordingly.
- Finally, click OK to save the changes. Your selected app should now be allowed through Windows Firewall in Windows 11.
Note: You can also use Start menu and Control Panel to access Windows Security in Windows 11.
What if your Allow an app through firewall option is grayed out?
Sometimes, you may not be able to select an app in the firewall settings because the entire section is grayed out, as shown in the image below!
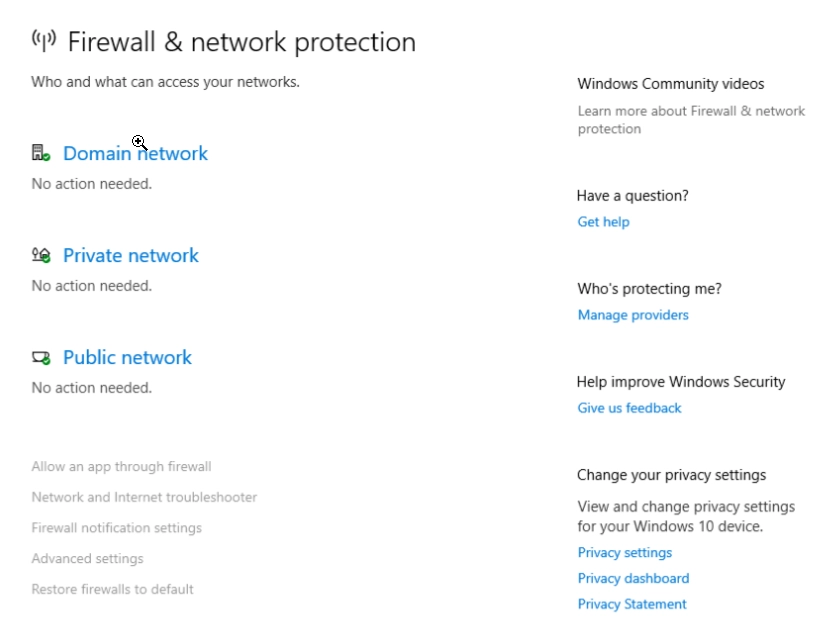
The fix for this issue is to ensure that your firewall is active, as suggested in a Reddit community post. However, I believe you need an administrator account to allow applications through the firewall. Follow these simple steps to do that:
- Press Winkey + S, type Windows Security, and open it.
- Click Firewall & network protection on the left side.
- Scroll down and click Allow an app through firewall.
- At the top-right corner, click Change settings (with a shield icon).
- If prompted, click Yes on the User Account Control (UAC) popup.
- Find the app you want to allow in the list.
- Check the Private and/or Public box as needed.
- Click OK to save the changes.
That’s it, in this way you can run the firewall as administrator and allow an app through the firewall.
What are the Risks of allowing an app through Windows Firewall?
Allowing an app through Windows Firewall introduces several risks, such as unauthorized access and data leakage. If the app has security vulnerabilities or becomes compromised, attackers can exploit these weaknesses to gain unauthorized access to your system, potentially leading to data breaches. Additionally, allowing apps increases your network’s attack surface, providing more opportunities for malware to communicate with command-and-control servers, which can further spread infections or exfiltrate data. Furthermore, allowing unnecessary apps can consume network bandwidth and system resources, affecting overall performance.
When should an App be allowed?
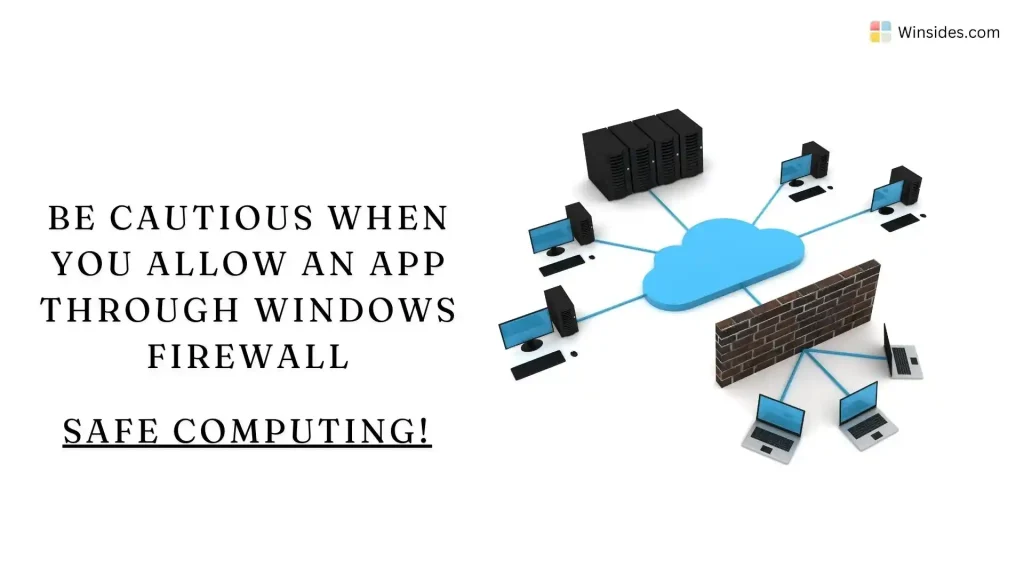
There are three crucial considerations. Trusted Source, Specific need, and Proper Configuration.
- Ensure the app comes from a trusted source and is not malicious. Only allow apps that are necessary and verified to be safe.
- Allow the app through the firewall only if it specifically needs network access to function. Unnecessary allowances can create security risks.
- Configure the firewall to allow only the necessary types of traffic for the app. For example, allow specific ports, protocols, or IP addresses rather than a broad allowance.
Information on the Go!
The principle of “default deny” is a security best practice. It means that by default, all connections are blocked, and only those explicitly allowed are permitted. This minimizes the attack surface and enhances security.
Restore Firewalls to default in Windows 11:
If you wish to restore the Firewall Settings back to its default configuration, follow the below steps.
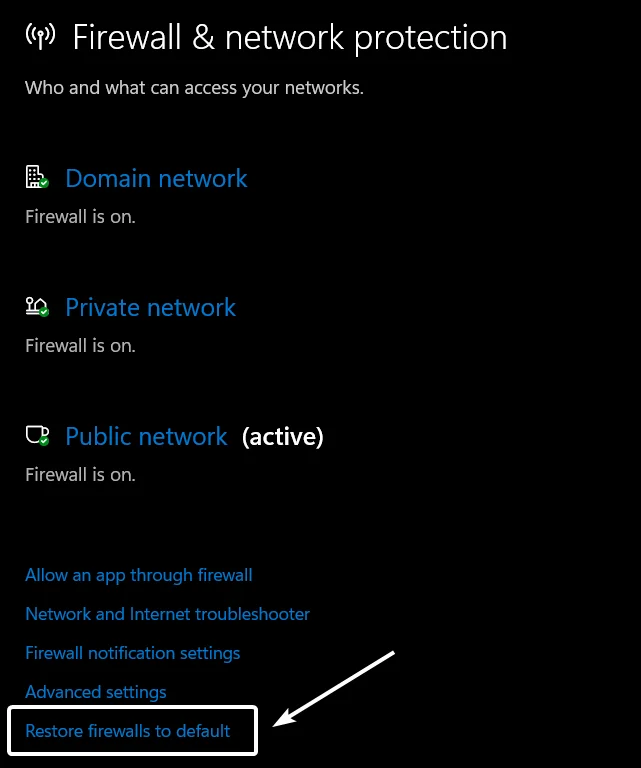
- Under Firewall and Network Protection, click on Restore firewalls to default.
- Now, Default Settings window will open now. Click on Restore Defaults.
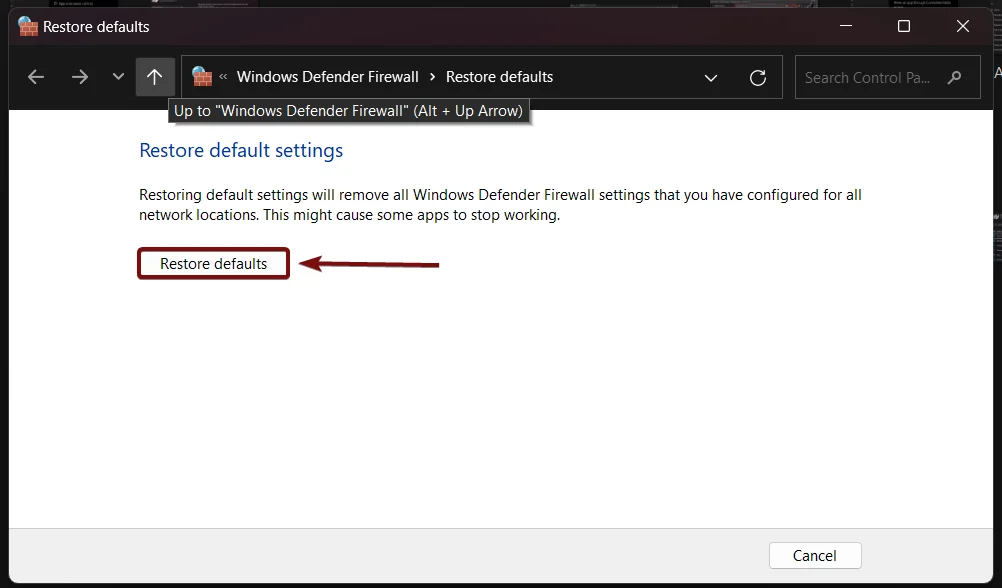
- This option will remove Windows Defender Firewall settings that you have configured for all network locations. Please note that this might cause some apps to stop working.
Take away:
Windows Firewall blocks apps by default, even those from trusted sources, to maintain a high level of security and ensure that only necessary network communications are allowed. This approach helps maintain a secure computing environment and minimizes the risk of unauthorized access and data breaches. By being cautious and selective about which apps are allowed through Windows Firewall, you can minimize potential security risks and maintain a more secure network environment in Windows 11. Safe Computing! Peace out!
Articles References:
- Microsoft Community: Windows Defender Firewall has blocked some features of this app. Retrieved from Microsoft Community Answers on 04.02.2025
- Microsoft Community: Which Apps Should I Allow through Defender Firewall. Retrieved from Microsoft Community Answers on 04.02.2025
- Microsoft Community: I cannot allow an app through firewall – and security settings have been changed but not by me!. Retrieved from Microsoft Community Answers on 04.02.2025
- Reddit Community: Allow an app through firewall” button is greyed out. Retrieved from Reddit Community on 04.02.2025
- Youtube Video Community: How to Allow Apps Through Firewall on Windows 10? Retrieved from DO IT / mostafa ahmed Youtube Channel video on 04.02.2025
We combine expert insights with user-friendly guidance. We thoroughly research and test everything to give you reliable and simple to understand tech guides. Please take a look at our publishing process to understand why you can trust Winsides.
