How to Enable Sudo Command on Windows 11?
Use Elevated Commands Safely on Windows 11, Features and Safety Notes
Enable Sudo Command on Windows 11: Sudo originated in Unix and Linux Systems, and it is similar to the Administrator on Windows 11. Microsoft has recently introduced a native version of sudo in Windows 11, which provides similar functionality by letting users elevate commands directly from a normal console. In this article, let’s check out the various methods to Enable Sudo Command on Windows 11.
How does the Sudo Command Work?

Sudo is short for Superuser do. Initially, Unix and Linux-based systems operated fully on Command Line Interfaces, and unlike assigning an entire administrative account to the root user on Windows Operating systems, Unix and Linux systems allow users to safely execute specific commands that require elevated permissions using the sudo command.
Microsoft took it a step further by integrating the Sudo Command with User Account Control, in this way, it does not rely on passwords or user roles like Linux operating systems do. This makes it a convenient tool for developers and power users to run administrative commands more easily, while still maintaining the security model of Windows. Let’s get started.
A superuser usually called Root User is the highest-level user on a system, the one with the ability to do anything, including tasks that could fix or break the system. It has unrestricted access to all commands, file, processes, settings, and more.
How to Enable Sudo Command on Windows 11?
Before enabling the sudo command on Windows 11, there are some prerequisites, as it is a newly introduced feature on Windows 11.
Prerequisties
| Operating System | Windows 11 |
| Build Version | 24H2 & Higher |
| Administrative privileges needed | Yes |
Note: Please make a note that the Sudo Command option is not available on the previous Windows 11 Builds. Hence, make sure you are on the 24H2 Build of Windows 11 to enable this feature.
Important Security Disclaimer: Enabling and using Sudo in Windows 11 comes with important security considerations. Windows 11 allows commands to run with elevated administrator privileges, which can affect critical system files and settings. Users should exercise caution, ensure you fully understand any command you execute, and avoid running untrusted scripts or programs. This feature relies on User Account Control (UAC) for confirmation, but misuse or incorrect commands can still cause system instability, data loss, or security vulnerabilities. It is recommended to use sudo sparingly, follow best practices. Use this feature at your own risk as “Enable Sudo feature” in Windows 11 is primarily intended for developers and advanced users.
Different Methods to Enable Sudo Command on Windows 11
- Enable Sudo on Windows 11 using the Windows Settings.
- Turn on the Sudo Command using the Command Prompt or Windows PowerShell.
Enable Sudo Command on Windows 11 using the Windows Settings [GUI Method]
- Go to the Windows Settings using the keyboard shortcut WinKey + I.
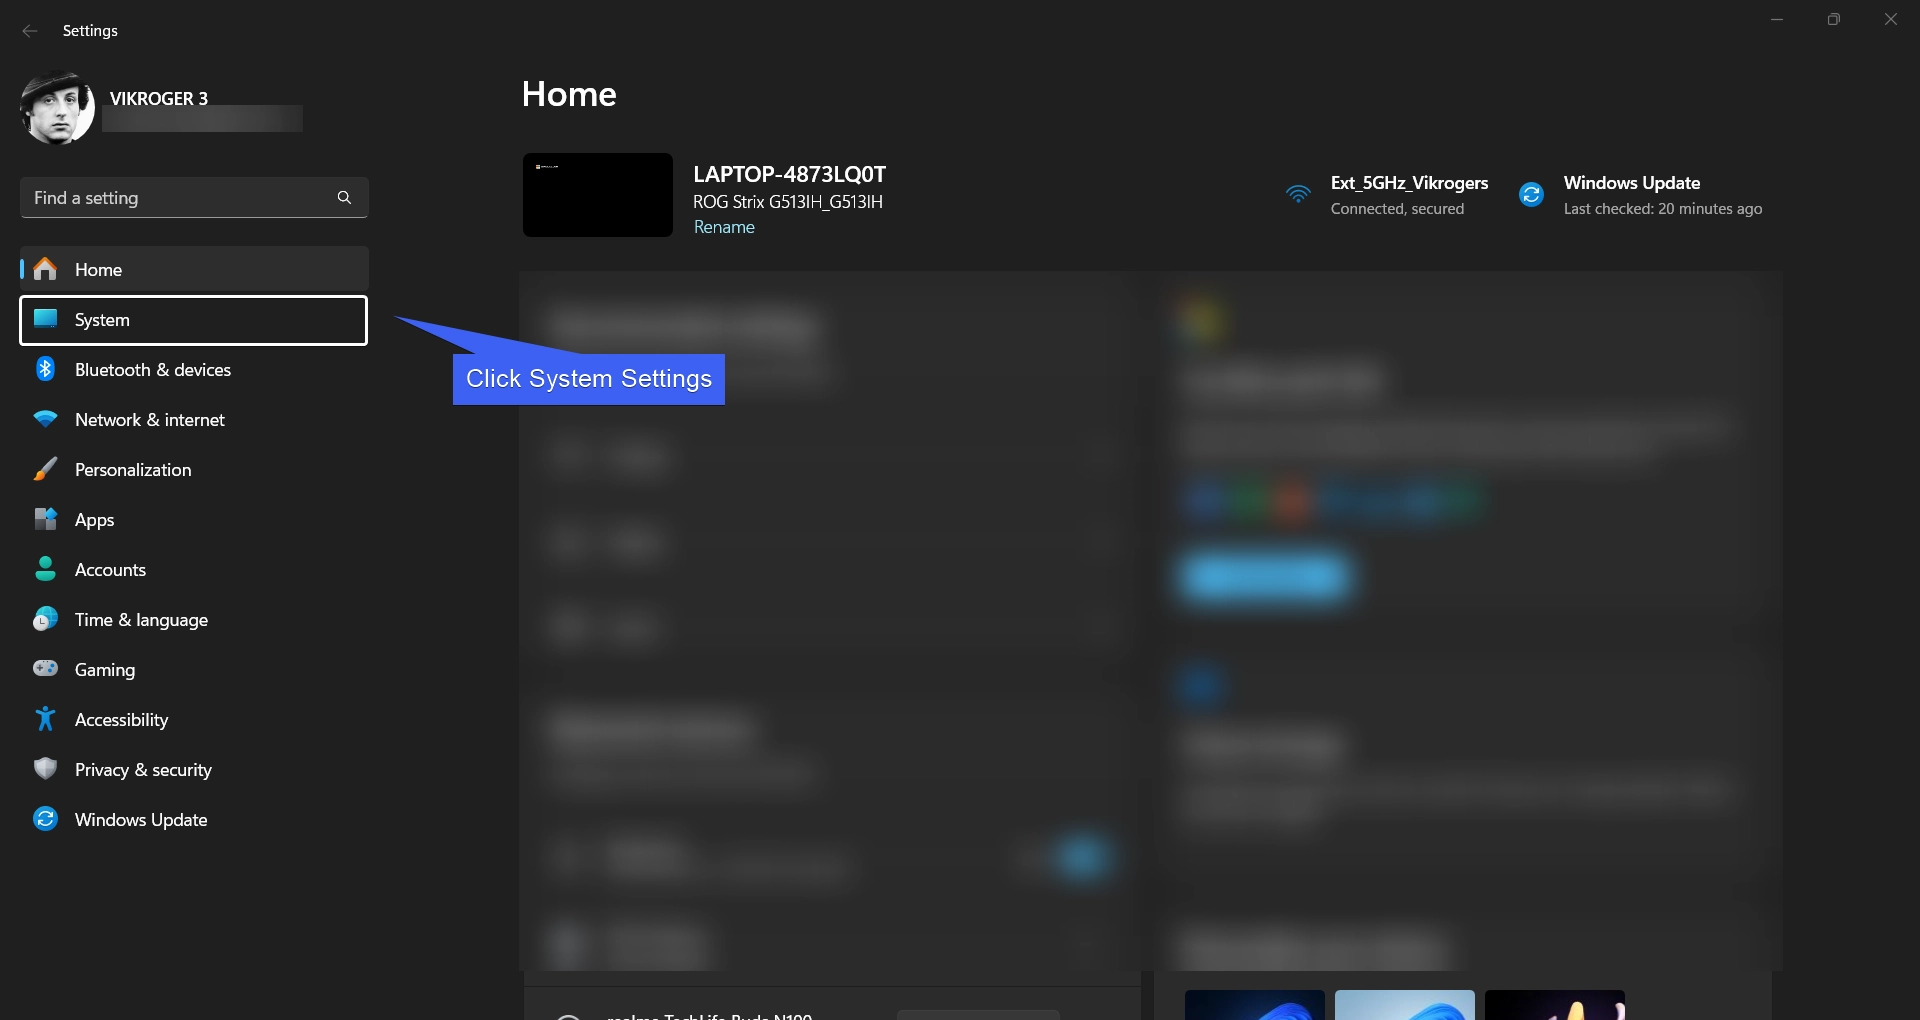
- In the Windows Settings, from the left pane, click on System.
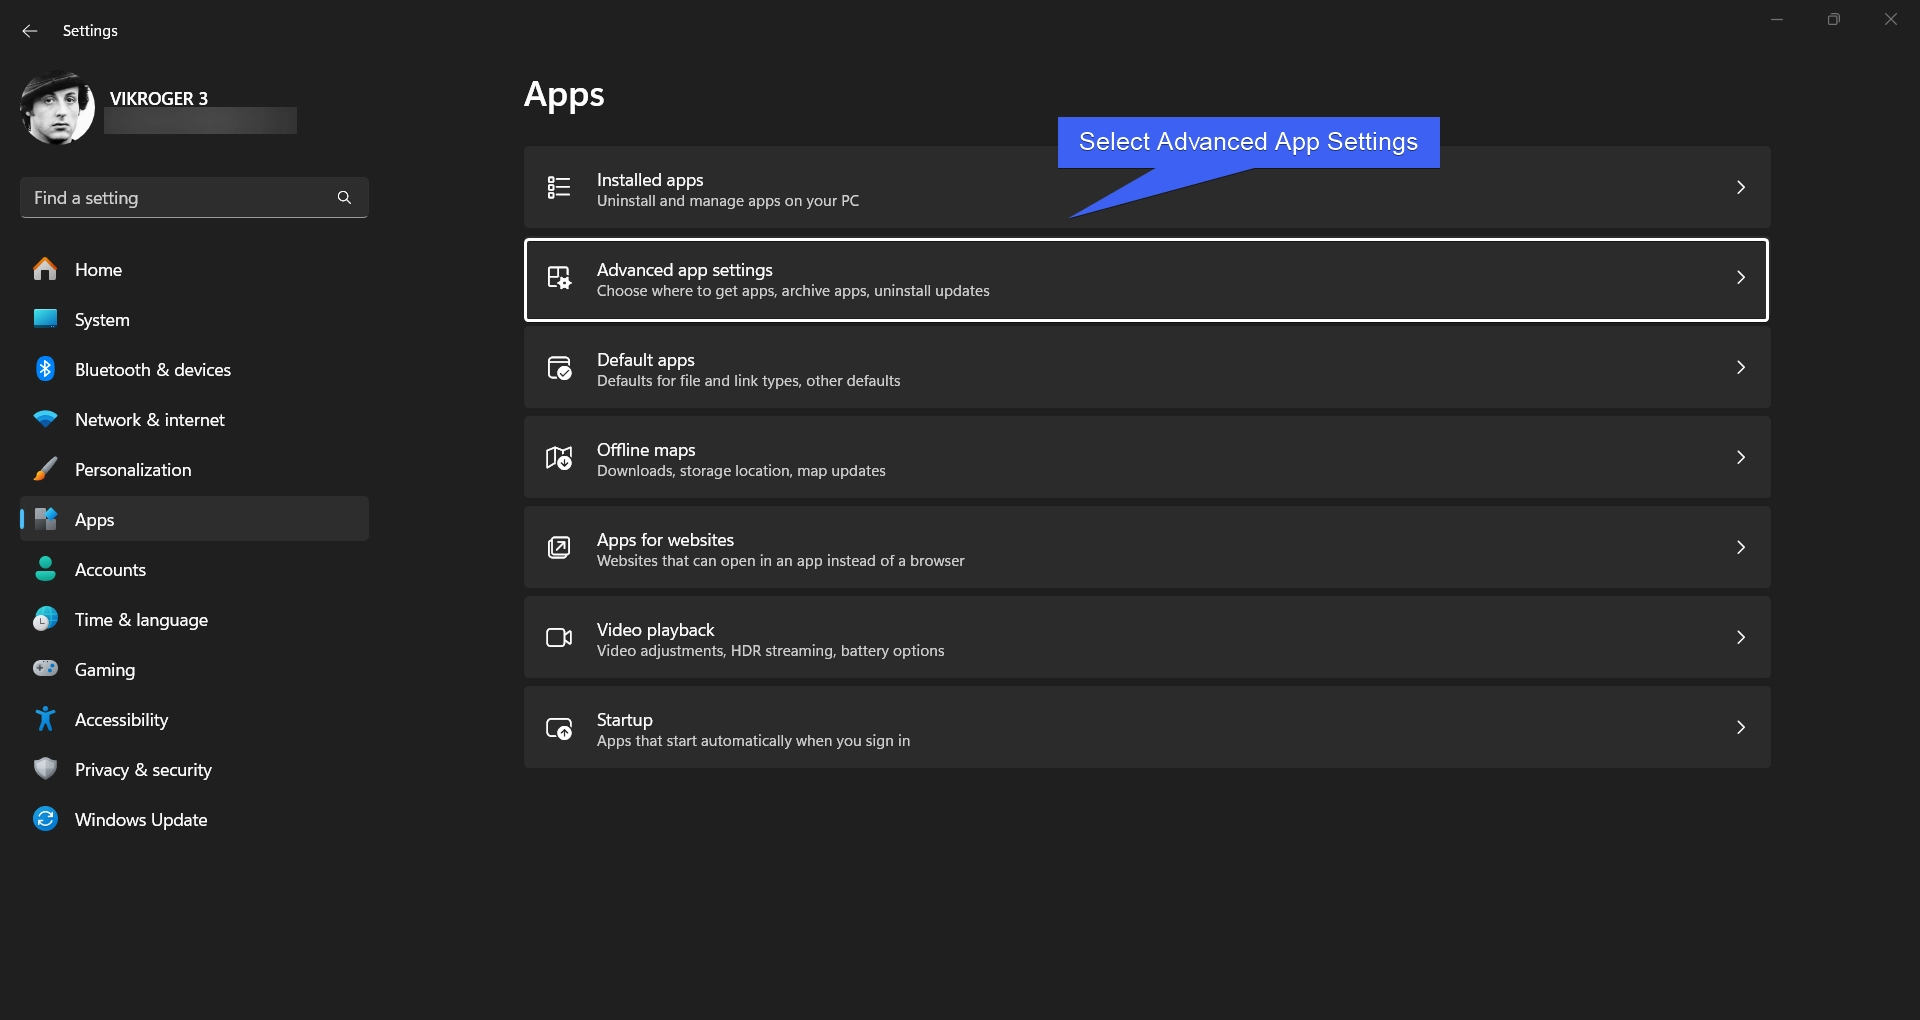
- Under System Settings, scroll down and locate Advanced, and open Advanced Settings.
- You can find the Enable Sudo option under Terminal. Turn it on to enable the Sudo Command on Windows 11.
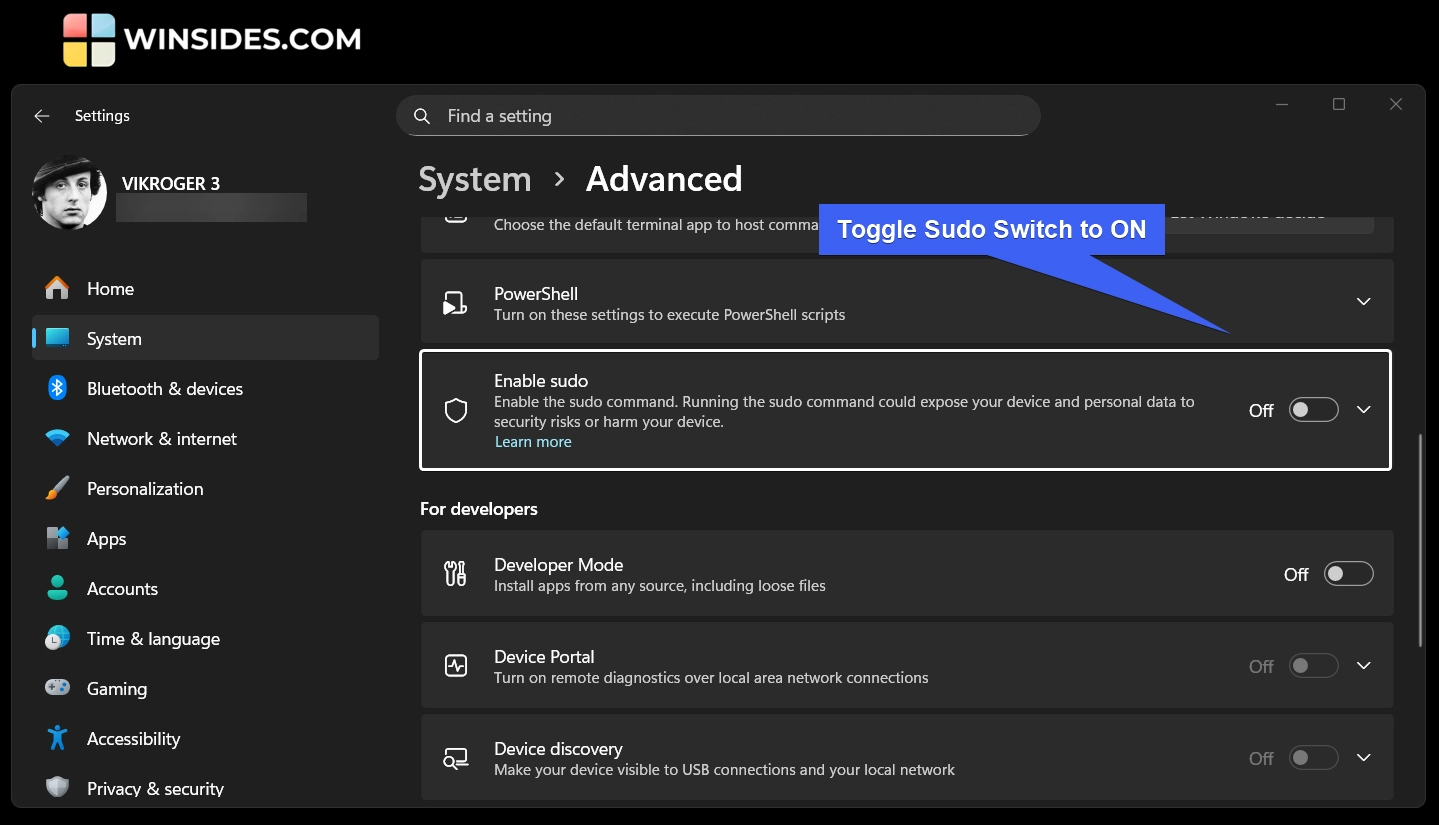
- User Account Control will prompt for your confirmation. Choose accordingly. That’s it, Sudo Command will now be enabled on your Windows 11.
- Once Sudo is enabled on your Windows 11, you can configure how Sudo runs applications.
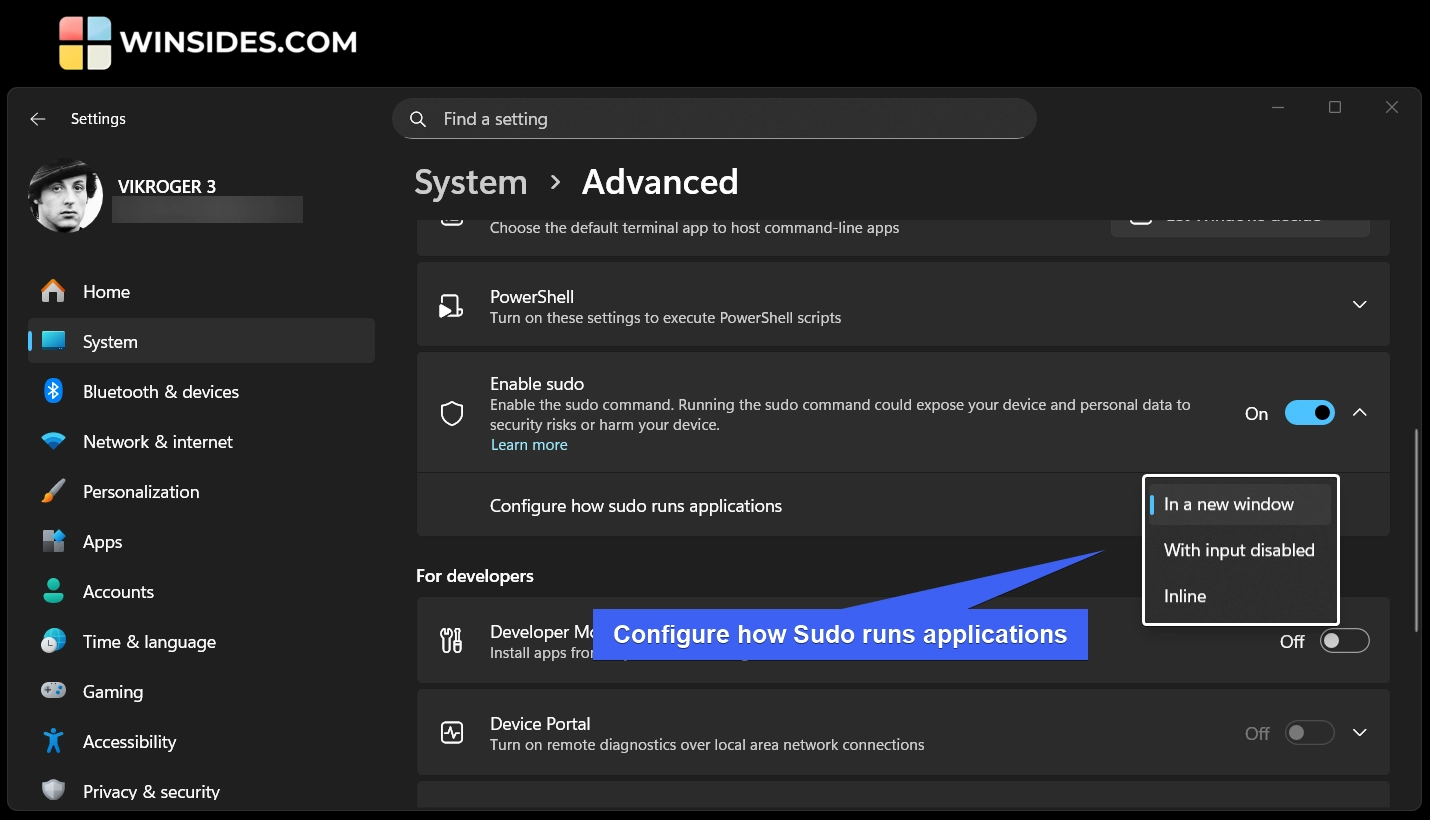
- You can choose between In a new window, With input disabled, and Inline.
In a new Window
This is the default and the safest option. When we work with the sudo command, it opens a separate elevated console window. This makes sure that the elevated process that works with the sudo command runs in isolation.
With Input Disabled
This option runs the command with elevated permissions in the same window. However, it blocks further user input. This way can prevent accidental or malicious input. This is useful for running scripts or one-off commands.
Inline
The inline option is the least secure and the most vulnerable way because, with this option enabled, users can run elevated commands directly inside your current console session. Here, elevated and non-elevated processes will share the same console, which increases the risk if a command behaves unexpectedly.
Turn on the Sudo Command on Windows 11 using the Command Prompt or Windows PowerShell [CLI Method]
In this method, we will use the Command Line Interface via the Command Prompt or Windows PowerShell. For explanation, we will use Windows PowerShell.
To enable Sudo Command on Windows 11 via the Command Prompt or Windows PowerShell, we have to run them with Administrative Privileges.
- Go to the Run Command using the keyboard shortcut WinKey + R. In the Run, type the following command
powershelland press CTRL + SHIFT + ENTER.
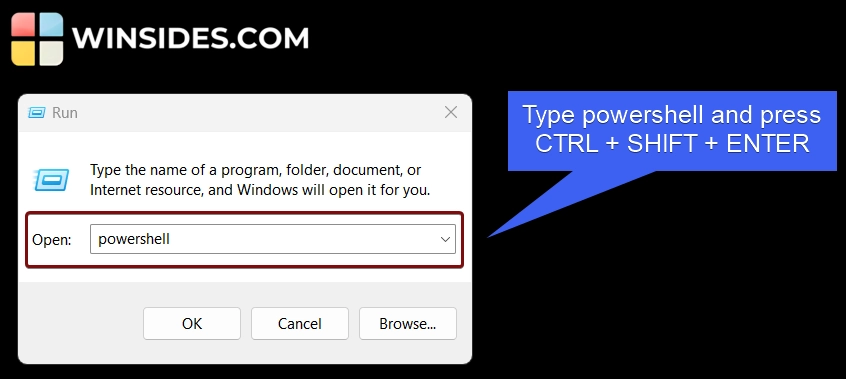
- This will prompt the system to run the
powershellcommand with Elevated Privileges. UAC will confirm and open Windows PowerShell with Elevated Permissions. sudo config --enable (mode)is the syntax. Here, mode is the sudo configuration option. You can specify which one you are going to use. You can choose between In a New Window, With Input Disabled, and Inline. For explanation, we will use the option “In a New Window“. Execute the following command in Windows PowerShell.sudo config --enable forceNewWindow
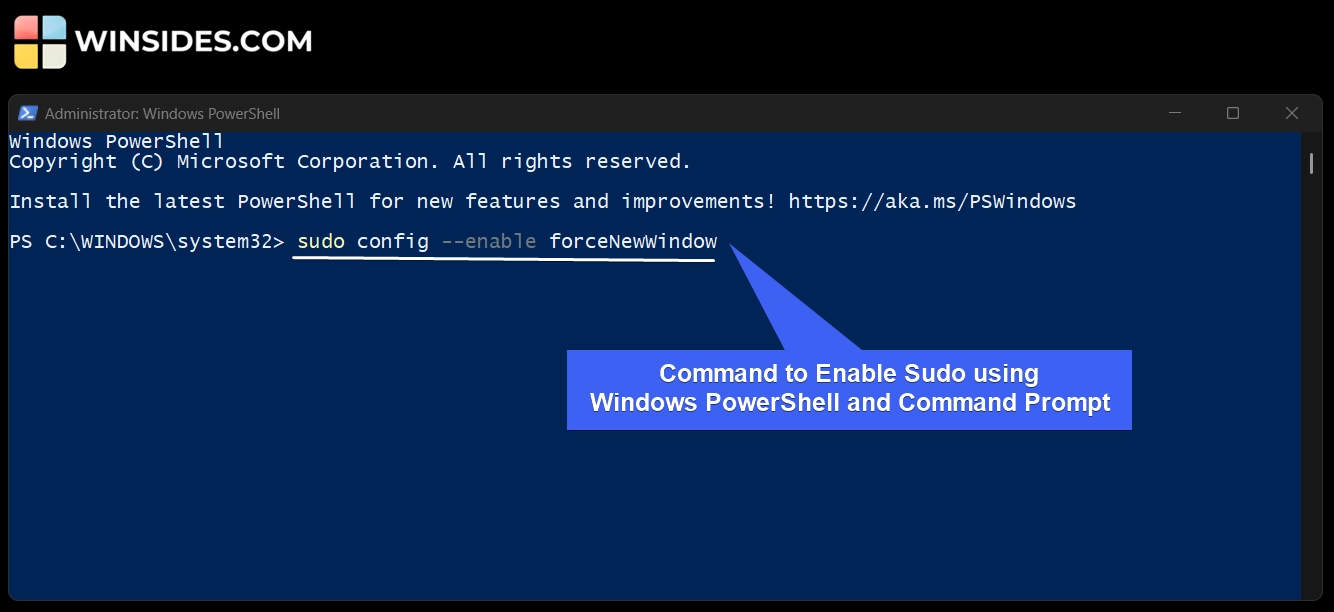
- This command will enable sudo and set its configuration to “In a New Window“. You can execute the same command in the Command Prompt as well.
- One interesting thing is that in Windows Settings, the default option refers to the safest option, “In a New Window“. However, in the CLI mode, with PowerShell or CMD, the default option refers to the Inline Mode. This difference in behavior is due to contextual awareness. The Windows Settings favors the safety of the general users, whereas the CLI modes favour the convenience of the developers. Here are the possible sudo configurations you can enable using Windows PowerShell or Command Prompt.
| Value | Behaviour |
| forceNewWindow | Enables Sudo with In a New Window configuration |
| normal/default | Enables Sudo with Inline Configuration |
| disableInput | Runs Elevated Commands inline, but blocks additional user input |
How to Disable the Sudo Command on Windows 11?
Just like the enabling process, to disable the Sudo Command on Windows 11, we have both GUI and CLI Methods.
CLI Method to Disable Sudo Command on Windows 11
For CLI, we can use Command Prompt, Windows PowerShell, and Windows Terminal. Make sure you are running these applications with Administrative Privileges. To disable Sudo on Windows 11, kindly execute the following command in the terminal. sudo config --enable disable
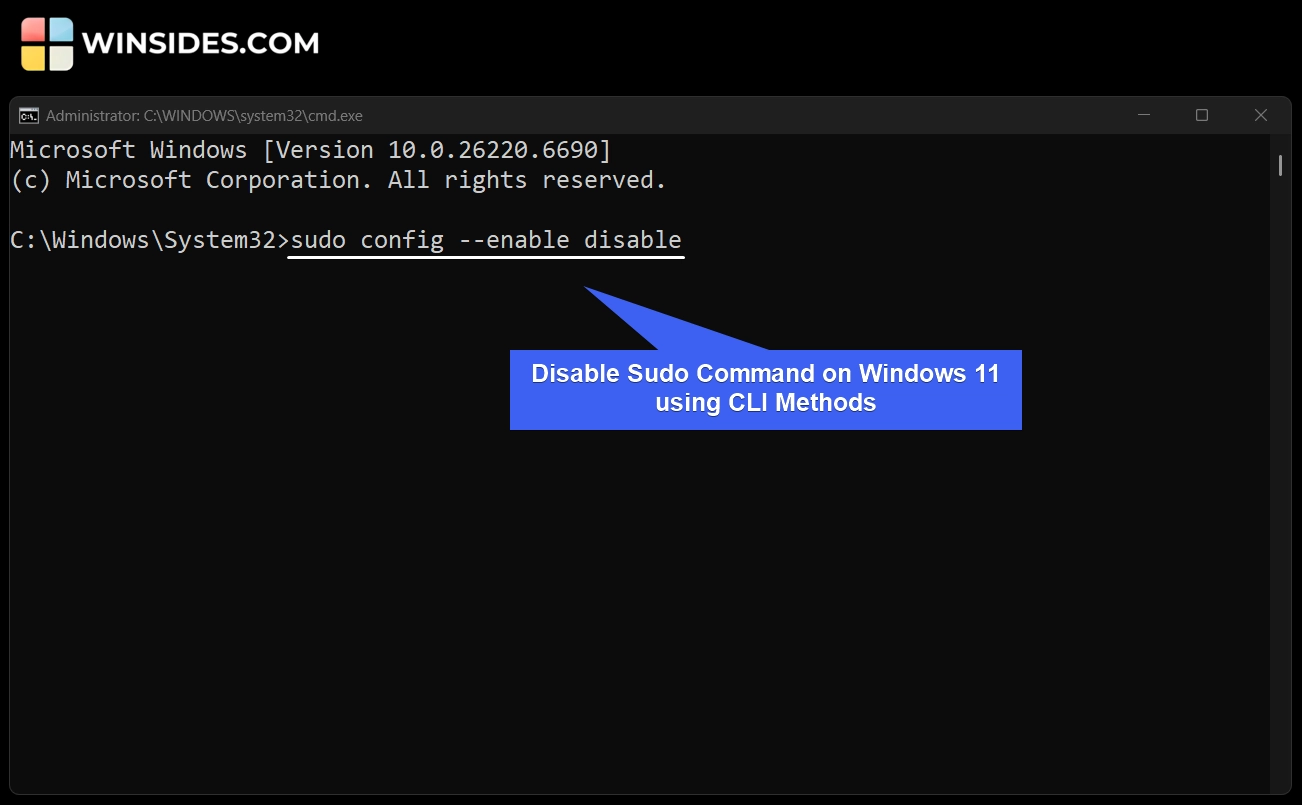
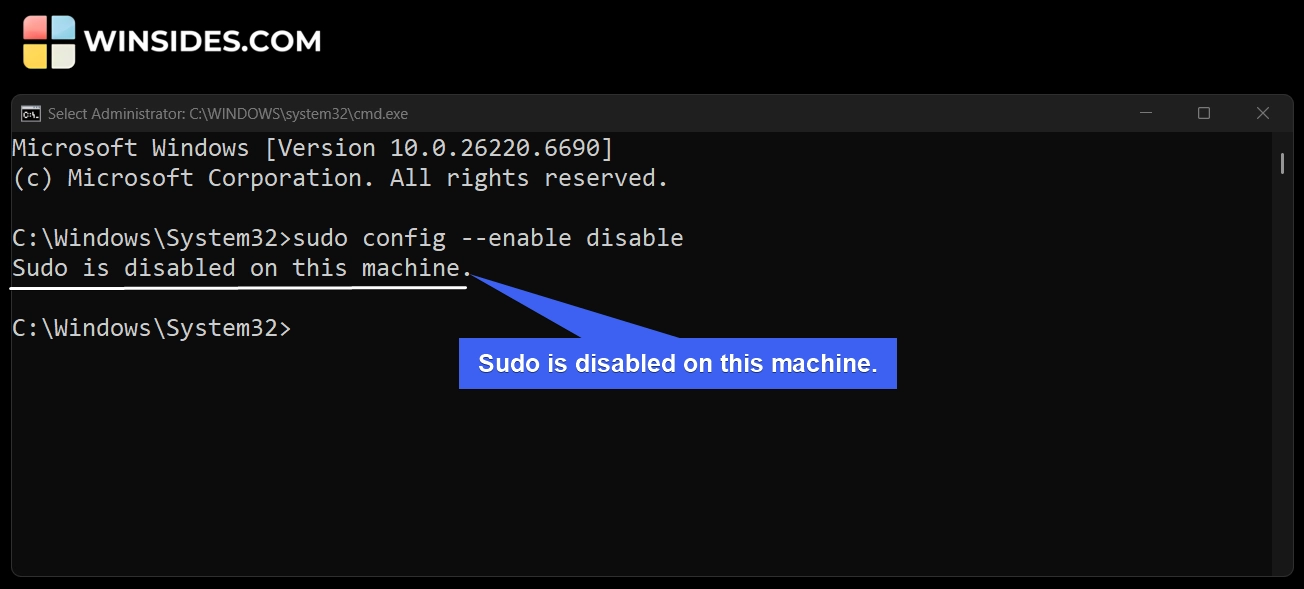
The above command will disable Sudo on Windows 11. Once it is disabled on your machine, the next time you use it, the system will throw the following error. “Sudo is disabled on this machine“.
GUI Method to Disable Sudo using Windows Settings on Windows 11
- The process is very similar to the enabling process.
- Navigate to the System Settings and then to the Advanced Settings.
- Toggle the Sudo switch to OFF to turn off Sudo Command on Windows 11.
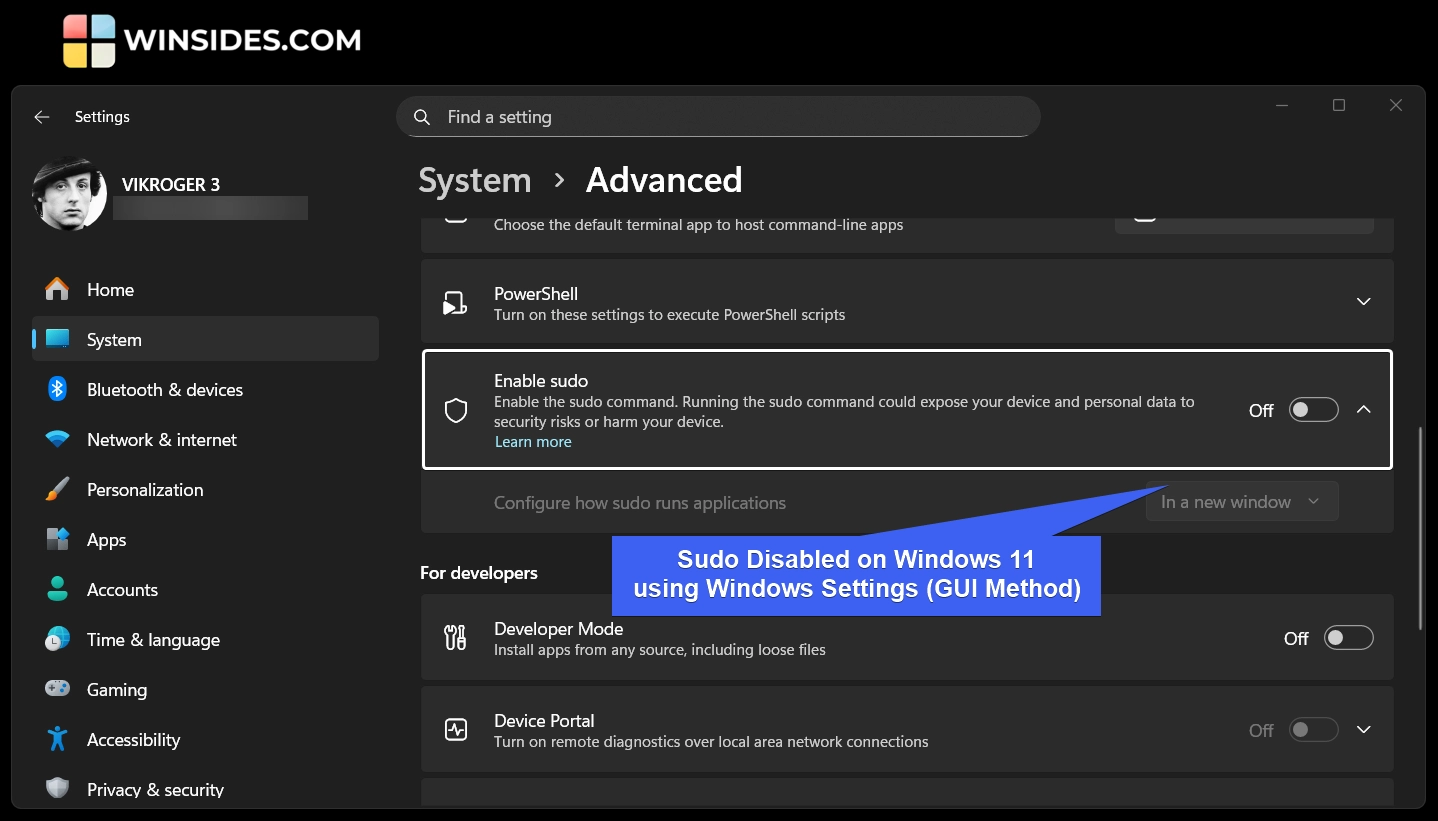
- That’s it. Sudo Command is now disabled on your Windows 11.
Take Away
Introducing the Sudo Command on Windows 11 bridges the gap between Windows and Linux and allows users and developers to run elevated commands directly from their console. However, running the Sudo Command could expose your device and personal data to security risks or harm your device. Hence, use Sudo wisely.
We hope you are satisfied with our article on “Enable Sudo Command on Windows 11.” If you have any queries, kindly let us know in the comments. For more interesting articles, stay tuned to Winsides.com. Safe Computing! Peace out!
We combine expert insights with user-friendly guidance. We thoroughly research and test everything to give you reliable and simple to understand tech guides. Please take a look at our publishing process to understand why you can trust Winsides.


