How to Enable Safe Boot in Windows 11?
Enable Safe Boot in Windows 11: The Safe Boot option in Windows 11 is a troubleshooting feature that allows you to start your computer with a minimal set of drivers and services. This mode is designed to help diagnose and fix issues that might be preventing your system from starting normally or running correctly. By limiting the number of startup programs and non-essential drivers, Safe Boot provides a clean environment for troubleshooting. This latest article will walk you through how to Enable the Safe Boot option in Windows 11, the types of safe boot options, and more. Checkout: Manage Ransomware Protection in Windows 11
Key Steps:
- Open Run Command.
- Execute the command msconfig in the Run command.
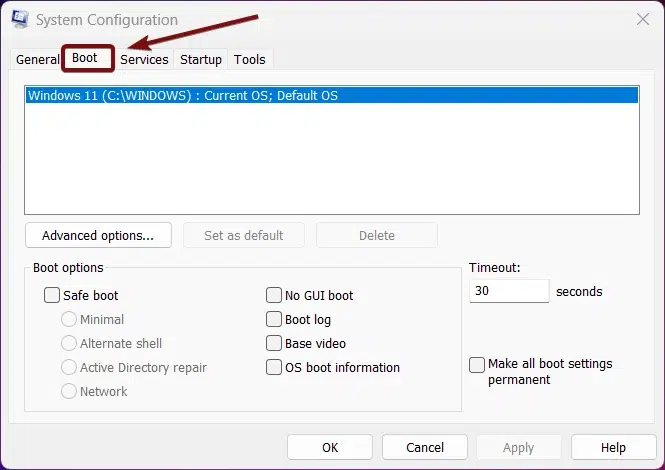
- Switch to Boot Tab in System Configuration.
- Enable Safe boot, choose Minimal or Alternate Shell, or Active Directory repair, or Network accordingly and Click Apply.
Why and When do I need the Safe Boot option in Windows 11?
Understanding why and when to use Safe Boot can significantly help maintain your system’s health and resolve problems efficiently.

Why?
- Safe Boot allows you to start Windows without third-party drivers and startup programs, helping you identify and fix problems that prevent Windows from starting normally.
- Some malware is designed to load automatically when Windows starts. Safe Boot prevents these malicious programs from launching, making it easier to remove them using antivirus or anti-malware tools.
- Conflicting or corrupt drivers can cause system instability or crashes. Safe Boot loads only essential drivers, allowing you to identify and update or uninstall problematic drivers without interference.
- Safe Boot provides a controlled environment for performing system maintenance tasks, such as running system file checks, disk checks, and restoring system settings using System Restore.
- If you encounter BSOD errors, Safe Boot can help you troubleshoot the underlying cause, whether it’s a driver issue, hardware failure, or software conflict.
When?
- After Installing New Software or Drivers
- Experiencing Frequent Crashes or Freezes
- Suspected Malware Infection
- System Performance Issues
- Blue Screen of Death (BSOD) Errors
Let’s get into the steps.
- Open the Run command using the Start menu or using the shortcut Win Key + R.
- Enter the following command and click OK.
msconfig

- System Configuration will open now.
- Switch to the tab “Boot“.

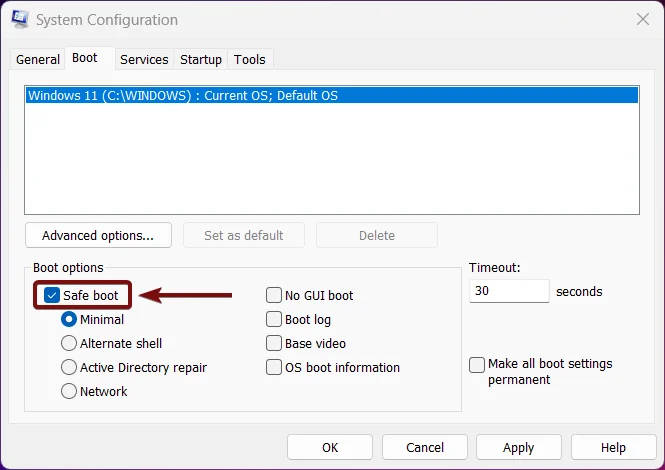
- Under Boot options, enable Safe Boot by clicking the checkbox next to it.

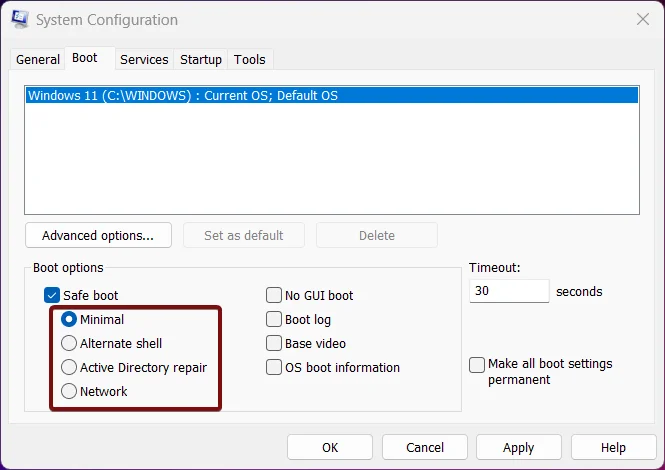
- Now, we have four options to choose from, Minimal, Alternate Shell, Active Directory repair, and Network.

Minimal Safe Boot option:
The basic set of drivers and services without network connectivity. Suitable for general troubleshooting.
Alternate Shell:
Command Prompt interface instead of the graphical user interface(GUI). Useful for advanced troubleshooting when the GUI is not accessible.
Active Directory Repair:
Loads services required to repair the Active Directory. Primarily used in enterprise environments.
Network:
The basic set of drivers and services with network connectivity. Useful for troubleshooting network-related issues.
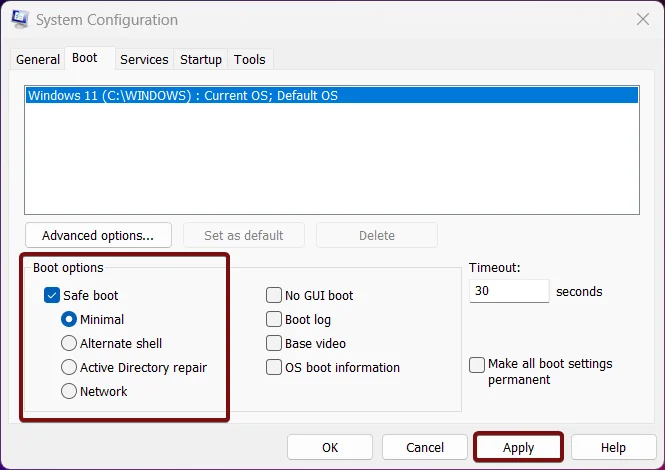
- Choose your option accordingly, and finally, click Apply.

- You will be prompted to restart your computer. Click “Restart” to boot into Safe Mode in Windows 11.
Take away:
The Safe Boot option in Windows 11 is a crucial tool for diagnosing and resolving various system issues. By starting your computer with a minimal set of drivers and services, Safe Boot provides a clean environment that helps isolate and fix problems effectively. Happy Computing! Peace out!
We combine expert insights with user-friendly guidance. We thoroughly research and test everything to give you reliable and simple to understand tech guides. Please take a look at our publishing process to understand why you can trust Winsides.


