Reset Network Settings in Windows 11: Wi-Fi connectivity issues can be incredibly frustrating especially when all your other devices are working fine, but one stubborn device refuses to connect. I recently faced this exact problem. My phone and other gadgets were connected to my home Wi-Fi with no issues, but my laptop (which I use for work) kept showing “Connected, No Internet”. I tried a few common fixes, but nothing worked until I finally hit the magic button, a network reset. In this article, I’ll walk you through my entire experience, from the different troubleshooting steps I took to finally performing a network reset in Windows 11. Check out: 6 Easy ways to find out IP Address in Windows 11
Related: 5+ Quick Ways To Run Dxdiag As Administrator On Windows 11!
Key Steps:
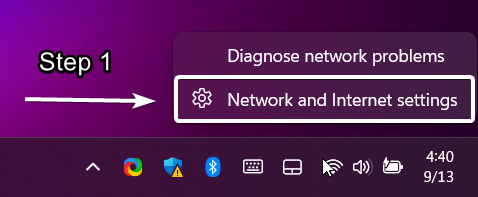
- The first step of this process is to access Windows Settings. You can either use the shortcut Win Key + I or simply right-click on the Wifi Symbol in the system tray and click on Network and Internet Settings.
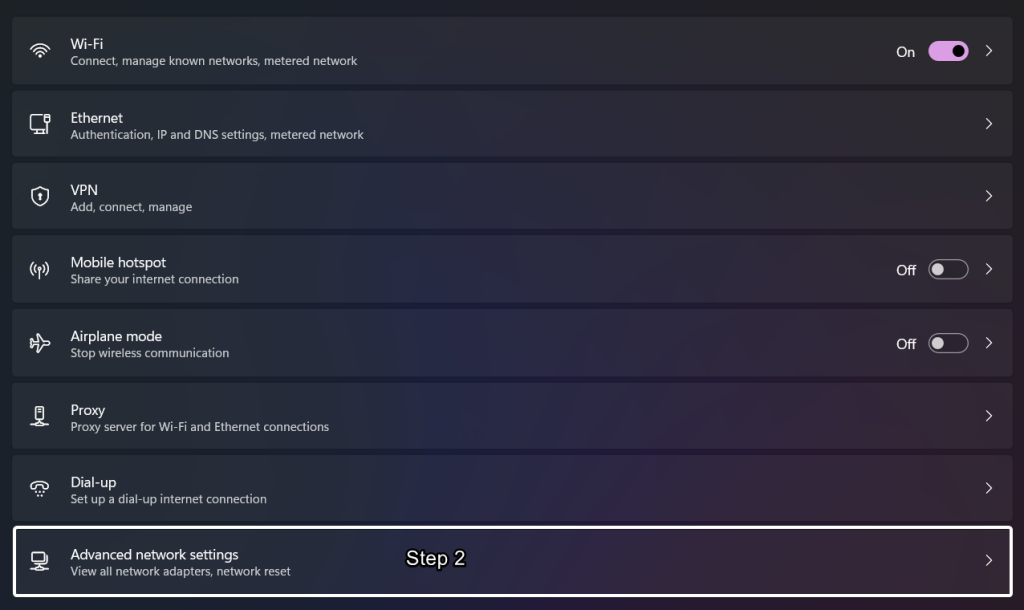
- Under Network & Internet Settings, you can find “Advanced Network Settings“. Click on that.
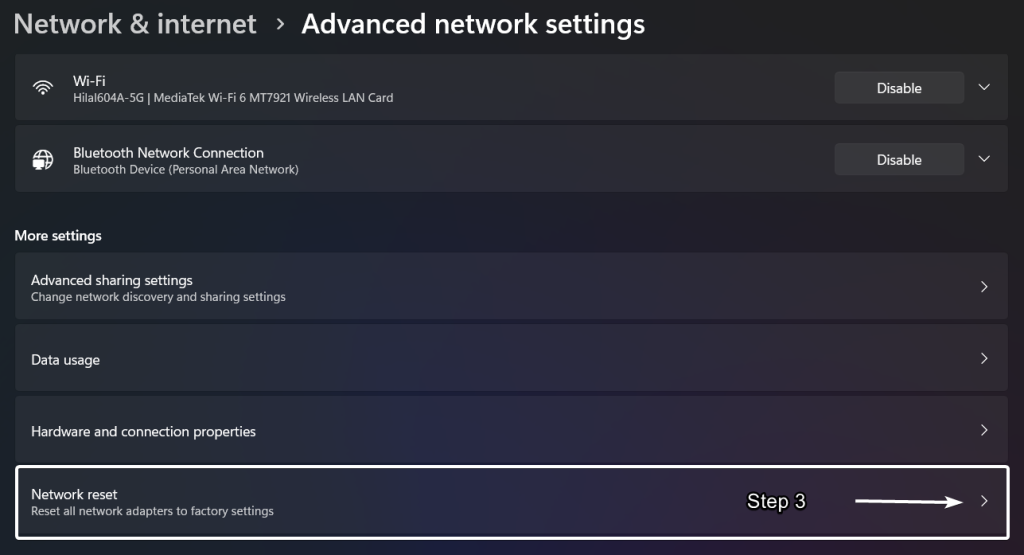
- Click on Network reset under More Settings.
- Finally, click on Reset now. This process will reset the Network Settings and the computer will automatically restart in 5 minutes. After the restart, you may connect to the WiFi Network successfully.
The Problem – One Device Stuck on “Connected, No Internet”
As mentioned in the introduction, my Wi-Fi network was working perfectly on my phone and tablet, but when I opened my laptop, it connected to the Wi-Fi. Still, it didn’t access the internet, which felt quite strange. The status kept showing “Connected, No Internet.” I assumed it was a temporary glitch, so I tried the usual quick fixes:
- I restarted my Asus ROG Gstrix Laptop.
- I restarted my TP-Link Router.
- I Disconnected and reconnected to the Wi-Fi in Windows 11.
- I tried “Forgetting the WiFi Network” and then again “reconnecting to the WiFi Network“.
Unfortunately, none of the above steps fixed the issue and I have decided to do a complete Network Reset in Windows 11.
Why did I decide to Reset the Network Settings?
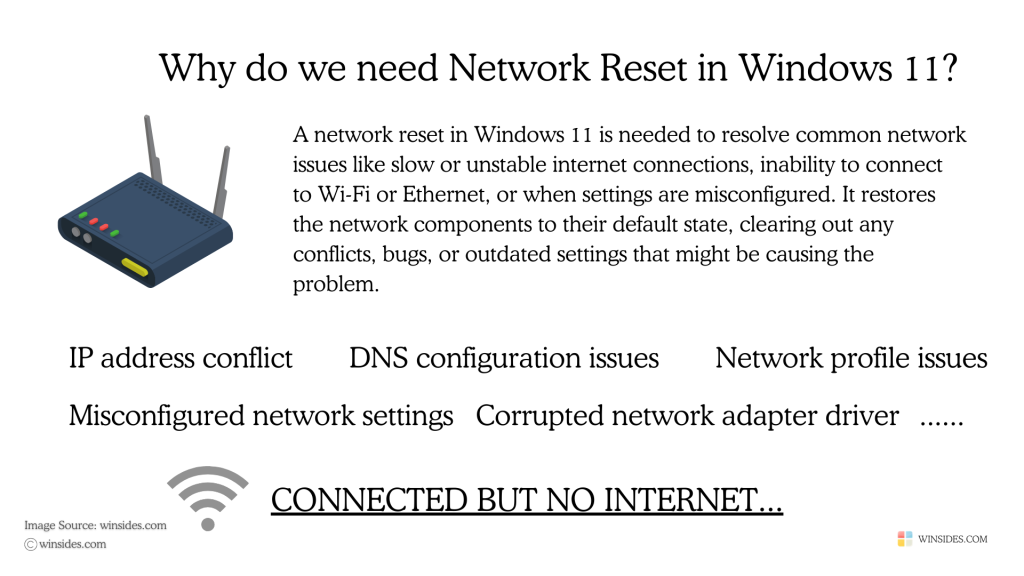
After trying everything I could think of, I realized this problem was likely due to some misconfiguration or hidden conflict that wasn’t immediately obvious and that’s when I decided to perform a network reset. However, I was cautious since it would remove all saved Wi-Fi networks, custom settings, and other network-related configurations. I was ready to re-enter my Wi-Fi passwords and set up everything again if needed. Here are the different methods
- Using Windows Settings
- Resetting TCP/IP Stack & Winsock
- Uninstalling the WiFi Adapter using the Device Manager
- Useful PowerShell Commands – Network Related
Reset Network Settings in Windows 11 using Network & Internet:
This is a quick and effective step to resolve the WiFi Connectivity in Windows 11. Please keep the cautions in mind before starting this process. Let’s get started.
- We have to open Windows Settings. To do so, right-click on the WiFi icon available in the System tray. You can find it in the bottom right corner of the screen.
- Now, click on Network and Internet Settings.
- The Network and Internet Settings window will open now. Here, you can find Advanced Network Settings. It is usually located in the bottom section. Click on that.
- The Advanced Network Settings incorporates various crucial Network-related settings, from Network Adapters, to Hardware and connection properties. Our interest is Network reset. You can find it under More Settings. Click on Network Reset.
- Eventually, click on Reset now.

- A small window will pop saying that the system will restart after 5 minutes. You can click on Close.
Here’s a crucial insight I’d like to share. When I saw that the system would restart after 5 minutes, I thought, why wait? So, I restarted the system right away after saving my work. However, the issue still persisted. I then followed the steps again, clicked ‘Reset now,’ and waited for the system to restart automatically after the 5 minutes as mentioned. Finally, I connected to my home Wi-Fi, and the connection was successful.
If this method doesn’t work for you, don’t worry. I’ve done extensive research and included some other effective methods in this article that can help resolve the issue.
Reset TCP/IP Stack using Command Prompt in Windows 11
This is also an effective method to resolve the network-related issues. However, instead of GUI, we will be using the Command Prompt. Here are the steps.
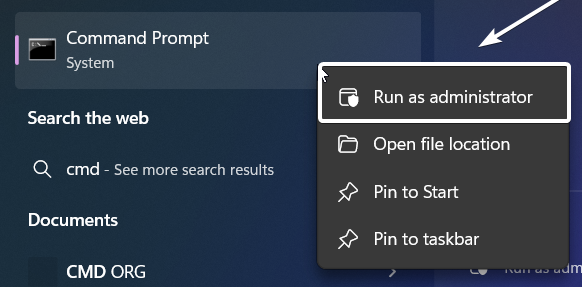
- Open Command Prompt (CMD) and Run it as Administrator. User Account Control (UAC) will prompt for permission. Click on Yes.
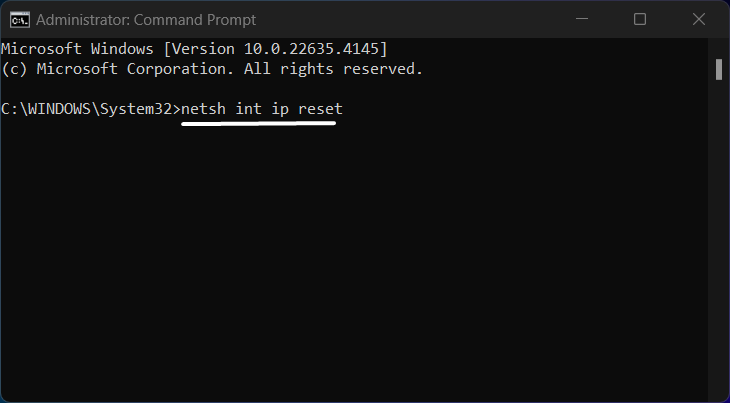
- We have to reset the TCP/IP Stack which can fix many Internet Connection issues. The following is the command to be used in the CMD to reset the TCP/IP Stack.
netsh int ip reset
- Winsock defines how Windows handles network requests from applications. If Winsock becomes corrupt, it can cause network connectivity issues. Use this command to reset Winsock.
netsh winsock reset
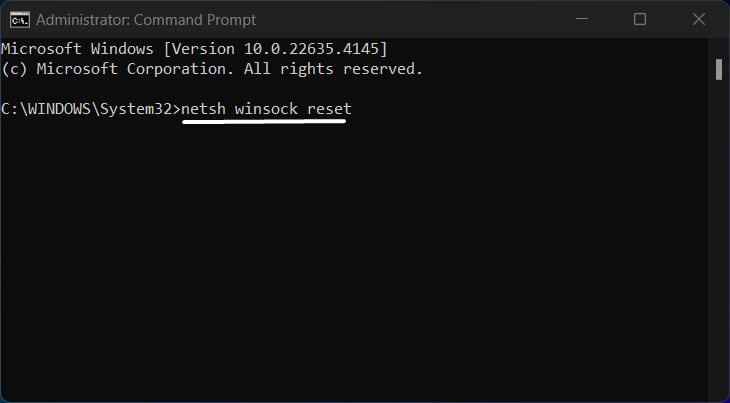
- Restart the PC and try to connect to the WiFi.
Reset the WiFi Adapter using the Device Manager
Device Manager is a built-in utility in the Windows operating system that allows you to view and manage all the hardware devices connected to your computer. It provides a centralized interface where you can see details about your system’s hardware components. Hence, it will also have information about Network Adapters. In this section, we will use Device Manager to reset the Network Adapter so that we can fix the issue.
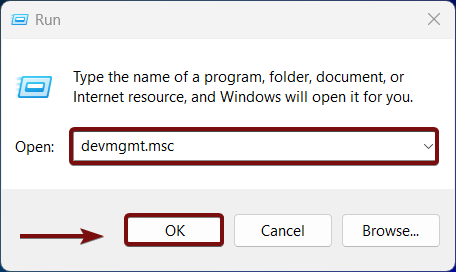
- Open Device Manager, you can either use the Start menu or you can just execute the following command in the Run.
devmgmt.msc
- Expand the Network Adapters Node.
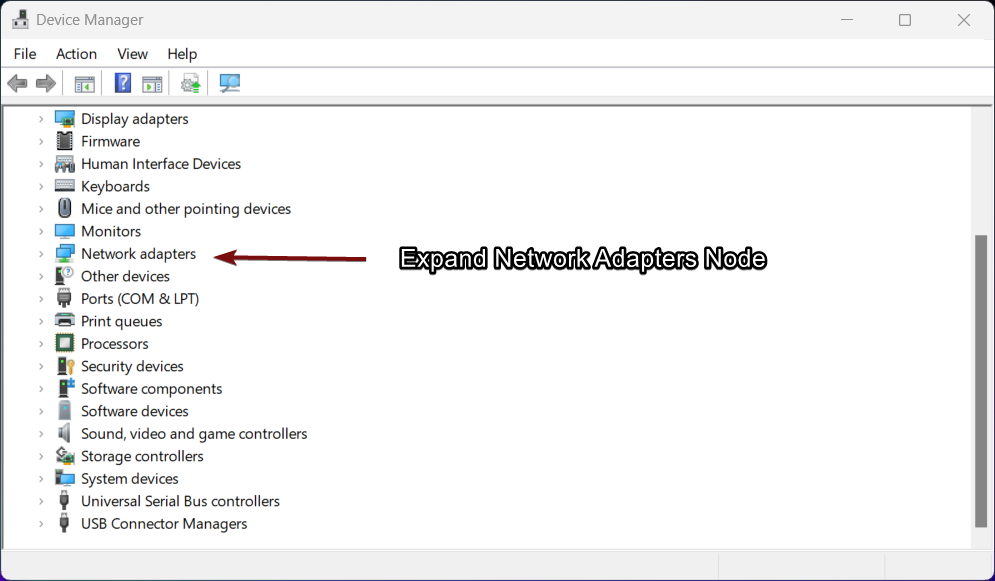
- You can find a lot of network-related Adapters, but we have to locate our WiFi Adapter. The name varies with different devices and different components, however, it usually includes terms like Wireless, WiFi, 802.11, or WLAN, etc.
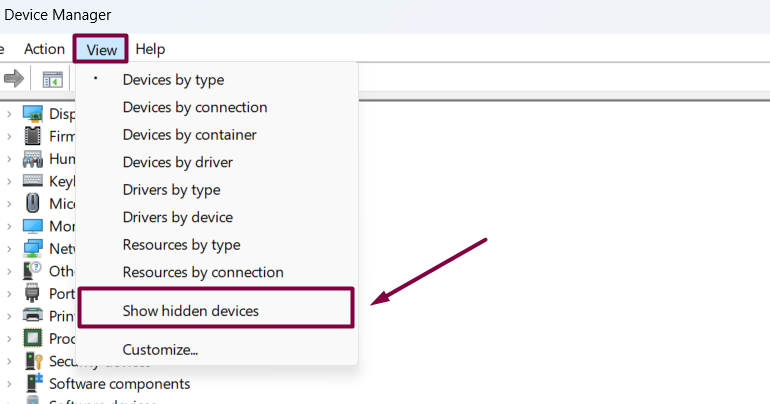
- It’s helpful to enable the Show Hidden Devices option in Device Manager. To do this, click on View, then select “Show Hidden Devices“.
- In my Laptop, the WiFi Adapter is a MediaTek Wi-Fi 6 MT 7921 Wireless LAN Card.
- Right-click on the WiFi Adapter and click on Uninstall device. This will uninstall the WiFi Adapter.
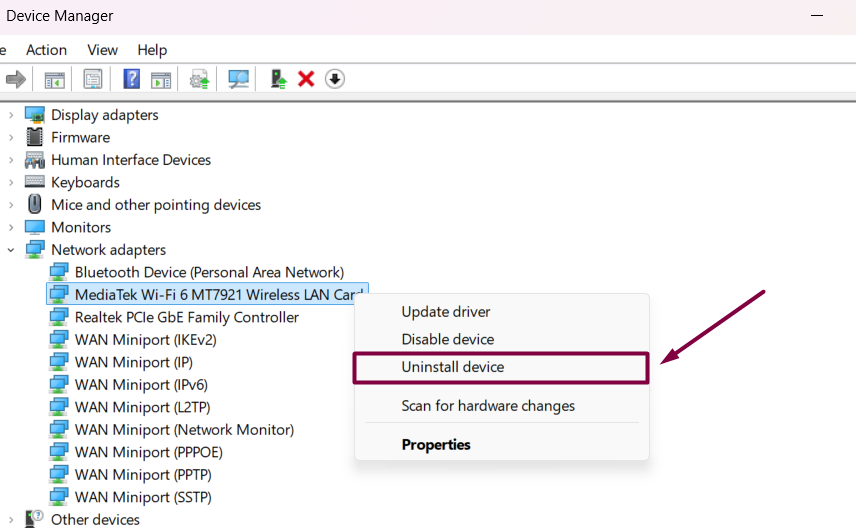
- Restart your computer, and Windows 11 will automatically reinstall the correct drivers. That is it.
Useful Network-Related PowerShell Commands in Windows 11
Some PowerShell commands can be used to reset specific network configurations without a full reset of all network settings. You can use them individually based on the issue you’re facing. The following are the list. Kindly make sure to run PowerShell as an Administrator.
| Command | Usage |
Get-NetAdapter | Disable-NetAdapter -Confirm:$false | Disable the network adapter to effectively reset it without reinstalling drivers. |
Get-NetAdapter | Enable-NetAdapter -Confirm:$false | Enable the network adapter. |
Clear-DnsClientCache | DNS Caching can sometimes cause issues. You can flush it using this command. |
ipconfig /release | This command releases the current IP address assigned to your computer by the DHCP server. |
ipconfig /renew | This command requests a new IP address from the DHCP server. |
Get-NetAdapter | List the available Network Adapters. |
Remove-NetAdapter -Name "YourNetworkAdapterName" | Remove a network adapter. Make sure to replace “YourNetworkAdapterName” with actual name. |
DHCP (Dynamic Host Configuration Protocol) is a network protocol used to automatically assign IP addresses and other network configuration settings to devices on a network. This allows devices to communicate on the network without requiring manual configuration of IP addresses.
Take away:
Having faced my own frustrating WiFi issues, I can say that “reset network settings in Windows 11” is an effective solution for many connectivity problems. It’s not the first step you should take, but when other troubleshooting methods fail, it can be the key to getting your device back online. Hopefully, this guide helps you tackle the issue with confidence and keeps your internet running smoothly! If you have any queries, do let us know in the comment section. For more interesting fixes, stay tuned to winsides.com. Happy Networking! Peace out!
Related Articles:
- What is Activity History on Windows 11?
- What are Filter Keys on Windows 11?
- How to Turn Off Sticky Keys on Windows 11?
We combine expert insights with user-friendly guidance. We thoroughly research and test everything to give you reliable and simple to understand tech guides. Please take a look at our publishing process to understand why you can trust Winsides.
