

Introduction to Display Calibration for HDR Video on Windows 11
display calibration for hdr video is the process of making an HDR-capable Windows 11 display show dark detail, bright highlights, color saturation, and SDR desktop content in a balanced way. HDR can make movies, streaming video, games, and creative work look much more vivid than standard dynamic range, but only when the whole chain is configured correctly.
Windows 11 includes HDR settings for capable displays and Microsoft also provides the Windows HDR Calibration app for creating a display-specific HDR color profile. Microsofts HDR overview explains that HDR in Windows is meant to show brighter highlights, deeper shadows, and a wider color range than SDR. Microsoft Support overview of HDR in Windows Microsofts HDR settings guide covers the Windows controls used to enable and troubleshoot HDR. Microsoft Support HDR settings in Windows
Calibration matters because HDR is not a single switch that magically fixes every screen. A laptop panel, OLED TV, Mini LED monitor, basic HDR400 monitor, gaming display, and external TV all behave differently. Some can produce very bright highlights. Some can show deep blacks. Some advertise HDR support but have limited real-world contrast. Some look excellent in games but washed out on the desktop. Calibration helps Windows understand the display and helps you avoid common problems like clipped highlights, crushed shadows, dull colors, or overly bright SDR apps.
This guide explains what display calibration for hdr video means on Windows 11, how to prepare the PC and display, how the Windows HDR Calibration app fits in, what settings to check before watching HDR video, how to balance SDR and HDR content, and how to troubleshoot common HDR problems.
Table of contents
Key Takeaways
- Display calibration for HDR video is about the whole signal path. Windows settings, the HDR calibration profile, GPU drivers, cables, display mode, playback app, and the monitor or TV all affect the result.
- Windows 11 needs an HDR-capable display and HDR enabled. Start in Settings > System > Display > HDR and confirm the display reports HDR support.
- The Windows HDR Calibration app creates a display-specific HDR color profile. Microsofts calibration guide explains that the app can be downloaded from the Microsoft Store and used for HDR displays. Microsoft Support Windows HDR Calibration app guide
- The app measures black level, peak brightness, full-screen brightness, and color saturation. These values help Windows map HDR content more appropriately for that display.
- HDR video must actually be HDR. SDR videos, SDR browsers, non-HDR streams, wrong playback settings, or unsupported DRM paths will not become true HDR just because Windows HDR is on.
- External displays need the right cable and port. HDMI, DisplayPort, USB-C, docks, refresh rate, bit depth, and color format can all affect HDR availability.
- SDR content brightness is separate from HDR peak brightness. Tune the SDR brightness slider so normal desktop apps do not look painfully bright or too dim when HDR is enabled.
- Washed-out HDR usually points to a mismatch. Check Windows HDR settings, display picture mode, GPU output format, browser or app support, and the calibration profile.
What HDR Video Calibration Actually Means
HDR stands for High Dynamic Range. In video, it is about preserving a wider range from dark shadows to bright highlights and using a wider color volume than ordinary SDR content. A good HDR video can show sunlight, reflections, lamps, fire, neon signs, and bright sky detail without losing the darker parts of the scene.
Display calibration for HDR video does not rewrite the movie. It helps the system describe your display accurately so the content can be mapped to the screen in a reasonable way. HDR content is mastered for certain brightness and color expectations, but your display may not match those expectations exactly. A budget HDR monitor may not reach the same brightness as a high-end TV. An OLED display may have excellent black levels but different full-screen brightness behavior. A laptop screen may support HDR video but need careful SDR brightness adjustment for desktop use.
Windows 11 sits between the HDR content and the display. It needs to know the display capabilities, the active HDR mode, and the color profile. The display then does its own processing, often called tone mapping, to fit the content to the panel. If Windows and the display disagree, HDR can look wrong.
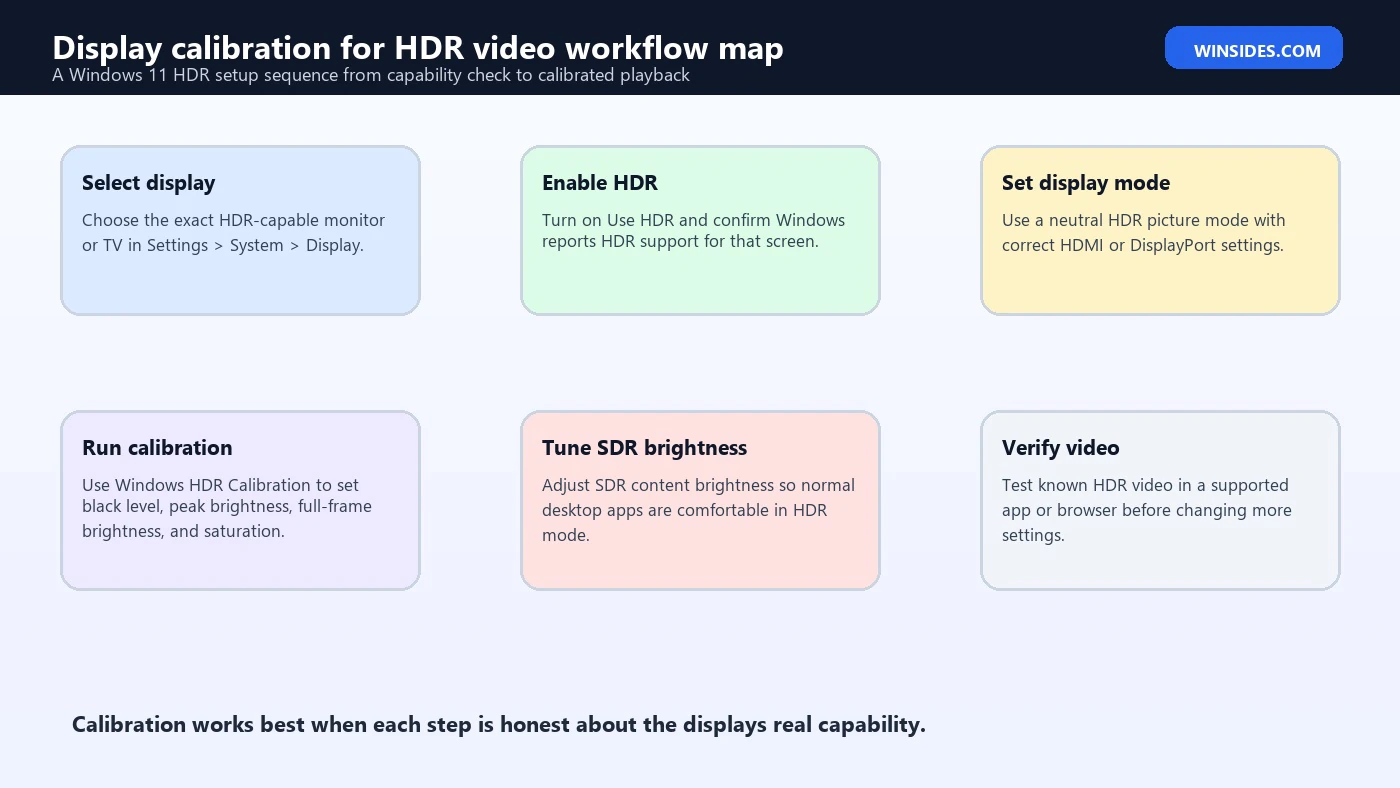
Calibration therefore means checking capability, enabling the right mode, creating or applying the right HDR profile, choosing sane SDR brightness, and verifying with real HDR content.
The HDR Signal Chain on Windows 11
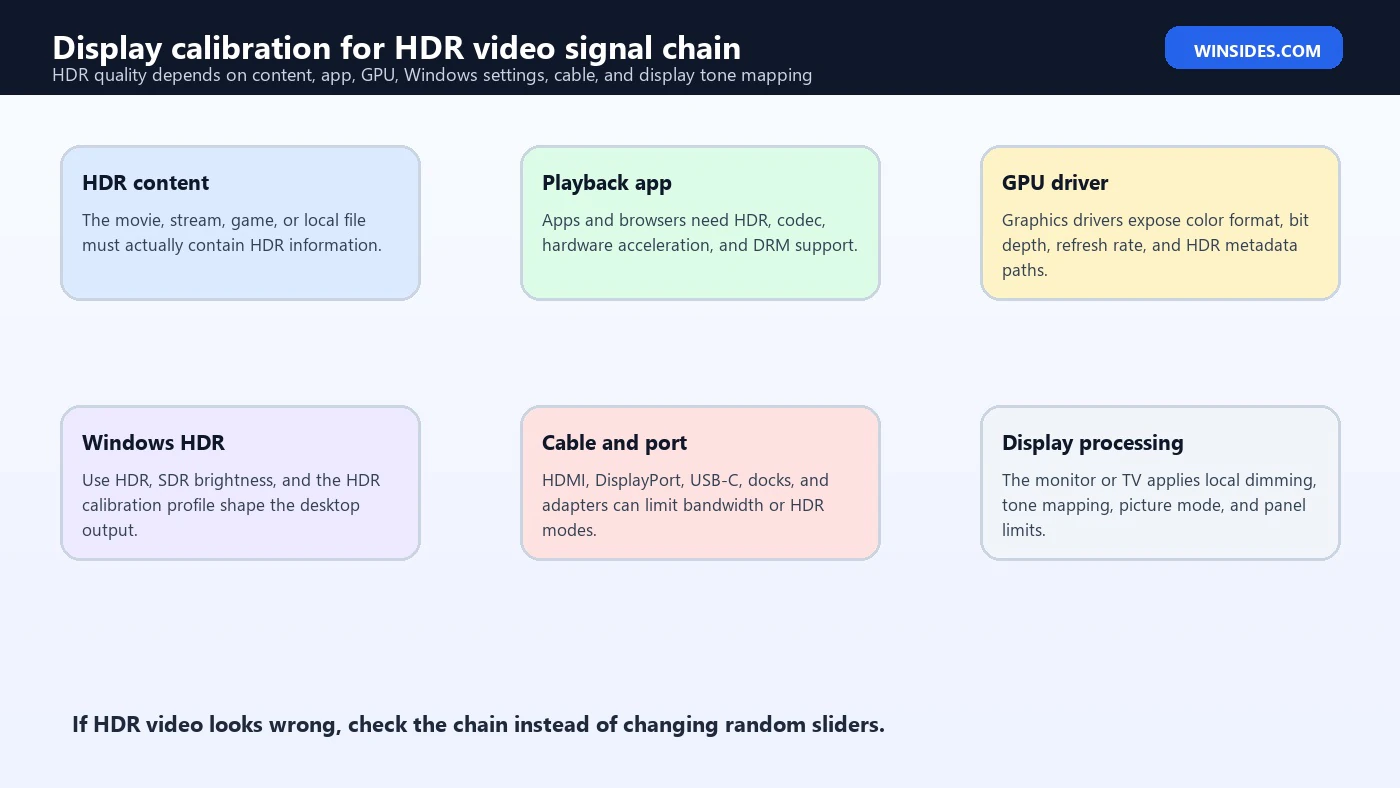
HDR video playback depends on a chain. If any link in the chain is wrong, the result may fall back to SDR, look washed out, clip highlights, or fail to expose the HDR toggle in Windows.
The content must be HDR. Streaming services, local files, games, and apps can contain SDR or HDR media. A video labeled 4K is not automatically HDR. A 4K SDR video is still SDR. Look for HDR10, Dolby Vision, HDR, or platform-specific HDR labels, but remember that the playback app and device must also support the format.
The playback app must support HDR output. Some apps and browsers support HDR only under specific conditions. Protected streaming content may also depend on DRM support, app version, display connection, and hardware decode capability. If the app cannot output HDR, Windows HDR settings alone cannot make the stream true HDR.
The GPU driver and Windows display stack must expose the HDR-capable display correctly. Keep graphics drivers current, especially on systems with hybrid graphics, gaming GPUs, docks, or external monitors.
The cable and port must carry the required signal. HDMI, DisplayPort, USB-C DisplayPort Alt Mode, adapters, docks, KVM switches, AV receivers, and capture devices can all limit resolution, refresh rate, bit depth, chroma format, or HDR metadata. A display may be HDR-capable, but an old cable or dock may prevent Windows from enabling HDR.
Finally, the display itself must be in the correct picture mode. Many TVs and monitors have separate HDMI enhanced mode, input signal plus, game mode, HDR picture mode, local dimming, tone mapping, or color space settings. Windows cannot fully fix a display that is set to an unsuitable picture mode.
Check Whether Windows 11 Sees HDR Support
Start in Settings > System > Display. Select the display you want to calibrate, then open HDR. On a multi-monitor system, make sure the correct display is selected. It is common to calibrate the wrong screen by accident when a laptop is connected to an external monitor.
In the HDR page, check whether Windows reports that the display supports HDR video or HDR use. Microsofts HDR settings page is the official starting point for controlling and troubleshooting HDR in Windows. Microsoft Support HDR settings in Windows If Windows says HDR is not supported, do not begin calibration yet. First solve the capability problem.
For an internal laptop display, check that the device is plugged in if required, battery saver is off, and the laptop firmware and graphics driver are current. Some laptops limit HDR behavior on battery or expose it differently depending on power mode.
For an external display, check the cable, port, resolution, refresh rate, and monitor or TV input settings. Try a direct connection from the GPU to the display instead of a dock or adapter. Use a known high-quality HDMI or DisplayPort cable. If HDR appears only at a lower refresh rate, the connection may not have enough bandwidth for the current resolution and color settings.
If you use multiple displays, test one display at a time. Disconnect or disable the others temporarily if troubleshooting gets confusing. HDR setup is much easier when Windows is negotiating with one display.
Enable HDR Before Calibrating
Calibration should happen with HDR enabled on the display you are calibrating. Open Settings > System > Display > HDR and turn on Use HDR for that display if the option is available. If Auto HDR appears, remember that it is mainly for games and does not turn SDR video into true HDR video. It can be useful, but it is not the same as native HDR video playback.
After enabling HDR, the desktop may look different. SDR content can appear brighter, duller, or flatter until the SDR content brightness is adjusted. This does not automatically mean HDR is broken. It means Windows is now blending SDR desktop content into an HDR desktop environment.
Before running calibration, set the monitor or TV to a neutral HDR-capable picture mode. Avoid exaggerated vivid modes, dynamic contrast tricks, heavy color boosts, and automatic brightness features that change the image while you are trying to calibrate. If the display has a dedicated HDR mode, use it. If the display has local dimming, follow the display manufacturers recommendation for HDR.
Let the display warm up for a few minutes if it is a monitor or TV whose brightness changes after startup. Avoid calibrating in a room where sunlight or reflections make black levels hard to judge. HDR calibration is visual, so the environment matters.
Use the Windows HDR Calibration App
Microsoft provides the Windows HDR Calibration app for Windows 11. Microsofts support page explains that you can use the app to calibrate an HDR display and download it from the Microsoft Store. Microsoft Support Windows HDR Calibration app guide The Microsoft Store listing describes the app as a way to calibrate the HDR display for HDR games, Auto HDR, and other HDR content by setting minimum brightness, maximum brightness, full-frame brightness, and color saturation. Microsoft Store Windows HDR Calibration app listing
Open the Windows HDR Calibration app on the HDR display you want to calibrate. The app takes you through a sequence of visual tests. The basic idea is to adjust sliders until the test pattern just disappears or reaches the intended threshold. This tells Windows about the display limits.
The minimum luminance step helps define black level. Set it carefully. If you set black too high, dark scenes can look gray and lifted. If you set it too low on a display that cannot truly show that black level, shadow details may crush or behave strangely.
The maximum luminance step helps define how bright small highlights can get. This affects bright details such as sunlight, sparks, specular reflections, fire, lamps, and bright UI elements in HDR scenes.
The maximum full-frame luminance step helps define how bright the display can get when much of the screen is bright. This is important because many HDR displays can make small highlights very bright but cannot sustain the same brightness across the whole screen.
The saturation step helps tune color intensity. Avoid making colors look artificially intense just because the slider allows it. The goal is believable HDR, not cartoonish oversaturation.
When finished, the app creates a color profile for that display. Use a clear name if the app lets you name the profile, especially if you calibrate multiple monitors.
Understand Minimum and Maximum Luminance
Minimum luminance is about the darkest useful level the display can show. On an OLED display, black can be extremely dark. On a typical LCD monitor, black may be visibly raised because the backlight is still active. On a Mini LED display, black level can depend on local dimming behavior and the size of the dark area.
Maximum luminance is about highlights. HDR video uses bright highlights to create realism. The sun reflecting off metal, a bright window in a dark room, a flashlight, a fire, a neon sign, or a snow scene can all use higher brightness than SDR. If maximum luminance is set too low, highlights can look dull. If it is set too high, detail may clip because Windows thinks the display can show brightness that it cannot actually reproduce.
Maximum full-frame luminance is a separate idea. Some displays can produce a bright highlight in a small area but dim the whole image when the entire screen becomes bright. This is normal behavior for many HDR displays. The full-frame test helps Windows understand this difference.
Do not chase unrealistic numbers. The calibration app is not a competition. If your display is a modest HDR monitor, set the thresholds honestly. Accurate values usually look better than inflated values because tone mapping becomes more predictable.
Tune SDR Content Brightness
One of the most common complaints after enabling HDR is that normal desktop apps look strange. This happens because SDR apps, websites, documents, and older videos must be shown inside an HDR desktop environment. Windows provides an SDR content brightness control for this reason.
Open Settings > System > Display > HDR and look for the SDR content brightness slider. Adjust it while looking at ordinary desktop content such as File Explorer, a browser page, a document, and the Start menu. The goal is comfort. SDR content should not look painfully bright, but it should not look dim and lifeless either.
This slider does not calibrate HDR peak brightness. It changes how SDR content is mapped while HDR is on. That is why you should adjust it separately from the Windows HDR Calibration app.
If you mostly watch HDR video and rarely use the desktop in HDR mode, you may keep SDR brightness modest. If you leave HDR on all day, tune SDR brightness so normal apps look natural. Some users prefer turning HDR on only when watching HDR video or playing HDR games. That is a valid choice if the desktop looks better in SDR on your display.
HDR Video Playback: App, Browser, and Streaming Checks
After calibration, test with real HDR content. Use a trusted streaming app, media app, or HDR sample file that you know is HDR. Do not rely only on a random online video title. Some videos are labeled in confusing ways, and some browser paths do not output HDR even when the content page claims HDR availability.
Check the app settings. Some streaming apps require a specific plan, resolution, hardware acceleration, DRM support, or app version for HDR playback. Some browsers handle HDR differently depending on GPU acceleration, codec support, and Windows settings. Some services support HDR in their app but not in every browser.
If the video looks no different from SDR, confirm the content is actually HDR, the app is using HDR output, Windows HDR is on, and the display switches into HDR mode. Many TVs and monitors show a small HDR indicator when they receive an HDR signal. That indicator is useful, but not perfect. It tells you the display received an HDR mode, not necessarily that the content is well mastered or that your calibration is ideal.
For local files, use a media player that supports HDR passthrough or HDR tone mapping correctly. A player that mishandles HDR metadata can make content look washed out, too dark, or overly saturated.
External Displays, TVs, and Laptop Panels
External HDR displays often need extra setup. A TV may require an enhanced HDMI mode for the input. A monitor may require a specific DisplayPort version, HDR toggle, local dimming mode, or firmware update. A dock may limit bandwidth and prevent HDR at the resolution and refresh rate you want.
If HDR is missing on an external display, connect the PC directly to the display with a known-good cable. Then test a lower refresh rate, such as 60 Hz, to see whether HDR appears. If HDR works at 60 Hz but not at 120 Hz or 144 Hz, the issue may be bandwidth, color depth, chroma subsampling, or cable capability.
Laptop HDR panels have their own quirks. They may support HDR video but have limited peak brightness compared with desktop monitors. Some depend on power mode. Some look best only at high brightness. Some use dynamic behavior that changes with ambient light or battery settings.
Calibrate each display separately. Do not assume a profile created for an external monitor applies to the laptop panel. Each display has different luminance and color behavior.
Color Profiles and Multiple Monitors
The Windows HDR Calibration app creates a color profile for the display you calibrate. On a multi-monitor setup, this distinction is important. The profile should match the physical display. If you move cables, change ports, replace a monitor, or rearrange displays, verify that the right profile is still associated with the right screen.
If HDR looks worse after calibration, you can remove or change the profile. Do not be afraid to recalibrate. A profile created in a bright room, with the wrong picture mode, or with a display setting later changed may no longer be ideal.
Avoid mixing several color management tools unless you understand what each one is doing. GPU control panels, monitor software, ICC profiles, Windows HDR Calibration, professional calibration tools, and display firmware can all affect output. Too many corrections stacked together can create unpredictable results.
For ordinary HDR video viewing, keep the setup simple. Use the display HDR mode, Windows HDR settings, the Windows HDR Calibration app, and app-specific playback settings. Add professional color calibration only if you need color-critical creative accuracy.
Washed-Out HDR: Common Causes
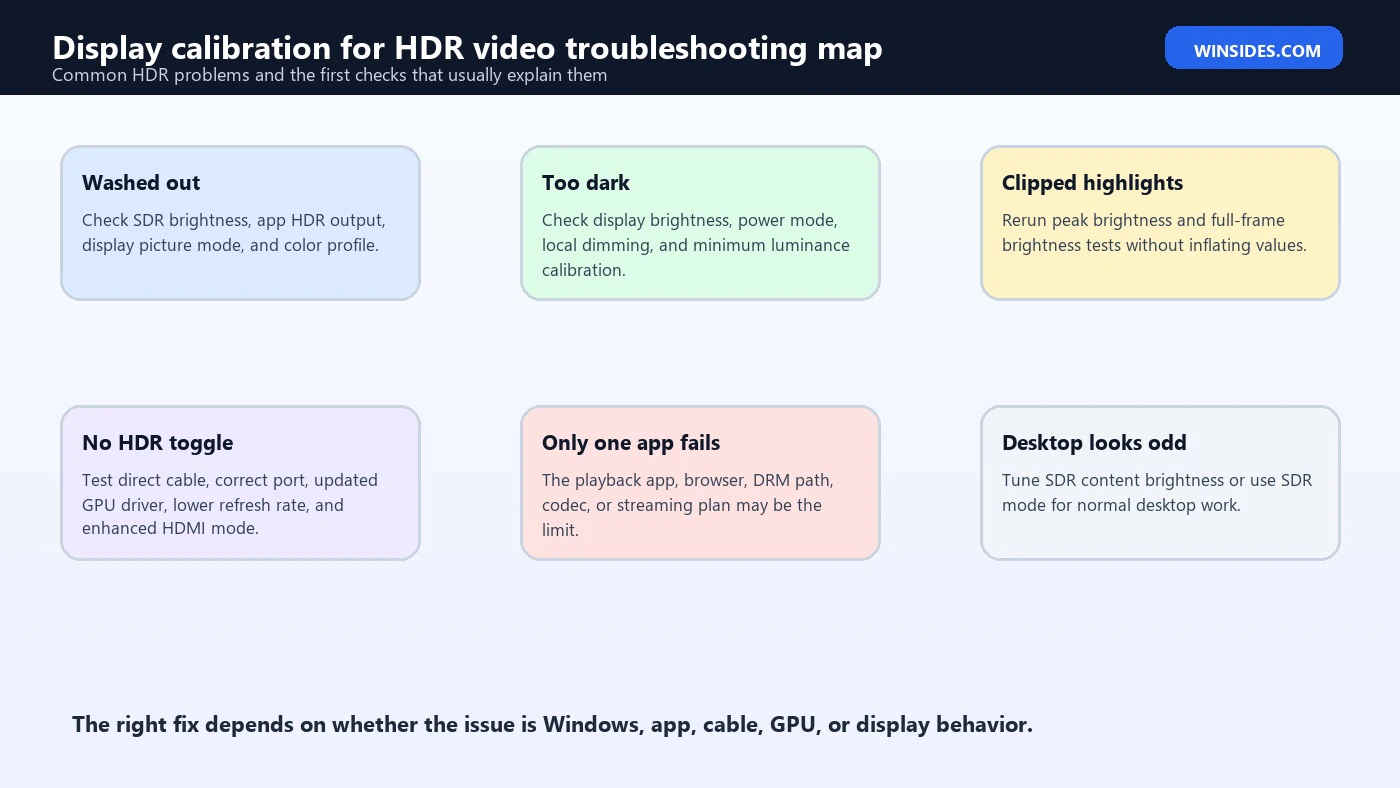
Washed-out HDR usually means a mismatch somewhere in the chain. The display may be receiving SDR while Windows is in HDR mode. The playback app may be tone mapping incorrectly. The GPU may be outputting an unexpected color format. The display picture mode may be wrong. The SDR brightness slider may be too high. The calibration profile may be unsuitable.
Start with Windows HDR settings. Confirm Use HDR is on for the correct display. Check SDR content brightness. Then test another HDR source. If one app looks washed out but another looks correct, the problem is likely the app or browser path.
Next, check the display. Use a standard HDR picture mode, not a vivid showroom mode. Disable aggressive dynamic contrast if it creates unstable brightness. Make sure the display is not applying a strange color temperature or limited color range setting.
For external displays, check the cable and port. A weak connection can force compromises. Try a direct cable, different port, lower refresh rate, or updated GPU driver.
If the problem began after calibration, rerun the Windows HDR Calibration app in a controlled room and set the patterns honestly. Do not push saturation too far. HDR should look dynamic, not fluorescent.
HDR Too Dark or Highlights Clipped
If HDR video is too dark, first decide whether the content itself is dark. Some HDR movies and shows are intentionally mastered with low average brightness and bright highlights. Compare multiple known HDR sources before changing everything.
If all HDR video is too dark, check display brightness, HDR picture mode, local dimming, power saving, and Windows calibration. Some displays reduce brightness dramatically in eco modes. Laptop panels may dim on battery. TVs may have separate settings for each HDMI input and each picture mode.
If bright areas lose detail, the maximum luminance may be wrong or the display tone mapping may be aggressive. Rerun calibration and watch the maximum luminance steps carefully. Set the pattern where the app instructs, not where the image looks most dramatic.
If shadows lose detail, revisit minimum luminance and the display black-level settings. Also check video range settings in GPU software and display menus. A mismatch between limited and full range can crush blacks or lift shadows.
When Not to Use HDR All Day
HDR is valuable, but it is not always the best mode for everything. Many users prefer HDR only for HDR video and HDR games. That is especially true on displays where SDR desktop content looks better with HDR turned off.
If your monitor has limited HDR hardware, the HDR desktop may look flat or inconsistent. If your work is mostly documents, browsing, spreadsheets, and SDR images, SDR mode can be more comfortable. If you edit SDR photos or web graphics, leaving HDR on may make judgment harder unless your workflow is color-managed.
Use HDR when the content benefits from HDR. Use SDR when the desktop looks better and the task is SDR. Windows makes it easy to toggle HDR from Settings, and some systems provide shortcuts or quick settings depending on build and device.
Calibration improves HDR behavior, but it cannot give a basic display the brightness, contrast, or local dimming of a high-end HDR panel. Honest expectations matter.
Best Practices for Display Calibration for HDR Video
Start with hardware. Use an HDR-capable display, direct connection, correct cable, updated GPU driver, and appropriate display picture mode. Then enable HDR in Windows 11 and confirm the correct screen is selected.
Run the Windows HDR Calibration app after the display is in HDR mode. Calibrate in normal viewing conditions, avoid reflections, and set black level, peak luminance, full-frame luminance, and saturation carefully. Save the profile and make sure it applies to the intended display.
Tune SDR content brightness after calibration. This makes the desktop comfortable while HDR remains enabled. Use real desktop apps, not only HDR video, when setting the slider.
Test with known HDR content from more than one app. If HDR works in one app and not another, troubleshoot the app path rather than recalibrating the display immediately.
Recalibrate after changing displays, cables, ports, GPU drivers, display picture modes, firmware, or major brightness settings. The profile describes a display state. If that state changes, the profile may no longer be ideal.
Frequently Asked Questions
What is display calibration for HDR video?
It is the process of configuring Windows 11, the HDR calibration profile, display settings, and playback path so HDR video shows correct shadow detail, highlights, color, and SDR desktop balance.
Do I need the Windows HDR Calibration app?
If you use HDR on Windows 11, the Windows HDR Calibration app is strongly recommended for compatible HDR displays. It creates a profile based on minimum brightness, maximum brightness, full-screen brightness, and saturation. Microsoft Support Windows HDR Calibration app guide
Why does HDR look washed out on Windows 11?
Washed-out HDR usually comes from a mismatch: SDR content inside HDR mode, wrong app output, poor display mode, bad cable, incorrect SDR brightness, GPU color range issues, or an inaccurate calibration profile.
Does HDR calibration improve SDR videos?
Not directly. HDR calibration helps HDR behavior. SDR videos remain SDR, although the SDR content brightness slider affects how SDR content appears while HDR is enabled.
Can Auto HDR make normal videos HDR?
No. Auto HDR is primarily for supported games. It is not a true HDR conversion path for ordinary SDR video playback.
Should HDR be on all the time?
Only if your display handles SDR desktop content well in HDR mode and you like the result. Many users turn HDR on for HDR video and games, then use SDR for normal desktop work.
Conclusion: Calibrate the Whole HDR Video Path
Display calibration for hdr video on Windows 11 is not just one slider or one app. It is the combination of HDR-capable hardware, Windows HDR settings, the Windows HDR Calibration app, the correct display profile, suitable SDR brightness, a reliable cable or port, and a playback app that can actually output HDR.
Once the chain is correct, HDR video can look much better: brighter highlights, deeper shadows, richer color, and more realistic contrast. If it looks washed out, too dark, or clipped, work through the chain instead of guessing. Check capability, enable HDR, calibrate honestly, tune SDR brightness, test known HDR content, and adjust display or app settings only after the basics are right.
For more interesting articles, stay tuned to Winsides.com!









Community
Comments (0)