

Windows 11, like its predecessors, employs a sophisticated file management system that often keeps certain files and folders out of sight. This isn’t an oversight; rather, it’s a deliberate design choice aimed at protecting critical system components and streamlining the user experience. However, there are numerous occasions when you might need to peek behind this digital curtain. Whether you’re troubleshooting a stubborn application, recovering a misplaced document, or delving into system configurations, knowing how to see hidden files in Windows 11 is an invaluable skill.
This comprehensive guide will demystify the concept of hidden files, explaining their purpose and the potential implications of interacting with them. We’ll walk you through multiple methods to reveal these elusive items, from the straightforward File Explorer ribbon to more advanced techniques involving the Command Prompt and even the Registry Editor. Our goal is to equip you with the knowledge and confidence to manage your file system effectively and safely.
Understanding file visibility is fundamental for anyone looking to gain deeper control over their Windows 11 environment. By the end of this article, you’ll be well-versed in not just how to show hidden files, but also when and why you might need to, ensuring you can navigate your system with greater precision and insight.
Table of contents
Key Takeaways: Unveiling Hidden Files
Before we dive into the intricate details, here’s a quick summary of the most important points regarding hidden files in Windows 11. These takeaways will provide a solid foundation for understanding the methods and best practices discussed throughout the article. For additional context, see view hidden files and folders in Windows, attrib command, and Set-ItemProperty PowerShell cmdlet.
- Purpose of Hidden Files: Windows hides files primarily to protect critical system components from accidental modification or deletion, and to reduce clutter in frequently accessed directories.
- Multiple Methods Available: You can reveal hidden files using various approaches, including the File Explorer ribbon, Folder Options, Command Prompt, PowerShell, and even the Registry Editor, each offering different levels of control and convenience.
- Distinguish File Types: It’s crucial to differentiate between user-hidden files (which you can safely modify or delete if you know their purpose) and system-protected operating system files (which should generally remain untouched due to their critical role).
- Safety First: Always exercise caution when interacting with hidden files, especially system files. Modifying or deleting essential system components can lead to system instability or even render your operating system unbootable.
- Temporary vs. Permanent Visibility: Some methods offer temporary visibility, while others provide a more permanent solution. Choose the method that best suits your current needs.
- Re-hiding Files: After you’ve finished working with hidden files, it’s often a good practice to re-hide them to maintain system integrity and a clean interface.
These core principles will guide you as you learn to see hidden files in Windows 11 and manage your system more effectively.
Understanding Hidden Files and Their Purpose
Hidden files are an integral part of how Windows 11 manages its vast array of data and configurations. They are not inherently malicious or problematic; rather, they serve several crucial functions within the operating system. Their primary role is to ensure system stability and provide a streamlined user experience by keeping less relevant or critical files out of immediate view.
When you browse through your C: drive or a user profile folder, you’re typically seeing only a fraction of the actual files present. Many folders, such as ProgramData, AppData, and the root directory of your system drive, contain numerous hidden items. These can include application settings, temporary files, system logs, and core operating system components.
The decision to hide these files is a protective measure. Imagine if every single system file, configuration setting, and temporary data entry were visible by default. Your file explorer would be overwhelmingly cluttered, making it difficult to find what you’re looking for. More importantly, it would significantly increase the risk of accidental deletion or modification of files vital for Windows to function correctly.
Therefore, understanding the nature of hidden files is the first step towards safely interacting with them. We’ll differentiate between files hidden by the system and those hidden by users, and discuss the implications of each.
Why Are Files Hidden by Default?
The default invisibility of certain files in Windows 11 is a cornerstone of its design philosophy, centered around protection and usability. The primary reason is to safeguard the operating system’s integrity.
Core system files, configuration settings, and application data are often hidden to prevent users from accidentally altering or deleting them. Such actions could lead to critical system errors, application malfunctions, or even prevent Windows from starting up properly. This protective mechanism acts as a digital fence, keeping essential components out of reach for casual browsing.
Another significant reason is to reduce visual clutter. Modern operating systems contain hundreds of thousands of files. If all of them were visible, navigating through directories would be a daunting task, making it harder for users to find their personal documents and installed applications. Hiding these background files simplifies the user interface and improves overall usability.
Finally, some hidden files are temporary or cache files that applications create and manage automatically. These files are not meant for direct user interaction and are hidden to prevent confusion and maintain system efficiency. This practice ensures that your system remains robust and user-friendly.
System Files vs. User-Hidden Files
It’s crucial to distinguish between two main categories of hidden files: those hidden by the operating system and those hidden manually by users. This distinction dictates how you should interact with them and the potential risks involved.
System-hidden files are typically critical components of Windows or installed applications. Examples include files within the ProgramData folder, the AppData folder (which contains application-specific settings and data for individual users), and various files in the root directory of your system drive, often marked as “System protected operating system files.” These files are hidden by default and often require elevated permissions to modify.
Modifying or deleting these files without a clear understanding of their function can have severe consequences, ranging from application crashes to system instability. It’s generally advised to leave these files untouched unless you are following specific, expert-level troubleshooting steps.
User-hidden files, on the other hand, are files or folders that you or another user have intentionally marked as hidden through their properties. This might be done for organizational purposes, to keep sensitive personal documents out of casual view, or simply to declutter a directory. These files are generally safer to interact with once revealed, as they are not typically critical to the operating system’s core functionality.
While user-hidden files pose less risk to system stability, always ensure you know what a file is before deleting or modifying it, regardless of how it was hidden. Understanding this distinction is key to safely manage hidden files when you see hidden files in Windows 11.
Method 1: Showing Hidden Files Using File Explorer Ribbon
The most straightforward and commonly used method to see hidden files in Windows 11 is directly through the File Explorer ribbon. This approach is quick, intuitive, and designed for ease of access, making it ideal for most users who need to temporarily reveal hidden items.
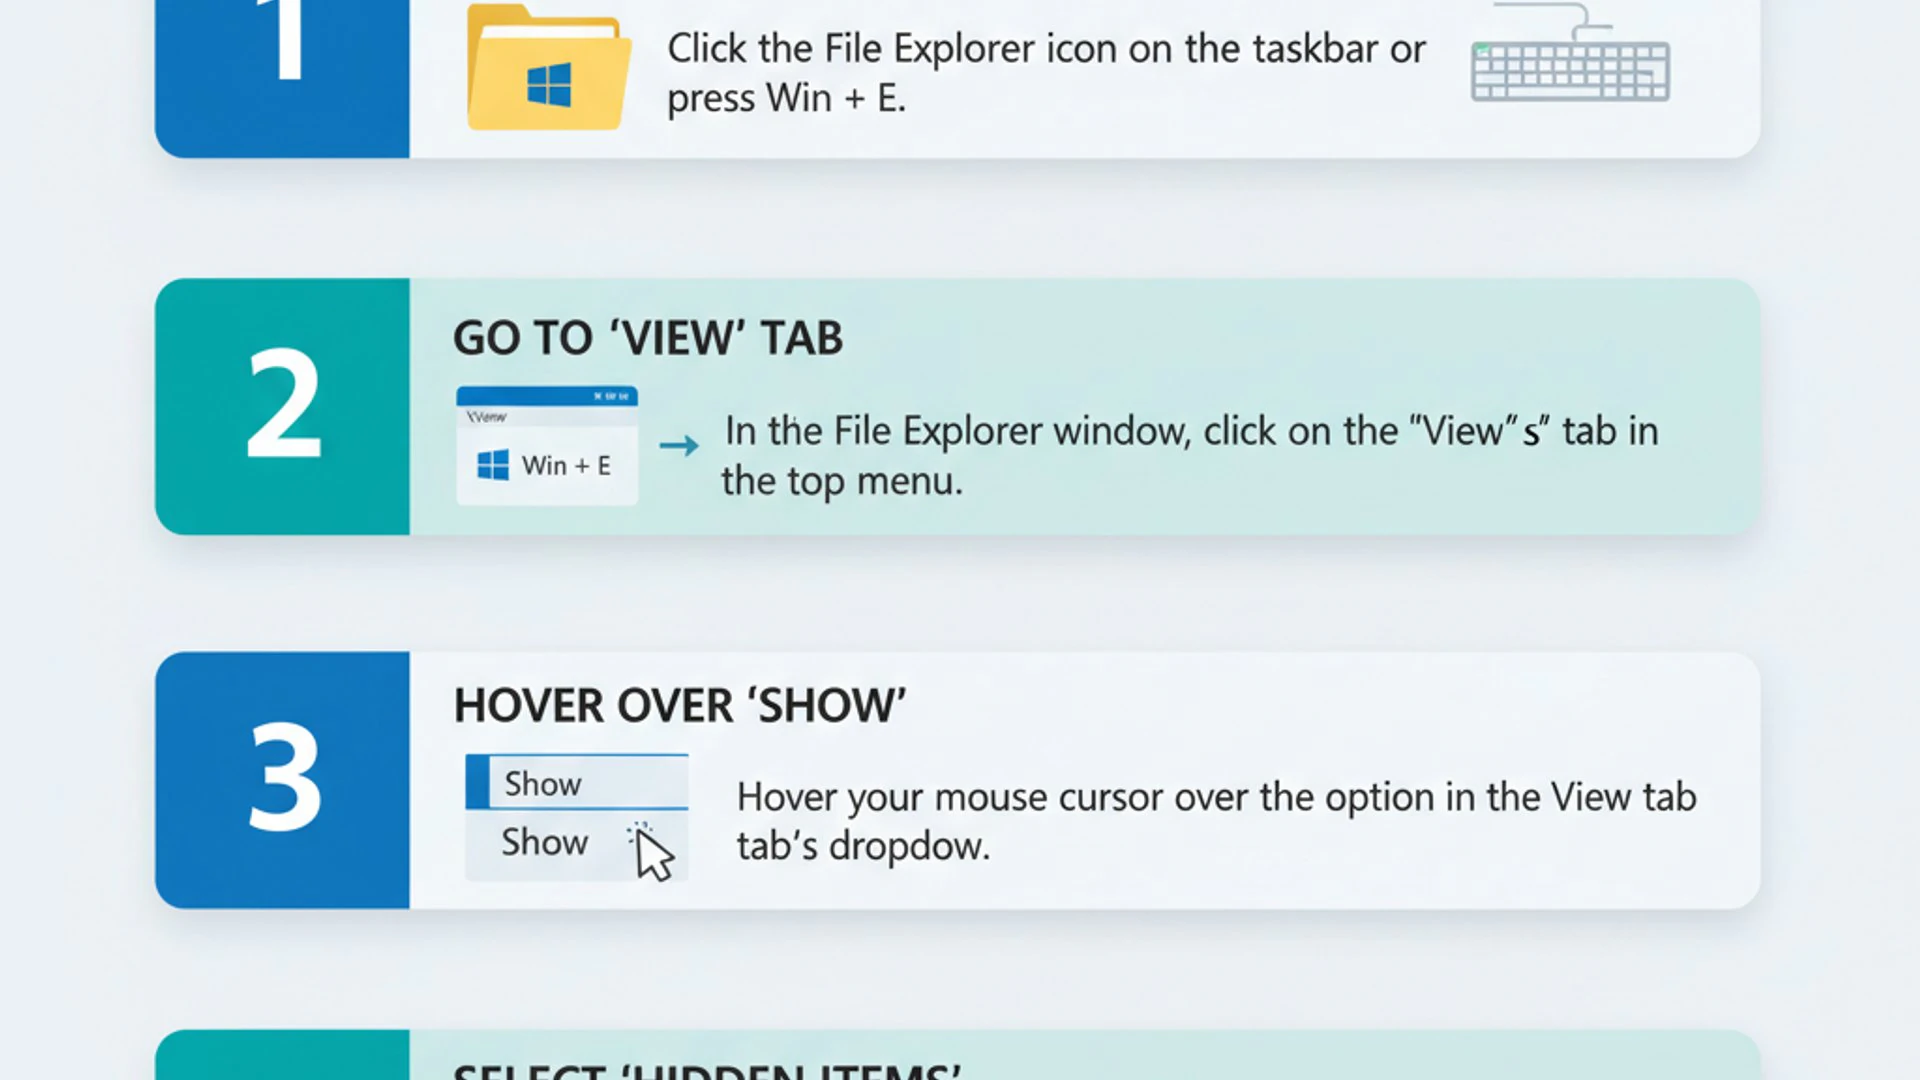
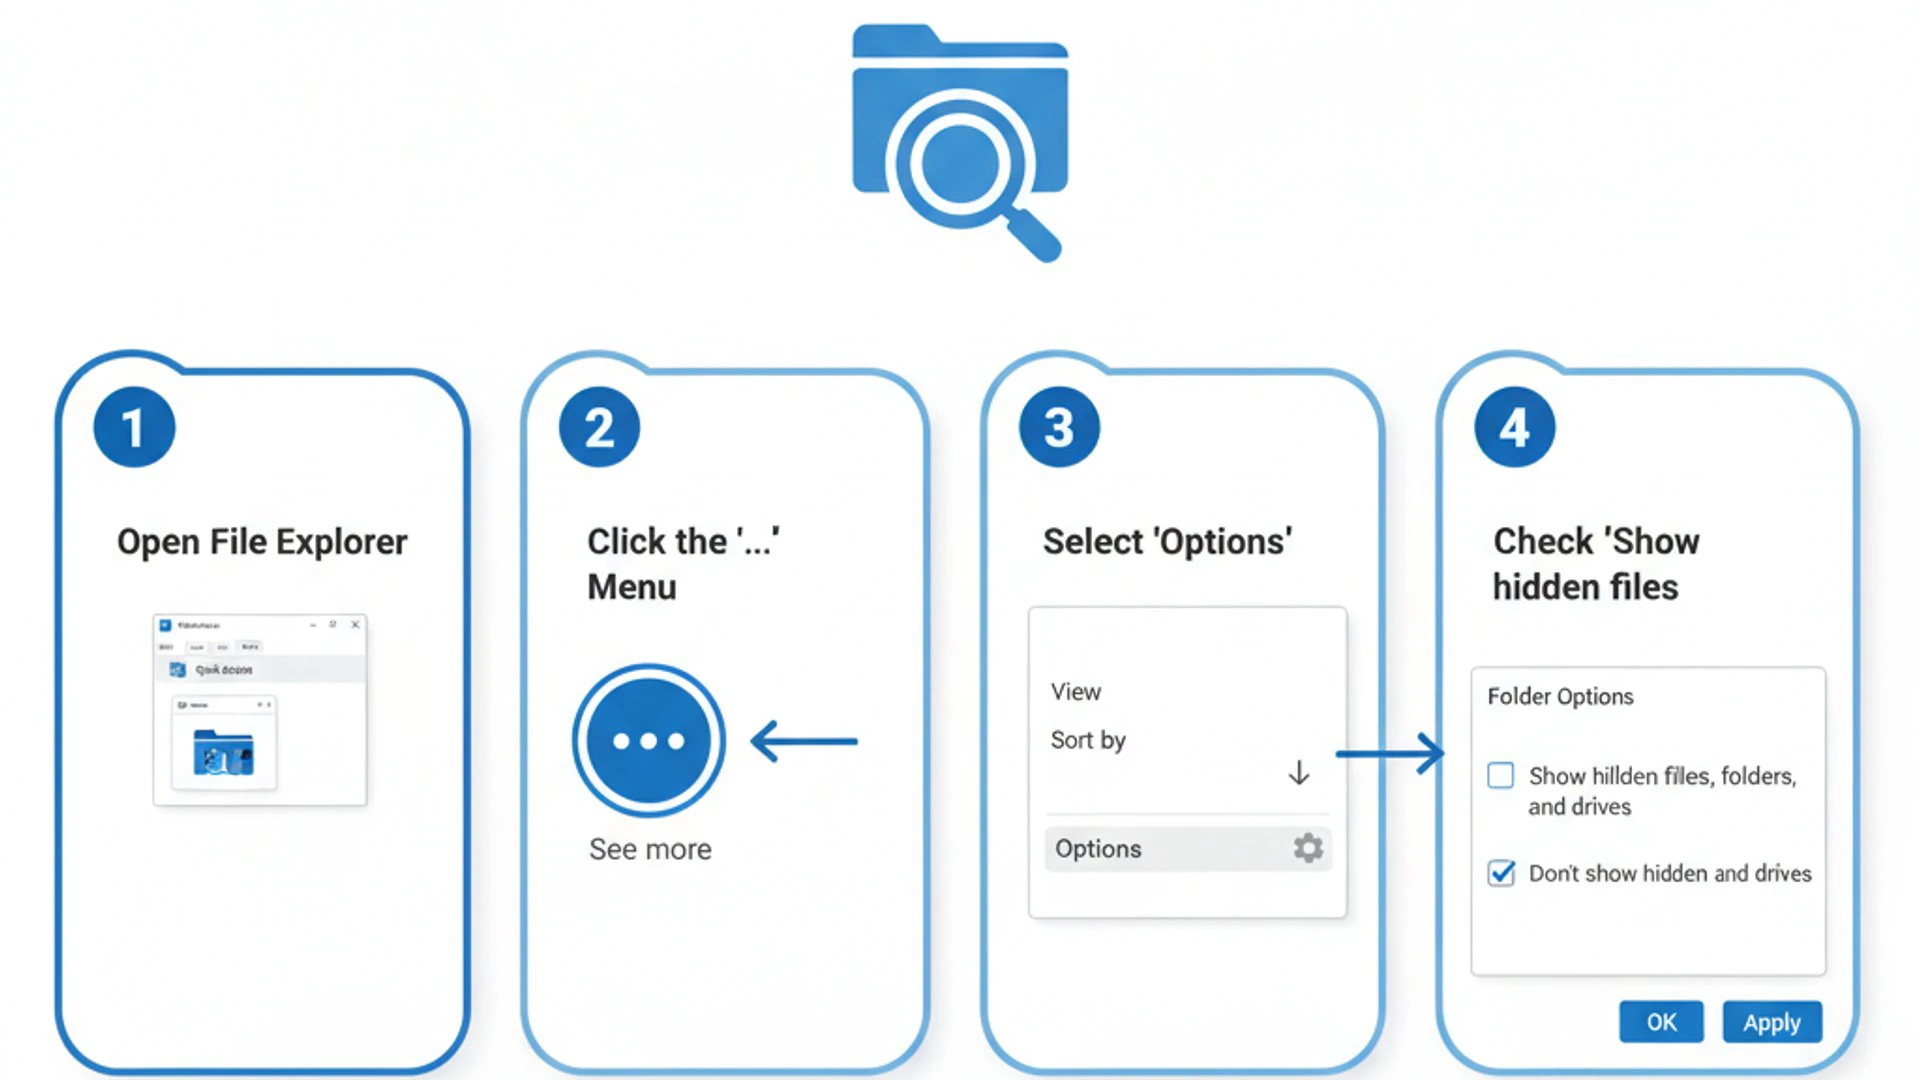
Windows 11’s File Explorer has been redesigned, but the functionality for showing hidden files remains easily accessible. You don’t need to delve into complex settings; a simple click is usually all it takes. This method is particularly useful when you’re looking for a specific hidden folder like AppData or a configuration file within an application’s directory.
It provides a quick toggle that instantly updates the visibility of files and folders in the current window and any subdirectories. This means you can enable it, find what you need, and then just as easily disable it to restore the default view, maintaining a clean and protected environment.
Let’s walk through the step-by-step process to activate this feature and verify its effect.
Step-by-Step Guide for Quick Access
Revealing hidden files using the File Explorer ribbon in Windows 11 is a very simple process. Follow these steps:
- Open File Explorer: You can do this by clicking the folder icon on your taskbar, pressing
Windows key + E, or searching for “File Explorer” in the Start menu. - Navigate to the Desired Location: Go to the folder where you suspect hidden files are located. For instance, if you’re looking for the AppData folder, navigate to
C:\Users\YourUsername\. - Access the View Options: In the File Explorer window, look at the top menu bar. You’ll see several options like “File,” “Home,” “Share,” and “View.” Click on the View tab.
- Show Hidden Items: Within the “View” tab, hover over “Show.” A small dropdown menu will appear. From this menu, click on Hidden items. A checkmark will appear next to it, indicating that hidden files are now visible.
As soon as you click “Hidden items,” any previously concealed files and folders in the current directory and its subfolders will instantly become visible. They often appear slightly faded or translucent compared to regular files, providing a visual cue that they are hidden items.
Verifying Changes and Locating Files
Once you’ve enabled the “Hidden items” option in File Explorer, it’s important to verify that the changes have taken effect and to know where to look for commonly hidden directories.
Immediately after checking the box, you should observe new files and folders appearing in your current File Explorer window. These newly visible items will typically have a slightly transparent or ghosted appearance, distinguishing them from standard, always-visible files. This visual cue is helpful for identifying which files were previously hidden.
A common location where users often need to see hidden files in Windows 11 is the AppData folder. This folder is crucial for many applications as it stores settings, temporary files, and user-specific data. To find it, navigate to C:\Users\YourUsername\ (replace YourUsername with your actual user profile name). Once hidden items are shown, you’ll see the AppData folder appear.
Pro Tip: The AppData folder itself contains three subfolders: Local, Roaming, and LocalLow. Each stores different types of application data. For example, Roaming data follows your profile if you log into different computers on a network, while Local data stays on the specific machine.
You might also notice other hidden folders in the root of your C: drive, such as ProgramData or $Recycle.Bin. Remember to re-uncheck “Hidden items” when you’re done to restore the default view and prevent accidental modifications.
Method 2: Accessing Hidden Files via Folder Options (Control Panel)
While the File Explorer ribbon offers a quick toggle, the traditional Folder Options dialog provides a more granular and persistent way to manage file visibility settings. This method is particularly useful for users who prefer the classic Windows interface or require more advanced control over what is displayed.
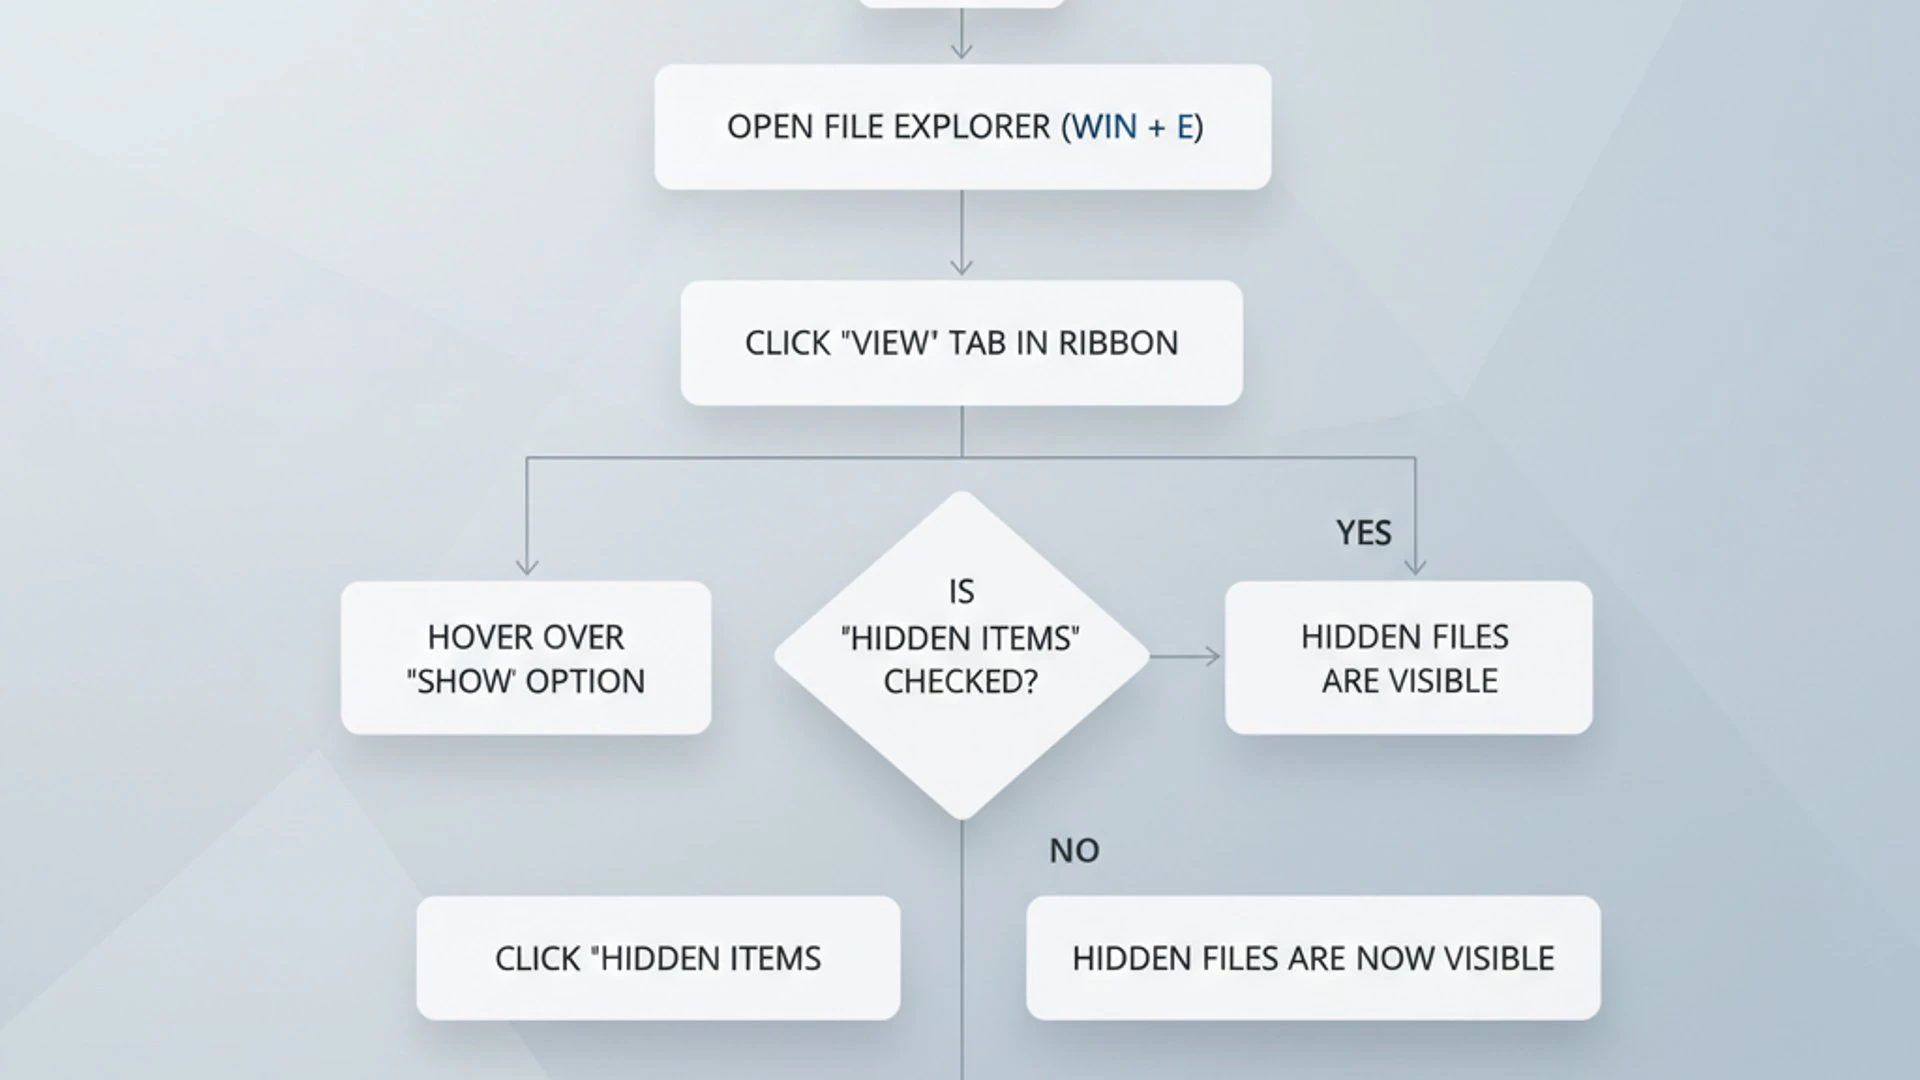
Accessing these options through the Control Panel allows you to configure not only the visibility of general hidden files but also to manage the display of system-protected operating system files. This level of detail is often necessary for advanced troubleshooting or system maintenance tasks that go beyond simply finding a user-hidden document.
The settings configured here will apply globally across all File Explorer windows until you manually change them again. This makes it a more permanent solution compared to the ribbon toggle, which can sometimes reset or be overlooked when opening new File Explorer instances.
Let’s explore how to navigate to these settings and apply the necessary changes to see hidden files in Windows 11 more comprehensively.
Navigating to View Settings
To access the Folder Options and configure hidden file visibility, follow these steps:
- Open Control Panel: Search for “Control Panel” in the Start menu and open it.
- Access Folder Options: In the Control Panel, change the “View by” option to Large icons or Small icons if it’s set to “Category.” Then, locate and click on File Explorer Options (it might be labeled “Folder Options” in older Windows versions).
- Go to the View Tab: In the “File Explorer Options” window that appears, click on the View tab. This tab contains a variety of advanced settings related to how files and folders are displayed.
Alternatively, you can access “File Explorer Options” directly from File Explorer itself:
- Open File Explorer.
- Click the ellipsis (…) icon in the command bar at the top.
- Select Options from the dropdown menu. This will open the “File Explorer Options” window directly to the General tab. Navigate to the View tab from there.
Once you are on the “View” tab, you will find a list of advanced settings. This is where you can make precise adjustments to file and folder visibility.
Applying Changes and Advanced Options
Within the “View” tab of File Explorer Options, you’ll find two critical settings for managing hidden files:
- Hidden files and folders: This section has two radio button options:
To reveal standard hidden files, select Show hidden files, folders, and drives.
- Don’t show hidden files, folders, or drives (default setting)
- Show hidden files, folders, and drives
- Hide protected operating system files (Recommended): This checkbox is usually ticked by default. These are the most critical system files. If you need to see them, uncheck this box.
When you uncheck “Hide protected operating system files,” Windows will display a warning message. This message emphasizes the importance of these files and the potential risks of modifying them. Click Yes to confirm if you understand the implications and wish to proceed.
Important Warning: Only uncheck “Hide protected operating system files” if you have a specific, well-understood reason to do so, such as advanced troubleshooting under expert guidance. Accidental deletion or modification of these files can render your system unusable. Consider creating a System Image Backup on Windows 11 before making such changes.
After making your selections, click Apply to see the changes immediately, and then OK to close the “File Explorer Options” window. Your File Explorer windows will now reflect these new visibility settings, allowing you to see hidden files in Windows 11 more comprehensively.
Method 3: Using Command Prompt or PowerShell to Reveal Hidden Files
For users who prefer command-line interfaces or need to automate tasks, the Command Prompt and PowerShell offer powerful ways to reveal hidden files. These methods provide a more direct interaction with the file system attributes and can be particularly useful for IT professionals, developers, or advanced users.
Unlike the graphical interface methods, which change a global display setting, command-line tools allow you to specifically target files or folders and modify their attributes. This means you can remove the hidden attribute from a file, making it permanently visible without affecting the global File Explorer settings. This precision can be very beneficial in certain scenarios.
Understanding how to use these tools effectively adds another layer of control to your file management capabilities. We’ll explore the attrib command in Command Prompt and equivalent commands in PowerShell.
Employing the ‘attrib’ Command
The attrib command in Command Prompt is a classic and highly effective tool for managing file attributes, including the hidden attribute. It allows you to view or change file attributes directly.
To use the attrib command:
- Open Command Prompt as Administrator: Search for “cmd” in the Start menu, right-click on “Command Prompt,” and select Run as administrator. This is crucial for modifying attributes of system or protected files.
- Navigate to the Desired Directory: Use the
cdcommand to change to the directory where the hidden files are located. For example, to go to your user profile, typecd C:\Users\YourUsernameand press Enter. - View Hidden Files: To list all files and folders, including hidden ones, in the current directory, type
dir /aand press Enter. The/aswitch stands for “attributes” and will show files with all attributes. - Remove the Hidden Attribute: To make a specific hidden file or folder permanently visible, you need to remove its hidden attribute. Use the command:
attrib -h "filename_or_foldername"For example, to unhide a file named secret_doc.txt, you would type:attrib -h "secret_doc.txt". To unhide a folder named MyHiddenFolder, type:attrib -h "MyHiddenFolder". To unhide all hidden files and folders within the current directory and its subdirectories, use:attrib -h -s -r /s /d *.*Explanation of switches:
Using
-sfor system files should be done with extreme caution, as it can expose critical system files to accidental modification. - Add the Hidden Attribute (to hide files): To hide a file or folder again, use:
attrib +h "filename_or_foldername" -h: Removes the Hidden attribute.-s: Removes the System attribute (use with caution).-r: Removes the Read-only attribute./s: Processes matching files in the current folder and all subfolders./d: Includes folders in the processing.*.*: Specifies all files.
This method directly manipulates the file system attributes, making the files visible even if the File Explorer “Show hidden items” option is off. It’s a powerful way to manage file visibility when you need to see hidden files in Windows 11 at a deeper level.
PowerShell Commands for Hidden Attributes
PowerShell, being a more modern and object-oriented shell, offers even more robust ways to manage file attributes. It provides cmdlets that are often more intuitive and powerful than the traditional attrib command.
To use PowerShell for managing hidden files:
- Open PowerShell as Administrator: Search for “PowerShell” in the Start menu, right-click on “Windows PowerShell,” and select Run as administrator.
- Navigate to the Desired Directory: Use the
Set-Locationcmdlet (or its aliascd) to change to the directory. For example:Set-Location C:\Users\YourUsername. - List Hidden Files: To list all items, including hidden ones, in the current directory, use:
Get-ChildItem -ForceThe-Forceparameter is essential here, as it allowsGet-ChildItemto display hidden and system files. - Remove the Hidden Attribute: To make a specific file or folder permanently visible by removing its hidden attribute, use the
Set-ItemPropertycmdlet:Set-ItemProperty -Path "path_to_file_or_folder" -Name Attributes -Value $( (Get-ItemProperty -Path "path_to_file_or_folder").Attributes -band (-bnot [System.IO.FileAttributes]::Hidden) )A simpler way to remove the hidden attribute for a file:
(Get-Item -Path "path_to_file_or_folder").Attributes -= 'Hidden'For example, to unhide secret_doc.txt in the current directory:
(Get-Item -Path ".\secret_doc.txt").Attributes -= 'Hidden'To unhide a folder named MyHiddenFolder:
(Get-Item -Path ".\MyHiddenFolder").Attributes -= 'Hidden'To recursively unhide all hidden files and folders in a directory:
Get-ChildItem -Path "C:\path\to\folder" -Recurse -Force | ForEach-Object { $_.Attributes -= 'Hidden' }This command gets all child items (
Get-ChildItem) recursively (-Recurse) including hidden/system ones (-Force), then for each object (ForEach-Object), it removes the ‘Hidden’ attribute. - Add the Hidden Attribute (to hide files): To hide a file or folder again:
(Get-Item -Path "path_to_file_or_folder").Attributes += 'Hidden'
PowerShell provides a more flexible and scriptable approach to managing file attributes, making it a powerful tool for advanced users who need to see hidden files in Windows 11 and programmatically control their visibility.
Method 4: Modifying Registry Editor for Persistent Hidden File Visibility
For the most persistent and system-wide control over hidden file visibility, you can directly modify the Windows Registry. This method is generally recommended only for advanced users who are comfortable navigating and editing the Registry, as incorrect modifications can lead to system instability.
Editing the Registry directly offers a way to set the hidden file visibility preference that is less likely to be inadvertently reset by other system processes or user actions. While the Folder Options method also provides persistence, the Registry offers the ultimate underlying control.
This approach is particularly useful in environments where you need to ensure a consistent display setting across multiple user profiles or for specific system configurations. However, due to the inherent risks, it’s crucial to proceed with extreme caution.
Cautionary Steps Before Registry Edits
Before making any changes to the Windows Registry, it is absolutely imperative to take precautionary measures. The Registry is the central database for system and application settings, and even a small, incorrect edit can cause significant problems, including making your system unbootable.
- Create a System Restore Point: This allows you to revert your system to a previous working state if something goes wrong. Search for “Create a restore point” in the Start menu, open it, and click “Create…”. Give it a descriptive name.
- Back up the Registry Key: Before modifying a specific key, export it.
- Open Registry Editor (
regedit.exe). - Navigate to the key you intend to modify.
- Right-click on the key (or its parent folder) and select Export.
- Save the
.regfile to a safe location. This file can be used to restore the key’s original state if needed.
- Open Registry Editor (
- Understand the Changes: Ensure you fully understand what each value you are modifying does. Do not blindly follow instructions without comprehending the impact.
Once you’ve taken these precautions, you can proceed to modify the Registry to see hidden files in Windows 11 persistently:
- Open Registry Editor: Press
Windows key + R, typeregedit, and press Enter. Click Yes to the User Account Control prompt. - Navigate to the Key: In the Registry Editor, navigate to the following path:
HKEY_CURRENT_USER\Software\Microsoft\Windows\CurrentVersion\Explorer\Advanced - Modify ‘Hidden’ Value:
- In the right pane, locate the
DWORD (32-bit) Valuenamed Hidden. - Double-click on Hidden.
- To show hidden files, change its Value data to
1. - To hide them again, change it to
0. - Click OK.
- In the right pane, locate the
- Modify ‘ShowSuperHidden’ Value (for protected system files):
- In the same location, locate the
DWORD (32-bit) Valuenamed ShowSuperHidden. - Double-click on ShowSuperHidden.
- To show protected operating system files, change its Value data to
1. - To hide them again, change it to
0. - Click OK.
- In the same location, locate the
- Apply Changes: Close the Registry Editor. The changes should take effect immediately. If not, restart File Explorer or your computer.
Remember, this method is powerful and should be used with extreme caution. Always back up your system and the specific Registry keys before making any modifications.
Distinguishing Between Hidden and System Protected Operating System Files
When you embark on the journey to see hidden files in Windows 11, it’s paramount to understand the critical difference between standard hidden files and system protected operating system files. While both are concealed by default, their nature and the implications of interacting with them vary significantly.
Standard hidden files are typically those marked with the ‘Hidden’ attribute. These can be files or folders hidden by applications (e.g., configuration files, cache data) or by users themselves for organizational or privacy reasons. Examples include the AppData folder within your user profile or custom folders you’ve manually hidden.
These files are generally safe to view and, with caution, can sometimes be modified or deleted if you understand their purpose. Revealing them usually just requires ticking the “Hidden items” box in File Explorer or selecting “Show hidden files, folders, and drives” in Folder Options.
System protected operating system files, often referred to as “super hidden” files, are a much more critical category. These files are essential for the core functionality, stability, and security of Windows 11. They are marked with both the ‘Hidden’ and ‘System’ attributes.
Examples include the pagefile.sys (virtual memory), hiberfil.sys (hibernation file), and various files within the root of your system drive or Windows folders. Modifying or deleting these files can lead to severe system errors, data loss, or even prevent your operating system from booting. Windows explicitly warns you when you attempt to reveal these files, underscoring their importance.
Always proceed with extreme caution when dealing with system protected files. If you’re unsure about a file’s purpose, it’s best to leave it untouched.
When to Show System Protected Files (and When Not To)
Deciding when to reveal system protected operating system files is a critical judgment call that should not be taken lightly. For the vast majority of users and everyday tasks, there is absolutely no need to display these files.
When to show them:
- Advanced Troubleshooting: If you are following specific, expert-level troubleshooting guides for complex system issues, you might be instructed to locate or modify a particular system file. This is often done under the guidance of IT support or a reputable technical resource.
- System Recovery or Repair: In rare cases, during advanced system recovery or repair operations, you might need to access these files to diagnose or fix boot problems.
- Specific Development or Administration Tasks: Developers or system administrators might need to interact with these files for very specific, controlled development or system management tasks, often in a test environment.
When NOT to show them:
- General Browsing: For everyday use, browsing, or even basic troubleshooting, showing system protected files only adds clutter and increases the risk of accidental damage.
- Curiosity Without Knowledge: If you’re simply curious about what’s hidden without a clear understanding of the purpose of each file, it’s best to keep them hidden. The risk of accidental deletion or modification outweighs the benefit of satisfying curiosity.
- Security Concerns: While not a direct security threat, exposing these files could potentially make it easier for malware or unauthorized users to target critical system components if they gain access to your machine.
In summary, always keep “Hide protected operating system files (Recommended)” checked unless you have a very specific, informed reason to uncheck it. When you do uncheck it, proceed with the utmost care and consider creating a System Image Backup on Windows 11 beforehand.
Hiding Files and Folders in Windows 11
Just as important as knowing how to see hidden files in Windows 11 is understanding how to hide them. Hiding files and folders can serve several practical purposes, from decluttering your directories to safeguarding sensitive information from casual viewers. It’s a simple, built-in feature that offers a basic layer of privacy and organization.
While hiding a file doesn’t provide robust security against determined individuals (as anyone can easily reveal hidden items), it does prevent accidental discovery or modification. For instance, you might hide configuration files for a portable application, or a folder containing personal notes you don’t want immediately visible to others who might use your computer.
The process is straightforward and can be applied to any file or folder that is not a critical system protected operating system file. Let’s look at the manual method using file properties.
Manual Hiding via File Properties
Hiding a file or folder in Windows 11 is a simple process that involves modifying its attributes through the Properties dialog. Here’s how to do it:
- Locate the File or Folder: Open File Explorer and navigate to the file or folder you wish to hide.
- Open Properties: Right-click on the file or folder. From the context menu, select Properties.
- Apply Hidden Attribute: In the Properties window, ensure you are on the General tab.
- Under the “Attributes” section at the bottom, you will see two checkboxes: Read-only (Only applies to files in folder) and Hidden.
- Check the box next to Hidden.
- Click Apply, then OK.
If you are hiding a folder, Windows will ask you if you want to apply the changes to “this folder only” or “this folder, subfolders, and files.” Choose the option that best suits your needs. Typically, if you want everything inside the folder to be hidden, select the second option.
Once you click OK, the file or folder will disappear from view, provided that the “Show hidden items” option in File Explorer is not enabled. If it is enabled, the item will still be visible but will appear translucent, indicating its hidden status. To fully hide it, you would then need to disable “Show hidden items.”
Remember: Hiding files is a convenience feature, not a security measure. For true data protection, consider using encryption tools like Encrypting File System on Windows 11 or password-protected archives.
Troubleshooting Common Issues When Showing Hidden Files
Even with clear instructions, you might occasionally encounter issues when trying to see hidden files in Windows 11. These problems can range from files not appearing as expected to settings not persisting. Understanding common culprits can help you quickly diagnose and resolve these minor frustrations.
One of the most frequent misunderstandings involves the distinction between standard hidden files and system protected operating system files. If you’ve only enabled “Show hidden items” and still can’t find a particular file, it’s highly probable that the file is a system protected file, which requires an additional setting to be revealed.
Another common issue relates to the scope of the visibility setting. The File Explorer ribbon toggle is session-specific, while Folder Options and Registry edits provide more persistent, global changes. Knowing which method you used can help you troubleshoot why a setting might not be sticking.
Let’s delve into specific scenarios and their solutions.
Files Not Appearing After Enabling Visibility
If you’ve followed the steps to show hidden files but still can’t find what you’re looking for, consider these troubleshooting steps:
- Check for “System Protected Operating System Files”: This is the most common reason. If the file you’re searching for is critical to Windows, it’s likely “super hidden.”
This should reveal files like pagefile.sys, hiberfil.sys, and the System Volume Information folder.
- Go to File Explorer Options (via Control Panel or File Explorer’s ‘…’ menu).
- Navigate to the View tab.
- Uncheck the box labeled Hide protected operating system files (Recommended). Confirm the warning message.
- Click Apply and OK.
- Verify the Correct Folder: Double-check that you are in the correct directory. For example, the AppData folder is located in your specific user profile (
C:\Users\YourUsername\AppData), not directly underC:\. - Refresh File Explorer: Sometimes, File Explorer needs a refresh to update its view. Press
F5or close and reopen the File Explorer window. - Check File Attributes (Command Prompt): If you suspect a file’s attributes are corrupted or not set correctly, use the
attribcommand in Command Prompt to inspect them.- Open Command Prompt.
- Navigate to the file’s parent directory.
- Type
attrib filename.ext(replace with your file’s name) and press Enter. Look for ‘H’ (Hidden) or ‘S’ (System) attributes. If ‘H’ is present, useattrib -h filename.extto remove it.
- Restart Your Computer: As a last resort, a full system restart can sometimes resolve minor glitches that prevent settings from applying correctly.
By systematically checking these points, you should be able to resolve most issues related to files not appearing after enabling visibility. Remember to re-hide system protected files after you’re done for safety.
Best Practices for Managing Hidden Files
Effectively managing hidden files in Windows 11 goes beyond simply knowing how to reveal them. It involves adopting best practices that ensure system stability, data integrity, and personal security. Interacting with hidden files, especially system-protected ones, carries inherent risks, so a cautious and informed approach is always recommended.
One crucial aspect is to always understand the purpose of a hidden file before you modify or delete it. If you’re unsure, it’s safer to leave it alone or research its function thoroughly. Unnecessary changes can lead to unexpected system behavior or application failures.
Another best practice is to only show hidden files when absolutely necessary and to re-hide them once your task is complete. This reduces clutter and minimizes the chance of accidental interaction with critical components. It maintains the default protective layer Windows provides.
Furthermore, regularly backing up your system, especially before delving into advanced file management or Registry edits, is a non-negotiable safety measure. Tools like System Image Backup on Windows 11 can be lifesavers.
Security Implications and Data Integrity
Managing hidden files has direct implications for both system security and data integrity. While hidden files are not inherently a security vulnerability, how you interact with them can impact your system’s resilience.
Security Implications:
- Malware Concealment: Malicious software often uses the hidden attribute to conceal its presence on your system. If you’re troubleshooting a suspected infection, revealing hidden files is a crucial step to uncover hidden malware components.
- Accidental Exposure: While hiding files doesn’t encrypt them, it prevents casual viewing. If you frequently leave hidden files visible, sensitive personal or corporate data could be more easily accessed by unauthorized individuals who gain access to your computer.
- System Vulnerability: Modifying or deleting critical system files (even if you reveal them) can compromise the integrity of your operating system, potentially creating vulnerabilities that could be exploited by attackers.
Data Integrity:
- Accidental Deletion: The most significant risk to data integrity is the accidental deletion of essential configuration files or application data. This can lead to applications failing to launch or losing their settings.
- Corruption: Incorrectly modifying a hidden system file can corrupt the operating system, leading to boot failures, blue screens of death, or other severe system instability issues.
- Backup Importance: To protect data integrity, always perform backups before making significant changes, especially when dealing with system-protected files. A System Image Backup on Windows 11 ensures you can revert to a stable state.
Therefore, when you see hidden files in Windows 11, always proceed with caution, verify the purpose of each file, and restore default visibility settings when your task is complete. This responsible approach ensures both the security and integrity of your Windows 11 environment.
Conclusion: Mastering Hidden File Management in Windows 11
Navigating the intricacies of file visibility in Windows 11 is a fundamental skill for any user seeking deeper control and understanding of their operating system. From troubleshooting application issues to managing system configurations, knowing how to see hidden files in Windows 11 empowers you to interact with your computer at a more advanced level.
We’ve explored a range of methods, from the user-friendly File Explorer ribbon and the more comprehensive Folder Options, to the powerful command-line tools like attrib and PowerShell, and even direct Registry modifications. Each approach offers distinct advantages, catering to different levels of technical expertise and specific requirements. The key is to choose the method that best fits your immediate needs while always prioritizing system safety.
Crucially, we’ve emphasized the vital distinction between standard hidden files and system protected operating system files. This understanding is paramount for preventing accidental damage to your system. Always remember that while revealing these files grants you access, it also places the responsibility of careful interaction squarely on your shoulders.
By adopting best practices such as understanding file purposes, using caution, and regularly backing up your system, you can confidently manage hidden files without compromising stability or security. Mastering hidden file management not only enhances your troubleshooting capabilities but also deepens your overall proficiency with Windows 11, making you a more informed and capable user.
For more interesting articles, stay tuned to Winsides.com!









Community
Comments (0)