How to Auto Shutdown in Windows 11?
Schedule Auto Shutdown in Windows 11 using Task Scheduler
Auto Shutdown in Windows 11: In Windows 11, setting up an automatic shutdown can be a convenient way to ensure your system powers off at a specific time, whether to save energy, enhance security, or maintain a regular schedule. Using Task Scheduler, you can automate the shutdown process with just a few simple steps. This guide will walk you through the process of scheduling an automatic shutdown in Windows 11 for efficiency and effectiveness.
Read This: Color Filter In Windows 11- 4 Easy Ways!
Auto Shutdown in Windows 11 – How can it be helpful?

Several ways can make Auto Shutdown Feature or Scheduled Shutdown Feature in Windows 11 can be really helpful.
- Auto Shutdown prevents computers from running unnecessarily, saving electricity and reducing energy costs, especially in large organizations or households.
- It ensures systems are powered off after updates or maintenance tasks, avoiding unnecessary running time and potential issues from prolonged uptime.
- It enhances security by ensuring that unattended computers are not left running, reducing the risk of unauthorized access or data breaches.
- It helps prevent overheating in environments where computers might be left running for extended periods, especially in areas with inadequate cooling.
- Parents can manage the amount of time children spend on computers by scheduling shutdowns at specific times, such as bedtime.
- Setting up an automatic shutdown in Windows 11 helps reduce your Carbon Footprint by minimizing unnecessary energy consumption and lowering greenhouse gas emissions.

Setup Auto Shutdown in Windows 11 using Task Scheduler
Without any further delay, let’s dive into the steps.
- Open the Run command and execute the following command.
taskschd.msc
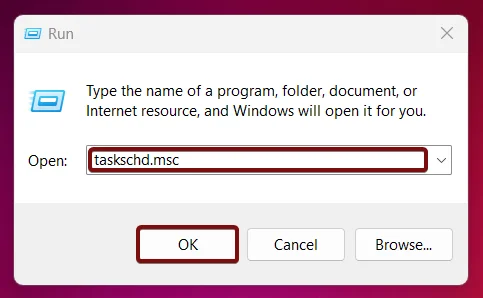
- Task Scheduler will open now.
- From the Right Pane, Click on Create Basic Task.
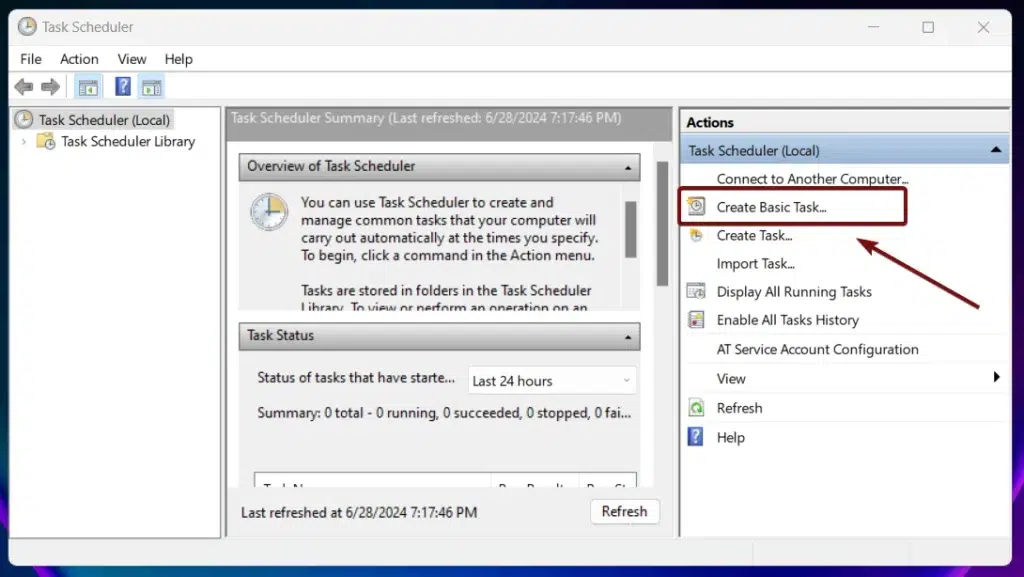
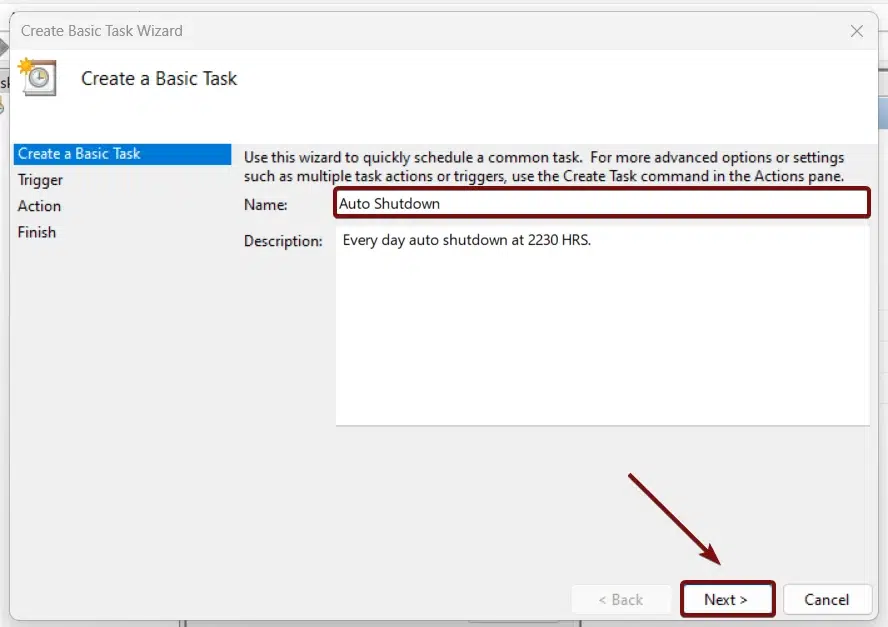
- Create Basic Task Wizard will open now.
- In the name field, please enter Auto Shutdown or a name that is convenient for you. The Description field is optional. You can describe this task in detail. Click Next.
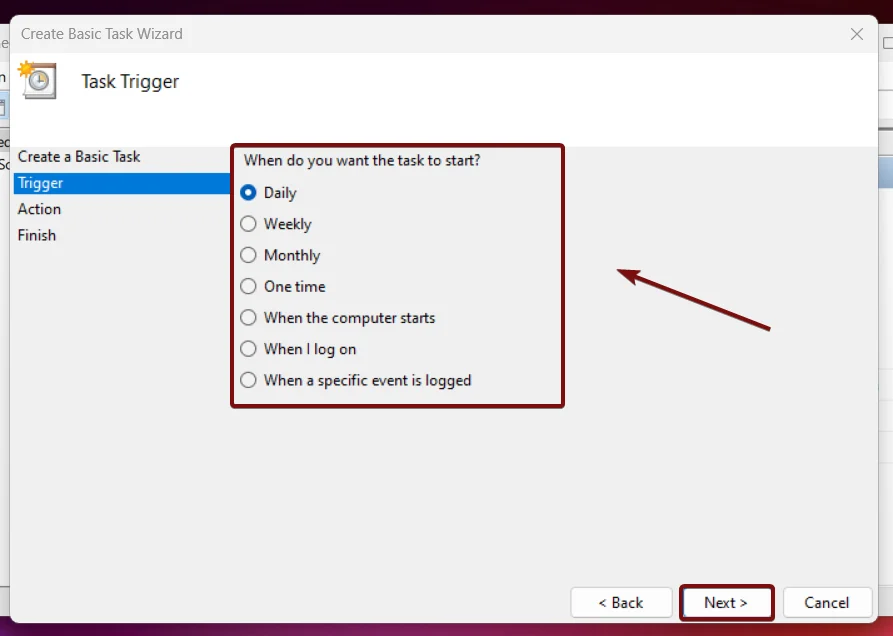
- Under Triggers, specify when you want to start the task. You can choose the Trigger for Daily, Weekly, Monthly, One time when the computer starts, When I log on When a specific event, is logged. Choose the trigger as per your requirement. For explanatory purposes, I will choose Daily. Click Next.
- The next step is the specify the date and time. Specify the start date and the time when the Trigger has to be triggered. Since I am looking to schedule auto shutdown every day, I kept 1 in the Recur every day. The “Synchronize across time zones” option in Task Scheduler ensures that the scheduled task runs at the same local time, regardless of the time zone the computer is in. This can be beneficial for Travelling users, cross-time zone coordination, and global operations. Click Next.
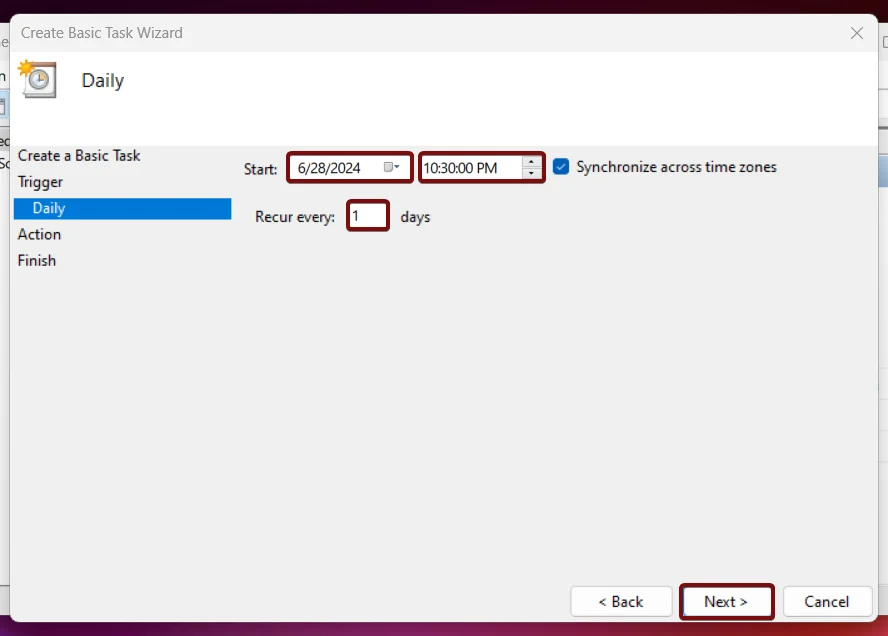
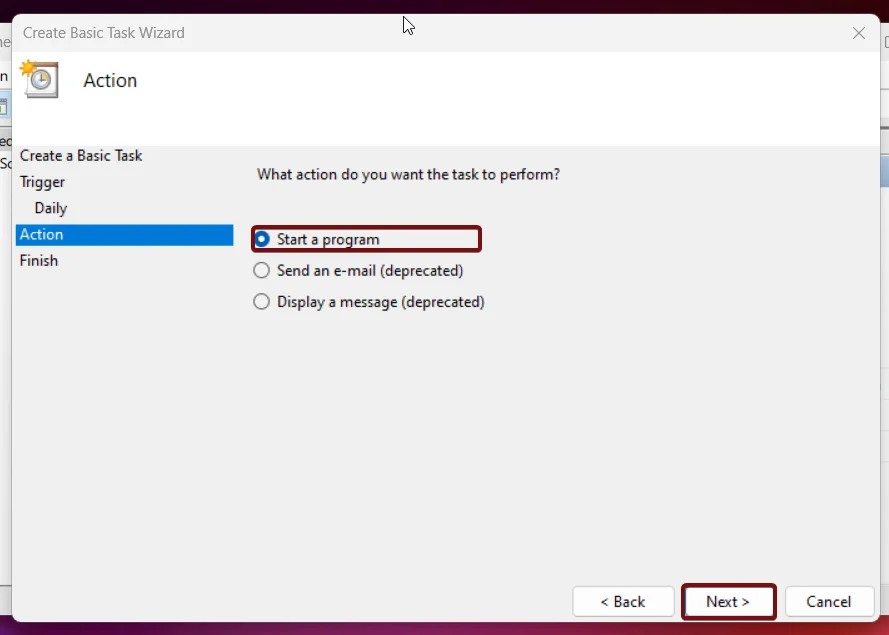
- Choose Start a Program as Action.
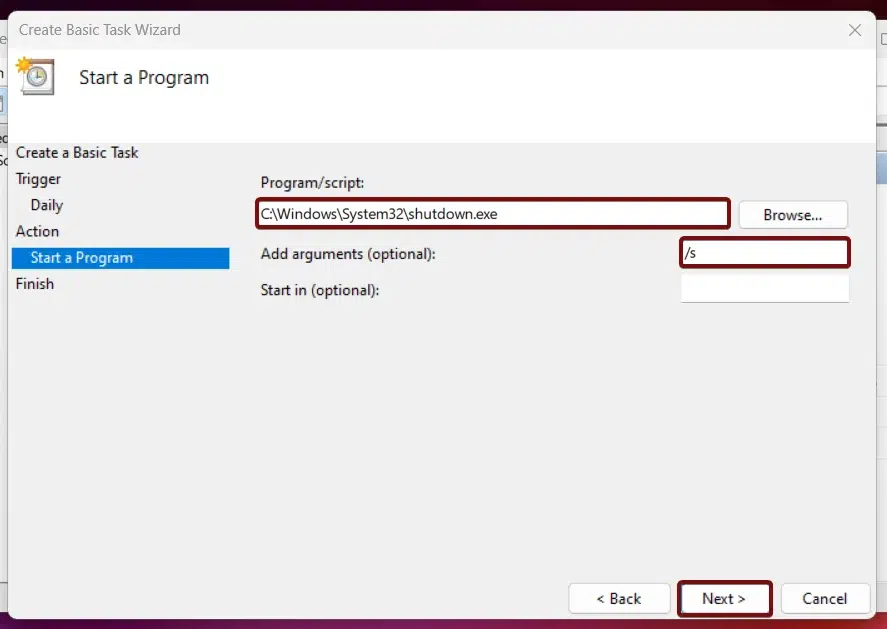
- In the Program/Script field, enter the following path.
C:\Windows\System32\shutdown.exe - Add Arguments is an optional field, choose your arguments as per your requirements. It is recommended to add /s
- Eventually, click Finish to complete the process. If you want to make any changes to the Triggers and actions, you can click Back.
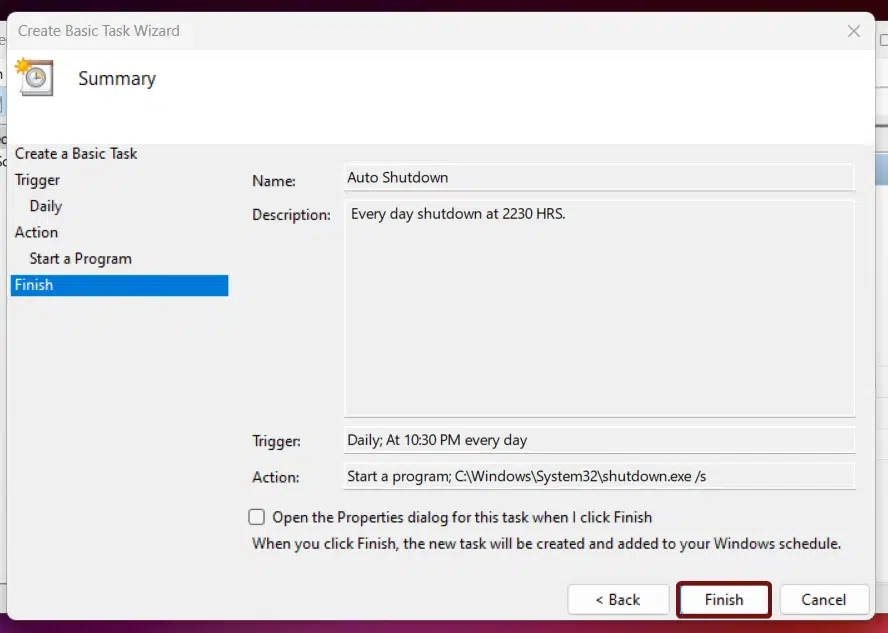
- Once you click Finish, the new task will be created and added to your Windows 11 Schedule.
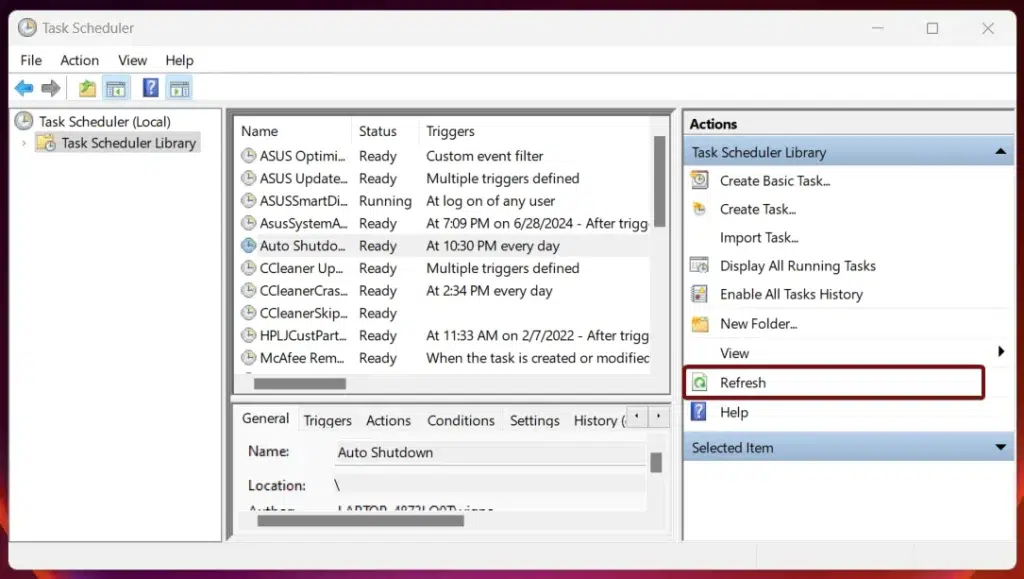
- Click on the Refresh option from the right pane to update the Task Scheduler.
- Under Task Scheduler Library, you can find the task created. That is it! We have now successfully set up Auto Shutdown in Windows 11.
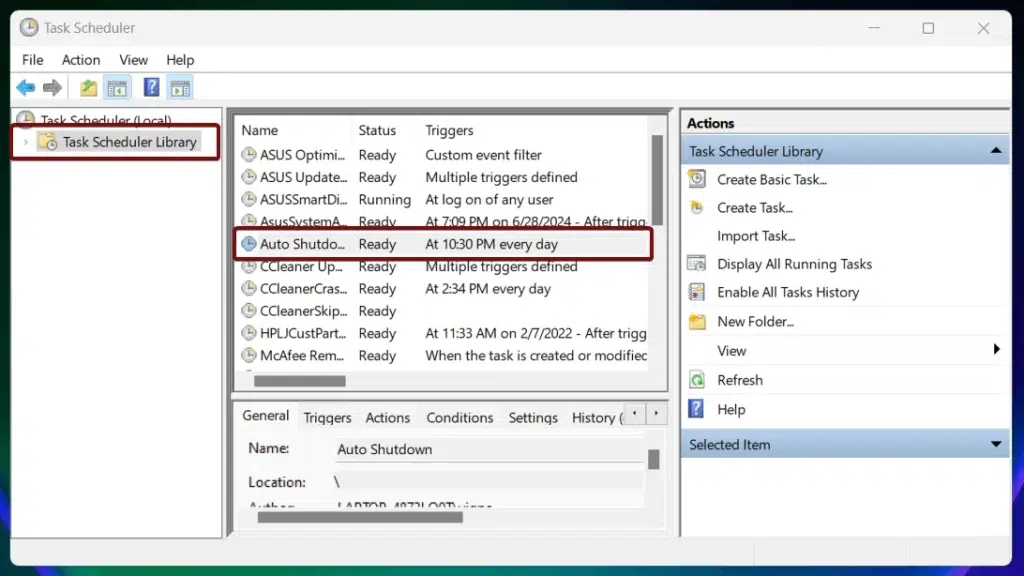
Test the Auto Shutdown Process in Windows 11:
In this section, we will check out steps to test the task that we have created in the Task Scheduler.
- Right-click on the Auto Shutdown Task that we have created, and click Run.
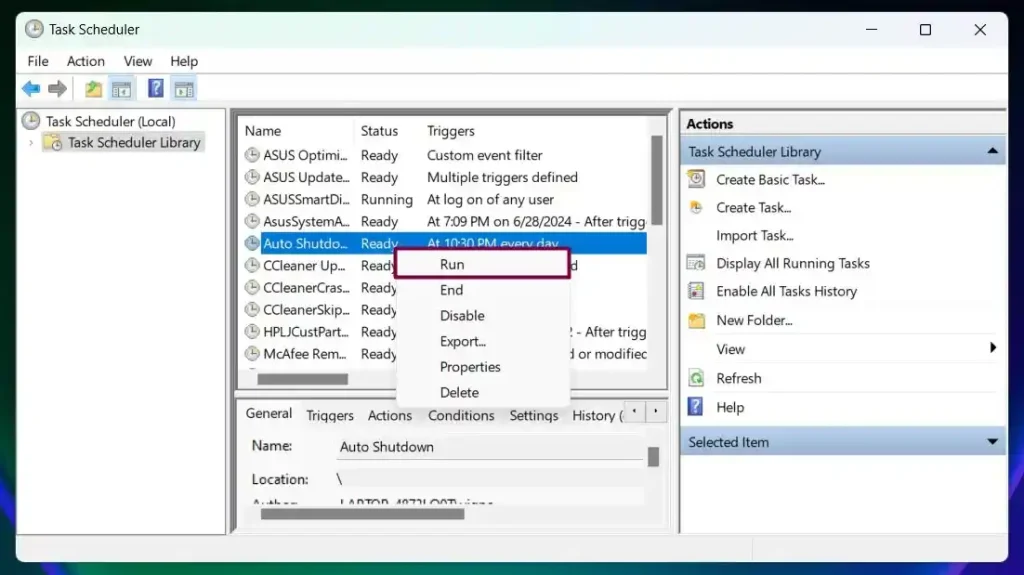
- The system will shut down if it is configured correctly, if not, please check the Arguments, and Trigger values for corrections.
Take away:
Task Scheduler in Windows is a powerful tool that allows users to automate various tasks on their computers. It enables the scheduling of programs, scripts, or commands to run at specific times or events. This includes tasks like system maintenance, software updates, backups, and more. Auto Shutdown in Windows 11 with Task Scheduler helps save energy, improve security, and solve the purpose as per your needs. Happy Windows 11! Peace out!
Related Articles:
- Enable SMB 1.0 / CIFS File Sharing Support using Command Prompt & Windows PowerShell
- How to Run Notepad as Administrator on Windows 11?
- How to Run Task Manager as Administrator on Windows 11? 4+ Quick Ways!
We combine expert insights with user-friendly guidance. We thoroughly research and test everything to give you reliable and simple to understand tech guides. Please take a look at our publishing process to understand why you can trust Winsides.
