

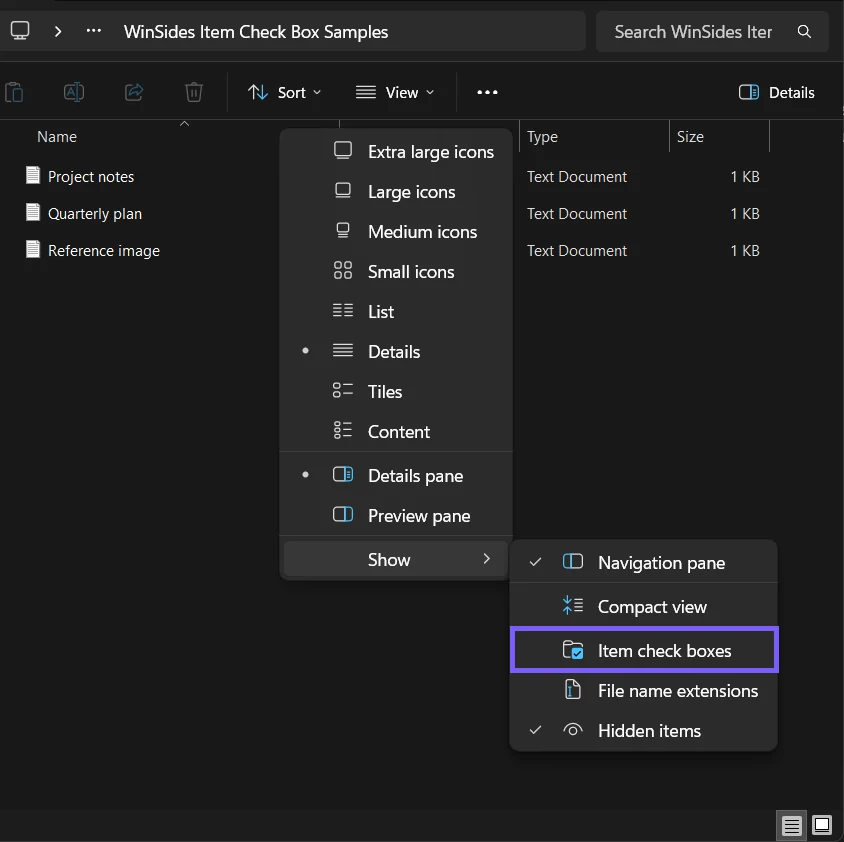
Windows 11 File Explorer can show a small check box beside each file and folder so you can build a selection with the mouse or touch. To turn the feature on, open View > Show and select Item check boxes. Repeat the same path to turn it off. A checkmark beside the menu command means the feature is enabled.
I reproduced both built-in graphical routes on Windows 11 version 25H2, build 26220.7872, using an isolated folder with three disposable text files. The test required no administrator approval. Two files were selected, no file command was invoked, every sample remained byte-identical, and the original Off state was restored and verified in a fresh Explorer window.
What do item check boxes change?
Item check boxes change the selection interface, not the files. When the setting is on, checking a box selects that item. Unchecking it removes that item from the current selection. The boxes do not tag, edit, rename, move, copy, synchronize, or change the contents of a file or folder.
The distinction is important because the command you choose after making a selection can act on every selected item. Delete, Rename, Cut, Copy, Share, and Properties are separate actions. Practice in a harmless folder first, clear the selection when you finish, and never test with personal files merely to make the visual result more interesting.
Microsoft's current File Explorer guidance documents the Windows 11 path as View > Show > Item check boxes and describes the result as a box next to files and folders for selecting them. Other commands in the same Show menu have different purposes. For example, use the dedicated WinSides guide if your goal is to show hidden files in Windows 11.
Table of contents
Method 1: Use View > Show in File Explorer
This is the shortest current Windows 11 route. Before changing it, record whether a checkmark already appears beside the command so you know the state to restore.
- Press Windows + E to open File Explorer, then open a privacy-safe folder.
- Select View on the command bar.
- Point to or select Show.
- Find Item check boxes. If there is no command checkmark, the feature is off. Select it once to turn the feature on.
How do you select several items with the boxes?
- After enabling the feature, locate the small box beside the first item you want.
- Select that box. The row becomes selected and its box becomes checked.
- Select the box beside another item. Both items remain in the selection.
- Before running any file command, review every checked row. Select a checked box again to remove that item from the selection.
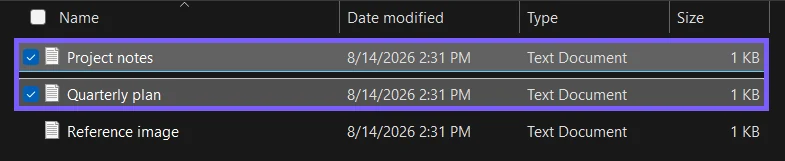
On the reproduced Details view, the check boxes were visible beside each row and a header box was also present. Layout can vary with the chosen view, window width, input method, and Windows build, so use the checked row and the status bar as confirmation instead of assuming every view must look identical.
Method 2: Use the Folder Options View tab
Folder Options exposes the same user-facing behavior with a labeled check box. This route is useful when you want a conventional settings dialog or need to cross-check the command-bar state.
- Open File Explorer and select the More options button, shown as three dots on the command bar.
- Select Options.
- Open the View tab.
- Scroll through Advanced settings to Use check boxes to select items.
- Select the box to enable it, or clear the box to disable it, then select OK. Do not select Restore Defaults; that affects more settings than this task requires.
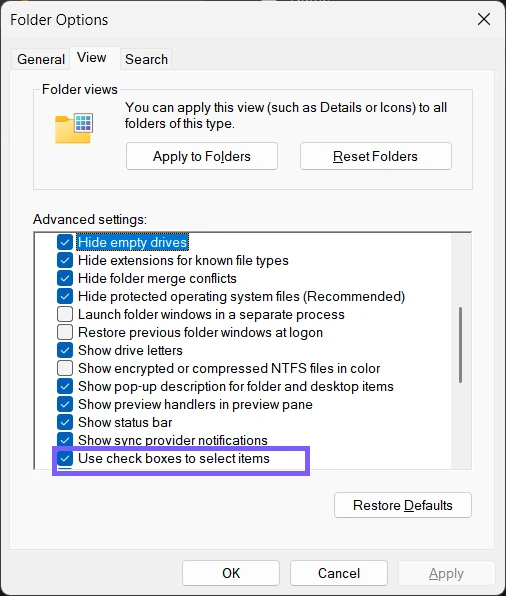
The test did not use Apply, Reset Folders, Restore Defaults, Registry Editor, a policy tool, or an Explorer-process restart. Keeping the method to one documented graphical control makes the change easy to understand and limits rollback to the same setting.
How do you turn item check boxes off and verify rollback?
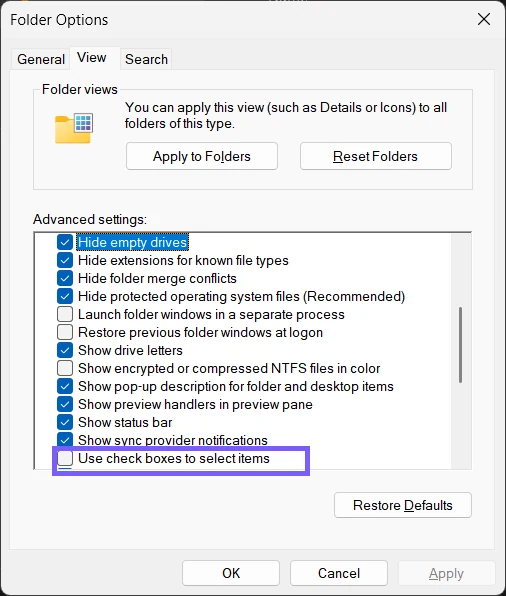
Clear any active selection first. Then return to View > Show > Item check boxes and select the checked command once. Alternatively, clear Use check boxes to select items in Folder Options and select OK.
For a stronger verification, close the isolated Explorer window, open a new one, and inspect the command again. The reproduced fresh window showed the command Off. Folder Options also showed its matching control clear, the sample selection was empty, and all three test files retained the same sizes and SHA-256 hashes.
Do you need check boxes to select multiple files?
No. The boxes are an optional selection interface. Keyboard and mouse selection still exist: Ctrl-click can add or remove individual items, Shift-click can select a range, and Ctrl+A can select all items in the current view. Those shortcuts are outside this article's dominant intent, and they can still produce a large active selection, so verify the selected set before applying a command.
Check boxes can be easier when you want explicit visible targets, are using touch or a pen, or prefer not to hold a modifier key. Microsoft documents the underlying setting as a global Shell setting and notes that Windows can enable it automatically when a pen input device is configured. That does not mean every touchscreen behaves identically, and it does not make the feature a per-folder file property.
Why might the setting look different on another PC?
Windows presentation can differ with build, device input capabilities, Explorer view, policy, and account configuration. A pen-capable system can enable the feature automatically. Managed computers can also enforce settings that a standard user cannot retain. If the command changes back unexpectedly, record the visible state and ask the administrator responsible for the device rather than editing undocumented values.
The current reproduced build synchronized the command-bar route and Folder Options immediately. Enabling it changed the current-user Shell preference, and disabling it returned the effective state and observed storage to the exact baseline. This local result supports the procedure on the tested build; it is not a promise about every past or future Windows release.
What mistakes should you avoid?
- Do not confuse selection with an action. A checked file has not been copied, moved, or deleted yet.
- Do not use Select all as a demonstration. It can create a risky selection in a real folder.
- Do not choose Restore Defaults. That control can change unrelated Explorer preferences.
- Do not publish private navigation or account labels. Use a disposable folder and crop identity-bearing panes from screenshots.
- Do not add a Registry method. Microsoft's current consumer guidance already provides two clear graphical routes, while internal value names vary across documentation.
Frequently Asked Questions
Do item check boxes change a file?
No. They change which items are selected. A separate command such as Delete, Rename, Cut, or Copy is required to act on the selection.
Do you need administrator rights to turn item check boxes on or off?
No administrator prompt was required on the tested Windows 11 laptop. A managed device can apply policy that changes what a user can retain.
Are item check boxes a per-folder setting?
No. Microsoft documents the behavior as a global Shell setting. The exact visual presentation can still vary between Explorer views.
Why did item check boxes turn on without me selecting the menu?
Microsoft says Windows can enable the option automatically when a pen input device is configured. Device management can also affect settings, so check the visible controls before changing anything else.
Use a disposable folder and restore the recorded state
Use View > Show > Item check boxes for the fastest Windows 11 route, or use the labeled control in Folder Options when you want a second graphical location. Practice with disposable items, treat a check as selection rather than a file change, clear the selection, and return the setting to the state you recorded before testing.
For more interesting articles, stay tuned to WinSides.com!









Community
Comments (0)