

Introduction to NTFS.SYS Blue Screen Errors on Windows 11
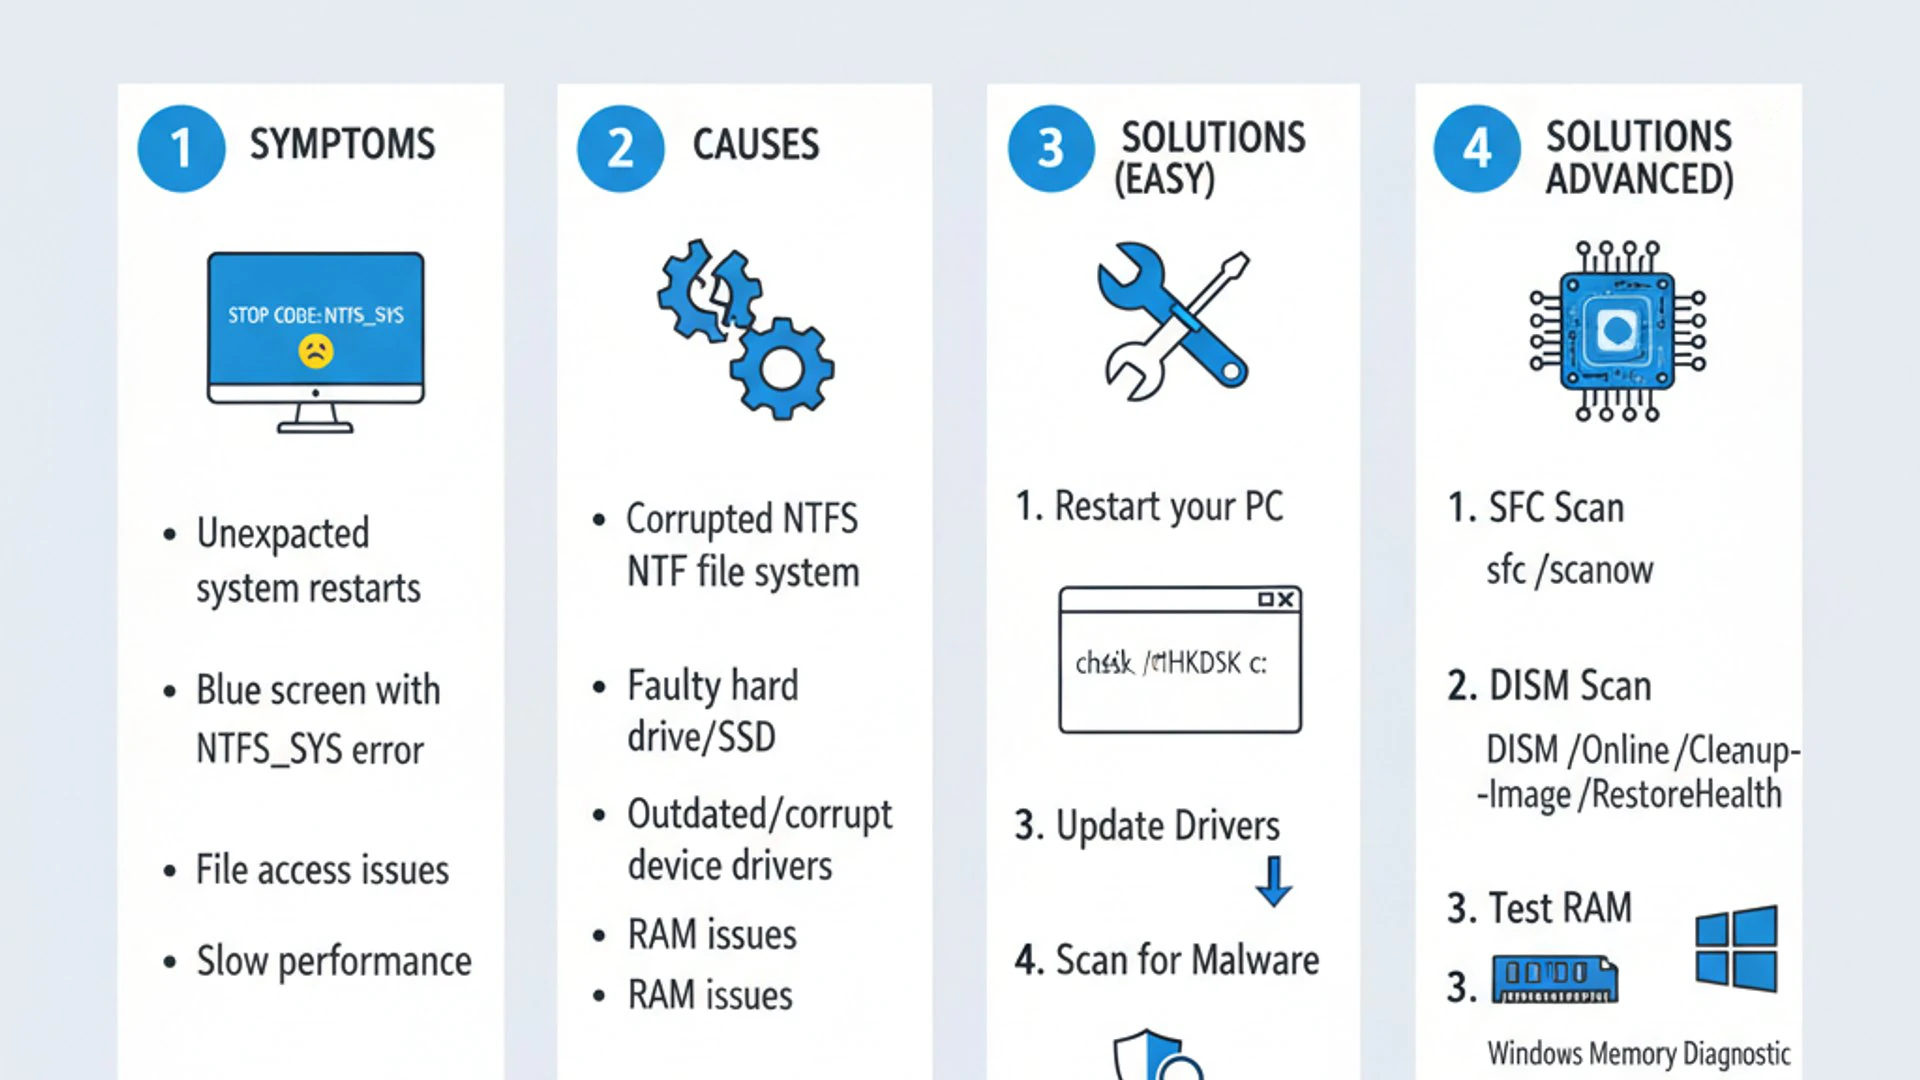
Encountering a blue screen of death (BSOD) on your Windows 11 system can be a frustrating and alarming experience. Among the various stop codes that can appear, the NTFS.SYS blue screen on Windows 11 is particularly notorious. This error signifies a critical problem within the Windows NT File System (NTFS) driver, which is fundamental to how your operating system interacts with your storage devices. For additional context, see Bug Check 0x24: NTFS_FILE_SYSTEM, chkdsk command, and DISM command.
The NTFS.SYS file is a crucial component responsible for reading and writing data on your hard drive or solid-state drive. When this file becomes corrupted or encounters an issue, your system loses its ability to manage files, leading to an immediate crash to prevent further data damage. This guide aims to demystify the NTFS.SYS error, explaining its causes and providing a comprehensive, step-by-step approach to diagnose and resolve it.
Addressing this error promptly is paramount. Ignoring it can lead to repeated system crashes, potential data loss, and even permanent damage to your storage drive. We will walk you through initial troubleshooting, advanced diagnostics, and preventative measures to restore your system’s stability and protect your valuable information. By the end of this article, you will have the knowledge and tools to confidently tackle the ntfs.sys blue screen windows 11 issue.
Table of contents
Key Takeaways
- The NTFS.SYS blue screen on Windows 11 indicates a critical issue with the NTFS file system driver, essential for disk operations.
- Common causes include file system corruption, faulty drivers (especially storage controllers), problematic hardware (RAM, hard drive), and software conflicts or malware.
- Initial troubleshooting often involves booting into Safe Mode or using the Windows Recovery Environment (WinRE) to access diagnostic tools.
- CHKDSK is vital for repairing disk errors, while SFC and DISM commands address corrupted system files and Windows image issues.
- Regularly updating drivers, performing system maintenance, and running memory diagnostics are crucial preventative measures.
- If basic fixes fail, consider advanced options like System Restore or resetting Windows 11 to resolve persistent problems.
Understanding the NTFS.SYS Error and Its Causes
The appearance of a blue screen with the stop code “NTFS.SYS” on Windows 11 is a clear signal that your system has encountered a severe problem related to its file system. Understanding what this file is and why it fails is the first step toward effective troubleshooting.
What is NTFS.SYS?
NTFS.SYS is a core system driver file in Windows that enables the operating system to interact with the New Technology File System (NTFS). NTFS is the default file system for Windows, responsible for organizing, storing, and retrieving files on your hard drives and SSDs. It handles everything from file permissions and encryption to journaling and large file support.
Essentially, every time you save a document, open an application, or even boot your computer, NTFS.SYS is actively working behind the scenes. It acts as the bridge between your applications and the physical storage device, ensuring data integrity and efficient access. When this driver malfunctions, the entire system’s ability to manage data is compromised, leading to a crash.
Common Triggers for NTFS.SYS BSOD
The ntfs.sys blue screen windows 11 error can stem from various sources, ranging from software glitches to critical hardware failures. Identifying the specific trigger is key to applying the correct solution.
Corrupted File System or Disk Errors
One of the most frequent culprits behind an NTFS.SYS BSOD is a corrupted file system or underlying disk errors. Over time, sectors on a hard drive can become bad, or the file system structure itself can get damaged due to sudden power outages, improper shutdowns, or malware infections. These issues prevent NTFS.SYS from correctly reading or writing data, leading to a system crash.
When the operating system tries to access data on a corrupted sector or navigate a broken file system index, the NTFS.SYS driver encounters an unrecoverable error. This immediately triggers the blue screen to prevent further damage to the data or the storage device. Regular disk checks are essential to catch these problems early.
Outdated or Corrupt Drivers
Another significant cause of the NTFS.SYS blue screen is outdated, incompatible, or corrupt drivers, particularly those related to storage controllers. These drivers are responsible for allowing Windows to communicate with your hard drives, SSDs, and other storage peripherals.
If a storage controller driver is faulty, it can lead to miscommunication between the operating system and the storage hardware. This can manifest as the NTFS.SYS driver failing to perform its functions correctly. Similarly, graphics card drivers or chipset drivers, if corrupt, can sometimes indirectly affect system stability, leading to various BSODs, including the NTFS.SYS error.
Always ensure your critical drivers, especially for storage and chipset, are up-to-date and compatible with your Windows 11 version. Incompatible drivers are a frequent source of system instability.
Initial Troubleshooting Steps for System Access
When faced with an NTFS.SYS blue screen on Windows 11, the immediate challenge is often gaining access to your system to perform diagnostics and repairs. If your computer is stuck in a boot loop or crashes immediately after startup, standard troubleshooting methods become inaccessible. Fortunately, Windows 11 provides robust recovery options.
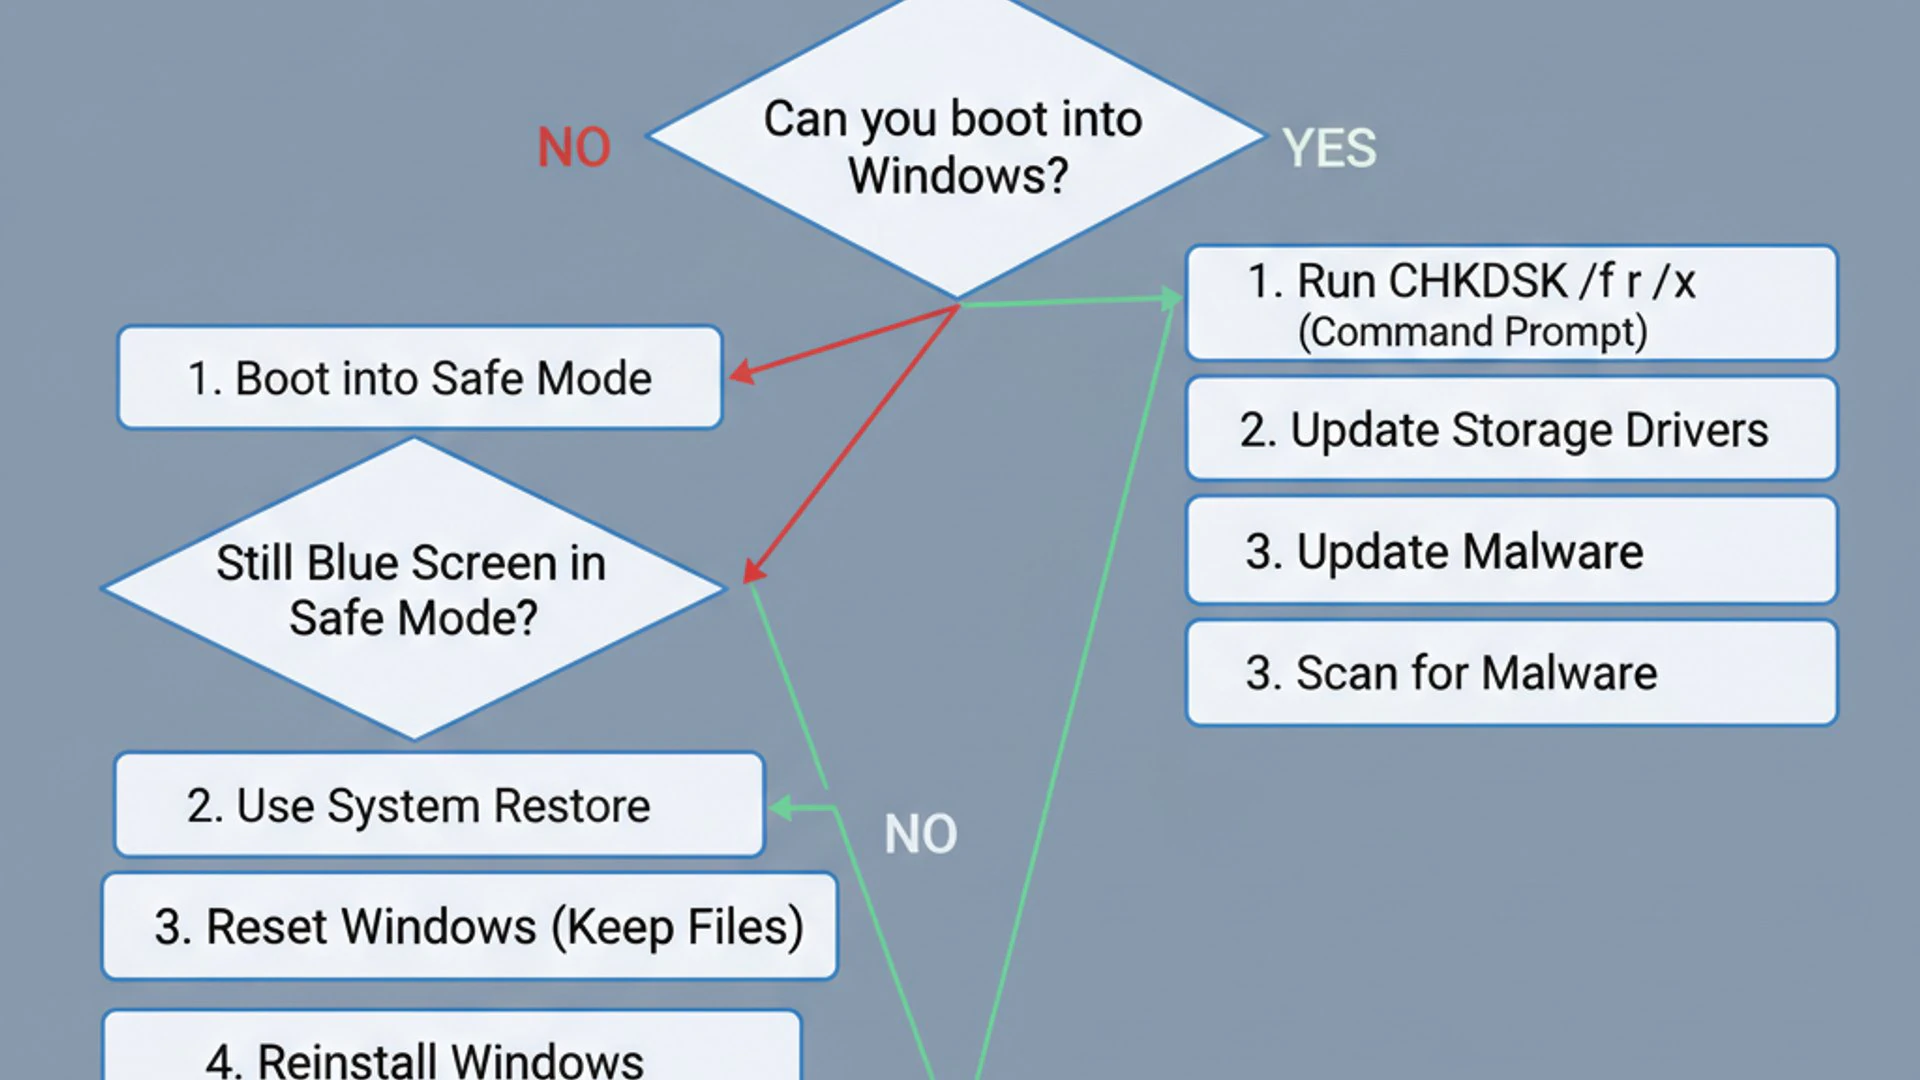
Accessing Safe Mode in Windows 11
Safe Mode is a diagnostic startup mode that runs Windows with only essential drivers and services. This minimalist environment can often bypass the issues causing the BSOD, allowing you to perform initial troubleshooting steps without the system crashing again.
To enter Safe Mode:
- If your PC can’t boot normally, Windows 11 will usually automatically enter the Windows Recovery Environment (WinRE) after two consecutive failed boot attempts.
- From WinRE, select Troubleshoot > Advanced options > Startup Settings > Restart.
- After your PC restarts, you’ll see a list of options. Select 4 or F4 to start your PC in Safe Mode. Alternatively, select 5 or F5 for Safe Mode with Networking if you need internet access.
Once in Safe Mode, you can proceed with driver updates, malware scans, or system file checks without the interference of potentially problematic software or drivers. This is a critical first step when dealing with an ntfs.sys blue screen windows 11 error.
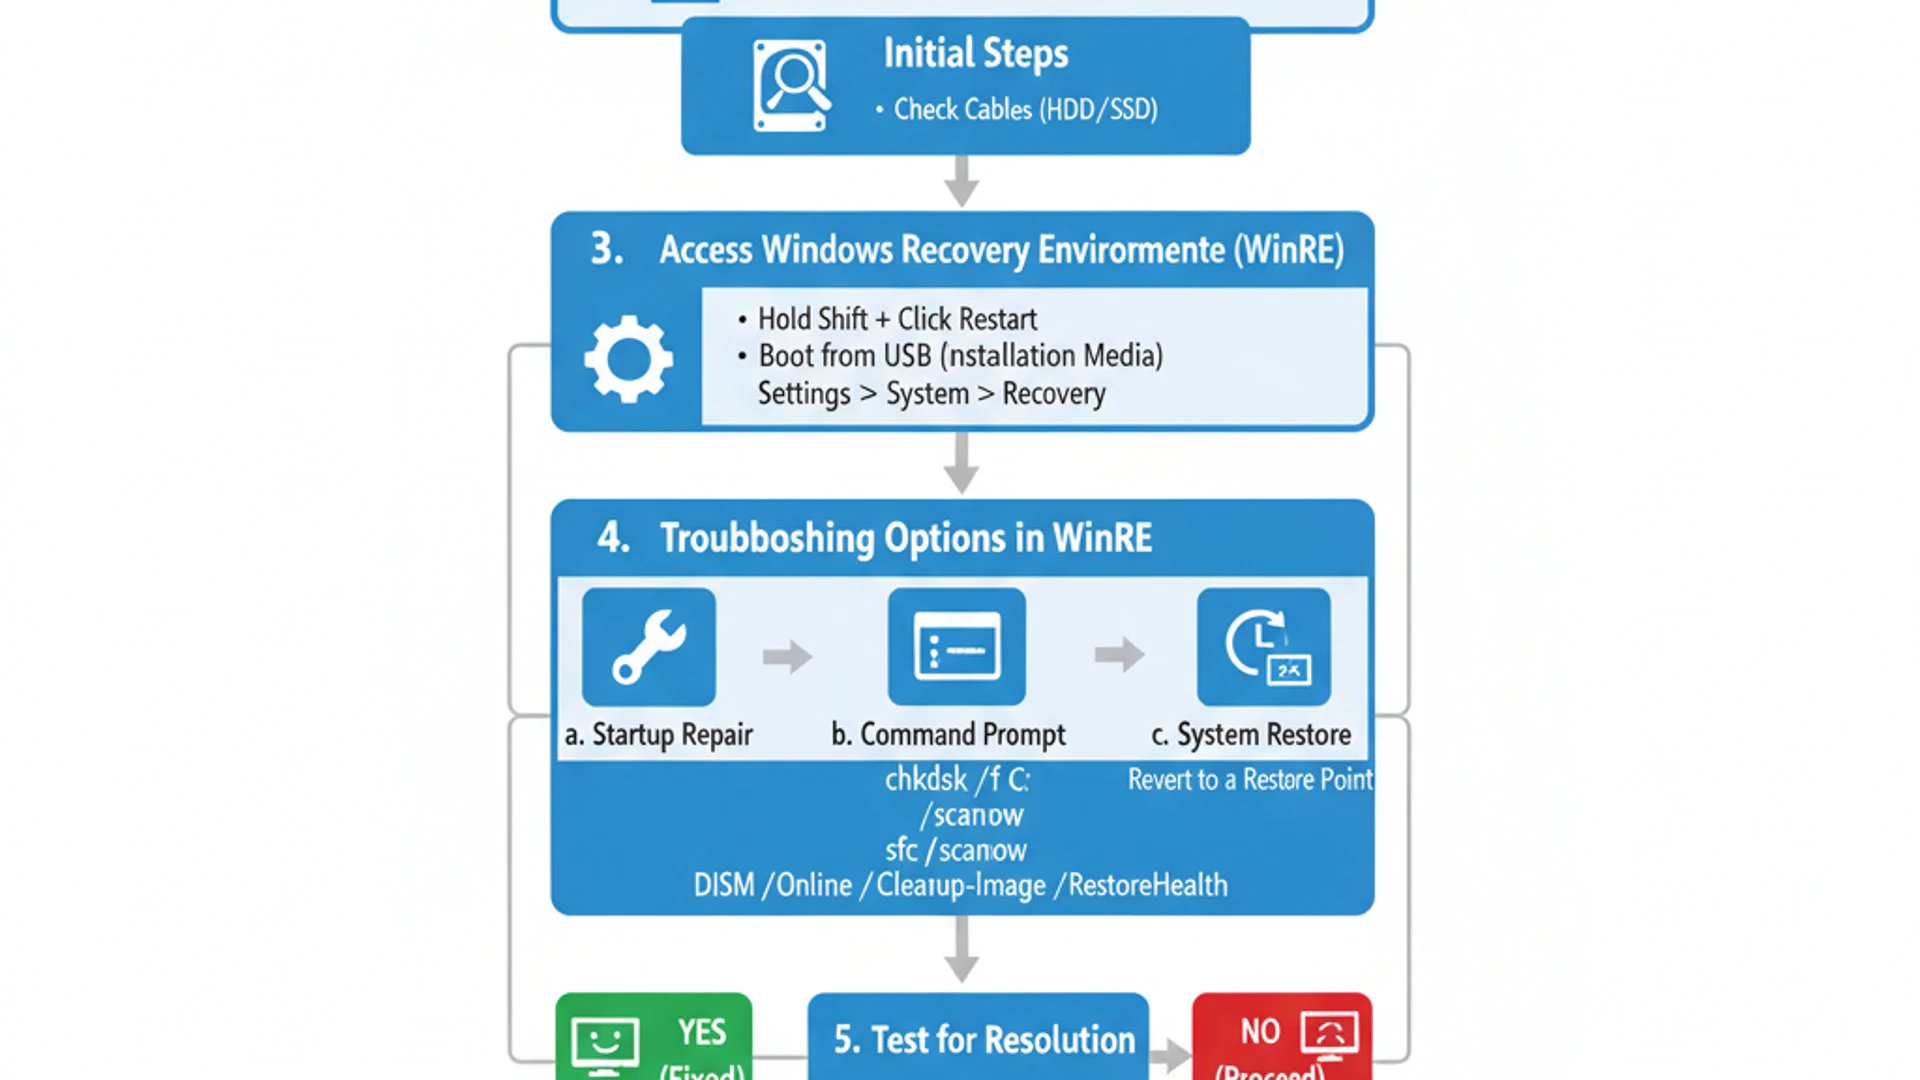
Utilizing Windows Recovery Environment (WinRE)
The Windows Recovery Environment (WinRE) is a powerful suite of diagnostic and repair tools available outside of the standard Windows operating system. It’s invaluable when your PC cannot boot into Safe Mode or needs more advanced recovery options.
You can access WinRE in several ways:
- Automatic Entry: As mentioned, Windows 11 will typically enter WinRE after two failed boot attempts.
- Shift + Restart: If you can get to the login screen or desktop, hold down the Shift key while clicking Restart from the Power menu.
- Bootable USB Drive: Create a Windows 11 installation media (USB drive) and boot your PC from it. Instead of installing Windows, select “Repair your computer” on the first screen.
Within WinRE, you’ll find options like System Restore, Startup Repair, Command Prompt, and the ability to uninstall updates. These tools are crucial for diagnosing and fixing the root cause of the NTFS.SYS error when normal access is impossible.
Diagnosing and Repairing Disk Errors
Since the NTFS.SYS error is fundamentally linked to the file system, diagnosing and repairing disk errors is often the most effective solution. Windows provides built-in tools to help you identify and fix these issues.
Running CHKDSK from Command Prompt
The Check Disk (CHKDSK) utility is a powerful command-line tool designed to scan your hard drive for file system errors and bad sectors, then attempt to repair them. It’s a fundamental step when troubleshooting an ntfs.sys blue screen windows 11.
To run CHKDSK:
- Boot into Safe Mode or the Windows Recovery Environment (WinRE).
- From WinRE, select Troubleshoot > Advanced options > Command Prompt.
- In the Command Prompt window, type
chkdsk C: /f /r /xand press Enter.
Let’s break down the command: C: specifies the drive to check (usually your system drive). /f tells CHKDSK to fix errors on the disk. /r locates bad sectors and recovers readable information. /x forces the volume to dismount first if necessary. This process can take a significant amount of time, especially for large drives, so be patient.
Interpreting CHKDSK Results
After CHKDSK completes, it will provide a report detailing its findings. Look for messages indicating “found bad sectors” or “errors corrected.” If CHKDSK reports significant errors that it couldn’t fix, or if the error reappears shortly after, it might suggest a more severe underlying hardware problem with your hard drive.
A successful CHKDSK run that identifies and fixes errors is a strong indicator that file system corruption was the cause of your NTFS.SYS blue screen. However, repeated errors suggest a failing drive.
If CHKDSK repeatedly finds errors, consider backing up your data immediately. Tools like System Image Backup on Windows 11 can help you create a full backup.
Checking Drive Health with S.M.A.R.T. Tools
While CHKDSK focuses on file system integrity, S.M.A.R.T. (Self-Monitoring, Analysis, and Reporting Technology) tools assess the physical health of your hard drive or SSD. All modern drives include S.M.A.R.T. capabilities, which monitor various attributes like read error rate, spin-up time, and reallocated sector count.
You can check S.M.A.R.T. status using third-party utilities or a simple command in Windows:
- Open Command Prompt as administrator (or from WinRE).
- Type
wmic diskdrive get statusand press Enter. - If the status shows “OK” for all drives, it indicates a healthy drive. Any other status (e.g., “Pred Fail”) suggests an impending drive failure.
For a more detailed S.M.A.R.T. report, consider using free tools like CrystalDiskInfo. If S.M.A.R.T. data indicates a failing drive, replacing the drive is the most reliable solution to prevent future NTFS.SYS errors and data loss.
Updating and Rolling Back Drivers
Driver issues are a very common cause of BSODs, including the NTFS.SYS error. Ensuring your drivers are current and compatible, or rolling back problematic ones, can often resolve the problem.
Updating Graphics and Storage Controller Drivers
Outdated or corrupt drivers, especially for your storage controller (e.g., SATA, NVMe) and graphics card, are frequent culprits behind the ntfs.sys blue screen windows 11. These drivers are fundamental to system stability and data handling.
To update drivers:
- Boot into Safe Mode if you cannot access Windows normally.
- Right-click the Start button and select Device Manager.
- Expand Storage controllers and Display adapters.
- Right-click on each device and select Update driver. Choose “Search automatically for drivers.”
- If Windows doesn’t find a new driver, visit your computer manufacturer’s website (for pre-built PCs) or the component manufacturer’s website (e.g., Intel, AMD, NVIDIA, Samsung) to download the latest drivers directly.
Always download drivers from official sources to avoid malware and ensure compatibility. Install them and then restart your computer to see if the issue is resolved.
Rolling Back Recently Updated Drivers
Sometimes, a newly installed driver update, even from an official source, can introduce bugs or incompatibilities that lead to a BSOD. If the NTFS.SYS error started occurring immediately after a driver update, rolling back to the previous version is a smart troubleshooting step.
To roll back a driver:
- Boot into Safe Mode.
- Open Device Manager.
- Locate the driver you suspect (e.g., under Storage controllers or Display adapters).
- Right-click the driver and select Properties.
- Go to the Driver tab and click Roll Back Driver. If the button is grayed out, a previous driver version is not available.
After rolling back, restart your PC. If the BSOD disappears, the updated driver was the cause. You might need to prevent Windows from automatically updating that specific driver until a more stable version is released.
System File Checker and DISM Commands
Corrupted system files or issues with the Windows image itself can also trigger the NTFS.SYS blue screen. Windows 11 includes powerful command-line tools, SFC and DISM, specifically designed to address these problems.
Using SFC /scannow to Repair System Files
The System File Checker (SFC) utility scans for and restores corrupted Windows system files. If the NTFS.SYS file itself is damaged, SFC might be able to repair it, resolving your BSOD.
To run SFC:
- Boot into Safe Mode or WinRE.
- Open Command Prompt as administrator.
- Type
sfc /scannowand press Enter.
The scan will take some time to complete. Once finished, it will report whether it found any integrity violations and if it was able to repair them. If SFC reports that it found corrupt files but couldn’t fix them, or if the issue persists, you should proceed to use DISM.
Running
sfc /scannowis a fundamental step for any system instability issue, as it directly addresses the integrity of critical Windows files like NTFS.SYS.
Employing DISM for Image Repair
The Deployment Image Servicing and Management (DISM) tool is used to service a Windows image. It’s more powerful than SFC because it can repair the underlying Windows component store from which SFC draws its files. If your Windows installation itself is damaged, DISM can often fix it, paving the way for SFC to work effectively.
To use DISM:
- Boot into Safe Mode or WinRE.
- Open Command Prompt as administrator.
- First, check the health of your Windows image:
DISM /Online /Cleanup-Image /CheckHealth - Then, scan the image for corruption:
DISM /Online /Cleanup-Image /ScanHealth - Finally, restore the image if issues are found:
DISM /Online /Cleanup-Image /RestoreHealth
The /RestoreHealth command will attempt to repair the image using Windows Update. If your internet connection is unavailable or unreliable in Safe Mode, you might need to specify an installation source using the /Source: parameter. After running DISM, it’s a good practice to run sfc /scannow again to ensure all system files are now correctly repaired.
Memory Diagnostics and Hardware Checks
While the NTFS.SYS error points to a file system driver, underlying hardware issues, particularly with RAM, can often manifest as seemingly unrelated BSODs. Faulty memory can corrupt data as it’s being processed, leading to file system errors or driver crashes.
Running Windows Memory Diagnostic Tool
The Windows Memory Diagnostic Tool is a built-in utility designed to check your computer’s RAM for errors. It’s an essential step when troubleshooting persistent BSODs, including the ntfs.sys blue screen windows 11.
To run the diagnostic:
- Save any open work and close all applications.
- Press Windows key + R, type
mdsched.exe, and press Enter. - Choose Restart now and check for problems (recommended).
Your computer will restart and run a series of memory tests. This process can take several minutes. If errors are detected, Windows will usually notify you upon logging back in. Memory errors often indicate faulty RAM modules that need to be replaced.
Physically Inspecting RAM Modules
Sometimes, RAM issues aren’t due to faulty modules but rather improper seating or dust accumulation. A physical inspection can help rule out these simple mechanical problems.
Before you begin, ensure your computer is completely powered off and unplugged from the wall. If it’s a laptop, remove the battery if possible.
- Open your computer case (for desktops) or access the RAM compartment (for laptops).
- Locate the RAM modules.
- Gently unclip and remove each RAM stick.
- Inspect the RAM slots for dust or debris. Use compressed air to clean them if necessary.
- Carefully reinsert each RAM module, ensuring it’s firmly seated in its slot until the clips on both sides snap into place.
- If you have multiple RAM sticks, try booting with only one at a time to identify a potentially faulty module.
If you find a specific RAM stick causes the BSOD when installed alone, that module is likely defective and needs replacement. Even if the diagnostic tool doesn’t find errors, reseating RAM can sometimes resolve intermittent contact issues.
Addressing Software Conflicts and Malware
Beyond hardware and driver issues, software conflicts and malicious programs can also destabilize your system and lead to an NTFS.SYS blue screen. Identifying and eliminating these software-related problems is crucial for system stability.
Performing a Clean Boot
A clean boot starts Windows with a minimal set of drivers and startup programs, similar to Safe Mode but with more control over which services are enabled. This helps you determine if a third-party application or service is causing the ntfs.sys blue screen windows 11.
To perform a clean boot:
- Press Windows key + R, type
msconfig, and press Enter to open System Configuration. - Go to the Services tab. Check Hide all Microsoft services, then click Disable all.
- Go to the Startup tab, then click Open Task Manager.
- In Task Manager, disable all startup items one by one. Close Task Manager.
- Click OK in System Configuration and restart your computer.
If the BSOD does not occur in a clean boot environment, it indicates that one of the disabled services or startup programs was the culprit. You can then re-enable them in small groups to pinpoint the problematic software.
Scanning for Malware and Viruses
Malware can corrupt system files, interfere with drivers, and cause various system instabilities, including BSODs like the NTFS.SYS error. A thorough scan is essential to rule out malicious software as the cause.
To scan for malware:
- Boot into Safe Mode with Networking if possible, to allow your antivirus software to update its definitions.
- Use Windows Security (built-in antivirus) to perform a full scan. Go to Start > Settings > Privacy & security > Windows Security > Virus & threat protection > Scan options > Full scan.
- Consider using a reputable third-party anti-malware tool (e.g., Malwarebytes) for an additional layer of scanning, especially if Windows Security doesn’t find anything or the issue persists.
Remove any detected threats and restart your computer. Regular, up-to-date antivirus protection is critical for preventing such issues.
Advanced Recovery Options
If all previous troubleshooting steps fail to resolve the NTFS.SYS blue screen on Windows 11, you might need to consider more drastic recovery options. These steps can help restore your system’s stability, though they may involve some data loss if not handled carefully.
Performing a System Restore
System Restore is a feature that allows you to revert your computer’s system files, installed applications, Windows Registry, and settings to a previous point in time, known as a restore point. This can be incredibly useful if the BSOD started after a recent software installation, driver update, or system change.
To perform a System Restore:
- Boot into the Windows Recovery Environment (WinRE).
- Select Troubleshoot > Advanced options > System Restore.
- Follow the on-screen prompts to choose a restore point. Ideally, select a restore point from before the ntfs.sys blue screen windows 11 error began appearing.
- Confirm your choice and let the process complete. Your computer will restart.
System Restore does not affect your personal files (documents, pictures, videos), but it will uninstall any programs or drivers installed after the chosen restore point. This is a non-destructive way to revert system changes.
Resetting Windows 11 While Keeping Files
If System Restore doesn’t fix the problem, or if you don’t have a suitable restore point, resetting Windows 11 is the next step. This option reinstalls the operating system while giving you the choice to keep your personal files.
To reset Windows 11:
- Boot into the Windows Recovery Environment (WinRE).
- Select Troubleshoot > Reset this PC.
- Choose Keep my files. This option removes apps and settings but preserves your personal data.
- Select how you want to reinstall Windows: Cloud download (downloads a fresh copy of Windows from Microsoft) or Local reinstall (uses files already on your device). Cloud download is often more reliable.
- Review the changes and click Reset.
This process can take some time. While your personal files are kept, you will need to reinstall all your applications and reconfigure your settings. It’s a more thorough approach to resolving deep-seated system issues without completely wiping your data.
Preventing Future NTFS.SYS Blue Screens
After successfully resolving the NTFS.SYS blue screen on Windows 11, the next crucial step is to implement preventative measures. Proactive maintenance and safe computing habits can significantly reduce the likelihood of encountering this frustrating error again.
Regular System Maintenance Practices
Consistent system maintenance is key to a healthy and stable Windows 11 environment. Neglecting routine checks can lead to an accumulation of issues that eventually trigger critical errors.
- Disk Cleanup and Defragmentation: Regularly use the built-in Disk Cleanup tool to remove temporary files and unnecessary data. For traditional hard drives, periodically defragmenting them can improve performance, though it’s not necessary for SSDs.
- Error Checking: Schedule regular CHKDSK scans (e.g., monthly) to proactively identify and fix minor file system errors before they escalate into a full-blown ntfs.sys blue screen windows 11.
- System Backups: Implement a robust backup strategy. Use tools like Windows’ built-in backup features or third-party solutions to regularly back up your important files and create system image backups. This ensures you can recover quickly from any catastrophic failure.
These simple practices can go a long way in maintaining your system’s integrity and preventing data loss.
Keeping Drivers and Windows Up-to-Date
Outdated software and drivers are common sources of instability. Ensuring everything is current is one of the most effective preventative measures.
- Windows Updates: Always install Windows 11 updates promptly. Microsoft regularly releases patches that fix bugs, improve security, and enhance system stability. Go to Settings > Windows Update and check for updates regularly.
- Driver Updates: Beyond Windows Update, periodically check your hardware manufacturers’ websites for the latest drivers, especially for your motherboard chipset, graphics card, and storage controllers. While Windows Update often provides drivers, direct downloads from manufacturers can offer newer or more optimized versions.
- Antivirus and Anti-Malware: Keep your antivirus software up-to-date with the latest definitions and perform regular scans. Malware can corrupt system files and lead to BSODs.
By staying on top of updates, you ensure your system benefits from the latest fixes and security enhancements, significantly reducing the risk of encountering the NTFS.SYS error.
Conclusion
The NTFS.SYS blue screen on Windows 11 is a critical error that can disrupt your workflow and threaten your data. However, as this comprehensive guide has demonstrated, it is often a solvable problem with a systematic approach to troubleshooting. From understanding the core function of NTFS.SYS to diagnosing disk errors, updating drivers, and performing advanced system recoveries, each step plays a vital role in restoring your system’s stability.
Remember, the key to success lies in patience and methodical execution of the solutions provided. Start with initial access methods like Safe Mode, move on to disk and file system repairs with CHKDSK, SFC, and DISM, then address potential hardware and software conflicts. If all else fails, Windows 11 offers robust recovery options like System Restore and PC Reset to get you back on track.
Ultimately, preventing future occurrences of the ntfs.sys blue screen windows 11 error is about proactive maintenance. Regular updates, scheduled disk checks, and diligent malware protection are your best defense. By adopting these practices, you can ensure your Windows 11 system remains reliable, performs optimally, and protects your valuable data against unexpected crashes.
For more interesting articles, stay tuned to Winsides.com!









Community
Comments (0)