

Introduction to the Lenovo Blue Screen of Death (BSOD)
The sudden appearance of a Blue Screen of Death (BSOD) can be one of the most alarming and frustrating experiences for any computer user, especially when it interrupts critical work or leisure activities. For owners of Lenovo systems, this particular error, often referred to as the
, signals a fundamental problem that Windows has encountered and cannot recover from gracefully. It’s a critical system error that forces your computer to shut down or restart to prevent potential data corruption or further damage. This infamous blue screen, adorned with a cryptic error message and a stop code, is Windows’ way of telling you that something has gone seriously wrong at a low level. It could be anything from a faulty hardware component to a corrupted driver or even a malicious software intrusion. Understanding the nuances of these errors on Lenovo devices is crucial for effective troubleshooting and maintaining system stability. The impact of a BSOD extends beyond a simple inconvenience; it can lead to lost work, corrupted files, and a general sense of unease about your system’s reliability. Therefore, knowing how to diagnose, address, and ultimately prevent these occurrences is an invaluable skill for any Lenovo user. This comprehensive guide will walk you through every step, from initial understanding to advanced solutions, ensuring you can confidently tackle the
. We will explore the common culprits behind these crashes, both software and hardware-related, and provide you with actionable strategies to resolve them. Our goal is to empower you with the knowledge to restore your Lenovo system to its optimal, stable state, minimizing future disruptions and maximizing your productivity.
Table of contents
Key Takeaways for Troubleshooting Lenovo BSOD
Facing a
can be daunting, but a structured approach can significantly simplify the troubleshooting process. Here are the most crucial immediate insights and actions to consider:
- Note the Error Code: Always write down the specific stop code (e.g., KERNEL_SECURITY_CHECK_FAILURE) displayed on the blue screen. This code is your most valuable clue for diagnosing the root cause.
- Restart and Observe: A simple restart can sometimes resolve transient issues. If the BSOD recurs, pay attention to *when* it happens – during startup, while using a specific application, or randomly.
- Check Recent Changes: Reflect on any new software installations, driver updates, or hardware additions made just before the BSOD appeared. These are often direct culprits.
- Update Drivers and Windows: Outdated or corrupt drivers are a leading cause of BSODs. Prioritize updating all critical drivers (graphics, chipset, network) and ensure your Windows OS is fully patched.
- Scan for Malware: Malicious software can deeply infiltrate your system, causing instability. A thorough scan with a reputable antivirus program is a vital step.
- Test Hardware Components: If software solutions fail, consider hardware. Faulty RAM or a failing storage drive are common physical causes that require dedicated diagnostic tools.
- Utilize System Restore: If a recent change caused the issue, rolling back your system to a previous working state using System Restore can be an effective solution.
Understanding the Causes of Lenovo Blue Screen Errors
The dreaded
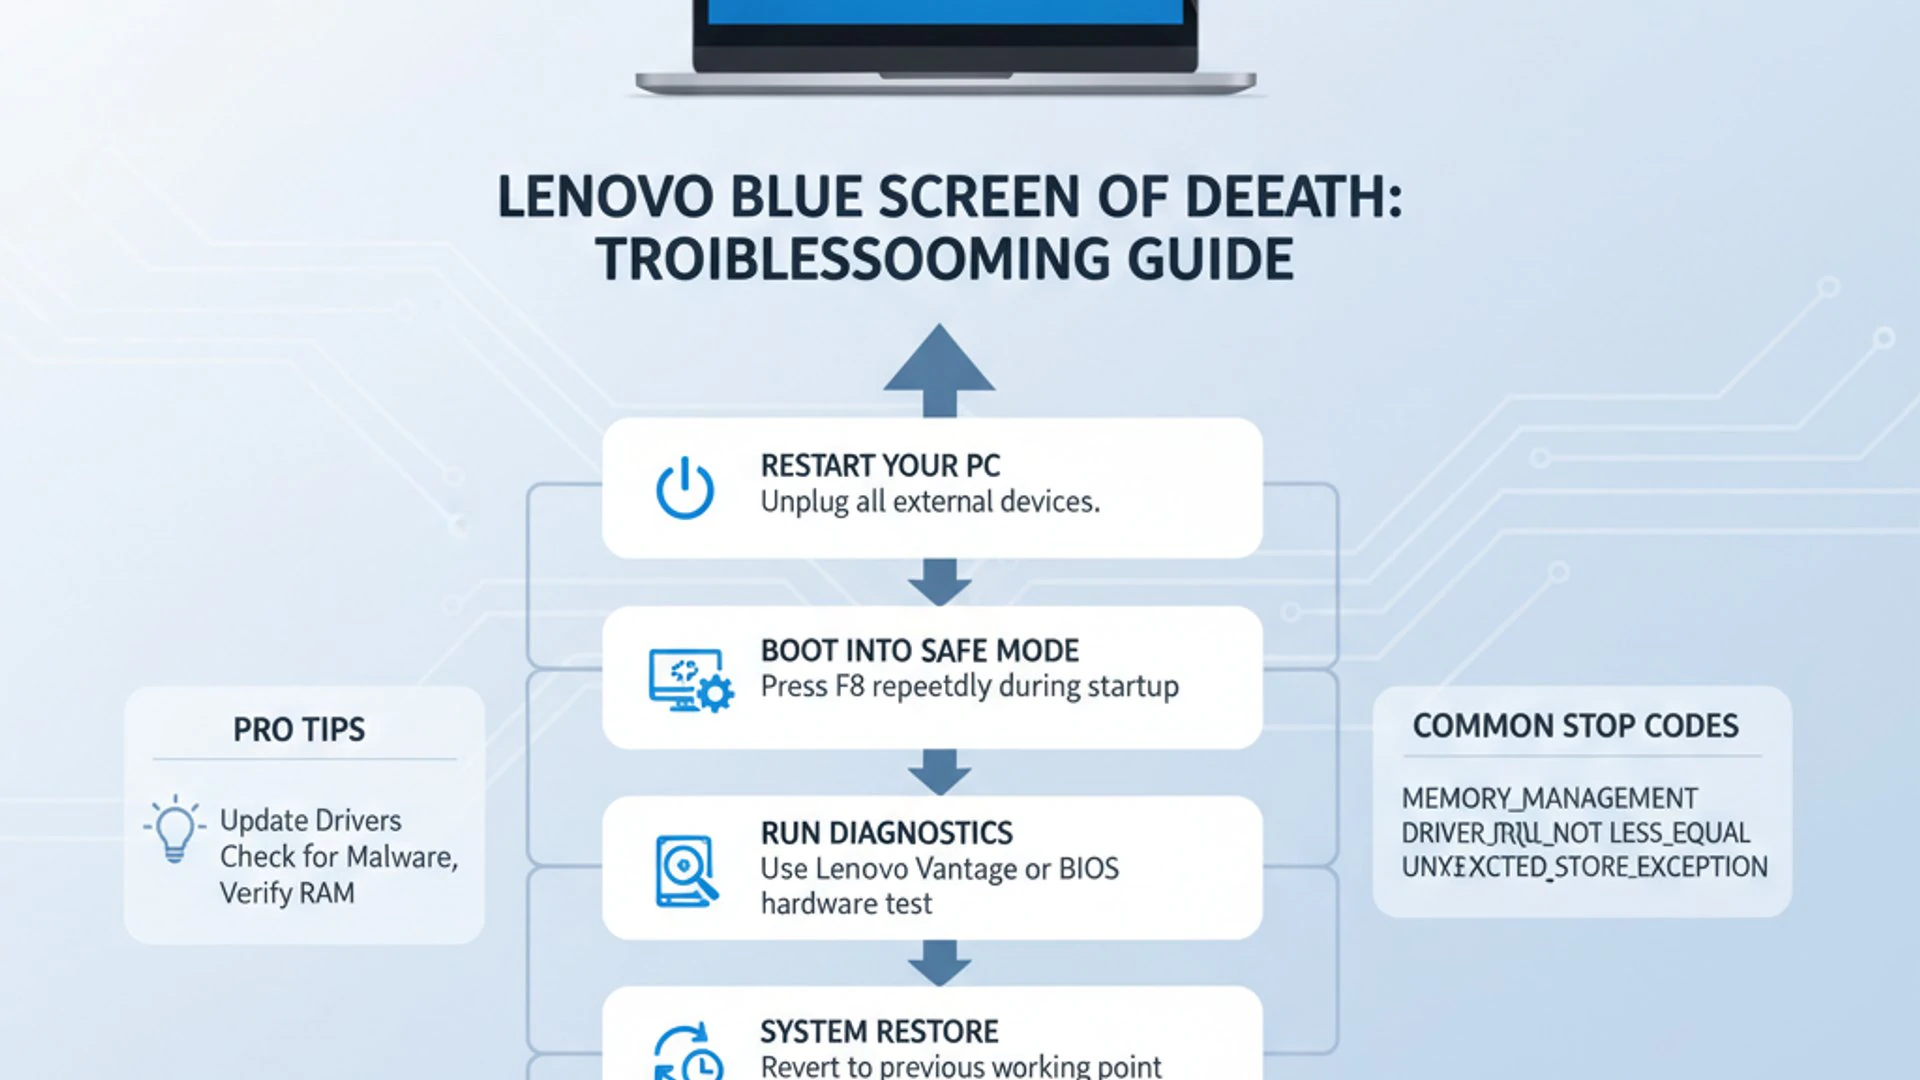
is rarely a random event; it’s a symptom of an underlying issue that has pushed your system beyond its operational limits. These issues can broadly be categorized into two main groups: software-related problems and hardware-related malfunctions. Understanding these distinctions is the first step toward effective diagnosis and resolution. Software-related causes often stem from conflicts within the operating system, problematic applications, or incorrect driver interactions. These are typically easier to address through updates, uninstalls, or system repairs. On the other hand, hardware-related issues point to a physical component failure or degradation, which might require more intensive testing or even component replacement. Identifying the precise cause is crucial because it dictates the troubleshooting path you will take. A generic "blue screen" message offers little help on its own; it’s the specific stop code that provides the necessary context. This section will break down the most common triggers for a Lenovo BSOD, giving you a foundational understanding before diving into solutions. By familiarizing yourself with these potential culprits, you’ll be better equipped to interpret the clues your system provides and narrow down the possibilities. This systematic approach saves time and prevents unnecessary steps, guiding you directly to the most probable solution for your specific
scenario.
Common Software-Related Triggers
Software issues are frequently at the heart of a
. These problems can range from simple compatibility glitches to deep-seated system corruption. They often manifest after a new installation, an update, or prolonged use without proper maintenance. Understanding these software triggers helps in tracing back the problem to its origin. It allows you to focus your initial troubleshooting efforts on areas that are most likely to be affected by recent changes or common software vulnerabilities.
Outdated or Corrupt Drivers
Drivers are essential software components that allow your operating system to communicate with your hardware devices. When these drivers become outdated, incompatible, or corrupted, they can lead to severe system instability, culminating in a
. This is particularly common after Windows updates, which might introduce new OS versions that older drivers aren’t designed to handle. A driver conflict might also arise if two different drivers attempt to control the same hardware resource, or if a newly installed driver is buggy. Graphics drivers, chipset drivers, and network adapter drivers are particularly notorious for causing BSODs when problematic. Keeping them updated is paramount.
Software Conflicts and Malware
Software conflicts occur when two or more applications interfere with each other’s operation, or with the operating system itself. This can happen with security software, system utilities, or even poorly coded applications that demand excessive resources or modify critical system files. Such conflicts can destabilize the system and trigger a BSOD. Furthermore,
are significant contributors to system instability. Malicious software can corrupt system files, interfere with legitimate processes, or even exploit vulnerabilities to gain control, leading to crashes. A deep infection can be particularly difficult to remove and often results in persistent BSODs.
Hardware-Related Issues Leading to BSOD
While software problems are common, a
can also be a stark indicator of underlying hardware malfunctions. These issues tend to be more persistent and often require physical inspection or component testing to diagnose accurately. Hardware problems can range from a failing component to insufficient power delivery. When software troubleshooting yields no results, shifting focus to hardware becomes essential. It’s important to approach hardware diagnostics systematically to avoid unnecessary component replacements. This often involves isolating components to identify the faulty one.
Faulty RAM or Storage Drives
Random Access Memory (RAM) is critical for your system’s operation. If RAM modules are faulty, incorrectly seated, or incompatible, they can cause data corruption and immediate system crashes, manifesting as a
. Errors like "MEMORY_MANAGEMENT" or "PAGE_FAULT_IN_NONPAGED_AREA" often point directly to RAM issues. Similarly, problems with your storage drive (HDD or SSD) can lead to BSODs. Bad sectors, failing read/write heads, or corrupted file systems on the drive where Windows is installed can prevent the operating system from accessing critical files, resulting in a crash. Errors such as "CRITICAL_PROCESS_DIED" or "UNMOUNTABLE_BOOT_VOLUME" might indicate storage drive problems.
Overheating and Power Supply Problems
Excessive heat is a silent killer for computer components. If your Lenovo system’s CPU, GPU, or other critical components overheat due to clogged fans, poor airflow, or a failing cooling system, they can become unstable and trigger a BSOD as a protective measure. Modern systems often throttle performance or shut down to prevent permanent damage. The Power Supply Unit (PSU) is another critical hardware component. An insufficient or failing PSU can lead to unstable power delivery to various components, causing them to malfunction intermittently or consistently. This can result in random reboots, freezes, or the dreaded
, especially under heavy load.
Initial Troubleshooting Steps for Immediate Resolution
When confronted with a
, panic is a natural reaction. However, some simple, immediate steps can often resolve transient issues or provide crucial information for further diagnosis. These initial actions are designed to be quick and non-invasive, serving as your first line of defense before diving into more complex solutions. It’s always wise to start with the simplest potential fixes. Many BSODs are not indicative of a catastrophic failure but rather a temporary glitch that can be cleared with basic interventions. By systematically performing these initial steps, you can save time and effort, potentially resolving the problem without extensive technical work. Remember, the goal here is not just to fix the immediate problem but also to gather clues. Pay close attention to how your system behaves after each step. Does the BSOD reoccur? Does it happen under different circumstances? These observations are vital for guiding your subsequent troubleshooting efforts.
Restarting Your Lenovo Device
The classic "turn it off and turn it on again" advice holds surprising power, even for a
. A simple restart can clear temporary glitches, reset hardware states, and resolve minor software conflicts that might have led to the crash. It’s the most basic yet often effective first step. If your system is stuck on the blue screen, you might need to perform a hard shutdown by holding down the power button until the device turns off completely. Wait a few seconds, then power it back on. Observe if Windows boots normally or if the BSOD reappears. If the BSOD disappears after a restart and doesn’t return, it might have been a one-off event caused by a temporary resource exhaustion or a minor software hiccup. However, if it recurs, especially under similar circumstances, you know the problem is more persistent and requires further investigation.
Checking for Recent Hardware or Software Changes
One of the most effective diagnostic questions to ask yourself after a
is: "What did I change recently?" New software installations, driver updates, Windows updates, or the addition of new hardware components are incredibly common triggers for system instability. Think back to anything you installed, connected, or updated just before the BSOD occurred. This could include a new game, a peripheral device like a printer or webcam, a graphics driver update, or even a recent Windows security patch. Identifying these changes can often pinpoint the exact cause. If you suspect a recent software installation, try uninstalling it. For new hardware, disconnect it and see if the problem persists. If a Windows update is the culprit, you might need to roll back the update. This process of elimination is incredibly powerful in narrowing down the source of the problem.
Advanced Software-Based Solutions to Fix BSOD
When initial troubleshooting steps don’t resolve the
, it’s time to delve into more comprehensive software-based solutions. These methods target deeper system issues, from corrupted files and outdated drivers to malicious software and problematic applications. They require a more systematic approach and often involve using built-in Windows tools. Before proceeding with these steps, ensure you have backed up any critical data, if possible. While most of these solutions are designed to repair your system, unforeseen complications can always arise. A recent backup provides peace of mind and protection against data loss. Many of these solutions require accessing Windows in Safe Mode, especially if the BSOD prevents normal startup. Safe Mode loads Windows with only essential drivers and services, making it easier to troubleshoot and apply fixes without interference from problematic software or drivers.
Updating Drivers and Windows Operating System
Outdated or corrupt drivers are a primary cause of the
. Ensuring all your device drivers are current and compatible with your Windows version is a critical step in maintaining system stability. Similarly, keeping your Windows operating system fully updated addresses known bugs and security vulnerabilities that could lead to crashes. This dual approach tackles two of the most common software-related BSOD triggers simultaneously. Neglecting driver updates or postponing Windows patches can leave your system vulnerable to instability and performance issues.
Using Device Manager for Driver Updates
The Windows Device Manager is your primary tool for managing hardware drivers. It allows you to check the status of installed drivers, update them, or roll back to a previous version if a new update causes issues. This is often the first place to look for driver-related BSODs.
- Press Windows Key + X and select Device Manager from the menu.
- Look for any devices with a yellow exclamation mark, which indicates a problem.
- Right-click on the device you suspect is causing issues (e.g., Display adapters, Network adapters) and select Update driver.
- Choose “Search automatically for updated driver software.” If Windows doesn’t find a new driver, visit the Lenovo support website for your specific model to download the latest drivers directly.
- After installing new drivers, restart your computer.
Sometimes, rolling back a driver can be helpful if a recent update caused the BSOD. In Device Manager, right-click the device, go to Properties, then the Driver tab, and select "Roll Back Driver" if available.
Performing a Windows Update
Keeping your Windows operating system up to date is crucial for stability and security. Microsoft regularly releases patches and updates that fix bugs, improve performance, and address compatibility issues that could lead to a
.
- Go to Settings (Windows Key + I).
- Click on Update & Security (Windows 10) or Windows Update (Windows 11).
- Click Check for updates.
- Download and install any available updates. Your system may need to restart multiple times.
Ensure that all optional updates, especially those related to drivers, are also considered. Sometimes, critical fixes are delivered through these optional channels. A fully updated system provides the best foundation for stability.
Running System File Checker (SFC) and DISM Commands
Corrupted system files are a common cause of the
. Windows includes powerful built-in tools,
and
, designed to scan for and repair these issues. They are invaluable for resolving BSODs caused by system file integrity problems. SFC specifically checks for and repairs corrupted Windows system files, replacing them with correct versions. DISM, on the other hand, is used to repair the Windows system image itself, which SFC relies upon. Running them in conjunction provides a comprehensive repair strategy.
- Open Command Prompt as administrator. You can do this by searching for “cmd” in the Start menu, right-clicking on “Command Prompt,” and selecting “Run as administrator.”
- First, run the DISM command to ensure the system image is healthy:
DISM /Online /Cleanup-Image /RestoreHealthThis process can take some time, especially if repairs are needed. Ensure you have an active internet connection. - Once DISM completes, run the SFC command:
sfc /scannowThis command will scan all protected system files and replace corrupted files with cached copies. - After both commands have finished, restart your Lenovo device.
These tools are particularly effective for BSODs with error codes like "CRITICAL_PROCESS_DIED" or "SYSTEM_SERVICE_EXCEPTION" which often indicate system file corruption.
Scanning for Malware and Viruses
Malware can deeply infiltrate your system, corrupting files, interfering with legitimate processes, and ultimately triggering a
. A thorough scan for viruses and other malicious software is a critical step, especially if BSODs occur randomly or after visiting suspicious websites. Even if you have an antivirus program installed, it’s worth performing a deep scan or even using a second opinion scanner. Some sophisticated malware can evade detection by a single security suite.
- Ensure your antivirus software is up to date with the latest definitions.
- Perform a full system scan. This can take several hours, so plan accordingly.
- Consider using a reputable second-opinion scanner like Malwarebytes or Windows Defender Offline Scan for deeper threats.
- If any threats are detected, follow the software’s instructions to quarantine or remove them.
- Restart your computer after the scan and removal process.
Regular, scheduled malware scans are a best practice for preventing such issues and maintaining overall system health. For more on Windows security, you might find information on
useful.
Uninstalling Problematic Software or Updates
If the
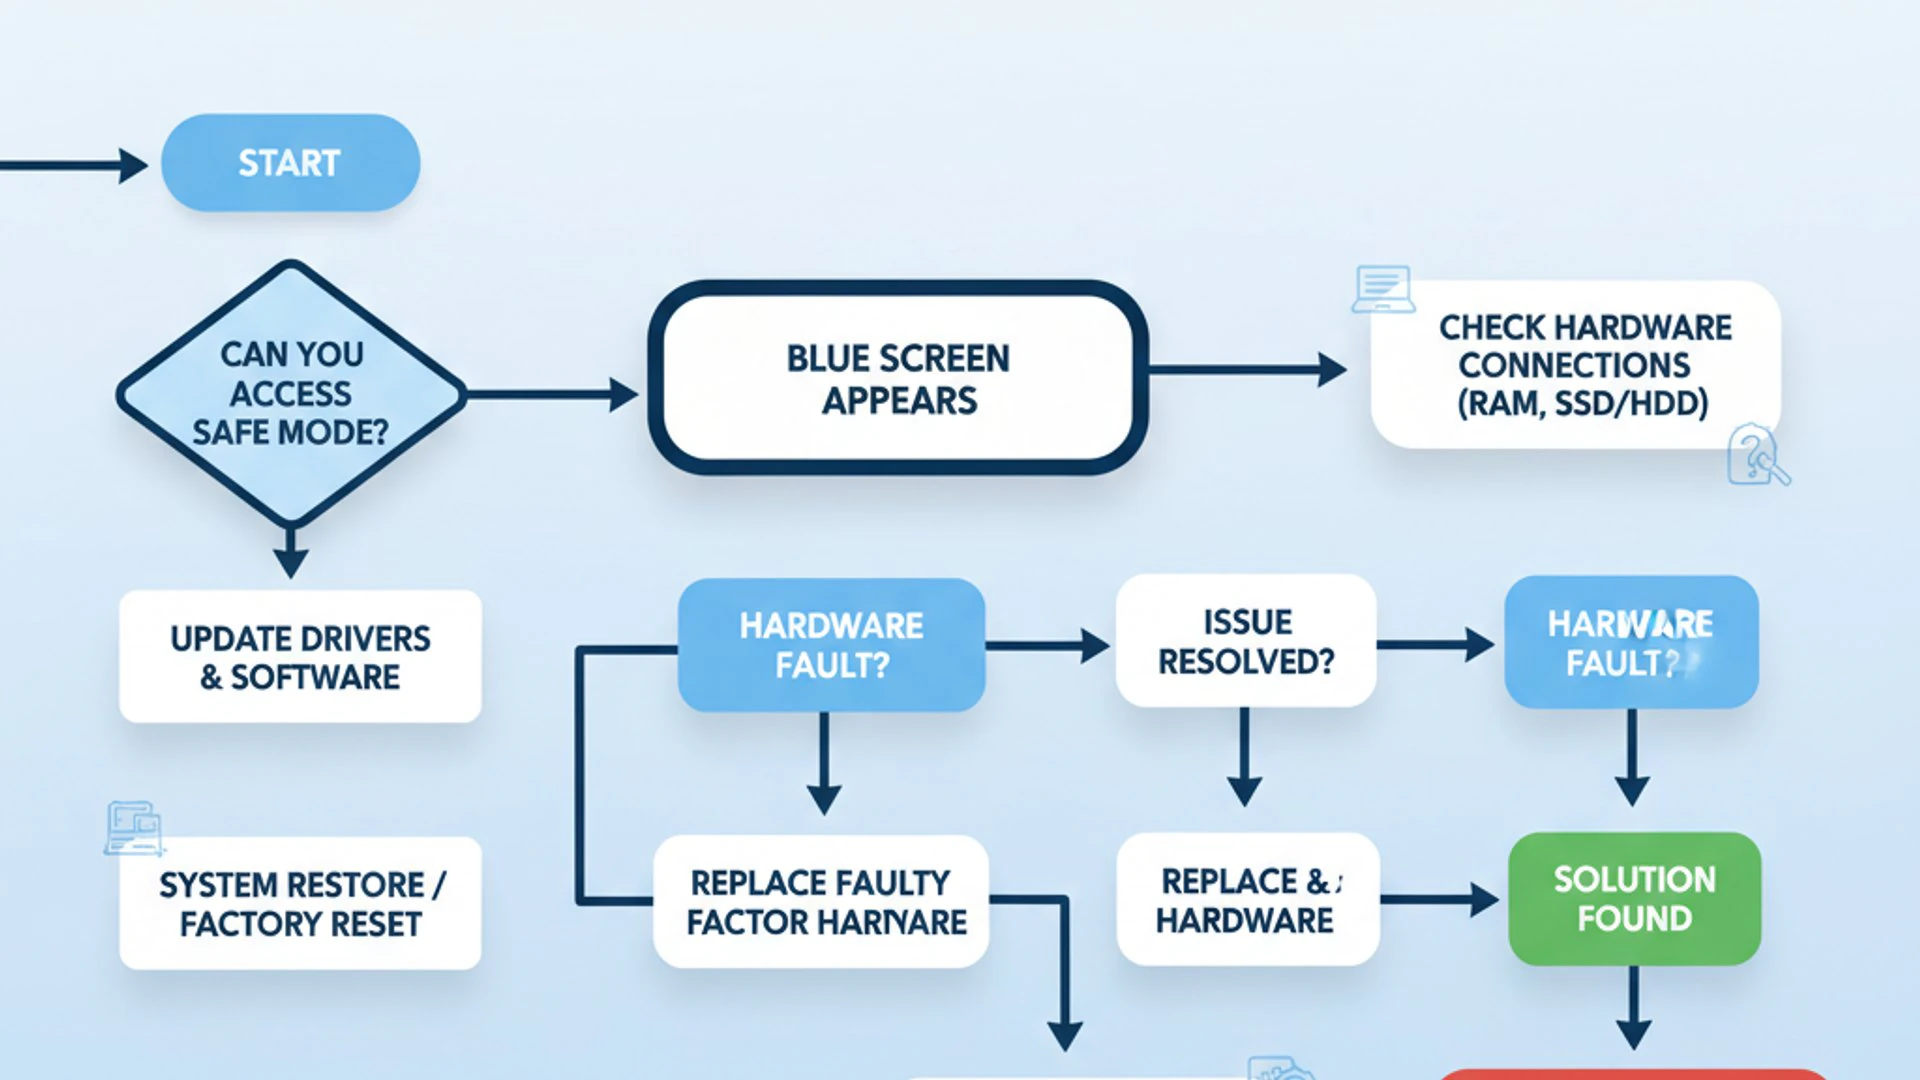
started appearing shortly after installing a new application or a Windows update, that software or update is a prime suspect. Uninstalling the problematic element can often resolve the issue directly. This step relies heavily on your memory of recent changes. It’s a process of elimination that can quickly identify the culprit if you’ve been tracking your installations.
- Uninstalling Software:
- Go to Settings > Apps > Apps & features.
- Locate the recently installed application, click on it, and select Uninstall.
- Follow the on-screen prompts and restart your computer.
- Uninstalling Windows Updates:
- Go to Settings > Update & Security > Windows Update.
- Click on View update history, then Uninstall updates.
- Find the most recent update (especially quality or feature updates), right-click it, and select Uninstall.
- Restart your system.
If the BSOD disappears after uninstalling, you’ve found your problem. You might need to seek an alternative application or wait for a more stable version of the update.
Utilizing System Restore or Resetting Windows
When all other software-based solutions fail to fix the
, more drastic measures like System Restore or resetting Windows become necessary. These options allow you to revert your system to a previous stable state or completely reinstall the operating system, effectively wiping out software-related problems. These are considered last resorts for software troubleshooting because they can lead to data loss (especially with a full reset) or undo many recent changes. Always ensure you have a backup of your important files before proceeding.
- Using System Restore:
System Restore reverts system files, installed applications, and registry settings to a previous state without affecting your personal files.
- Search for “Create a restore point” in the Windows search bar and open it.
- In the System Properties window, click on the System Restore… button.
- Click Next and choose a restore point created *before* the BSOD issues began.
- Follow the prompts to complete the restoration. Your computer will restart.
- Resetting Windows:
- Go to Settings > Update & Security > Recovery.
- Under “Reset this PC,” click Get started.
- You will be given two options: “Keep my files” (removes apps and settings but keeps personal files) or “Remove everything” (a clean reinstallation). Choose wisely based on your backup status and the severity of the problem.
- Follow the on-screen instructions. This process can take a significant amount of time.
A full Windows reset is often the most effective way to eliminate persistent software-related BSODs, providing a fresh start for your Lenovo system. For more advanced backup strategies, consider exploring resources like
.
Diagnosing and Resolving Hardware-Related BSODs
If you’ve exhausted all software-based troubleshooting steps and the
persists, the problem likely lies within your hardware. Hardware failures can be more challenging to diagnose and resolve, often requiring specialized tools or even component replacement. However, a systematic approach can help you pinpoint the exact faulty part. It’s crucial to proceed with caution when dealing with internal hardware. Ensure your Lenovo device is powered off and unplugged before opening it or manipulating any components. Static electricity can damage sensitive electronics, so consider using an anti-static wrist strap. This section will guide you through common hardware diagnostic procedures. Remember that some of these steps might require a certain level of comfort with disassembling parts of your computer. If you’re unsure, it’s always better to seek professional assistance.
Testing RAM Modules for Errors
Faulty RAM is a very common cause of the
, often indicated by error codes like "MEMORY_MANAGEMENT" or "IRQL_NOT_LESS_OR_EQUAL." Testing your RAM modules for errors is a crucial diagnostic step. Windows includes a built-in tool for this purpose, but more comprehensive third-party utilities are also available.
- Using Windows Memory Diagnostic:
- Save your work and close all programs.
- Search for “Windows Memory Diagnostic” in the Start menu and open it.
- Select “Restart now and check for problems (recommended).”
- Your computer will restart and run a memory test. This can take several minutes.
- Upon reboot, Windows will display the test results.
- Physical Inspection and Reseating:
- If you have multiple RAM sticks, try running your system with only one stick at a time to isolate a potentially faulty module.
- Ensure all RAM modules are properly seated in their slots. Sometimes, a loose connection can cause issues.
If the diagnostic tool reports errors or if removing a specific RAM stick resolves the BSOD, you’ve likely identified a faulty module that needs replacement.
Checking Storage Drive Health (HDD/SSD)
A failing hard drive or SSD can lead to a
, especially if critical system files reside on corrupted sectors. Errors such as "CRITICAL_PROCESS_DIED" or "UNMOUNTABLE_BOOT_VOLUME" often point to storage issues. Checking the health of your storage drive is therefore essential.
- Using CHKDSK:
- Open Command Prompt as administrator.
- Type
chkdsk /f /rand press Enter. - If prompted to schedule the check on the next restart, type Y and press Enter.
- Restart your computer. CHKDSK will scan and attempt to repair bad sectors on your drive.
- Using S.M.A.R.T. Data:
- Utilize third-party tools like CrystalDiskInfo or Hard Disk Sentinel to read your drive’s S.M.A.R.T. (Self-Monitoring, Analysis and Reporting Technology) data.
- This data provides insights into the drive’s health status, including temperature, error rates, and remaining lifespan.
If CHKDSK finds unrepairable errors or S.M.A.R.T. data indicates a failing drive, consider backing up your data immediately and replacing the drive.
Monitoring System Temperatures and Cooling
Overheating is a common culprit behind a
, as components like the CPU and GPU will throttle performance or shut down to prevent damage. Monitoring your system’s temperatures is crucial, especially if BSODs occur during graphically intensive tasks or after prolonged use.
- Install a Temperature Monitoring Tool:
- Use free software like HWMonitor, Core Temp, or SpeedFan to monitor CPU, GPU, and hard drive temperatures in real-time.
- Observe temperatures during normal use and under load.
- Inspect and Clean Cooling System:
- Power off and unplug your Lenovo device.
- Carefully open the laptop or desktop case.
- Inspect CPU and GPU heatsinks and fans for dust buildup. Use compressed air to clean out dust from fans and vents.
- Ensure fans are spinning freely and quietly.
If temperatures consistently run high, even after cleaning, you might need to reapply thermal paste to the CPU/GPU or consider replacing a failing fan.
Verifying Power Supply Unit (PSU) Functionality
A failing or inadequate Power Supply Unit (PSU) can cause erratic behavior, including the
, by delivering unstable or insufficient power to components. This is more common in desktop systems but can also affect some high-performance laptops with dedicated power bricks.
- Check Connections:
- Ensure all power cables from the PSU are securely connected to the motherboard, graphics card, and storage drives.
- For laptops, ensure the power adapter is the correct wattage and is functioning properly.
- Listen for Unusual Noises:
- A failing PSU might emit unusual buzzing, humming, or clicking sounds.
- Test with a Known Good PSU (Desktops):
- If possible, temporarily swap your PSU with a known working one of adequate wattage. This is the most definitive way to rule out a PSU issue.
Diagnosing a PSU can be tricky without specialized equipment. If you suspect your PSU is failing and cannot test it yourself, professional assistance is recommended.
Analyzing BSOD Dump Files for Specific Errors
When a
occurs, Windows typically creates a "minidump" file. This file contains crucial information about the system state at the time of the crash, including the specific error code, the driver or module that caused the crash, and other technical details. Analyzing these dump files is an advanced yet highly effective way to pinpoint the exact cause of the BSOD. While the blue screen itself provides a stop code, the dump file offers a much deeper insight into the underlying problem. It can tell you precisely which driver file (e.g., nvlddmkm.sys for NVIDIA drivers) or system process was responsible for the crash, significantly narrowing down your troubleshooting efforts. This method empowers you to move beyond generic solutions and target the specific component or software responsible for the instability. It’s a powerful diagnostic technique that can save a lot of time and guesswork.
How to Access and Interpret Minidump Files
Minidump files are small memory dumps that Windows creates in a specific location after a system crash. Knowing where to find them is the first step in their analysis.
- Locate Minidump Files:
- Minidump files are usually located in the
C:WindowsMinidumpfolder. - Each file is named with the date and time of the crash (e.g.,
071223-12345-01.dmp).
- Minidump files are usually located in the
- Understanding the Contents:
- These files are not human-readable directly. They require specialized software to interpret.
- The software will extract information like the Bug Check Code (the stop code), the Bug Check String (the error message), and most importantly, the Caused By Driver or module.
The "Caused By Driver" field is often the most valuable piece of information, as it directly points to the problematic driver or system component.
Using BlueScreenView or WinDbg for Analysis
To interpret minidump files, you’ll need a dump file analyzer. Two popular and effective tools are BlueScreenView and WinDbg.
- BlueScreenView (Easier for Beginners):
- Download and install BlueScreenView from NirSoft (nirsoft.net).
- Launch the application. It will automatically scan your
Minidumpfolder and list all recorded BSODs. - Each row represents a crash. The most important columns are “Bug Check String,” “Bug Check Code,” and “Caused By Driver.”
- BlueScreenView highlights the driver or module that likely caused the crash. You can then research this specific driver to find updates or solutions.
- WinDbg (More Advanced):
- WinDbg is part of the Windows SDK, available from Microsoft (developer.microsoft.com). Install the “Debugging Tools for Windows” component.
- Open WinDbg (x64) as administrator.
- Go to File > Open Crash Dump and navigate to your minidump file.
- Once loaded, type
!analyze -vin the command line at the bottom and press Enter. - WinDbg will perform a detailed analysis, providing extensive information, including the “MODULE_NAME” and “IMAGE_NAME” of the crashing component, which are often the most direct clues.
If a specific driver is consistently listed, updating or reinstalling that driver should be your next step.
Preventing Future Lenovo Blue Screen Incidents
Successfully resolving a
is a significant achievement, but the ultimate goal is to prevent its recurrence. Proactive maintenance and adopting best practices for system management can drastically reduce the chances of encountering another BSOD. Prevention is always better than cure, especially when it comes to system stability. Many BSODs are preventable through regular vigilance and a few simple habits. By establishing a routine of checks and updates, you can ensure your Lenovo system remains robust and reliable, minimizing unexpected interruptions and data loss. This section focuses on establishing good digital hygiene and maintaining optimal system conditions. Implementing these practices will not only help prevent BSODs but also contribute to overall better performance and longevity of your Lenovo device.
Regular Maintenance and Best Practices
Consistent system maintenance is the cornerstone of preventing the
. Just like a car needs regular servicing, your computer benefits from routine checks and cleanups.
- Regular Backups: Implement a robust backup strategy for your important files. Cloud services, external hard drives, or network storage can be used. This ensures that even if a BSOD leads to data loss, your critical information is safe.
- Disk Cleanup and Defragmentation: Periodically run Disk Cleanup to remove temporary files and unnecessary data. For traditional HDDs, defragmentation can improve performance. SSDs do not require defragmentation.
- Antivirus Scans: Schedule regular, full system scans with your antivirus software to catch and eliminate malware before it can cause significant damage.
- Avoid Overloading: Be mindful of the number of applications running simultaneously, especially resource-intensive ones. Close programs you’re not actively using to free up system resources.
- Safe Browsing Habits: Exercise caution when downloading files from unknown sources or clicking on suspicious links. Malware is a frequent cause of system instability.
Keeping Software and Drivers Updated
As previously discussed, outdated or incompatible software and drivers are a leading cause of the
. Making a habit of keeping them current is one of the most effective preventive measures.
- Enable Automatic Windows Updates: Ensure Windows Update is configured to download and install updates automatically. This ensures you receive critical security patches and bug fixes promptly.
- Regular Driver Checks: Periodically visit the official Lenovo support website for your specific model to check for the latest driver releases. Pay particular attention to chipset, graphics, audio, and network drivers.
- Update Applications: Keep your frequently used applications updated. Developers often release patches that fix bugs and improve compatibility, which can prevent conflicts leading to BSODs.
Ensuring Proper System Cooling
Overheating can lead to component damage and trigger the
as a protective measure. Maintaining proper system cooling is vital for hardware longevity and stability.
- Clean Vents and Fans: Regularly clean dust from your laptop’s vents and cooling fans using compressed air. Dust acts as an insulator, trapping heat inside.
- Ensure Good Airflow: For laptops, avoid using them on soft surfaces like beds or laps that can block air vents. Consider using a laptop cooling pad. For desktops, ensure your case has adequate airflow and that cables aren’t obstructing fans.
- Monitor Temperatures: Periodically use temperature monitoring software to ensure your CPU and GPU are operating within safe temperature ranges, especially during heavy workloads.
These simple steps can prevent thermal throttling and unexpected shutdowns, contributing to a more stable computing experience.
When to Seek Professional Assistance
While this guide provides comprehensive steps to address the
, there are situations where seeking professional help becomes the most sensible and cost-effective option. Knowing when to call in the experts can save you time, prevent further damage, and ensure a proper resolution. Attempting complex hardware repairs without the necessary tools or expertise can lead to more severe problems. Similarly, if you’re uncomfortable with any of the advanced troubleshooting steps, a professional can provide peace of mind and efficient service. Consider professional assistance if:
- Persistent Hardware Issues: You’ve identified a likely hardware fault (e.g., failing motherboard, CPU, or complex GPU issue) that requires specialized tools or knowledge to replace.
- Repeated BSODs After All Steps: Despite following all software and hardware troubleshooting steps diligently, the Lenovo blue screen of death continues to occur frequently.
- Lack of Technical Comfort: You are uncomfortable performing internal hardware diagnostics or complex software repairs, such as reinstalling Windows or interpreting dump files.
- Warranty Coverage: Your Lenovo device is still under warranty. Attempting self-repairs might void the warranty, whereas professional service (especially from Lenovo-authorized centers) will maintain it.
- Data Recovery Needs: If the BSOD is preventing access to critical data and you haven’t backed it up, a data recovery specialist might be needed.
A professional technician has the experience, diagnostic tools, and access to genuine parts to accurately diagnose and repair even the most stubborn BSOD issues, restoring your Lenovo system to full functionality.
Conclusion: Restoring Stability to Your Lenovo System
The
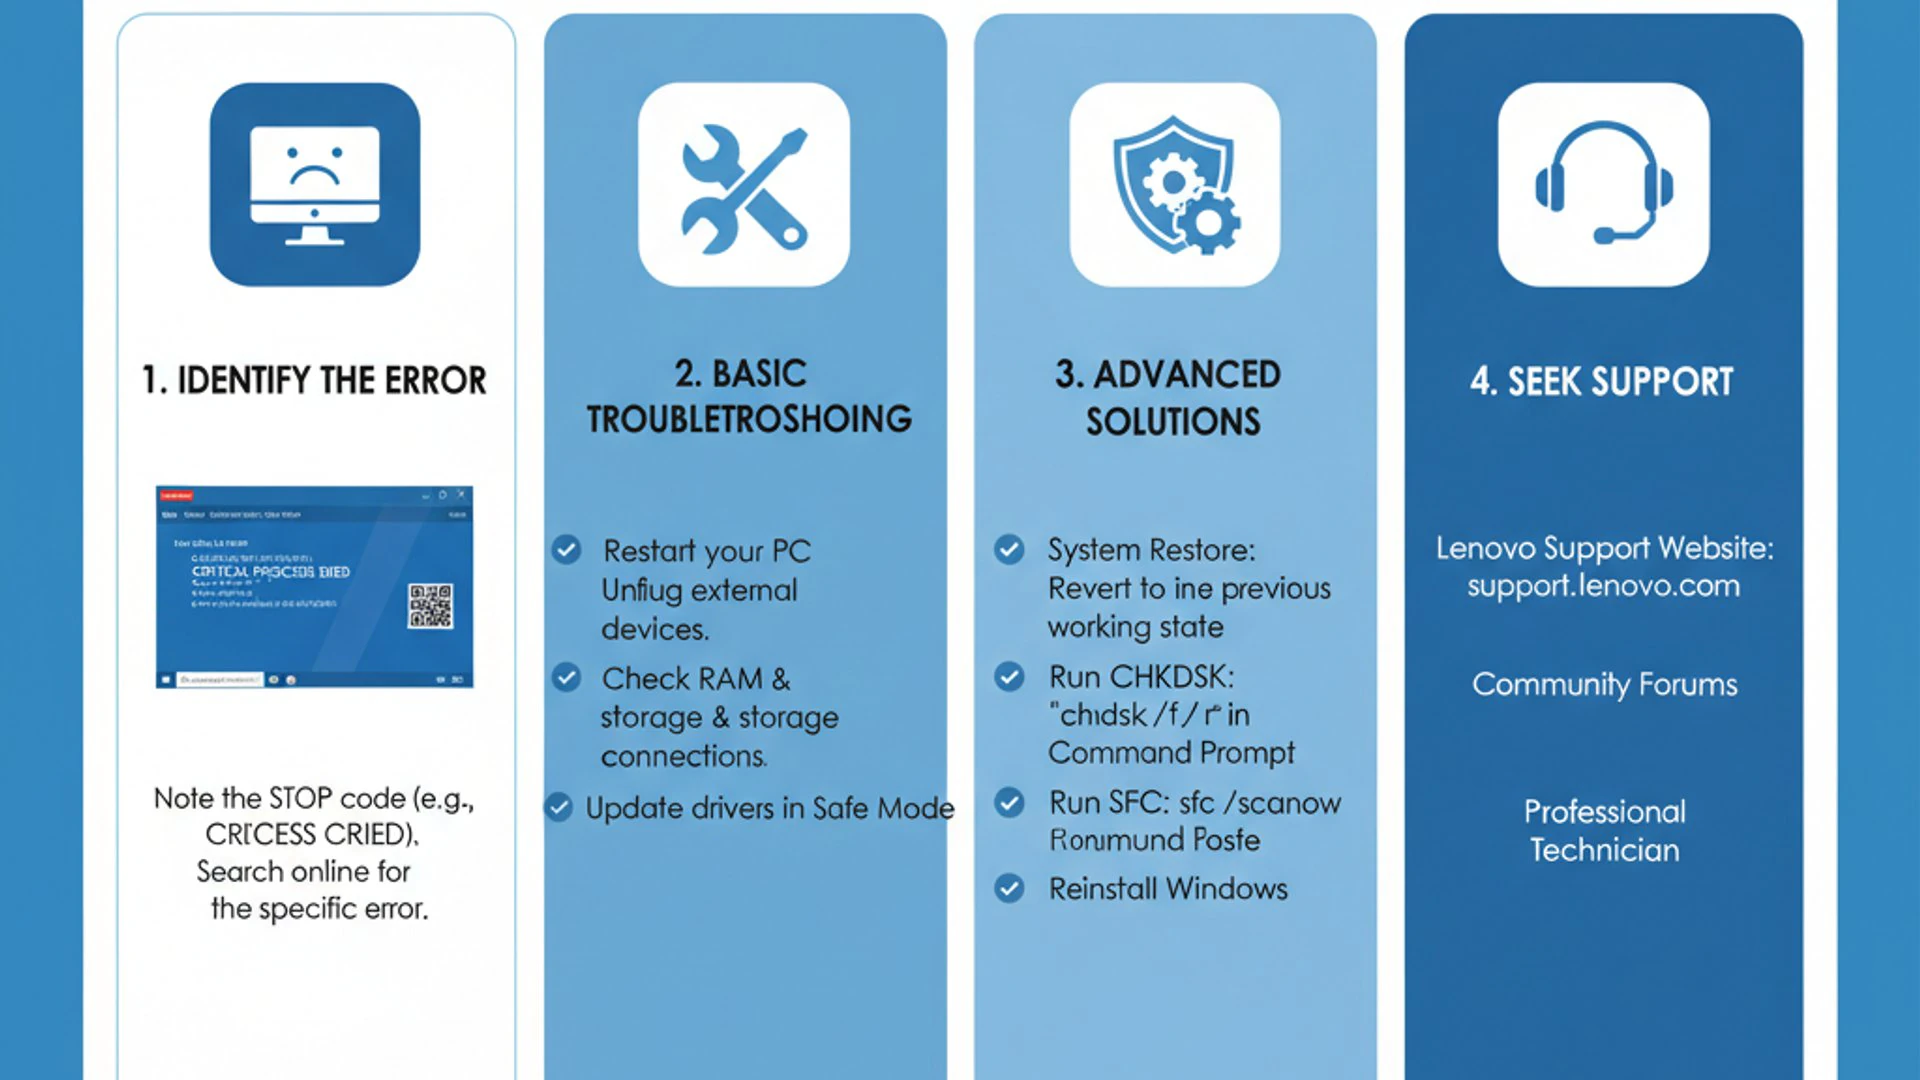
, while a formidable adversary, is not an insurmountable problem. By systematically approaching the issue with the knowledge and tools outlined in this comprehensive guide, you can effectively diagnose, troubleshoot, and ultimately resolve these critical system errors. From understanding the root causes to implementing advanced software and hardware solutions, you now possess a robust framework for tackling system instability. Remember that vigilance and proactive maintenance are your best allies in preventing future BSODs. Regularly updating your drivers and Windows, performing routine system scans, and ensuring proper cooling can significantly enhance your Lenovo system’s reliability and longevity. These habits contribute to a smoother, more productive computing experience, free from the sudden interruptions of a blue screen. Should you find yourself in a situation where self-troubleshooting proves insufficient, don’t hesitate to seek professional assistance. There’s no shame in calling upon experts when faced with complex hardware failures or persistent software conflicts. The ultimate goal is to restore and maintain the stability of your Lenovo system, allowing you to focus on your tasks without the constant worry of an impending crash. By applying the insights from this article, you are now better equipped to understand, manage, and prevent the
, ensuring your device remains a dependable tool rather than a source of frustration. Stay informed, stay vigilant, and enjoy a stable computing environment.
For more interesting articles, stay tuned to Winsides.com!









Community
Comments (0)