

Introduction to Memory Management Blue Screen on Windows 11
Encountering a Blue Screen of Death (BSOD) on your Windows 11 system can be a profoundly frustrating experience, often halting your work or entertainment without warning. Among the various types of BSODs, the "Memory Management" error stands out as particularly critical. This specific error signals a fundamental problem with how your operating system handles its random access memory (RAM), which is essential for every task your computer performs. When Windows 11 displays a
, it indicates that the system has detected an unrecoverable error in its memory operations. This could range from faulty RAM modules to corrupted system files or even driver conflicts. Ignoring this warning can lead to frequent crashes, data corruption, and a severely degraded user experience. Addressing this issue promptly is not just about restoring system stability; it’s also about protecting your valuable data and ensuring the longevity of your hardware. This comprehensive guide will walk you through a systematic approach to diagnose, troubleshoot, and ultimately resolve the dreaded "Memory Management" BSOD on your Windows 11 machine. We will explore various potential causes and provide actionable steps to get your system back on track. By following the detailed instructions and expert advice provided, you’ll gain the knowledge and tools necessary to tackle this complex problem effectively. Our aim is to empower you to restore your Windows 11 system to a reliable and efficient state, free from unexpected interruptions. Let’s dive into understanding and conquering this challenging error.
Table of contents
Key Takeaways to Resolve Memory Management Errors
Dealing with a
can seem daunting, but a structured approach can lead to a successful resolution. Here are the most crucial steps and insights to keep in mind as you troubleshoot:
- Start Simple: Always begin with basic steps like restarting your PC and ensuring Windows is fully updated, as these can often resolve transient issues.
- Diagnose RAM: Utilize the built-in Windows Memory Diagnostic Tool to thoroughly check your RAM for hardware faults. This is often the primary culprit.
- Verify System Files: Run SFC and DISM commands to repair any corrupted system files that might be interfering with memory management.
- Update/Roll Back Drivers: Outdated or faulty device drivers are a common cause; ensure all drivers, especially chipset and graphics, are current or revert to stable versions.
- Optimize Virtual Memory: Adjusting your paging file size can sometimes alleviate memory pressure and prevent crashes, particularly on systems with less physical RAM.
- Check for Malware: Malicious software can corrupt system processes, so a comprehensive scan using Windows Security is a vital step.
- Hardware Check: Physically reseat your RAM modules and test them individually to pinpoint a defective stick if software diagnostics fail.
Understanding the ‘Memory Management’ Blue Screen Error
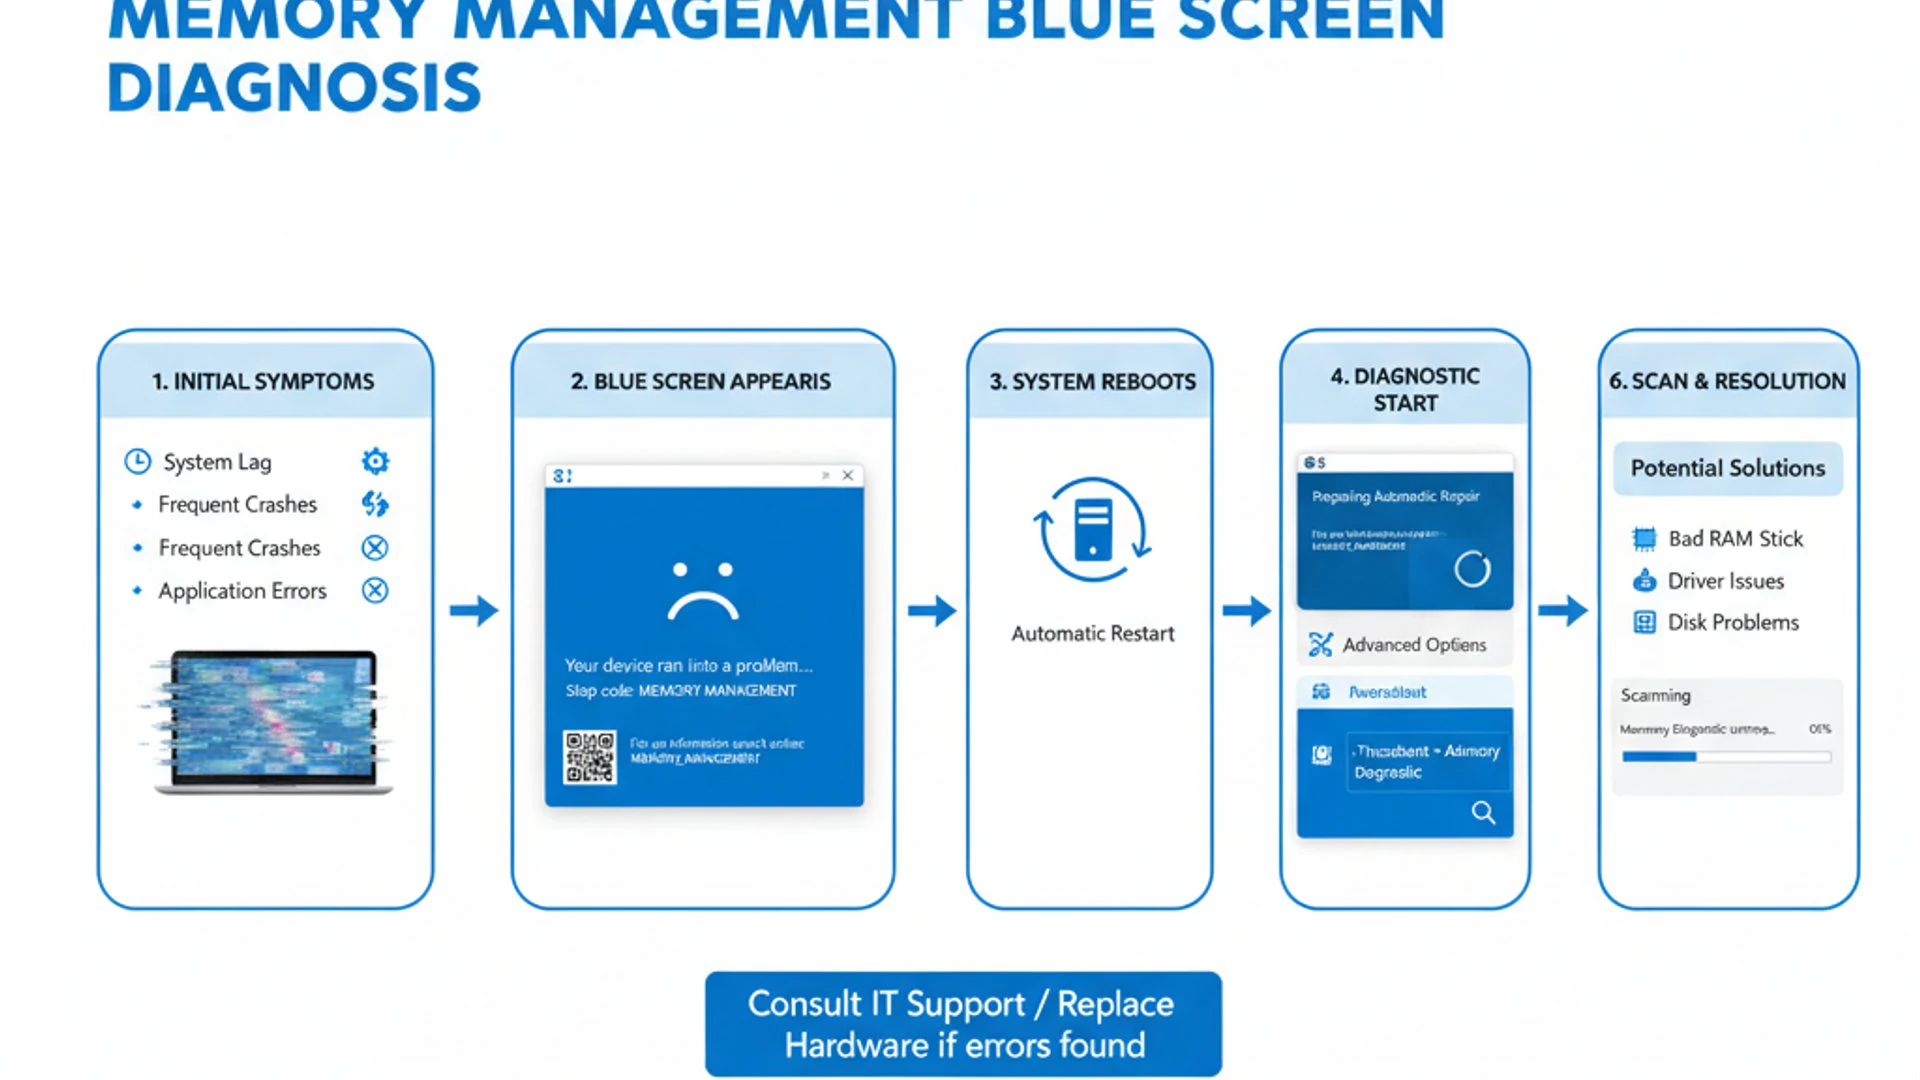
The "Memory Management" Blue Screen of Death (BSOD) is a critical error that indicates a fundamental problem with how your Windows 11 operating system handles its memory. When this error appears, your system is forced to shut down abruptly to prevent potential data corruption or further damage. It’s a clear signal that something is amiss in the core operations of your computer. This error message, often accompanied by the stop code 0x0000001A, points directly to issues related to Random Access Memory (RAM). The memory manager is a crucial component of the operating system responsible for allocating and deallocating memory to various processes and applications. When this intricate system encounters a severe flaw, the entire operation grinds to a halt.
What Causes This Specific BSOD?
Several factors can trigger a
. Identifying the root cause is the first step toward a lasting solution. Understanding these potential culprits helps in systematic troubleshooting. One of the most common causes is
. Physical defects in your RAM sticks can lead to incorrect data storage or retrieval, causing the memory manager to fail. Even a single bad sector on a RAM module can destabilize the entire system. Another frequent culprit is
. Drivers are software components that allow your operating system to communicate with hardware devices. An outdated, incompatible, or corrupted driver, especially for critical components like the chipset or graphics card, can lead to memory allocation errors. System file corruption is also a significant factor. Essential Windows system files can become damaged due to improper shutdowns, disk errors, or malware infections. When these files, particularly those related to memory management, are compromised, the system becomes unstable. Less common but still possible causes include disk errors on your storage drive, which can affect the paging file (virtual memory), or even BIOS/UEFI settings that are incorrectly configured. Overclocking your CPU or RAM beyond stable limits can also induce memory management issues.
Common Symptoms and Impact on Your System
Beyond the obvious BSOD, a "Memory Management" error often presents with a range of other symptoms that can severely impact your system’s usability and performance. Recognizing these signs can help you diagnose the problem even before the blue screen appears. One of the most noticeable symptoms is
. Your computer might freeze unexpectedly, applications might close without warning, or the entire system might restart randomly. These crashes can occur during various activities, from browsing the web to playing demanding games. You might also experience significant
. Your Windows 11 system could become sluggish, applications might take longer to load, and multitasking could become nearly impossible. This happens because the memory manager struggles to efficiently allocate resources, leading to bottlenecks. Data loss is another serious consequence. If a memory error occurs while you are working on a document or saving a file, the data being processed in RAM might become corrupted or lost entirely. This can be particularly devastating for important projects or creative work. Finally, you may observe unusual behavior from applications, such as graphical glitches, strange error messages, or programs failing to launch. These are often indirect indicators that the underlying memory infrastructure is unstable. Addressing these symptoms early is crucial for maintaining system integrity and data safety.
Initial Troubleshooting Steps Before Deeper Diagnostics
Before diving into complex diagnostics, it’s always wise to start with a few simple yet effective troubleshooting steps. These initial actions can often resolve transient issues or quickly rule out common, easily fixable problems that might be causing the
. They serve as a quick first response to system instability. These steps require minimal technical expertise and can save you a lot of time and effort if the problem isn’t deeply rooted. Always begin here to ensure you’re not overlooking an obvious solution. A systematic approach helps narrow down the potential causes efficiently.
Restarting Your System and Checking for Updates
The classic "turn it off and on again" advice holds surprising power, even for complex issues like a memory management error. A simple restart can clear temporary glitches, reset memory states, and resolve minor software conflicts that might be triggering the BSOD. It’s the simplest first step. After restarting, the next crucial action is to ensure your Windows 11 operating system is completely up to date. Microsoft frequently releases updates that include bug fixes, security patches, and performance improvements, which can often address underlying issues causing memory errors. To check for updates:
- Press
Windows key + Ito open Settings. - Navigate to Windows Update in the left-hand pane.
- Click on Check for updates.
- If updates are available, download and install them, then restart your computer as prompted.
and can prevent many common errors, including the memory manager blue screen. Regularly checking for and installing updates ensures you have the latest fixes and enhancements.
Disconnecting External Peripherals
Sometimes, external hardware devices can interfere with system operations, leading to unexpected errors, including memory management issues. An incompatible or faulty peripheral might be drawing too much power, causing driver conflicts, or simply sending erroneous signals that destabilize the system. To rule out external hardware as a cause, disconnect all non-essential peripherals from your computer. This includes USB drives, external hard drives, printers, webcams, and any other devices not crucial for basic operation. Keep only your keyboard, mouse, and monitor connected. After disconnecting the peripherals, restart your computer. If the
does not reappear, try connecting your devices one by one, restarting after each connection, to identify the problematic peripheral. This isolation technique is effective for pinpointing hardware conflicts.
“Eliminating external variables is a critical first step in troubleshooting any complex computer issue. It helps to isolate the problem to either internal components or software.”
This methodical approach helps determine if a specific external device or its driver is the root cause of the memory management error. If the BSOD only occurs when a particular peripheral is connected, you’ll know where to focus your efforts.
Diagnosing RAM Issues with Windows Memory Diagnostic Tool
When faced with a
, one of the most probable culprits is faulty Random Access Memory (RAM). Fortunately, Windows 11 includes a built-in utility specifically designed to test your RAM for errors: the
. This tool is invaluable for identifying hardware-level memory problems without needing third-party software. Running this diagnostic can provide crucial insights into the health of your RAM modules. It performs a series of tests to detect inconsistencies and errors in how your memory stores and retrieves data. If errors are found, it strongly suggests that one or more of your RAM sticks are defective and may need replacement.
How to Run the Tool and Interpret Results
Running the Windows Memory Diagnostic Tool is straightforward and requires a system restart. It’s a preemptive measure that runs before Windows fully loads, ensuring a thorough test environment.
Running the Test in Standard Mode
To initiate a standard memory diagnostic test:
- Press
Windows key + Rto open the Run dialog. - Type
mdsched.exeand pressEnter. - A dialog box will appear with two options. Select “Restart now and check for problems (recommended)”.
Your computer will restart, and the diagnostic tool will automatically begin its standard test. This process can take several minutes to an hour, depending on the amount of RAM installed. It’s crucial to let the test complete without interruption. Once the test is finished, your computer will restart again and boot back into Windows 11. The results of the diagnostic will usually appear automatically in a notification bubble in the system tray. If you miss it, you can find the results in the
. To view results in Event Viewer:
- Press
Windows key + Xand select Event Viewer. - Navigate to Windows Logs > System.
- In the right-hand pane, click Find… and search for “MemoryDiagnostic”.
- Look for events with “MemoryDiagnostic” as the source. Events indicating “No memory errors were detected” mean your RAM passed the test. If errors are reported, it will specify the nature of the issue.
, suggesting that physical replacement might be necessary.
Advanced Options and Multiple Passes
While the standard test is often sufficient, the Windows Memory Diagnostic Tool also offers advanced options for a more rigorous examination. These options can be accessed during the initial scan. When the tool starts after restarting, you’ll see a blue screen interface. Press the
key to access the advanced options. Here, you can configure:
- Test Mix: Choose between Basic, Standard, and Extended. Extended performs the most comprehensive set of tests but takes significantly longer.
- Cache: You can enable or disable the cache. Disabling it forces the tool to test the RAM directly, which can sometimes reveal errors missed with caching enabled.
- Pass Count: This determines how many times the entire set of tests will be run. Running multiple passes (e.g., 2-3) increases the likelihood of detecting intermittent errors.
For persistent
issues where the standard test shows no errors, running the Extended test with multiple passes and the cache disabled is highly recommended. While it will take much longer, it provides a more thorough analysis of your RAM’s integrity. If the advanced tests reveal errors, it’s almost certain that your RAM is physically defective. At this point, consider moving to the hardware-level solutions discussed later, such as reseating or replacing your RAM modules.
Checking and Repairing Corrupted System Files
Corrupted system files are a common underlying cause for various Windows errors, including the dreaded
. These critical files can become damaged due to improper shutdowns, disk errors, malware infections, or even failed updates. When essential system files related to memory management are compromised, Windows 11 can become unstable, leading to BSODs. Fortunately, Windows 11 provides powerful built-in tools to scan for and repair these corrupted files. The System File Checker (SFC) and Deployment Image Servicing and Management (DISM) tools are your primary weapons in this battle for system integrity. Using them systematically can often resolve memory management errors that aren’t hardware-related.
Utilizing SFC (System File Checker)
The System File Checker (SFC) is a command-line utility that scans for and restores corrupted Windows system files. It compares your current system files with the known good versions stored in your Windows installation repository. If it finds any discrepancies, it attempts to replace the corrupted files with their correct counterparts. To run the SFC scan:
- Press
Windows key + Sto open the search bar. - Type
cmd, right-click on Command Prompt, and select “Run as administrator”. - In the Command Prompt window, type
sfc /scannowand pressEnter.
The scan will begin and can take a considerable amount of time, sometimes up to an hour or more, depending on your system’s speed and the extent of corruption. It’s crucial not to close the Command Prompt window until the scan is 100% complete. Once the scan finishes, you’ll receive one of several messages:
- “Windows Resource Protection did not find any integrity violations.” (No issues found)
- “Windows Resource Protection found corrupt files and successfully repaired them.” (Issues found and fixed)
- “Windows Resource Protection found corrupt files but was unable to fix some of them.” (Issues found, some not fixed)
- “Windows Resource Protection could not perform the requested operation.” (Indicates a deeper problem, often requiring DISM first)
If SFC successfully repaired files, restart your computer and observe if the
recurs. If it reports unfixable files, you’ll need to proceed to the DISM tool.
Deploying DISM (Deployment Image Servicing and Management)
The Deployment Image Servicing and Management (DISM) tool is a more powerful utility than SFC. While SFC focuses on repairing system files against a local cache, DISM works by repairing the Windows system image itself, which SFC uses as its source. If SFC fails to repair files, it often means the source image it’s using is also corrupted, and DISM can fix that. To run DISM commands:
- Open Command Prompt as administrator, just as you did for SFC.
- First, run a check health command:
DISM /Online /Cleanup-Image /CheckHealth. This quickly checks for corruption. - Next, run a scan health command:
DISM /Online /Cleanup-Image /ScanHealth. This performs a more advanced scan to detect any component store corruption. - Finally, run the restore health command:
DISM /Online /Cleanup-Image /RestoreHealth. This command attempts to repair the detected issues using Windows Update as a source for healthy files. Ensure you have an active internet connection for this step.
Each DISM command can take a significant amount of time to complete, sometimes appearing to be stuck at a certain percentage. Be patient and let each process finish entirely. After running the DISM commands, especially the
option, it’s highly recommended to run the
command again. This ensures that any system files that SFC previously couldn’t repair, due to a corrupted source, can now be fixed using the newly repaired Windows image.
“The combination of DISM and SFC is a potent one for resolving system file integrity issues. Always run DISM first if SFC reports unfixable files.”
Once both tools have completed their tasks and reported successful repairs, restart your Windows 11 system. This comprehensive approach to system file integrity can often eliminate the underlying cause of a persistent
.
Updating or Rolling Back Device Drivers
Device drivers are the essential software components that allow your operating system to communicate with your hardware. When these drivers become outdated, corrupted, or incompatible, they can cause a myriad of system issues, including the notorious
. Faulty drivers can lead to incorrect memory allocation or access violations, triggering the BSOD. Therefore, managing your device drivers effectively is a critical step in troubleshooting memory management errors. This involves identifying any problematic drivers and then either updating them to their latest stable version or rolling them back to a previous, known-good version. This process helps ensure that your hardware and software are communicating harmoniously.
Identifying Problematic Drivers
Pinpointing a specific problematic driver can sometimes be challenging, but Windows provides tools to help. The Event Viewer and Device Manager are your best friends here. The
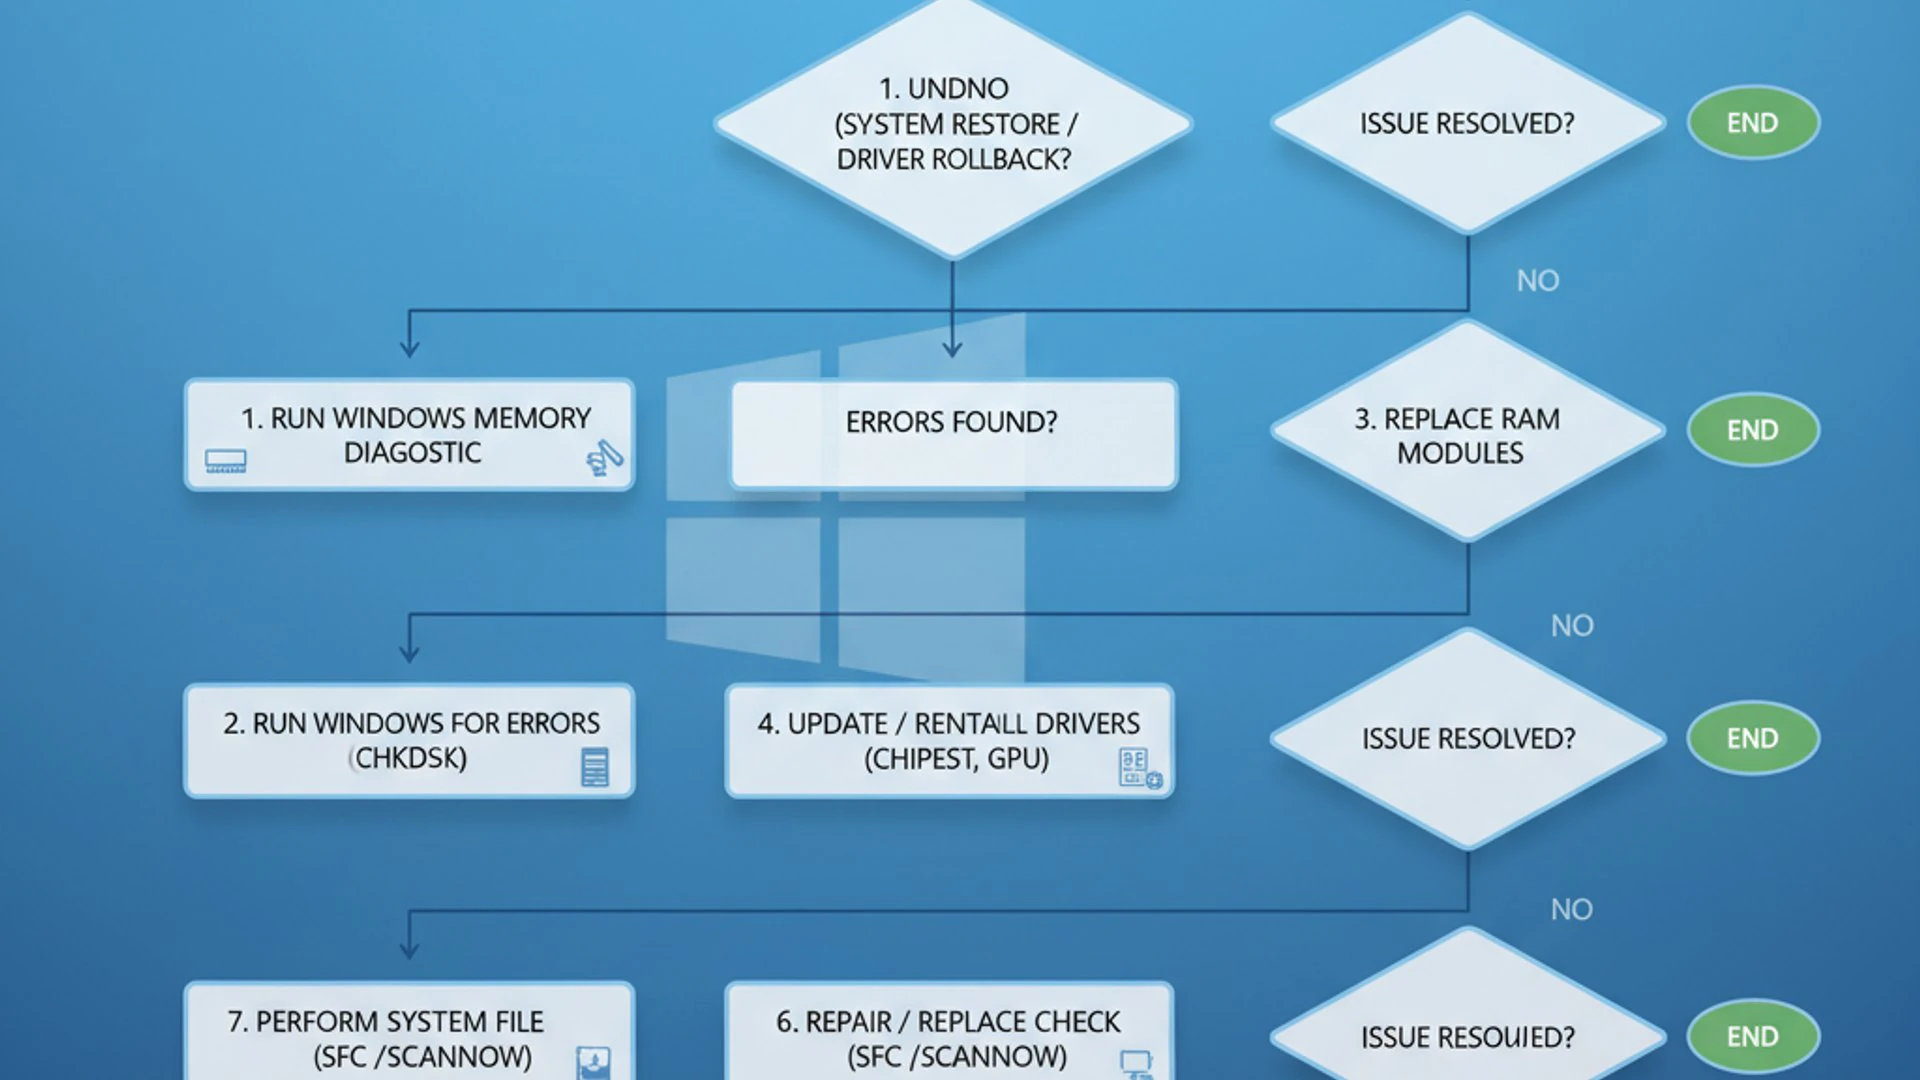
(accessible via
) can often log critical errors that occurred just before a BSOD. Navigate to
and look for "Error" or "Critical" events around the timestamp of your last crash. These entries might explicitly name a driver or a hardware component that failed. Another approach is to consider recent changes. Did you install any new hardware or software just before the BSODs started? If so, the drivers associated with that new installation are prime suspects.
Updating Drivers via Device Manager
Once you have a suspect driver or if you simply want to ensure all critical drivers are up-to-date, the Device Manager is the place to go. Focus particularly on drivers for your chipset, graphics card, network adapter, and any storage controllers. To update drivers:
- Press
Windows key + Xand select Device Manager. - Expand the categories (e.g., “Display adapters,” “System devices”).
- Right-click on the device you want to update and select “Update driver”.
- Choose “Search automatically for drivers”. Windows will attempt to find the latest driver online.
If Windows doesn’t find a newer driver, it’s often best to visit the manufacturer’s website (e.g., NVIDIA, AMD, Intel, or your motherboard manufacturer) directly. Download the latest drivers specifically designed for your hardware and Windows 11, then install them manually.
to avoid malware or incompatible versions. After updating any drivers, restart your system to ensure the changes take effect and to check if the
has been resolved.
Rolling Back Driver Versions
Sometimes, a newly installed driver, even if it’s the "latest" version, can introduce instability. This is especially true if the driver is buggy or incompatible with other system components. In such cases, rolling back to a previous, stable driver version can be the solution. To roll back a driver:
- Open Device Manager.
- Locate the problematic device, right-click on it, and select “Properties”.
- Go to the “Driver” tab.
- If available, click the “Roll Back Driver” button.
- Provide a reason for rolling back and confirm.
The "Roll Back Driver" option will only be available if a previous driver version is stored on your system. If it’s grayed out, you might need to uninstall the current driver and then install an older version manually from the manufacturer’s website. After rolling back a driver, restart your computer. Observe if the system stability improves and if the
ceases to appear. This step is particularly effective if the BSOD started occurring shortly after a driver update.
“Driver management is a delicate balance; sometimes the newest isn’t the best. Knowing when to update and when to roll back is key to system stability.”
Regularly checking for driver updates and being prepared to roll them back if issues arise is a proactive approach to preventing many system errors.
Adjusting Virtual Memory (Paging File) Settings
Virtual memory, often referred to as the paging file, is a crucial component of how Windows 11 manages its memory resources. When your physical RAM becomes full, Windows uses a portion of your hard drive as virtual memory to temporarily store data that doesn’t fit into RAM. While not as fast as physical RAM, it helps prevent system crashes due to memory exhaustion. An improperly configured or insufficient paging file can contribute to a
. If the system constantly struggles to swap data between RAM and the paging file, or if the paging file itself is too small, it can lead to memory allocation errors and instability. Optimizing these settings can sometimes alleviate memory pressure and improve overall system stability.
Optimizing Paging File Size for Stability
Windows 11 typically manages the paging file size automatically, which works well for most users. However, in cases of persistent memory management errors, manually adjusting these settings can be beneficial. The goal is to ensure there’s enough virtual memory to supplement your physical RAM without being excessively large, which can consume valuable disk space. To adjust virtual memory settings:
- Press
Windows key + S, typeperformance, and select “Adjust the appearance and performance of Windows”. - In the Performance Options window, go to the “Advanced” tab.
- Under “Virtual memory,” click “Change…”.
- Uncheck “Automatically manage paging file size for all drives”.
- Select the drive where Windows is installed (usually C:).
- Choose “Custom size”.
For the "Initial size (MB)" and "Maximum size (MB)," a common recommendation is to set the initial size to 1.5 times your total physical RAM and the maximum size to 3 times your total physical RAM. For example, if you have 8GB (8192 MB) of RAM:
- Initial size: 8192 * 1.5 = 12288 MB
- Maximum size: 8192 * 3 = 24576 MB
However, if you have a very large amount of RAM (e.g., 32GB or more), you might not need such a large paging file. In such cases, setting it to a fixed size of 4GB (4096 MB) for both initial and maximum can be sufficient. The key is to avoid letting Windows dynamically resize it too frequently, which can fragment the disk and cause performance hiccups. After setting the custom size, click
, then
on all open windows, and restart your computer for the changes to take effect.
“While increasing virtual memory can help with memory pressure, it’s not a substitute for adequate physical RAM. If you frequently hit memory limits, consider upgrading your RAM.”
Adjusting the paging file size can provide a temporary reprieve or even a permanent fix if your
was primarily due to virtual memory exhaustion or inefficient management. Monitor your system’s behavior after making these changes to assess the impact.
Scanning for Malware and Viruses
Malicious software, commonly known as malware or viruses, can wreak havoc on a computer system in numerous ways, and causing a
is certainly one of them. Malware can corrupt system files, interfere with legitimate processes, consume excessive memory, or even directly attack the memory management routines of the operating system. These actions can lead to instability, crashes, and the dreaded BSOD. Therefore, a thorough scan for malware and viruses is an essential troubleshooting step when facing persistent memory management errors. Even if you have an antivirus program installed, it’s crucial to perform a deep scan, as some sophisticated threats can evade real-time protection.
Performing a Full System Scan with Windows Security
Windows 11 comes with a robust built-in security suite called
(formerly Windows Defender). This tool is highly capable of detecting and removing a wide range of threats. Performing a full system scan with Windows Security should be your first line of defense. To perform a full system scan:
- Press
Windows key + S, typeWindows Security, and open the application. - Click on “Virus & threat protection”.
- Under “Virus & threat protection settings,” click “Manage settings” to ensure real-time protection is enabled.
- Go back to the “Virus & threat protection” screen, and under “Current threats,” click “Scan options”.
- Select “Full scan” and then click “Scan now”.
A full scan can take several hours to complete, depending on the size of your hard drive and the number of files. It’s important to let the scan run to completion without interruption. If any threats are detected, follow the prompts to quarantine or remove them. After the scan is complete and any threats have been dealt with, restart your computer. Observe if the
continues to appear. If it does, consider running a scan with a reputable third-party antivirus program as a second opinion, as different engines may catch different threats.
“Even with real-time protection, periodic full system scans are crucial. Malware can sometimes slip through, and a deep dive is needed to uncover hidden threats.”
Keeping your antivirus definitions up-to-date and regularly scanning your system are fundamental practices for maintaining a healthy and stable Windows 11 environment, free from malware-induced memory issues.
Testing and Replacing Faulty RAM Modules
When all software-based troubleshooting steps, including driver updates, system file repairs, and malware scans, fail to resolve the
, the problem often points directly to a hardware issue with your Random Access Memory (RAM). Faulty RAM modules are a leading cause of this specific BSOD, as they directly impact how your system stores and retrieves data. At this stage, physical inspection and systematic testing of your RAM modules become essential. This involves opening your computer case, which might seem daunting to some, but it’s a critical step in isolating and replacing a defective memory stick. Always ensure your computer is powered off and unplugged before performing any internal hardware manipulation.
Physical Inspection and Reseating RAM
Before assuming a RAM module is completely faulty, a simple physical action can sometimes resolve intermittent contact issues: reseating the RAM. Dust, vibrations, or slight shifts can cause a RAM stick to lose proper contact with its slot on the motherboard. To physically inspect and reseat your RAM:
- Power down and unplug: Shut down your computer completely and disconnect it from the power outlet. For laptops, remove the battery if possible.
- Open the case: Remove the side panel of your desktop PC or the back cover of your laptop to access the motherboard and RAM slots.
- Locate RAM modules: RAM sticks are typically long, thin circuit boards inserted into slots on the motherboard.
- Release and remove: Gently push down on the small clips at both ends of the RAM slot. The RAM module should pop up slightly, allowing you to carefully pull it straight out.
- Inspect: Check the RAM stick and its slot for any visible dust, debris, or damage. Use compressed air to clean the slots if necessary.
- Reseat: Align the RAM module with the slot, ensuring the notch on the stick matches the key in the slot. Press down firmly and evenly on both ends until the clips snap back into place, securing the RAM.
If you have multiple RAM sticks, reseat all of them. After reseating, reassemble your computer and power it on. Observe if the
persists. This simple step often fixes issues caused by poor contact.
Single Module Testing for Isolation
If reseating doesn’t work, and the Windows Memory Diagnostic Tool indicated errors, you’ll need to identify which specific RAM module is faulty. This is done by testing each module individually. To perform single module testing:
- Power down and unplug your computer again.
- Remove all but one RAM module from your system. If you have two sticks, leave only one in its primary slot.
- Power on your computer.
- Run the Windows Memory Diagnostic Tool (as described in a previous section) with only that single RAM module installed. Perform an Extended test with multiple passes for thoroughness.
- Note the results. If the test passes, that module is likely good. If it reports errors, that module is faulty.
- Repeat the process for each remaining RAM module, one at a time, until you identify the defective one(s).
If all individual modules pass the test, but the error reappears when they are all installed, it could indicate an issue with a specific RAM slot on your motherboard, or an incompatibility when multiple modules are used together. Try different slot combinations.
“Isolating a faulty RAM module through individual testing is the most reliable method to pinpoint hardware memory issues.”
Once you’ve identified the faulty RAM module(s), the solution is to replace them with new, compatible RAM. Ensure the new RAM matches the specifications (DDR generation, speed, and capacity) of your existing working modules or is fully compatible with your motherboard. Replacing defective RAM is often the definitive fix for a persistent
.
Performing a System Restore or Reinstalling Windows 11
When all other troubleshooting methods fail to resolve the persistent
, you might need to consider more drastic measures. These include performing a system restore to revert your system to a previous stable state or, as a last resort, a clean reinstallation of Windows 11. These options are powerful but should be approached with caution, as they can lead to data loss if not handled properly. It’s crucial to back up all your important data before attempting either of these steps. While System Restore aims to preserve personal files, a clean installation will wipe your drive entirely. Always prioritize data safety above all else.
is a highly recommended preparatory step.
Using System Restore Points
System Restore is a Windows feature that allows you to revert your computer’s system files, installed applications, Windows Registry, and system settings to an earlier point in time, known as a restore point. This can be incredibly useful if the memory management error started after a recent software installation, driver update, or system change. To use System Restore:
- Press
Windows key + S, typecreate a restore point, and select “Create a restore point” from the search results. - In the System Properties window, go to the “System Protection” tab.
- Click on “System Restore…”.
- Click “Next”.
- You’ll see a list of available restore points. Choose a restore point from before the time you started experiencing the memory manager blue screen on Windows 11. If you don’t see enough options, check the box for “Show more restore points.”
- Click “Next”, then “Finish” to confirm.
Your computer will restart and begin the restoration process. This can take some time, and it’s important not to interrupt it. Once complete, your system will boot back up, and you’ll receive a notification about the success or failure of the restore.
(documents, pictures, videos, etc.), but it will uninstall any programs or drivers installed after the chosen restore point. Check if the memory management error is resolved after the restore.
Clean Installation of Windows 11 as a Last Resort
If System Restore fails, or if the
persists, a clean installation of Windows 11 becomes the most viable, albeit drastic, solution. This process completely erases everything on your primary drive and installs a fresh copy of the operating system. It eliminates all software conflicts, corrupted files, and lingering malware that might be causing the issue. Before proceeding with a clean installation:
- Back up all critical data: This is non-negotiable. Copy all personal files to an external hard drive, cloud storage, or another computer.
- Gather product keys: Make sure you have product keys for Windows and any essential software you’ll need to reinstall.
- Prepare installation media: You’ll need a USB flash drive (at least 8GB) with the Windows 11 installation media created using Microsoft’s Media Creation Tool.
To perform a clean installation:
- Insert your Windows 11 installation USB drive and boot your computer from it (you may need to change the boot order in your BIOS/UEFI settings).
- Follow the on-screen prompts to choose your language, time, and keyboard preferences.
- Click “Install now”.
- Enter your product key or select “I don’t have a product key” if you’re reactivating a previously activated Windows 11.
- Choose “Custom: Install Windows only (advanced)”.
- Select the primary partition where Windows is currently installed (usually “Drive 0 Partition X”) and click “Delete”. Delete all partitions associated with the Windows installation.
- Select the unallocated space and click “Next” to install Windows 11.
The installation process will take some time, and your computer will restart several times. Once complete, you’ll have a fresh, stable Windows 11 system. You will then need to reinstall your applications and restore your backed-up data. While a clean install is time-consuming, it is the most effective way to eliminate software-related causes of the
.
Preventing Future Memory Management Errors
Resolving a
is a significant achievement, but proactive measures are equally important to prevent its recurrence. A stable system is not just about fixing problems when they arise, but also about maintaining its health and integrity over time. By adopting good habits and performing regular maintenance, you can significantly reduce the risk of encountering memory management errors in the future. Prevention is always better than cure, especially when dealing with critical system errors. Implementing a routine of checks and updates will ensure your Windows 11 environment remains robust and reliable, allowing you to focus on your tasks without interruption.
Regular System Maintenance Tips
Consistent system maintenance is key to preventing a wide array of Windows issues, including memory management problems. Here are actionable tips to keep your system in top shape:
- Keep Windows Updated: Regularly check for and install Windows Updates. These updates often include critical bug fixes, security patches, and performance enhancements that can prevent system instability.
- Update Drivers Regularly: Ensure all your device drivers, especially for your chipset, graphics card, and storage controllers, are always up to date. Visit the manufacturers’ websites periodically for the latest versions.
- Monitor RAM Health: Consider running the Windows Memory Diagnostic Tool periodically, perhaps once every few months, especially if you notice any subtle performance dips or unusual behavior.
- Maintain Clean Storage: Regularly clean up temporary files, old downloads, and unnecessary applications. Use Windows’ built-in Disk Cleanup tool or Storage Sense to free up space. A cluttered drive can impact virtual memory performance.
- Scan for Malware: Perform full system scans with Windows Security or your preferred antivirus software on a regular basis. Keep your antivirus definitions updated to detect the latest threats.
- Check Disk Health: Periodically run the
chkdskcommand to check your hard drive for errors. Open Command Prompt as administrator and typechkdsk /f /r, then restart your PC. - Monitor System Temperatures: Overheating components can lead to instability. Ensure your computer’s cooling system is working efficiently. Clean dust from fans and vents regularly.
- Practice Safe Browsing: Be cautious about clicking suspicious links, downloading files from untrusted sources, or installing unknown software. These are common vectors for malware that can corrupt system files.
- Avoid Overclocking: If you’ve overclocked your CPU or RAM, ensure it’s stable. Unstable overclocks can lead to memory errors and system crashes. Consider reverting to default settings if issues persist.
- Create Restore Points: Make it a habit to create a system restore point before installing new software, drivers, or making significant system changes. This provides a quick rollback option if something goes wrong.
“Proactive maintenance is the best defense against system errors. A few minutes invested regularly can save hours of troubleshooting later.”
By diligently following these maintenance tips, you create a robust and resilient computing environment. This systematic approach not only helps prevent the
but also contributes to a smoother, more efficient, and more enjoyable overall Windows 11 experience.
Conclusion: Restoring Stability to Your Windows 11 System
Encountering a
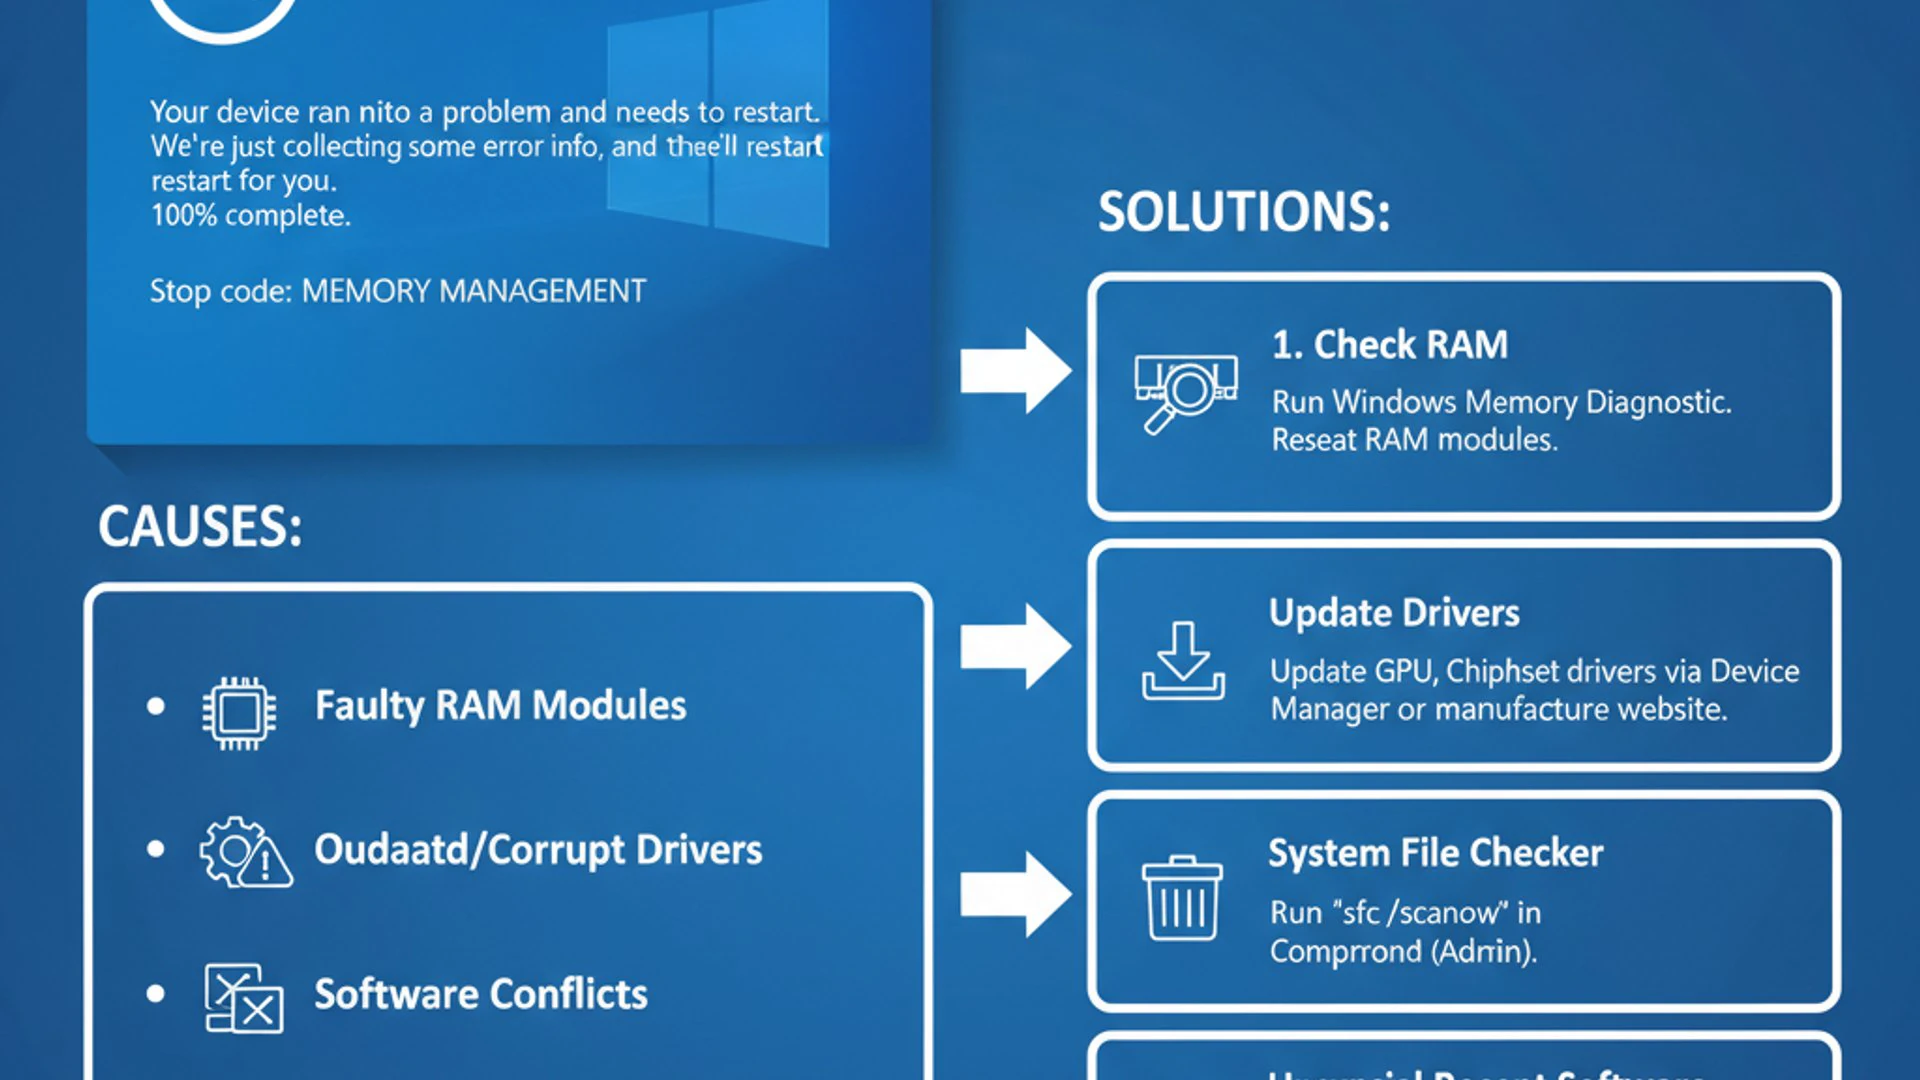
can be a deeply unsettling experience, often signaling a critical issue that demands immediate attention. This comprehensive guide has provided a structured, step-by-step approach to diagnosing and resolving this disruptive error, from initial checks to advanced hardware diagnostics and system recovery options. We’ve explored how understanding the potential causes—whether faulty RAM, corrupted drivers, or system file integrity issues—is the first step toward a lasting solution. The systematic application of tools like the Windows Memory Diagnostic, SFC, and DISM, combined with careful driver management, forms the backbone of effective troubleshooting. Remember that patience and methodical testing are your greatest assets throughout this process. Ultimately, the goal is to restore your Windows 11 system to a state of reliable stability, free from unexpected crashes and performance bottlenecks. By following the actionable advice provided, you empower yourself to tackle even complex technical challenges. Moreover, adopting proactive maintenance habits, such as regular updates, driver management, and malware scans, is crucial for preventing future occurrences and ensuring the long-term health of your PC. A stable and efficiently running Windows 11 system is fundamental to productivity and an enjoyable computing experience. By taking control of these issues, you not only fix a problem but also gain a deeper understanding of your system’s inner workings, making you a more confident and capable user.
For more interesting articles, stay tuned to Winsides.com!









Community
Comments (0)