

Introduction to WHEA Logger Event 17 on Windows 11
Encountering a system error can be a frustrating experience, especially when it points to underlying hardware issues. Among the many cryptic messages Windows 11 might present, the WHEA Logger Event 17 stands out as a critical indicator. This event signals that your system has detected an uncorrectable hardware error, a problem that the operating system cannot simply fix or ignore. For additional context, see WHEA Architecture, Troubleshoot Event ID 17 WHEA Logger, MemTest86, HWInfo, and SFC command.
Such errors are not merely inconveniences; they are often precursors to significant system instability. They can manifest as sudden crashes, freezes, performance degradation, or even data corruption, severely impacting your productivity and overall computing experience. Understanding and addressing WHEA Logger Event 17 on Windows 11 is paramount for maintaining a healthy and reliable machine.
This comprehensive guide will demystify WHEA Logger Event 17, exploring its causes, symptoms, and, most importantly, providing actionable steps to diagnose and resolve it. We’ll delve into the intricate mechanisms of Windows hardware error reporting and equip you with the knowledge to tackle this challenging issue head-on, ensuring your Windows 11 system remains stable and responsive.
Understanding the Windows Hardware Error Architecture (WHEA)
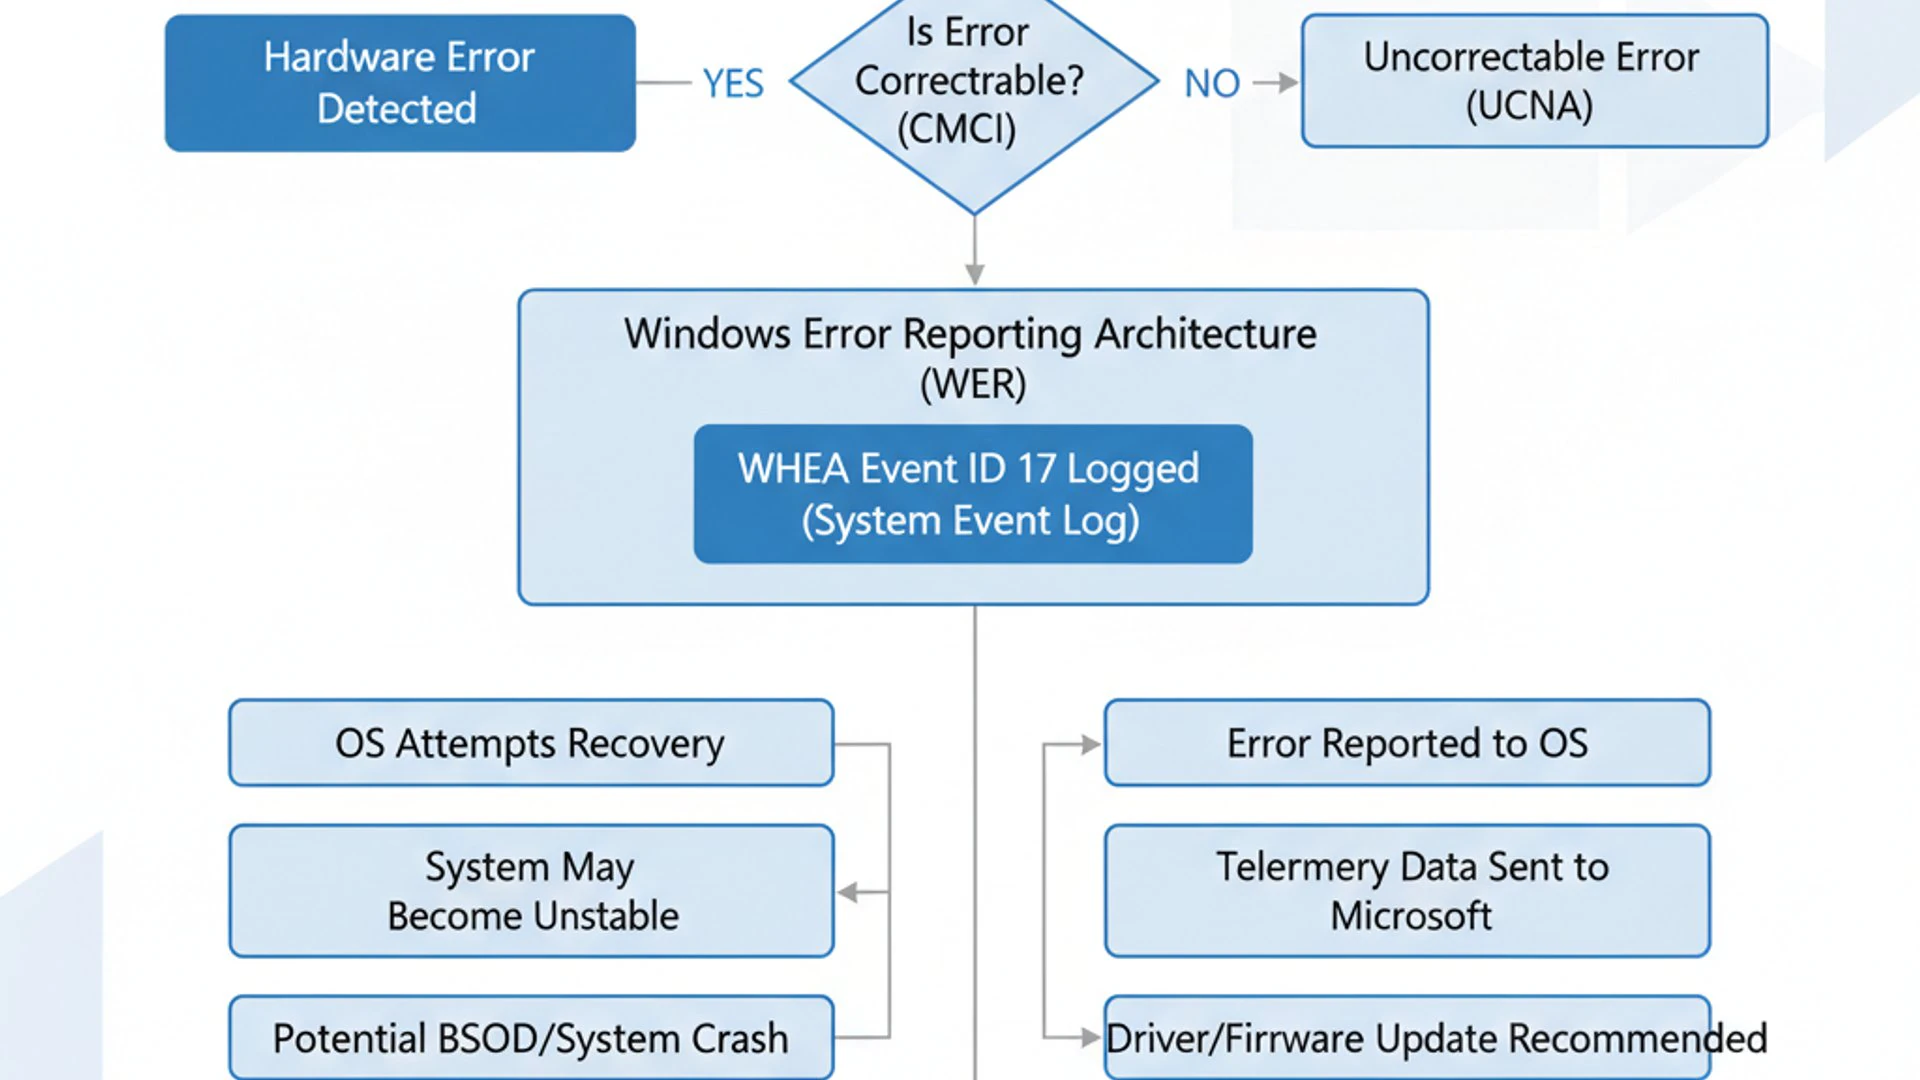
Before diving deep into Event ID 17, it’s crucial to grasp the framework that reports it: the Windows Hardware Error Architecture (WHEA). WHEA is a robust mechanism integrated into modern Windows operating systems, designed to detect, report, and recover from hardware errors. Its primary purpose is to enhance system reliability and availability by providing a standardized way for hardware components to communicate issues to the OS.
When a piece of hardware, such as your CPU or RAM, encounters an error, it often reports this to the system firmware (BIOS/UEFI). WHEA then intercepts these reports, processes them, and logs them in the Windows Event Log. This architecture allows Windows 11 to identify potential hardware failures before they lead to catastrophic system crashes, giving users and administrators a chance to intervene.
WHEA categorizes errors based on their severity and whether they are correctable or uncorrectable. Correctable errors might be handled by the hardware itself without user intervention, while uncorrectable errors, like those associated with Event ID 17, require immediate attention because they indicate a fundamental problem that the system cannot autonomously resolve.
Why Event ID 17 Matters for System Stability
Among the various WHEA events, Event ID 17 carries particular weight. It specifically indicates an uncorrectable hardware error, meaning the system encountered a critical fault that it could not recover from gracefully. This is not a minor glitch; it’s a red flag signaling a significant problem with a core hardware component.
The implications of an uncorrectable hardware error are severe. Such errors can lead to the infamous Blue Screen of Death (BSOD), unexpected system reboots, application crashes, or even data loss if the error occurs during a write operation. Persistent Event ID 17 occurrences suggest a fundamental instability that, if left unaddressed, will continue to plague your Windows 11 experience.
Therefore, when you see WHEA Logger Event 17 in your Event Viewer, it’s a clear call to action. Ignoring it could result in ongoing frustration, potential data corruption, and ultimately, a compromised computing environment. Proactive diagnosis and resolution are essential to restore your system’s stability and prevent further damage.
Table of contents
Key Takeaways for Resolving WHEA Logger Event 17
Before we delve into the intricate details of troubleshooting, here’s a quick rundown of the most crucial steps and considerations for anyone facing WHEA Logger Event 17 on Windows 11. These immediate actions form the foundation of a successful resolution strategy.
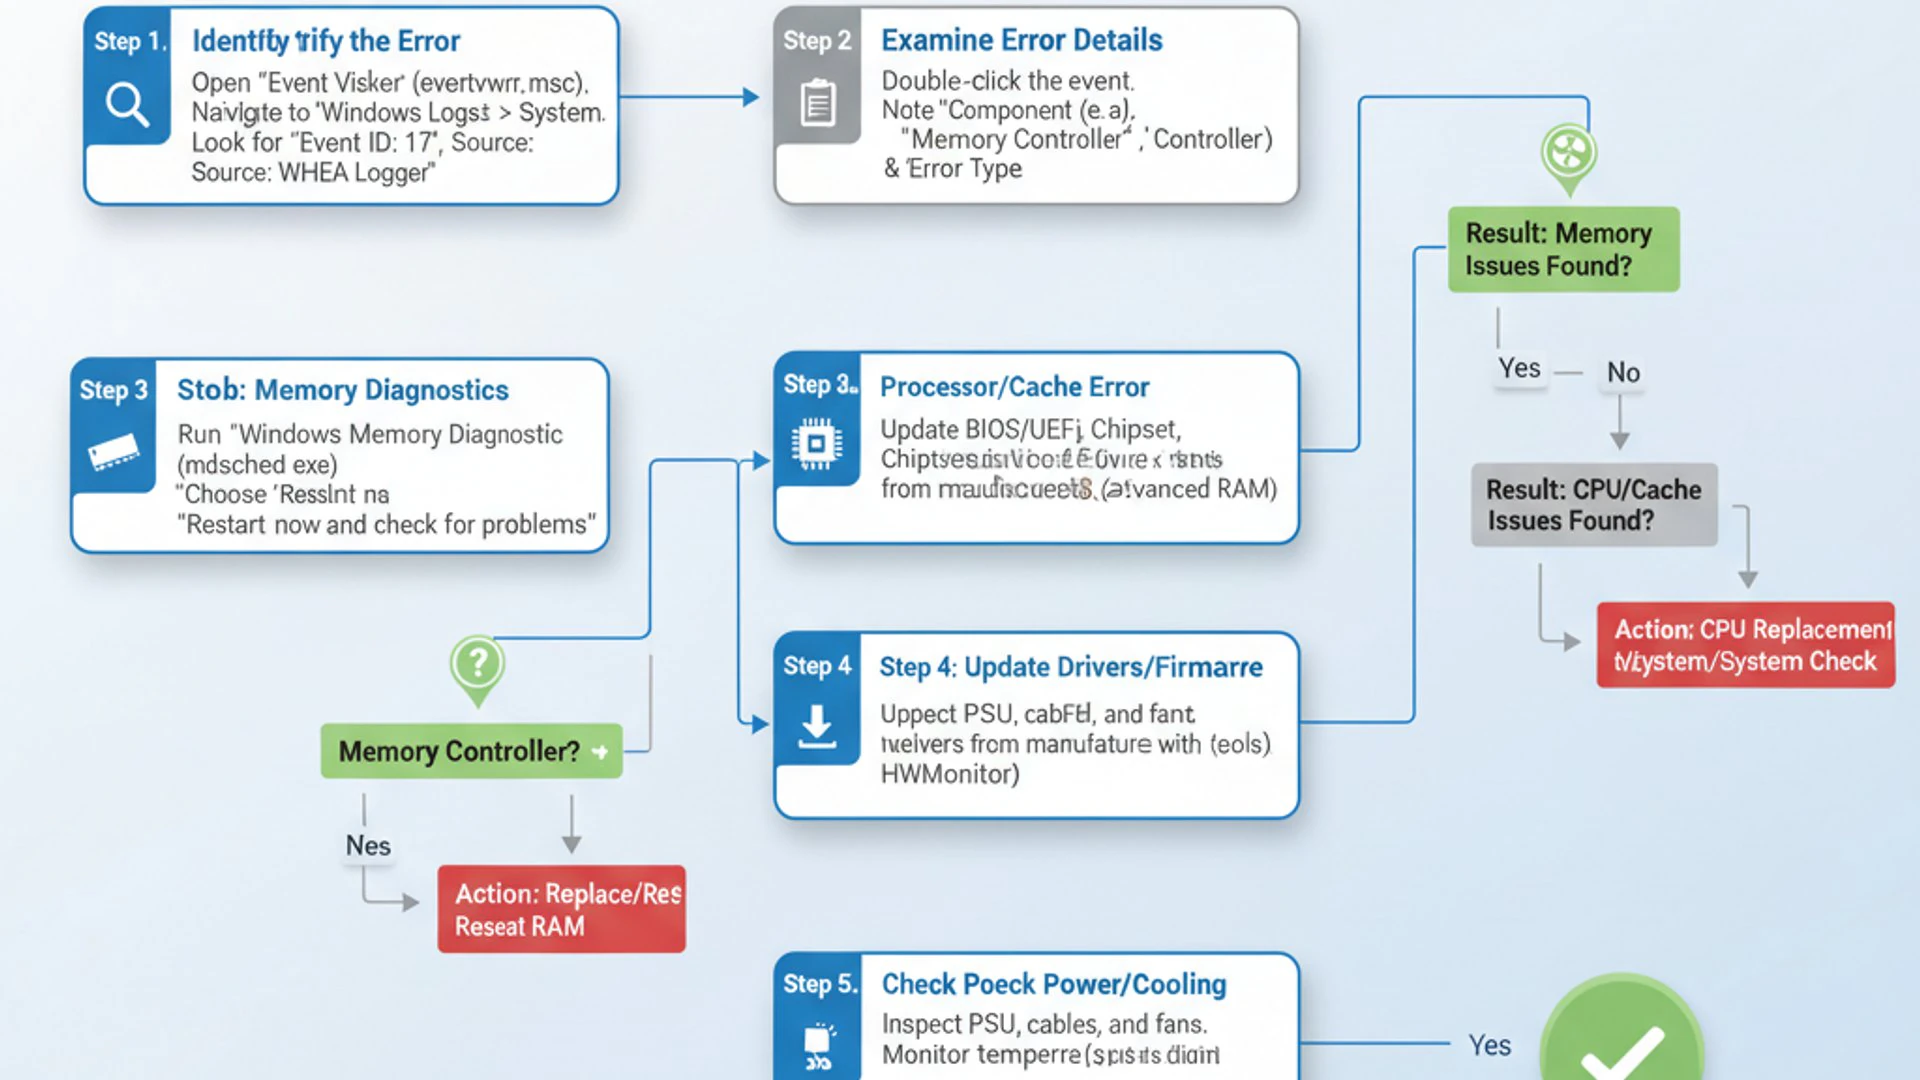
- Check Event Viewer Details: Always start by examining the specific error details within the Event Viewer. The information provided, such as the component reporting the error (e.g., Processor, Cache, Memory), is vital for narrowing down the cause.
- Update Drivers and Firmware: Outdated or corrupted drivers, especially for chipset, CPU, and graphics, are common culprits. Ensure your BIOS/UEFI firmware is also up to date, as it often contains stability improvements.
- Test Hardware Components: Since Event 17 points to hardware, rigorous testing of your CPU and RAM is non-negotiable. Tools like Windows Memory Diagnostic or MemTest86 for RAM and Prime95 or OCCT for CPU can help identify faulty components.
- Revert Overclocking: If you have overclocked your CPU or RAM, immediately revert all settings to their default values. Overly aggressive overclocks are a frequent cause of uncorrectable hardware errors.
- Monitor Temperatures: Overheating can cause hardware instability. Use monitoring tools to check your CPU and GPU temperatures, especially under load, and ensure proper cooling.
- Inspect Power Supply: An unstable or insufficient power supply unit (PSU) can lead to erratic hardware behavior. While harder to diagnose without specialized equipment, consider its age and wattage.
Decoding WHEA Logger Event 17: Common Causes and Symptoms
To effectively address WHEA Logger Event 17 on Windows 11, we must first understand its origins. This event is a symptom, not the root cause, and it points to a deeper hardware or, less commonly, a software-related instability. Identifying the specific trigger is key to finding a lasting solution.
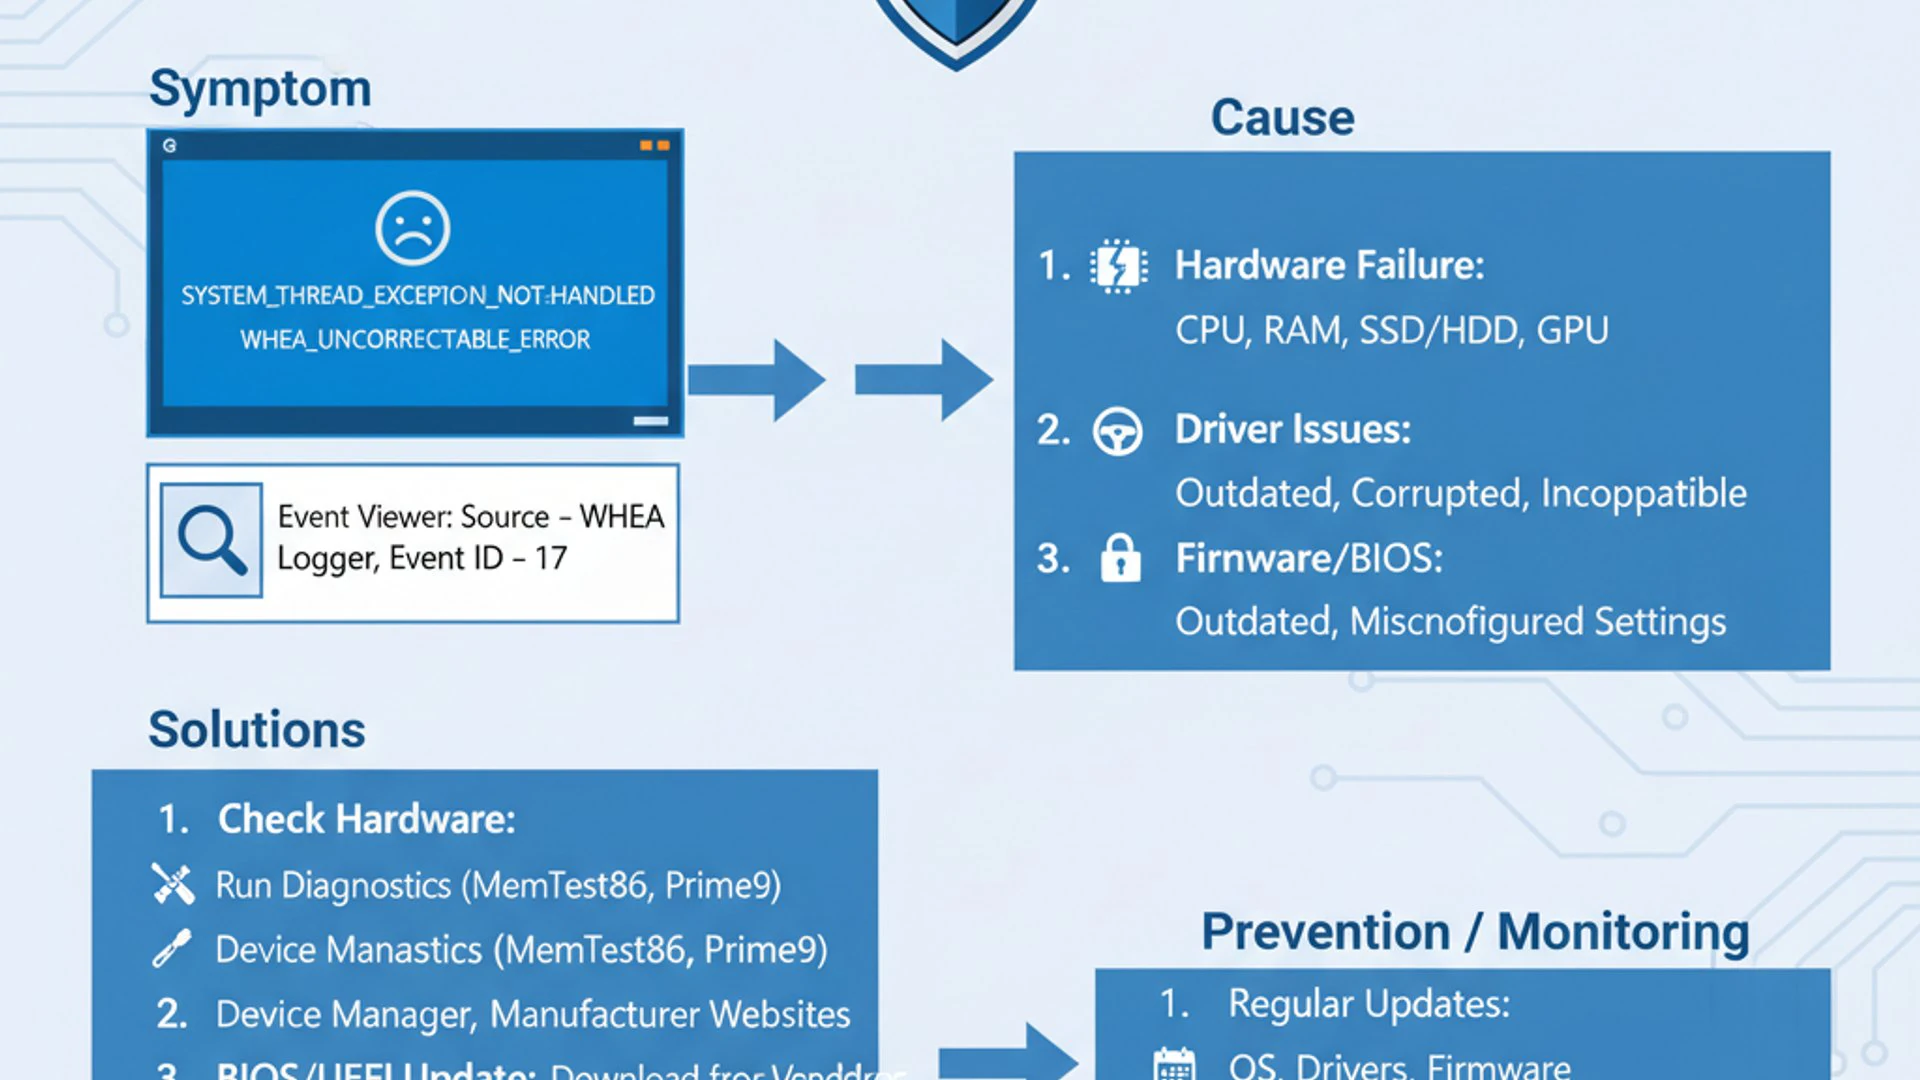
The underlying reasons for this critical error can broadly be categorized into hardware malfunctions and software conflicts. Both can manifest in similar ways, making a systematic diagnostic approach essential. We’ll explore the typical symptoms users might encounter, which often precede or accompany the Event ID 17 log entry.
Symptoms often include unexpected system shutdowns, Blue Screen of Death (BSOD) errors with codes like “WHEA_UNCORRECTABLE_ERROR,” application freezes, or general system unresponsiveness. Sometimes, the system might simply restart without warning, leaving little trace beyond the Event Viewer entry. Pinpointing the exact cause requires careful investigation.
Identifying Hardware-Related Instabilities
The vast majority of WHEA Logger Event 17 occurrences stem from issues within your system’s physical components. These are often the most challenging to diagnose but are crucial to resolve. Understanding which hardware elements are most commonly implicated can guide your troubleshooting efforts.
The primary suspects usually include the central processing unit (CPU), system memory (RAM), and the motherboard itself. These components are the core of your computer, and any instability within them can quickly cascade into system-wide errors. We’ll examine each of these in detail.
Other hardware elements, such as the power supply unit (PSU) or even storage drives, can indirectly contribute to instability by providing insufficient or unstable power, or by corrupting critical system files. A holistic approach to hardware health is therefore vital.
Processor (CPU) Issues and Overclocking
The CPU is the brain of your computer, and any issues with it can directly lead to WHEA Logger Event 17 on Windows 11. Processor malfunctions can range from manufacturing defects to excessive heat or unstable operating conditions. Modern CPUs are highly complex, and even minor deviations from optimal parameters can trigger critical errors.
One of the most common CPU-related causes is overclocking. Pushing your CPU beyond its factory-set speeds and voltages can yield performance gains, but it also introduces instability. If the voltage is too low for the increased clock speed, or if the CPU generates too much heat, it can lead to uncorrectable errors.
Thermal issues are another significant factor. An improperly installed cooler, dried-out thermal paste, or inadequate case airflow can cause the CPU to overheat, leading to thermal throttling and eventual instability. Even without overclocking, a CPU running too hot will eventually report errors.
Memory (RAM) Malfunctions and Incompatibilities
Random Access Memory (RAM) is another frequent culprit behind WHEA Logger Event 17. Faulty RAM modules can cause data corruption as the CPU tries to access or store information, leading to uncorrectable errors. This can manifest as crashes during memory-intensive tasks or even during system startup.
Beyond outright faulty modules, RAM incompatibilities can also trigger these events. Mixing different brands, speeds, or timings of RAM, even if they appear compatible, can sometimes lead to instability. Incorrectly configured RAM timings in the BIOS/UEFI, especially when enabling XMP/DOCP profiles, can also be a source of errors.
Even if your RAM is technically functional, issues like improper seating in the motherboard slots or dust accumulation in the slots can disrupt communication, causing intermittent errors. It’s crucial to ensure all RAM modules are securely installed and free from obstructions.
Driver Conflicts and Software Incompatibilities
While WHEA Logger Event 17 primarily points to hardware, software can certainly play a role, particularly through driver conflicts or incompatibilities. Drivers are the essential software bridges that allow your operating system to communicate with your hardware. If these bridges are broken or faulty, hardware can misbehave, leading to error reports.
Outdated, corrupted, or incorrectly installed device drivers – especially for critical components like the chipset, graphics card, or storage controllers – can cause hardware to operate outside its stable parameters. This can trick the WHEA system into believing there’s a hardware fault when the issue is actually software-related.
Certain software applications, particularly those that heavily interact with hardware or modify system settings, can also contribute to instability. For instance, aggressive system optimizers, virtualization software, or even some anti-virus programs can, in rare cases, interfere with hardware operations, leading to WHEA events. Identifying such conflicts often requires a process of elimination.
Initial Diagnostic Steps: Event Viewer and System Information
When confronted with WHEA Logger Event 17 on Windows 11, the first and most crucial step is to gather information. Windows provides powerful built-in tools that can offer invaluable insights into the nature and origin of the error. These tools are your starting point for any effective troubleshooting.
The Event Viewer is your primary window into system events, including hardware errors. It logs detailed information that can help pinpoint the problematic component. Complementing this, collecting comprehensive system information will provide context about your hardware configuration, which is essential for diagnosis.
By meticulously examining these details, you can often narrow down the potential causes significantly, saving time and effort in the subsequent troubleshooting stages. Don’t skip these initial diagnostic steps; they are the foundation of an informed resolution.
Navigating the Event Viewer for WHEA Errors
The Event Viewer is a powerful administrative tool that records a chronological log of events and errors occurring on your Windows 11 system. To effectively troubleshoot WHEA Logger Event 17, you need to know how to access and interpret these logs.
- Open Event Viewer: Press
Win + Xand select “Event Viewer” from the power user menu. Alternatively, type “Event Viewer” into the Start menu search bar. - Navigate to System Logs: In the left-hand pane, expand “Windows Logs” and then select “System.” This log contains system-wide events, including hardware errors.
- Filter for WHEA Errors: With the “System” log selected, click “Filter Current Log…” in the right-hand “Actions” pane. In the filter window, check the “Critical” and “Error” checkboxes under “Event level.” Then, in the “Event IDs” field, type
17and click “OK.” - Examine Event Details: Double-click on any Event ID 17 entry to open its properties. Pay close attention to the “General” and “Details” tabs. The “Details” tab, especially the XML view, often contains crucial information about the component that reported the error (e.g., Processor, Cache, Memory Controller).
“The Event Viewer is your system’s black box recorder. Every detail, however cryptic, can be a clue to understanding and resolving critical issues like WHEA Logger Event 17.”
Look for phrases like “Component: Processor Core,” “Memory Controller,” or “PCI Express Root Port.” This information is invaluable for directing your troubleshooting efforts towards the correct hardware component. Note down the exact error source and any associated codes.
Gathering System Information for Troubleshooting
Once you’ve identified the WHEA error in the Event Viewer, the next step is to gather comprehensive information about your system’s hardware and software configuration. This context is vital for understanding how your components are interacting and what might be causing the instability.
You can access basic system information easily:
- System Information Tool: Press
Win + R, typemsinfo32, and press Enter. This utility provides a detailed overview of your operating system, processor, BIOS version, installed RAM, motherboard model, and more. - DirectX Diagnostic Tool: Press
Win + R, typedxdiag, and press Enter. This tool offers information about your display adapter, sound devices, and other multimedia components, which can be useful if the error appears related to graphics.
Specifically, note down the following:
- CPU Model: Full name and generation.
- Motherboard Model: Essential for finding BIOS/UEFI updates.
- RAM Configuration: Total capacity, speed (MHz), and number of modules.
- BIOS/UEFI Version and Date: Crucial for checking if an update is available.
- Operating System Version: Including build number (e.g., Windows 11 23H2).
This detailed snapshot of your system will be invaluable when searching for driver updates, checking for known hardware incompatibilities, or seeking assistance from online forums or technical support. It helps create a complete picture of your environment.
Comprehensive Troubleshooting Methods for WHEA Logger Event 17
With a solid understanding of WHEA Logger Event 17 and initial diagnostic data in hand, it’s time to move into the comprehensive troubleshooting phase. This section will guide you through a range of practical solutions, starting from software adjustments and progressing to more involved hardware diagnostics.
Remember, troubleshooting is often a process of elimination. Start with the simplest and least invasive solutions, then gradually move to more complex ones. Always test your system after each significant change to see if the WHEA error has been resolved. Patience and methodical execution are key here.
The goal is not just to temporarily stop the errors but to identify and rectify the root cause, ensuring long-term system stability. We will cover updating drivers and firmware, rigorous hardware testing, managing overclocking, checking system file integrity, and addressing software conflicts.
Updating Drivers and Firmware (BIOS/UEFI)
One of the most effective initial steps in resolving WHEA Logger Event 17 on Windows 11 is ensuring all your system drivers and firmware are up to date. Manufacturers frequently release updates that improve stability, fix bugs, and enhance compatibility, which can directly address hardware-related issues.
Outdated chipset drivers, for instance, can lead to improper communication between your CPU and other components, triggering WHEA errors. Similarly, an old BIOS/UEFI version might not fully support your installed hardware or contain critical bug fixes that prevent uncorrectable errors.
Prioritize updates for your motherboard’s chipset, CPU, and graphics card. These are the components most frequently involved in WHEA events. Always obtain drivers directly from the component manufacturer’s official website to ensure authenticity and compatibility.
Step-by-Step Driver Update Process
Updating drivers correctly is crucial to avoid introducing new problems. Follow these steps for a safe and effective driver update process:
- Identify Your Hardware: Use the system information gathered earlier (
msinfo32,dxdiag) to identify your motherboard model, CPU, and graphics card. - Visit Official Websites: Go to the official support websites of your motherboard manufacturer (e.g., ASUS, MSI, Gigabyte, ASRock) and your graphics card manufacturer (e.g., NVIDIA, AMD, Intel).
- Download Latest Drivers: Navigate to the “Support” or “Downloads” section for your specific models. Download the latest available chipset drivers, graphics drivers, and any other critical drivers (e.g., storage controller drivers). Make sure they are for Windows 11 and the correct architecture (64-bit).
- Uninstall Old Drivers (Optional but Recommended for Graphics): For graphics drivers, it’s often best to use a tool like Display Driver Uninstaller (DDU) in Safe Mode to completely remove old drivers before installing new ones. For chipset drivers, simply running the installer usually suffices.
- Install New Drivers: Run the downloaded installer files. Follow the on-screen prompts. You may need to restart your computer after installation.
Always download drivers from official sources. Avoid third-party driver update utilities, as they can sometimes install incorrect or malicious drivers. Regularly checking for updates, perhaps quarterly, can help maintain system health.
Safely Updating BIOS/UEFI Firmware
Updating your BIOS/UEFI firmware is a more delicate process than updating drivers, as a failed update can render your motherboard inoperable. However, it’s often essential for resolving deep-seated hardware instabilities.
- Identify Motherboard Model and Current BIOS Version: Use
msinfo32to get this information. - Visit Manufacturer’s Support Site: Go to your motherboard manufacturer’s official website and locate the support page for your exact model.
- Download Latest BIOS/UEFI: Download the latest stable BIOS/UEFI version. Read the release notes to see if it specifically addresses stability issues or supports your CPU/RAM better.
- Read Instructions Carefully: Each motherboard manufacturer has a specific procedure for updating BIOS/UEFI. This often involves placing the firmware file on a USB drive, booting into the BIOS/UEFI utility, and using a built-in “Flash” tool. Some modern motherboards support updating directly from Windows, but the USB method is generally safer.
- Precautions:
- Do NOT interrupt the process: A power outage or accidental shutdown during the update can brick your motherboard.
- Use a stable power source: Consider a UPS if your power is unreliable.
- Reset BIOS to defaults: Before updating, it’s often recommended to reset your BIOS settings to their factory defaults.
After a successful update, re-enter your BIOS/UEFI settings to reconfigure any custom settings you had, such as boot order or XMP profiles, but do so cautiously. Test your system thoroughly after the update to confirm stability.
Testing and Validating Hardware Components
Since WHEA Logger Event 17 points directly to hardware, rigorous testing of your components is paramount. This involves putting your CPU and RAM under stress to identify any inherent instabilities or defects. These tests can often reveal issues that don’t appear during normal usage.
It’s important to run these tests for an extended period, as some hardware faults are intermittent and only manifest under sustained load or specific conditions. Be prepared for your system to potentially crash during these tests, as that’s precisely what you’re trying to provoke to identify the faulty component.
Always ensure your system has adequate cooling before initiating stress tests, as they will push your hardware to its thermal limits. Monitoring temperatures throughout the testing process is also a critical step.
Memory Diagnostic Tools (MemTest86, Windows Memory Diagnostic)
Faulty RAM is a very common cause of uncorrectable hardware errors. Fortunately, there are excellent tools available to test your memory:
- Windows Memory Diagnostic: This is a built-in tool in Windows 11.
- Press
Win + R, typemdsched.exe, and press Enter. - Choose “Restart now and check for problems (recommended).”
- Your computer will restart and run a basic memory test. If it finds errors, it will usually report them after rebooting into Windows.
- Press
- MemTest86: For a more thorough and reliable test, MemTest86 is highly recommended. It runs independently of Windows from a bootable USB drive.
- Download the MemTest86 Free Edition from its official website (memtest86.com).
- Follow the instructions to create a bootable USB drive.
- Reboot your computer and boot from the USB drive.
- Allow MemTest86 to run for several passes (at least 4-8 passes, or overnight for severe issues). Even a single error indicates faulty RAM.
If MemTest86 reports errors, try testing your RAM modules one by one if you have multiple sticks. This helps isolate the faulty module. If all modules pass individually but fail together, it might indicate a motherboard slot issue or an incompatibility.
CPU Stress Testing and Temperature Monitoring
Stress testing your CPU can reveal instabilities, especially if the WHEA error points to the processor. Combine this with temperature monitoring to rule out overheating.
- Download Stress Test Software: Popular choices include Prime95 (mersenne.org/download/) or OCCT (ocbase.com).
- Download Temperature Monitoring Software: Tools like HWMonitor (cpuid.com/softwares/hwmonitor.html) or Core Temp (alcpu.com/CoreTemp/) are excellent for this.
- Run Stress Test: Start your temperature monitoring software first. Then, launch your chosen stress test (e.g., Prime95’s “Small FFTs” test, which heavily loads the CPU).
- Monitor and Observe: Keep a close eye on your CPU temperatures. Ideally, they should remain below 85-90°C under full load. If the system crashes or reports a WHEA error during the test, it strongly suggests a CPU instability, potentially due to overheating, insufficient voltage, or a faulty chip.
If temperatures are consistently high, ensure your CPU cooler is properly installed, thermal paste is fresh, and case airflow is adequate. If temperatures are fine but crashes still occur, consider resetting BIOS settings or, in rare cases, a faulty CPU itself.
Managing Overclocking and Power Settings
Overclocking, while tempting for performance enthusiasts, is a frequent contributor to WHEA Logger Event 17 on Windows 11. Pushing hardware beyond its manufacturer-specified limits inherently introduces instability. Similarly, incorrect power settings can sometimes lead to erratic hardware behavior.
If you’ve ever adjusted CPU clock speeds, voltages, or RAM timings (including enabling XMP/DOCP profiles), these settings should be your primary suspect. Even a seemingly stable overclock can develop issues over time or with specific workloads.
Reviewing and adjusting your power plan settings in Windows can also sometimes mitigate issues, especially if the system isn’t providing consistent power to components during idle or low-load states.
Reverting Overclock Settings to Default
This is arguably the most critical step if you’ve ever overclocked your system. Unstable overclocks are a leading cause of WHEA errors.
- Access BIOS/UEFI: Restart your computer and repeatedly press the designated key (usually Del, F2, F10, or F12) during startup to enter your motherboard’s BIOS/UEFI settings.
- Load Optimized Defaults: Look for an option like “Load Optimized Defaults,” “Load Setup Defaults,” or “Restore Defaults.” Select this option and confirm. This will revert all CPU, RAM, and other system settings to their factory-recommended values.
- Disable XMP/DOCP: If you previously enabled an XMP (Intel) or DOCP (AMD) profile for your RAM, make sure it is disabled or set to “Auto.” While XMP/DOCP is technically an overclock, it’s usually validated by the RAM manufacturer. However, some motherboards or CPUs might struggle with certain profiles.
- Save and Exit: Save the changes and exit the BIOS/UEFI. Your system will restart with default settings.
After reverting, run your system for a few days to see if the WHEA Logger Event 17 reappears. If it doesn’t, your overclock was likely the cause. You can then try a more conservative overclock or stick to stock settings for maximum stability.
Adjusting Power Plans and Advanced Settings
While less common, certain power settings can sometimes contribute to instability, especially if they cause components to aggressively enter low-power states or if your power supply is borderline.
- Access Power Options: Right-click the Start button, select “Power Options” (or navigate via Settings > System > Power & battery > Power mode).
- Change Plan Settings: Click “Change plan settings” next to your active power plan (e.g., Balanced, High Performance).
- Change Advanced Power Settings: Click “Change advanced power settings.”
- Review Key Settings:
- Processor power management: Ensure “Minimum processor state” is not set too low (e.g., 5% is usually fine, but some systems prefer 100% for stability). Check “System cooling policy” is “Active.”
- PCI Express > Link State Power Management: Try setting this to “Off” or “Moderate power savings.” Aggressive power savings here can sometimes cause issues with certain PCIe devices.
- Hard disk > Turn off hard disk after: Set this to a reasonable value (e.g., 20-30 minutes) or “Never” if you suspect storage-related power issues.
Apply changes and monitor your system. While these adjustments are usually minor, they can sometimes resolve subtle power delivery issues that contribute to hardware instability. For more advanced users, checking power supply unit (PSU) voltages with a multimeter (if you have the expertise) can provide insight into its health.
Checking System Files and Disk Health
Even though WHEA Logger Event 17 points to hardware, a corrupted operating system or file system can sometimes mimic hardware issues or exacerbate existing ones. Ensuring the integrity of your Windows 11 installation and storage drives is a crucial step in comprehensive troubleshooting.
Corrupted system files can lead to improper hardware communication, while bad sectors on your hard drive can cause data read/write errors that the system might misinterpret as an uncorrectable hardware fault. These checks are relatively quick and easy to perform.
It’s always a good practice to perform these checks periodically, regardless of whether you’re experiencing WHEA errors. Maintaining a healthy file system and disk can prevent a multitude of other Windows issues.
Using SFC and DISM Commands
Windows 11 includes powerful command-line tools to check and repair system file integrity:
- Open Command Prompt as Administrator: Right-click the Start button and select “Terminal (Admin)” or “Command Prompt (Admin).”
- Run DISM Commands: The Deployment Image Servicing and Management (DISM) tool can repair the Windows image itself. Run these commands sequentially:
Allow each command to complete. This might take some time.
DISM /Online /Cleanup-Image /CheckHealth(checks for corruption)DISM /Online /Cleanup-Image /ScanHealth(scans for corruption)DISM /Online /Cleanup-Image /RestoreHealth(repairs corruption using Windows Update)
- Run SFC Scan: After DISM, run the System File Checker (SFC) tool to scan for and repair corrupted Windows system files:
This command will scan all protected system files and replace corrupted files with cached copies.
sfc /scannow
If SFC reports that it found and repaired corrupted files, restart your computer and monitor for the WHEA Logger Event 17. These tools are excellent for resolving issues stemming from software corruption.
Running CHKDSK for Disk Integrity
The Check Disk (CHKDSK) utility scans your hard drive for bad sectors and file system errors, attempting to fix them. This is vital for ensuring your storage devices are healthy.
- Open Command Prompt as Administrator: As before, right-click the Start button and select “Terminal (Admin).”
- Run CHKDSK: Type the following command and press Enter:
Replace
C:with the letter of the drive you want to check (usually your system drive).chkdsk C: /f /r /x
/f: Fixes errors on the disk./r: Locates bad sectors and recovers readable information./x: Forces the volume to dismount first if necessary.
- Schedule Restart: If you’re checking your system drive (C:), CHKDSK will likely tell you it can’t run immediately and will ask if you want to schedule it for the next restart. Type
Yand press Enter. - Reboot: Restart your computer. CHKDSK will run before Windows loads, which can take a significant amount of time depending on your drive size and speed. Do not interrupt it.
After CHKDSK completes, Windows will boot normally. Check the Event Viewer for the results of the scan (Event ID 26226, 26227, or 26228 under “Chkdsk” source in the Application log). If many errors were found or if the drive is consistently reporting issues, it might indicate a failing storage device.
Addressing Software Conflicts and Corruptions
While WHEA Logger Event 17 typically points to hardware, software conflicts or deep-seated operating system corruptions can sometimes trigger these errors indirectly. Identifying and resolving these software-related issues is a necessary part of comprehensive troubleshooting.
A “clean boot” environment can help isolate conflicts caused by third-party applications or services. If the issue persists even with minimal software running, it strengthens the case for a hardware problem. As a last resort, repairing or reinstalling Windows 11 can eliminate any OS-level corruption.
Always back up your important data before attempting major system changes like reinstallations. Tools like System Image Backup on Windows 11 can be invaluable here.
Performing a Clean Boot Environment
A clean boot starts Windows 11 with a minimal set of drivers and startup programs. This helps eliminate software conflicts that occur when you install a program or an update.
- Open System Configuration: Press
Win + R, typemsconfig, and press Enter. - Disable Services: Go to the “Services” tab. Check “Hide all Microsoft services” (this is crucial) and then click “Disable all.”
- Disable Startup Items: Go to the “Startup” tab and click “Open Task Manager.” In Task Manager, disable all startup items one by one.
- Apply and Restart: Close Task Manager, click “OK” in System Configuration, and then click “Restart.”
After restarting in a clean boot state, use your computer as you normally would to see if the WHEA Logger Event 17 reappears. If the error stops, it indicates that one of the disabled services or startup programs was the culprit. You can then re-enable them in small groups to identify the specific conflicting software.
Repairing or Reinstalling Windows 11
If all other troubleshooting steps fail to resolve WHEA Logger Event 17 on Windows 11, and you’ve ruled out obvious hardware faults, then a deeper operating system issue might be at play. In such cases, repairing or even reinstalling Windows 11 becomes a viable, albeit last-resort, option.
Before proceeding, ensure you have backed up all critical data. A fresh installation will wipe your primary drive. For repair, Windows 11 offers several options:
- In-Place Upgrade (Repair Install): This allows you to reinstall Windows 11 while keeping your personal files, apps, and settings.
- Download the Windows 11 ISO file from Microsoft’s official website.
- Mount the ISO file (double-click it) and run
setup.exe. - Follow the prompts, ensuring you select the option to “Keep personal files and apps.”
- Reset This PC: Navigate to
Settings > System > Recovery. Under “Recovery options,” click “Reset PC.” You’ll have the choice to “Keep my files” or “Remove everything.” Choosing “Remove everything” performs a cleaner reset. - Clean Installation: This is the most thorough option, completely wiping your drive and installing a fresh copy of Windows 11.
- Create a bootable Windows 11 USB drive using the Media Creation Tool.
- Boot from the USB drive and follow the installation wizard, choosing to delete existing partitions and install Windows on unallocated space.
If a clean installation of Windows 11 still results in WHEA Logger Event 17, it almost definitively points to a persistent hardware problem that needs physical replacement or professional diagnosis. This is the ultimate test for distinguishing between software and hardware issues.
Advanced Solutions and Preventative Measures
Beyond immediate fixes, maintaining a stable Windows 11 system free from WHEA Logger Event 17 requires a proactive approach. This involves continuous monitoring of your system’s health and knowing when to seek expert assistance for complex or persistent problems. Prevention is always better than cure, especially with hardware-related issues.
By implementing regular monitoring practices, you can often catch subtle signs of instability before they escalate into critical errors. Understanding the limits of your own troubleshooting capabilities is also important; sometimes, a professional diagnosis is the most efficient path to resolution.
These advanced strategies aim to build a resilient computing environment, minimizing the chances of encountering disruptive hardware errors in the future and ensuring peace of mind.
Monitoring System Health Proactively
Proactive monitoring is a powerful tool for preventing WHEA Logger Event 17 and other hardware-related issues. By keeping an eye on key system parameters, you can detect anomalies early and address them before they lead to critical failures.
Consider using dedicated monitoring software that provides real-time data on your components:
- CPU/GPU Temperatures: Tools like HWMonitor, Core Temp, or MSI Afterburner can display current, minimum, and maximum temperatures. Set up alerts if temperatures exceed safe thresholds (e.g., 85-90°C for CPU/GPU under load).
- Voltage Monitoring: HWMonitor also shows voltages supplied to various components. Significant fluctuations or unusually low voltages can indicate PSU issues.
- Fan Speeds: Ensure your CPU, GPU, and case fans are operating correctly and at appropriate speeds to maintain airflow.
- Event Viewer Regular Checks: Make it a habit to periodically check the Event Viewer, especially the System and Application logs, for any recurring errors or warnings. Don’t wait for a crash to investigate.
- Disk Health: Use tools like CrystalDiskInfo (crystalmark.info/en/software/crystaldiskinfo/) to monitor the S.M.A.R.T. status of your SSDs and HDDs. This can predict drive failures before they happen.
Regularly cleaning your PC’s interior to remove dust buildup is also a simple yet effective preventative measure. Dust acts as an insulator, trapping heat and hindering airflow, which can contribute to overheating and component stress.
Considering Professional Hardware Diagnosis
There comes a point in troubleshooting where the average user might hit a wall. If you’ve diligently followed all the steps outlined in this guide – updating drivers, testing components, reverting overclocks, checking software – and WHEA Logger Event 17 on Windows 11 still persists, it’s time to consider professional help.
Complex or intermittent hardware faults can be incredibly difficult to diagnose without specialized equipment and expertise. A professional technician has access to diagnostic tools that can pinpoint issues with motherboards, power supplies, or even subtle CPU defects that are beyond the scope of consumer-grade software.
When to seek professional help:
- You’ve replaced a suspected faulty component (e.g., RAM) but the error continues.
- The Event Viewer details are consistently vague or point to a core component (like the motherboard or CPU) that you cannot easily test or replace.
- You’re uncomfortable performing more invasive hardware tasks, such as disassembling your PC or flashing BIOS.
- The issue is causing significant data loss or preventing you from using your computer reliably.
Before taking your computer to a professional, compile all the information you’ve gathered: Event Viewer logs, system information, and a detailed list of the troubleshooting steps you’ve already taken. This will significantly aid the technician in diagnosing the problem efficiently.
Conclusion: Maintaining a Stable Windows 11 System
Encountering WHEA Logger Event 17 on Windows 11 can be a daunting experience, signaling a serious underlying hardware instability. However, as we’ve explored, it’s not an insurmountable problem. By systematically approaching diagnosis and troubleshooting, you can often identify and resolve the root cause, restoring your system’s reliability.
The journey to a stable system begins with understanding the significance of this critical event and leveraging Windows’ built-in diagnostic tools like the Event Viewer. From there, a methodical process of updating drivers and firmware, rigorously testing hardware components, managing overclocking settings, and ensuring system file integrity forms the backbone of effective resolution.
Ultimately, maintaining a stable Windows 11 system is an ongoing commitment. Proactive measures such as continuous system health monitoring, regular cleaning, and timely updates are crucial for preventing future occurrences of WHEA Logger Event 17. Remember that your computer is a complex interplay of hardware and software; a holistic approach to its care will yield the most stable and enjoyable computing experience.
For more interesting articles, stay tuned to Winsides.com!









Community
Comments (0)