

Introduction to ASUS Laptop Blue Screen Errors
Encountering a Blue Screen of Death (BSOD) on your ASUS laptop can be one of the most frustrating experiences for any computer user. This critical error, often accompanied by a sudden system halt and a stark blue screen displaying cryptic messages, signifies a fundamental problem that Windows cannot recover from gracefully. It disrupts your workflow, potentially leading to lost data, and leaves you wondering what went wrong. For additional context, see Troubleshoot blue screen errors, ASUS support page for blue screen issues, Bug Check Code Reference, MemTest86, and Defraggler.
An ASUS laptop blue screen isn’t just an inconvenience; it’s a stark warning sign. It indicates that your system has encountered a severe hardware malfunction, a critical software conflict, or a corrupted driver that prevents it from operating safely. Understanding these errors and knowing how to address them is crucial for maintaining your laptop’s health and ensuring data integrity.
This comprehensive guide aims to demystify the dreaded blue screen. We will explore the common causes specific to ASUS hardware and software, teach you how to interpret error codes, and provide a systematic approach to diagnosis and resolution. Our goal is to equip you with the knowledge and actionable steps needed to troubleshoot and fix these critical issues, restoring your ASUS laptop to its optimal performance.
Whether you’re a seasoned tech enthusiast or a casual user, this article will walk you through initial troubleshooting, software-based solutions, hardware diagnostics, and advanced recovery options. By the end, you’ll be better prepared to tackle an ASUS laptop blue screen with confidence and precision.
Table of contents
Key Takeaways: Quick Solutions for BSODs
When an ASUS laptop blue screen strikes, immediate action is often necessary to get your system back online. Before diving into deep diagnostics, these quick solutions can resolve many common BSOD occurrences. They serve as a rapid reference for urgent situations, offering the most impactful initial steps.
- Restart Your Laptop: A simple reboot can often clear temporary glitches. If the BSOD was a one-off event, this might be all you need.
- Disconnect Peripherals: Unplug all external devices (USB drives, printers, external monitors, etc.) and then restart. Faulty peripherals can often trigger blue screens.
- Undo Recent Changes: Think about any new software installations, driver updates, or hardware changes made just before the BSOD. Reverting these changes is a strong first step.
- Boot into Safe Mode: If Windows won’t start normally, try booting into Safe Mode. This loads only essential drivers and services, allowing you to troubleshoot without interference.
- Check for Windows Updates: Outdated system files can cause instability. If you can access Windows, ensure your operating system is fully updated.
- Scan for Malware: Malicious software can corrupt system files and lead to BSODs. Run a full system scan with your antivirus software.
- Utilize System Restore: If you have a restore point created before the issue, rolling back your system can often resolve software-related blue screens.
Understanding Blue Screen of Death (BSOD) on ASUS Laptops
The Blue Screen of Death, or BSOD, is Windows’ way of telling you that something has gone critically wrong and the system cannot continue to operate safely. It’s a protective measure designed to prevent potential data corruption or further damage when an unrecoverable error occurs. On an ASUS laptop, these errors are particularly concerning because they interrupt work and can indicate underlying hardware or software issues specific to the manufacturer’s configurations.
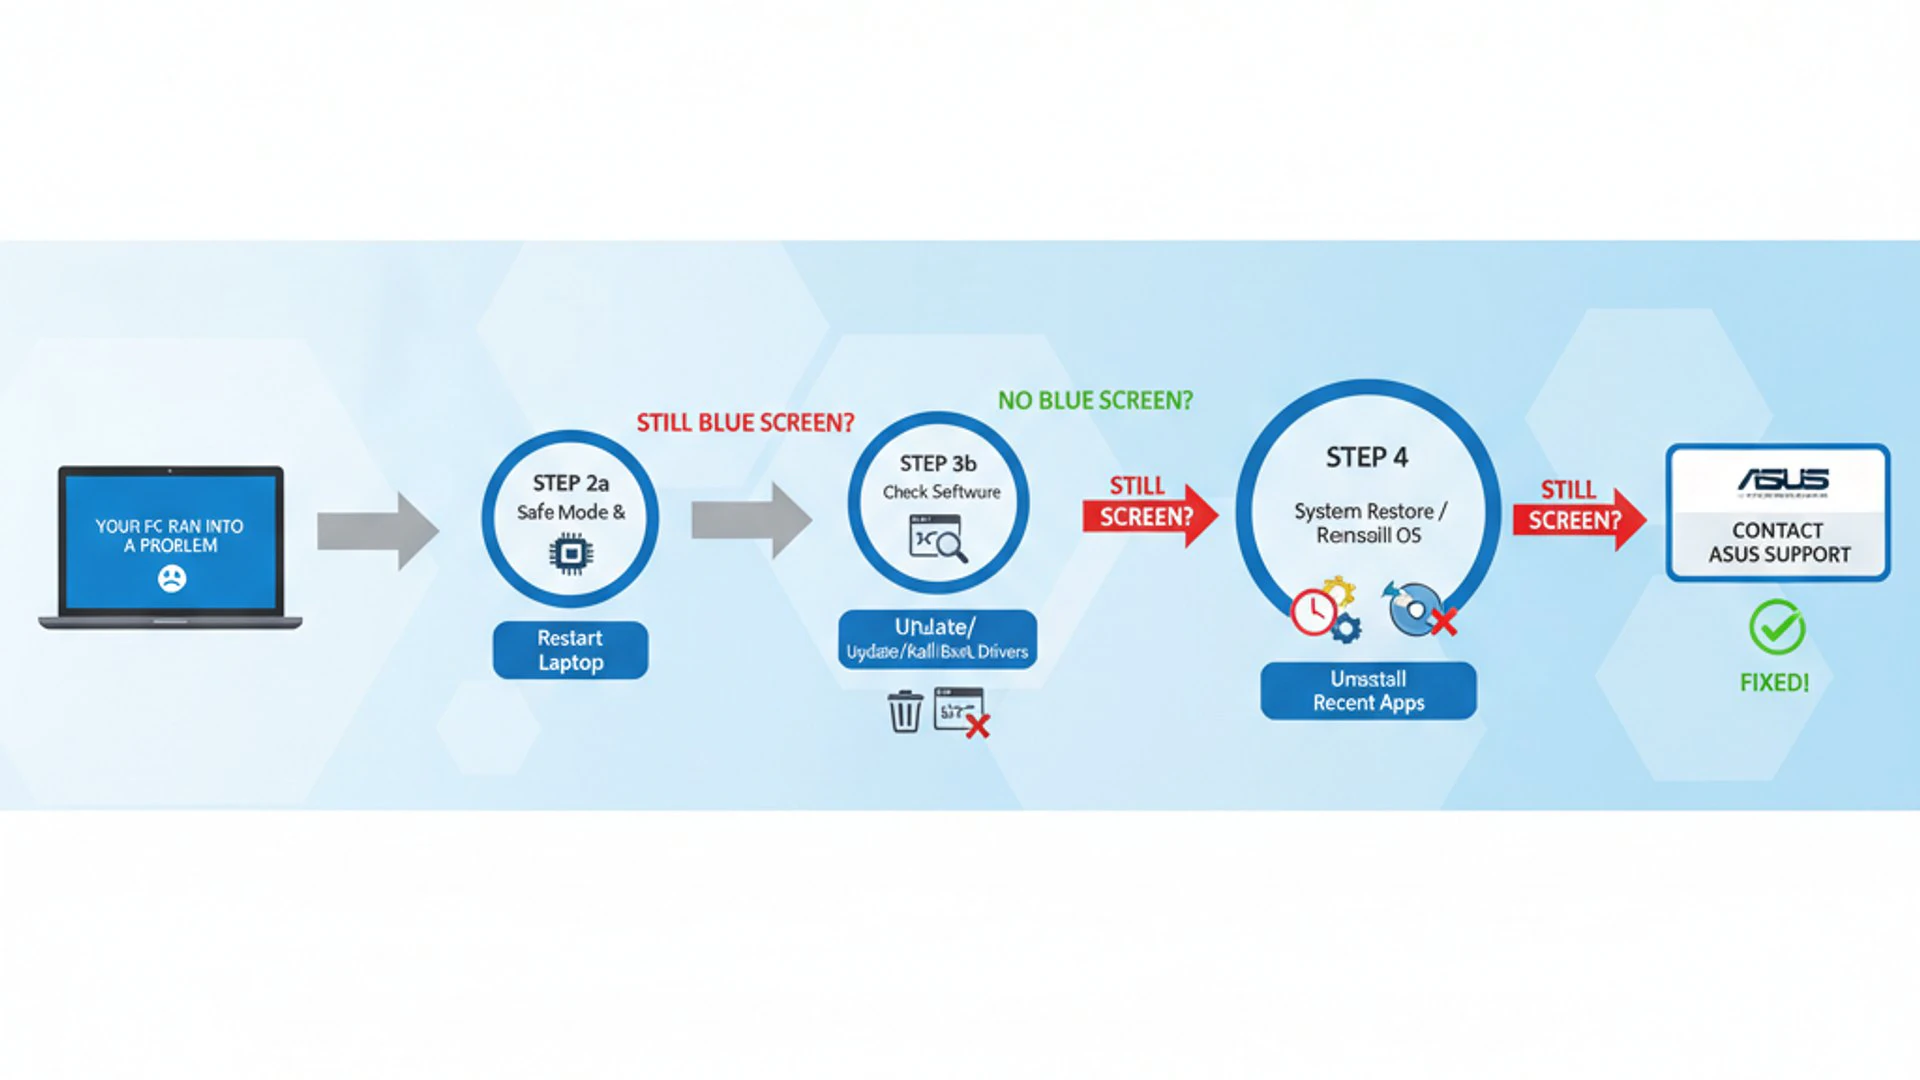
When your ASUS laptop displays a blue screen, it’s typically accompanied by a stop code and a QR code, along with a message indicating that your PC ran into a problem. This information is vital for diagnosing the root cause. Ignoring these warnings can lead to recurring issues or even permanent damage to your system components.
Understanding what these screens signify is the first step toward resolution. They are not random occurrences but rather symptoms of deeper problems. By systematically investigating the potential causes, you can effectively troubleshoot and restore your ASUS laptop’s stability.
Common Causes of ASUS Laptop Blue Screens
An ASUS laptop blue screen can stem from a variety of sources, ranging from simple software glitches to serious hardware failures. Identifying the category of the problem is crucial for efficient troubleshooting. We’ll break down the most frequent culprits into hardware and software-related issues.
These issues often manifest differently, but their end result is the same: a system crash. Paying attention to any patterns or specific error messages can provide valuable clues. For instance, a BSOD that occurs only during gaming might point to a graphics driver or overheating problem, while one that happens randomly could suggest memory corruption.
Hardware Malfunctions and Incompatibilities
Hardware problems are a significant cause of an ASUS laptop blue screen. These can range from components failing due to age or defect to incompatibilities between newly installed parts and your system. The stability of your laptop relies heavily on the proper functioning and communication of all its physical components.
RAM (Random Access Memory) issues are notoriously common. Faulty RAM modules can lead to data corruption, causing the operating system to crash. Overheating, often due to clogged fans or excessive dust, can also push components like the CPU or GPU beyond their safe operating temperatures, triggering a BSOD as a protective shutdown.
Storage drive problems, whether with an HDD or SSD, can also lead to blue screens. Bad sectors, corrupted file systems, or a failing drive can prevent Windows from accessing critical system files, resulting in a crash. Furthermore, issues with the motherboard, power supply, or even external peripherals can destabilize the entire system.
“Hardware failures are often silent until they cause a critical system error. Regular checks and monitoring can prevent many BSODs related to physical components.”
Software Conflicts and Driver Issues
Software is another major source of an ASUS laptop blue screen. Drivers, which are essential pieces of software that allow Windows to communicate with your hardware, are frequent culprits. An outdated, corrupted, or incompatible driver can cause system instability and lead to a crash.
Windows itself can be a source of problems. Corrupted system files, failed updates, or conflicts between different software applications can trigger BSODs. Even seemingly harmless programs or background processes can sometimes interfere with core system functions, especially if they are poorly coded or contain bugs.
Malware and viruses are also significant threats. These malicious programs can corrupt system files, inject harmful code, or interfere with critical processes, leading to an ASUS laptop blue screen. Keeping your software up-to-date and running regular security scans is paramount to preventing these types of issues.
Decoding BSOD Error Codes
When an ASUS laptop blue screen appears, it typically displays a “Stop Code” or “Bug Check Code.” This code is your most valuable clue for diagnosing the problem. While it might look like a string of random characters, each code corresponds to a specific type of error, helping you narrow down the potential causes.
Common stop codes include DRIVER_IRQL_NOT_LESS_OR_EQUAL (often driver-related), PAGE_FAULT_IN_NONPAGED_AREA (frequently memory or driver issues), and CRITICAL_PROCESS_DIED (indicating a critical system process has terminated). Modern Windows versions also provide a QR code that you can scan with your phone, leading you to Microsoft’s troubleshooting pages for that specific error.
It’s crucial to write down the exact error code when it appears. You can then search for this code online, often alongside “ASUS laptop blue screen” to find more specific solutions and discussions related to your particular hardware. Microsoft’s official documentation and community forums are excellent resources for interpreting these codes.
Initial Troubleshooting Steps for ASUS Blue Screens
When faced with an ASUS laptop blue screen, panic is a natural reaction. However, a systematic approach to initial troubleshooting can often resolve simpler issues without requiring extensive technical knowledge. These steps focus on immediate actions that can help identify and fix problems caused by temporary glitches or recent changes.
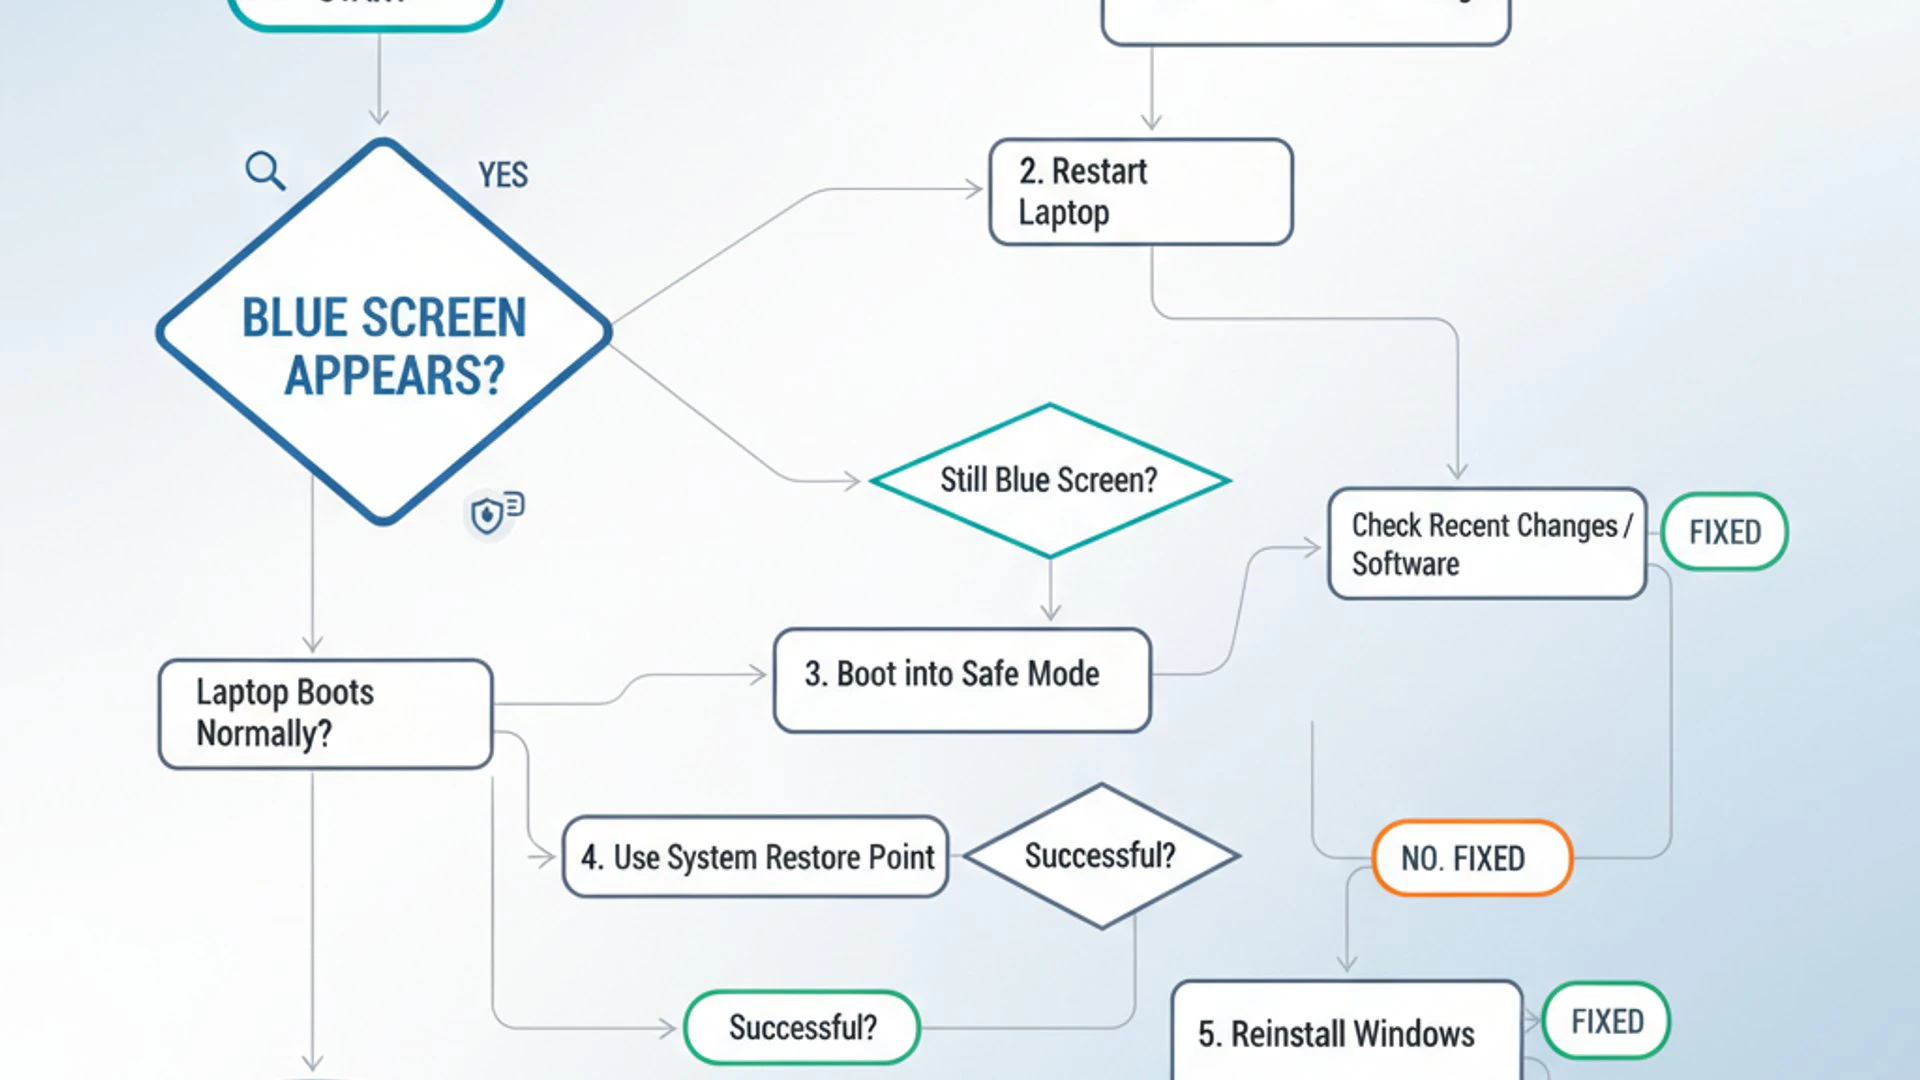
The goal here is to isolate the problem. By performing a few basic checks, you can determine if the issue is persistent or transient, and whether it’s related to external factors or internal system components. This foundational troubleshooting helps lay the groundwork for more advanced diagnostics if needed.
Remember, patience and careful observation are key. Documenting what you do and what happens can be incredibly helpful, especially if you later need to seek professional assistance. Let’s start with the most basic yet effective steps.
Restarting Your ASUS Laptop Safely
The simplest solution is often the most effective. A safe restart can clear temporary memory issues, reset corrupted processes, and resolve minor software conflicts that might have triggered the ASUS laptop blue screen. This is always the first step you should take after a BSOD.
If your laptop is stuck on the blue screen, you’ll need to perform a hard shutdown. Hold down the power button for about 10-15 seconds until the laptop completely turns off. Wait a few moments, then press the power button again to restart. Observe if the blue screen reappears immediately or if Windows boots normally.
If Windows boots successfully after a restart, monitor your system closely for any recurrence of the blue screen. Sometimes, a one-off glitch can cause a BSOD, and a simple reboot is all that’s needed. If it happens again, however, it indicates a more persistent underlying problem.
Checking for Recent Hardware or Software Changes
One of the most common triggers for an ASUS laptop blue screen is a recent change to your system. Our computers are complex machines, and introducing new elements can sometimes lead to unforeseen conflicts. This step involves a bit of detective work, recalling any modifications made just before the BSOD appeared.
Consider if you’ve recently installed any new software, updated drivers, or connected new external hardware. Even Windows updates can sometimes introduce bugs that cause system instability. If you can pinpoint a recent change, try to undo it. For software, uninstall it. For drivers, roll back to a previous version. For hardware, disconnect it.
If the blue screen disappears after reverting a change, you’ve likely found your culprit. This allows you to investigate the problematic item further, perhaps by seeking an updated version of the software or driver, or by testing the hardware on another system to confirm its functionality. This proactive approach saves significant troubleshooting time.
Software-Related Solutions for ASUS BSODs
Many instances of an ASUS laptop blue screen are rooted in software issues. These can range from outdated drivers to corrupted system files or even malicious software. Addressing these problems often involves systematic checks and updates within the Windows environment. This section will guide you through common software-based fixes.
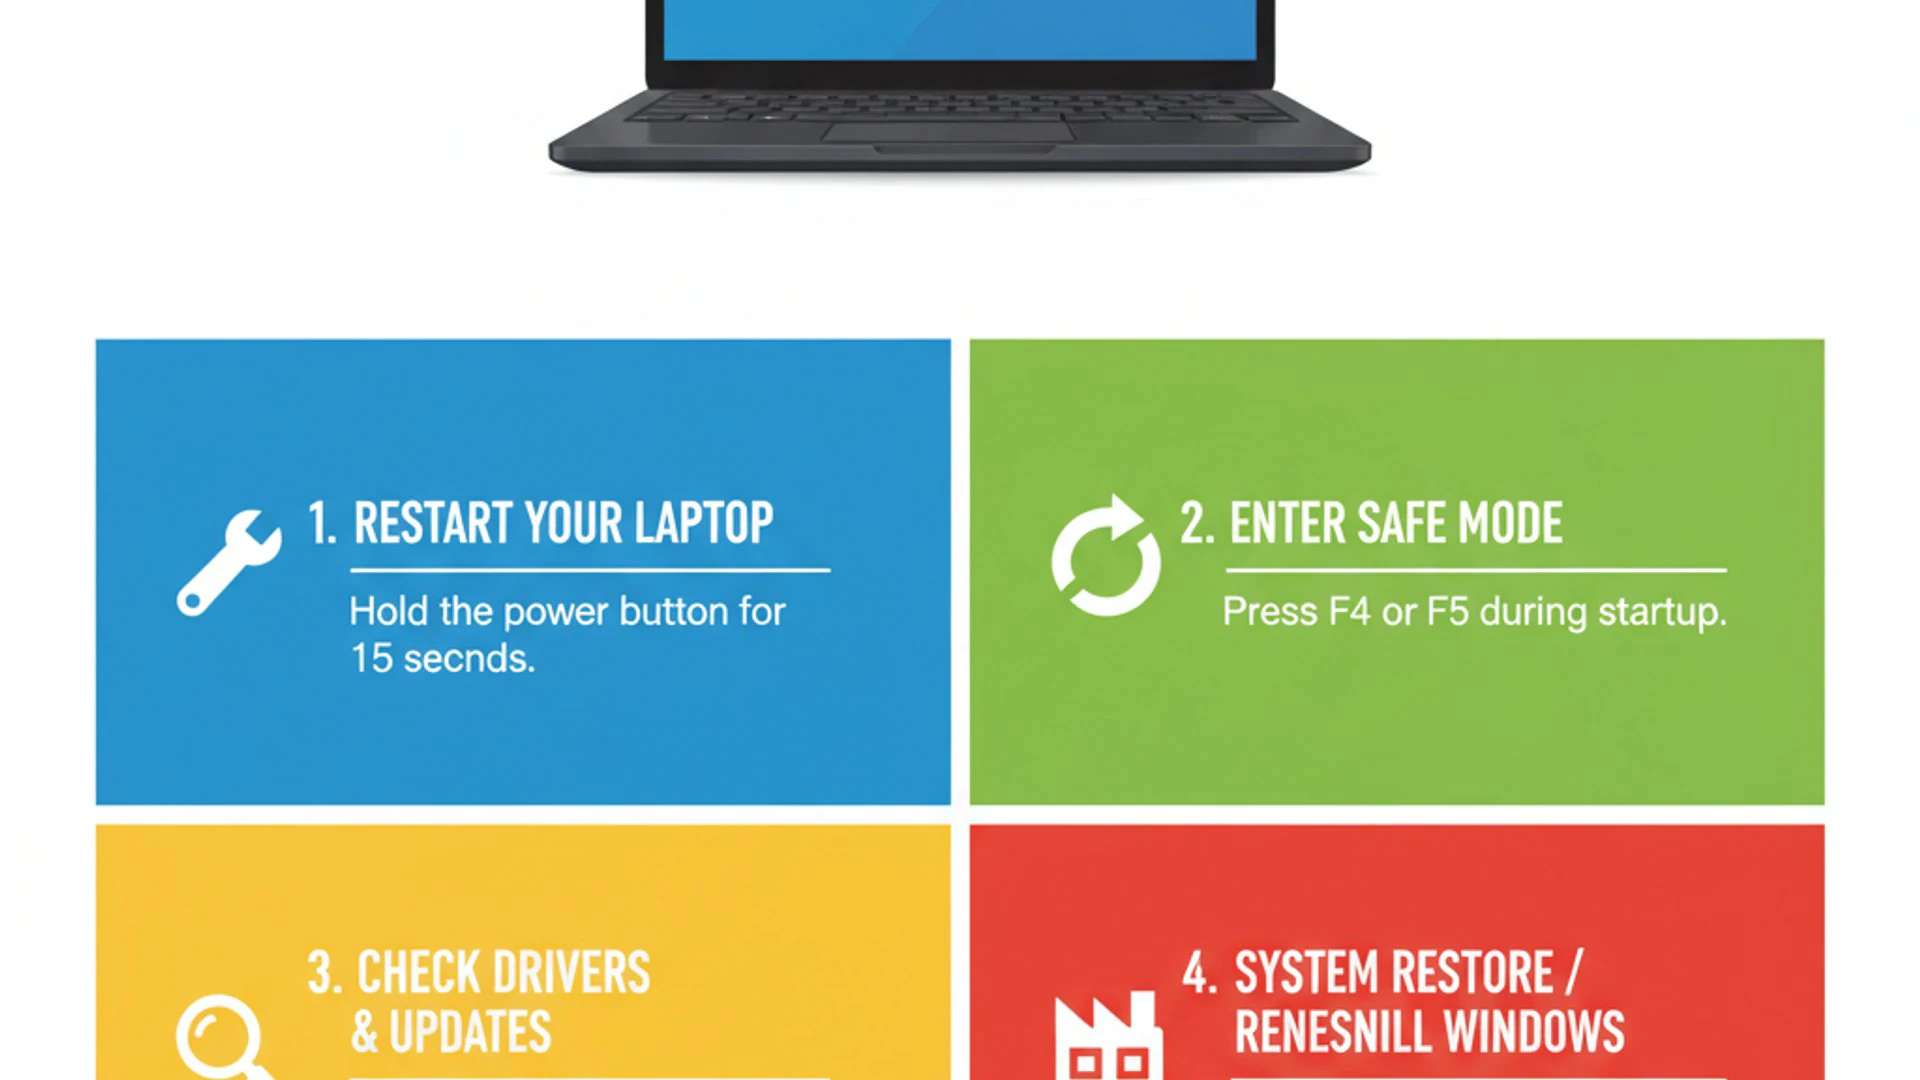
The key to resolving software-related BSODs is often ensuring that all components are compatible, up-to-date, and free from corruption. Windows provides several built-in tools to help with this, which we will explore in detail. Consistency in maintenance is crucial for preventing these types of errors.
Before proceeding with these steps, ensure you have backed up any critical data, especially if you’re dealing with persistent blue screens. While these solutions are generally safe, it’s always wise to be prepared for unforeseen complications. Consider creating a system image backup if possible.
Updating Drivers and Windows OS
Outdated or corrupted drivers are a primary cause of an ASUS laptop blue screen. Drivers act as translators between your operating system and your hardware. When this communication breaks down, often due to an old driver not being compatible with a new Windows update, a BSOD can occur.
To update drivers, visit the official ASUS support website for your specific laptop model. Download the latest drivers for your chipset, graphics card (both integrated and dedicated, if applicable), audio, network adapter, and any other critical components. Install them one by one, restarting your laptop after each major driver update.
Equally important is keeping your Windows operating system up-to-date. Microsoft regularly releases updates that include bug fixes, security patches, and improved hardware compatibility. Navigate to Settings > Windows Update and check for any pending updates. Install them and restart your system as prompted. Ensuring your system is current can prevent many stability issues.
Running System File Checker (SFC) and DISM
Corrupted system files can lead to an ASUS laptop blue screen, as Windows relies on these files for its core operations. Fortunately, Windows includes powerful command-line tools to check and repair these files: System File Checker (SFC) and Deployment Image Servicing and Management (DISM).
First, open Command Prompt as an administrator. Type sfc /scannow and press Enter. This command will scan all protected system files for corruption and attempt to repair them. This process can take some time, so allow it to complete fully without interruption.
If SFC reports that it couldn’t fix all issues, or if the problem persists, use DISM. This tool can repair the underlying Windows image that SFC uses. In the administrative Command Prompt, type DISM /Online /Cleanup-Image /RestoreHealth and press Enter. After DISM completes, run sfc /scannow again to re-check for repaired files. These tools are invaluable for maintaining system integrity.
Scanning for Malware and Viruses
Malicious software can wreak havoc on your system, often leading to an ASUS laptop blue screen. Viruses, ransomware, and other forms of malware can corrupt system files, interfere with critical processes, or exploit vulnerabilities, causing Windows to crash. A thorough scan is essential if you suspect an infection.
Use a reputable antivirus program to perform a full system scan. Windows Defender, built into Windows, is a good starting point. Ensure it’s updated and run a comprehensive scan. For a second opinion, consider using a free, on-demand malware scanner from a trusted vendor like Malwarebytes. These tools can often detect threats that your primary antivirus might miss.
If you can’t boot into Windows normally, try booting into Safe Mode with Networking. This allows you to download and run scanning tools with minimal interference from other software. Removing detected threats and then running SFC and DISM can often resolve BSODs caused by malware.
Uninstalling Problematic Software
Newly installed applications, especially those from untrusted sources or those that deeply integrate with the system, can sometimes cause an ASUS laptop blue screen. Software conflicts can arise when programs interfere with each other or with core Windows functions, leading to instability.
If your BSODs started after installing a new program, try uninstalling it. Go to Settings > Apps > Apps & features, locate the suspicious application, and select “Uninstall.” Restart your laptop after removal to see if the issue is resolved. Pay particular attention to system utilities, optimization tools, or pirated software, as these are common culprits.
In cases where you can’t identify a single problematic application, or if the BSOD prevents normal booting, consider booting into Safe Mode. From Safe Mode, you can often uninstall software that might be causing conflicts in the full Windows environment. This isolation helps in diagnosing and removing the offending program.
Utilizing System Restore Points
Windows System Restore is a powerful feature that allows you to revert your system’s state to an earlier point in time, effectively undoing recent changes that might have caused an ASUS laptop blue screen. It’s particularly useful for software-related issues, as it doesn’t affect your personal files but rolls back system files, installed programs, and drivers.
To use System Restore, search for “Create a restore point” in the Windows search bar and open the System Properties window. Click on the “System Restore” button. Follow the prompts to choose a restore point created before the BSODs started occurring. If you can’t boot into Windows, you can access System Restore from the Advanced Startup Options (usually by interrupting the boot process three times).
System Restore can be a lifesaver for software-induced BSODs. It’s a non-destructive way to revert your system to a known good configuration. Regularly creating restore points, especially before major updates or software installations, is a wise preventative measure.
Hardware-Related Diagnostics and Fixes
While software issues are common, an ASUS laptop blue screen can frequently point to underlying hardware problems. These physical component failures or instabilities require a different approach to diagnosis and resolution. This section will guide you through checking the most critical hardware components that often contribute to BSODs.
Hardware diagnostics can sometimes be more involved, potentially requiring opening your laptop or using specialized tools. However, many initial checks can be performed without advanced technical skills. The goal is to identify if a specific component is failing or if there’s an environmental factor, like overheating, at play.
Always ensure your laptop is powered off and unplugged before performing any physical checks. If you’re uncomfortable opening your laptop, consider seeking professional assistance for internal hardware diagnostics. Safety first is paramount when dealing with electronics.
Testing RAM (Memory) for Errors
Faulty RAM is a very common cause of an ASUS laptop blue screen. Memory errors can lead to data corruption, causing Windows to crash without warning. Fortunately, there are built-in tools to help diagnose RAM issues.
Windows Memory Diagnostic is a utility that can check your RAM for errors. Search for “Windows Memory Diagnostic” in the Start menu and run it. You’ll be prompted to restart your computer, and the test will run automatically before Windows loads. This process can take some time, so be prepared for your laptop to be unavailable during the test.
If the diagnostic tool reports errors, it strongly suggests a problem with one or more RAM modules. If your ASUS laptop has multiple RAM sticks, try removing them one by one and testing the system to identify the faulty module. Replacing defective RAM is often a straightforward process for those comfortable opening their laptop, but ensure you purchase compatible memory.
Checking Hard Drive/SSD Health
Your storage drive (HDD or SSD) is where Windows and all your files reside. If it’s failing or has corrupted sectors, it can prevent Windows from accessing critical data, leading to an ASUS laptop blue screen. Checking its health is a crucial diagnostic step.
Windows has a built-in tool called CHKDSK (Check Disk) that can scan your drive for errors and attempt to repair them. Open Command Prompt as an administrator and type chkdsk /f /r and press Enter. You’ll likely be prompted to schedule the scan for the next restart. Allow it to complete, as it can take a long time depending on drive size.
For more advanced diagnostics, consider using third-party tools that can read S.M.A.R.T. (Self-Monitoring, Analysis, and Reporting Technology) data from your drive. Programs like CrystalDiskInfo can provide detailed health reports, indicating if your drive is failing. If a drive is reported as failing, immediate data backup and replacement are recommended to prevent further BSODs and data loss.
Ensuring Proper Cooling and Preventing Overheating
Overheating is a common culprit behind an ASUS laptop blue screen, especially in high-performance or older models. When components like the CPU or GPU get too hot, they can become unstable, leading to crashes as a protective measure. Poor cooling can also cause permanent damage over time.
Ensure your laptop’s vents are clear and unobstructed. Dust buildup inside the cooling system is a major cause of overheating. Consider using compressed air to clean out the vents periodically. Using a laptop cooling pad can also help dissipate heat, especially during intensive tasks like gaming or video editing.
Monitor your laptop’s temperatures using software like HWMonitor or Core Temp. If temperatures consistently exceed 80-90°C under load, it’s a strong indicator of an overheating problem. If cleaning doesn’t help, the thermal paste on your CPU/GPU might need to be reapplied, which is a more advanced task best left to professionals if you’re not experienced.
Verifying External Device Connections
Sometimes, the cause of an ASUS laptop blue screen isn’t internal but external. Faulty or incompatible external peripherals can cause system instability, especially if their drivers are problematic or if they draw too much power. This is an easy check that can often yield quick results.
Disconnect all external devices: USB drives, external hard drives, printers, webcams, external monitors, and even your mouse and keyboard if they are not essential for booting. Then, restart your laptop. If the blue screen disappears, reconnect your devices one by one, restarting after each connection, to identify the problematic peripheral.
Once identified, try updating the drivers for that specific device, or test it on another computer to confirm if the device itself is faulty. A simple faulty USB cable can sometimes be the root cause. This step helps isolate whether the issue lies within your laptop or with something connected to it.
Advanced Troubleshooting and Recovery Options
When initial and software-related fixes don’t resolve the ASUS laptop blue screen, it’s time to delve into more advanced troubleshooting and recovery options. These methods are for persistent or complex issues and might involve deeper system modifications or even a complete reinstall of the operating system. They require a bit more technical comfort but can be incredibly effective.
Before attempting any of these advanced steps, ensure you have backed up all your important data. Some of these procedures, particularly a clean installation, will erase everything on your primary drive. Having a recent backup is paramount to prevent data loss.
These options are designed to tackle problems that are deeply embedded within the system or require a fresh start. Approach them systematically and carefully, following instructions precisely. If you’re unsure, consider consulting a professional.
Accessing Safe Mode on Your ASUS Laptop
Safe Mode is a diagnostic startup mode for Windows that loads only essential drivers and services. This minimal environment is invaluable for troubleshooting an ASUS laptop blue screen, as it often allows you to access your system even if it crashes during normal boot-up. It helps isolate whether the problem is caused by a core Windows component or a third-party driver/application.
To access Safe Mode, you typically need to interrupt the boot process three times. When your ASUS laptop starts, force it to shut down by holding the power button immediately after the Windows logo appears. Repeat this two more times. On the third attempt, Windows should enter the Automatic Repair environment. From there, navigate to Troubleshoot > Advanced options > Startup Settings > Restart. After restarting, you’ll see a list of options; press 4 or F4 for Safe Mode, or 5 or F5 for Safe Mode with Networking.
Once in Safe Mode, you can perform many of the software-related troubleshooting steps mentioned earlier, such as uninstalling problematic software, rolling back drivers, running SFC/DISM, or scanning for malware. If your ASUS laptop runs stably in Safe Mode but crashes in normal mode, it strongly indicates a driver or software conflict.
Performing a Clean Windows Installation
If all other troubleshooting steps fail and your ASUS laptop blue screen persists, a clean Windows installation is often the ultimate solution. This process completely erases your hard drive and reinstalls a fresh copy of the operating system, eliminating all software conflicts, corrupted files, and malware. It’s a drastic step but guarantees a clean slate.
You’ll need a Windows installation media (USB drive or DVD) created using Microsoft’s Media Creation Tool. Boot your ASUS laptop from this media, follow the on-screen instructions, and choose the “Custom: Install Windows only (advanced)” option. Be sure to delete all existing partitions on your primary drive before proceeding to ensure a truly clean installation.
A clean installation will resolve almost any software-related ASUS laptop blue screen. However, it means you’ll need to reinstall all your applications and restore your personal files from a backup. This is why a thorough backup before starting this process is absolutely critical.
Updating ASUS BIOS/UEFI Firmware
The BIOS (Basic Input/Output System) or UEFI (Unified Extensible Firmware Interface) is the firmware that initializes your hardware before Windows even starts. An outdated or corrupted BIOS/UEFI can cause hardware incompatibilities or stability issues, leading to an ASUS laptop blue screen. Updating it can sometimes resolve these deep-seated problems.
This is an advanced procedure and carries a small risk. A power outage or interruption during a BIOS update can permanently damage your motherboard. Only update your BIOS if recommended by ASUS support or if you suspect it’s the cause of your BSODs. Download the correct BIOS version for your specific ASUS laptop model directly from the official ASUS support website.
Follow ASUS’s specific instructions for updating the BIOS, which usually involves placing the update file on a USB drive and using a utility within the BIOS/UEFI settings. Ensure your laptop is plugged into a stable power source and its battery is fully charged before starting the update. This step should be approached with caution and only if other solutions have failed.
Preventing Future ASUS Laptop Blue Screens
Once you’ve resolved an ASUS laptop blue screen, the next logical step is to implement preventative measures. Proactive maintenance and system monitoring can significantly reduce the chances of encountering these disruptive errors again. A healthy system is a stable system, and regular care goes a long way in ensuring your ASUS laptop runs smoothly for years to come.
Prevention is always better than cure, especially when it comes to critical system errors. By adopting good computing habits and utilizing available tools, you can minimize the risks associated with both hardware and software degradation. These practices will not only prevent BSODs but also improve overall system performance and longevity.
Let’s explore some key strategies to keep your ASUS laptop free from future blue screen incidents. These tips are practical and easy to integrate into your routine, offering long-term stability.
Regular Maintenance and Updates
Consistent maintenance is the cornerstone of a stable computer. This includes keeping your operating system, drivers, and applications up-to-date. As discussed, outdated software is a frequent cause of an ASUS laptop blue screen, so staying current is paramount.
- Windows Updates: Enable automatic Windows updates to ensure you receive the latest security patches and bug fixes. Regularly check for optional updates as well.
- Driver Updates: Periodically visit the ASUS support website for your laptop model to check for updated drivers. Prioritize chipset, graphics, and network drivers.
- Software Updates: Keep all your installed applications updated. Many programs include automatic update features; ensure they are enabled.
- Disk Cleanup: Regularly run Disk Cleanup (search for it in Windows) to remove temporary files and free up space.
- Antivirus Scans: Schedule regular full system scans with your antivirus software to detect and remove any potential threats.
These routine tasks, while seemingly minor, collectively contribute to a robust and error-free computing experience. They help prevent the accumulation of issues that can eventually lead to an ASUS laptop blue screen.
Monitoring System Health
Being aware of your ASUS laptop’s health can help you catch potential problems before they escalate into a blue screen. Monitoring key performance indicators and listening to your system can provide early warnings.
Pay attention to unusual noises, such as excessive fan activity or grinding sounds from an HDD. Use software to monitor CPU and GPU temperatures regularly, especially during heavy usage. If temperatures consistently run high, it’s a sign that your cooling system needs attention.
Keep an eye on your storage space. Running critically low on disk space can cause system instability. Regularly check your drive health using tools like CrystalDiskInfo. Windows Event Viewer (search for it in Start) can also provide valuable insights into system errors and warnings, often pointing to recurring issues before they trigger a full BSOD. Proactive monitoring is a powerful tool against unexpected crashes.
When to Seek Professional Help
While this guide provides extensive troubleshooting steps, there are instances when an ASUS laptop blue screen requires professional intervention. Knowing when to call in the experts can save you time, prevent further damage, and ensure the problem is resolved correctly.
If you’ve exhausted all the troubleshooting steps outlined in this article, including advanced options like a clean Windows installation and BIOS updates, and the blue screen still persists, it’s a strong indicator of a complex hardware failure. This could involve issues with the motherboard, CPU, or other integrated components that are difficult or impossible for an average user to diagnose and repair.
Additionally, if you’re uncomfortable performing any of the more technical steps, such as opening your laptop to check RAM or clean cooling systems, seeking professional help is advisable. Attempting repairs beyond your skill level can lead to additional damage, potentially voiding your warranty or incurring more expensive repairs.
A reputable computer repair technician will have specialized diagnostic tools and expertise to pinpoint elusive hardware faults. They can also perform intricate repairs, such as component replacement or advanced motherboard diagnostics, ensuring your ASUS laptop is restored to full functionality safely and effectively. Don’t hesitate to seek assistance when you’re out of options.
Conclusion: Restoring Stability to Your ASUS Laptop
An ASUS laptop blue screen can be a daunting experience, but it’s not an insurmountable problem. By understanding what these errors signify and approaching them with a systematic troubleshooting methodology, you can effectively diagnose and resolve most issues. From simple restarts to complex hardware diagnostics and clean installations, the solutions are within reach for many users.
The journey to a stable system involves a combination of careful observation, methodical testing, and proactive maintenance. We’ve covered a wide array of potential causes, from outdated drivers and software conflicts to faulty RAM and overheating components. Each step in this guide is designed to help you narrow down the problem and apply the most appropriate fix.
Remember the importance of regular updates, system health monitoring, and creating backup copies of your data. These preventative measures are your best defense against future blue screens and contribute significantly to the longevity and performance of your ASUS laptop. A well-maintained system is a reliable system.
Should you find yourself at an impasse, don’t hesitate to seek professional assistance. Ultimately, the goal is to restore stability and ensure your ASUS laptop runs smoothly, allowing you to work, create, and play without interruption. By applying the techniques learned here, you’re well-equipped to tackle the challenges of an ASUS laptop blue screen with confidence.
For more interesting articles, stay tuned to Winsides.com!









Community
Comments (0)