

Introduction to Dell Laptop Bluescreen on Windows 11
Encountering a Bluescreen of Death (BSOD) on your Dell laptop running Windows 11 can be an incredibly frustrating experience. One moment you’re working, browsing, or gaming, and the next, your screen is filled with an alarming blue message, forcing an unexpected restart. This abrupt halt to your activities isn’t just an inconvenience; it often signals a deeper underlying issue within your system, potentially threatening data integrity and overall system stability. For additional context, see Dell’s official troubleshooting guide for blue screen errors, Microsoft’s comprehensive guide to troubleshoot blue screen errors, and Microsoft Learn’s bug check code reference.
The infamous bluescreen error, while less common than in previous Windows versions, still appears in Windows 11, especially on specific hardware configurations like Dell laptops. It serves as a critical warning sign, indicating that your operating system has encountered a problem it cannot recover from gracefully. Understanding these errors and knowing how to effectively troubleshoot them is paramount for any Dell Windows 11 user.
This comprehensive guide aims to demystify the Dell laptop bluescreen on Windows 11. We will explore its causes, interpret its cryptic messages, and provide a step-by-step roadmap to diagnose and resolve these disruptive issues. Our goal is to equip you with the knowledge and tools necessary to restore your Dell laptop’s stability and prevent future bluescreen occurrences, ensuring a smoother, more reliable computing experience.
Table of contents
Key Takeaways: Resolving BSOD on Dell Windows 11
For those in a hurry, here’s a quick summary of the most crucial advice and solutions for tackling a Dell laptop bluescreen on Windows 11:
- Start with the Basics: Always begin troubleshooting by safely restarting, checking for recent changes, and disconnecting peripherals. These simple steps often resolve transient issues.
- Update Everything: Outdated or corrupted drivers are a leading cause of BSODs. Prioritize updating all system drivers, especially graphics, chipset, and network drivers, using Dell SupportAssist or Device Manager.
- Check System Files: Utilize Windows’ built-in tools like System File Checker (SFC) and DISM to repair corrupted system files that might be triggering errors.
- Hardware Diagnostics: Don’t overlook hardware. Test your RAM with Windows Memory Diagnostic and check your storage drive’s health. Overheating is also a common culprit.
- Identify Problematic Software: Recently installed applications or Windows updates can introduce conflicts. Consider uninstalling them or using System Restore to revert changes.
- Understand Error Codes: Pay attention to the stop code displayed on the bluescreen. It provides vital clues for targeted troubleshooting.
- Backup Regularly: Before attempting major fixes, ensure your data is backed up. A system image backup on Windows 11 can be a lifesaver.
Understanding Bluescreen of Death (BSOD) on Windows 11
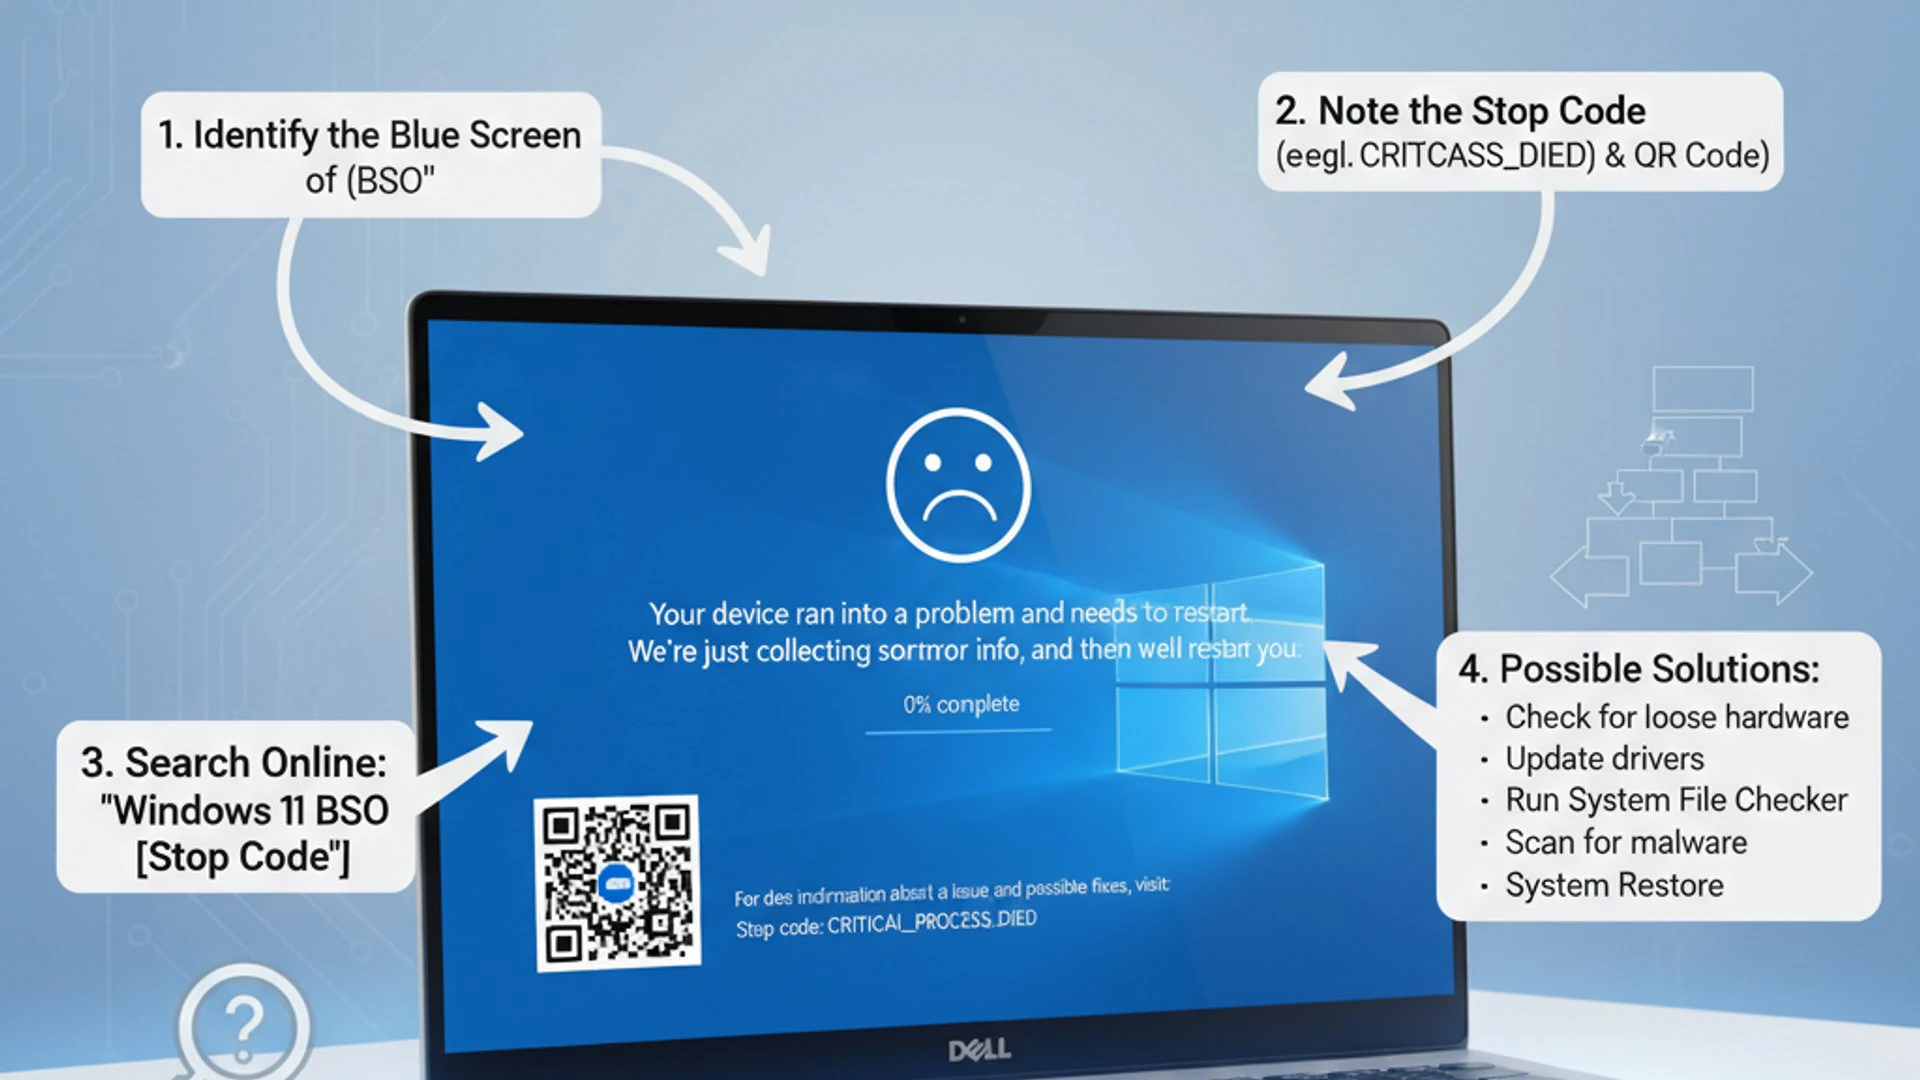
The Bluescreen of Death, or BSOD, is a full-screen error message displayed by Windows when it encounters a critical system error from which it cannot recover. Instead of crashing silently, Windows performs a “stop error,” displaying diagnostic information before restarting. This mechanism is designed to prevent potential data corruption and to provide clues for troubleshooting the underlying problem.
On Windows 11, the BSOD has a slightly more modern appearance compared to older versions, but its purpose remains the same. It indicates a severe issue, often related to hardware failure, driver conflicts, or critical software errors. When your Dell laptop bluescreens on Windows 11, it’s Windows’ way of saying, “I’ve hit a wall, and I need to stop to prevent further damage.”
These errors are not random; they are typically triggered by specific events or conditions. Identifying these conditions is the first step toward a permanent solution. The information presented on the bluescreen, particularly the stop code, is crucial for diagnosing the root cause.
Common Causes of BSOD on Dell Laptops
Dell laptops, like any other computing device, can experience BSODs due to a variety of factors. These causes can generally be categorized into hardware-related issues and software/driver conflicts. Understanding these categories helps narrow down the potential culprits when your Dell laptop bluescreens on Windows 11.
Hardware-Related Issues
Hardware problems are a significant contributor to BSODs. Even minor component malfunctions can lead to system instability. For Dell laptops, these can include:
- Faulty RAM: Defective or improperly seated RAM modules can cause memory access errors, leading to BSODs.
- Overheating: Inadequate cooling due to dust-clogged vents or failing fans can cause the CPU or GPU to overheat, triggering protective shutdowns and bluescreens.
- Hard Drive/SSD Failure: Bad sectors or impending failure of your storage drive can lead to critical system files becoming unreadable, resulting in crashes.
- Power Supply Issues: While less common in laptops due to external adapters, internal power delivery issues can cause instability.
- Peripheral Conflicts: Malfunctioning external devices (USB drives, printers, external GPUs) or their drivers can sometimes cause system crashes.
Diagnosing hardware issues often requires specific diagnostic tools or even physical inspection. It’s important to rule out software first, as hardware troubleshooting can be more complex.
Software and Driver Conflicts
Software-related issues are perhaps the most frequent cause of a Dell laptop bluescreen on Windows 11. These can be more challenging to pinpoint due to the intricate layers of software interacting within the operating system.
- Outdated or Corrupted Drivers: Drivers are essential for hardware communication. An outdated, incompatible, or corrupted driver (especially for graphics, chipset, or network adapters) is a very common cause of BSODs.
- Problematic Applications: Newly installed software, especially those that deeply integrate with the system or are poorly coded, can cause conflicts and crashes.
- Windows Updates: Occasionally, a Windows update might introduce bugs or incompatibilities with existing hardware or software, leading to instability.
- Malware and Viruses: Malicious software can corrupt system files, interfere with critical processes, and trigger BSODs.
- Corrupted System Files: Essential Windows system files can become corrupted due to various reasons, leading to critical errors.
- BIOS/UEFI Issues: An outdated or corrupted BIOS/UEFI firmware can sometimes cause hardware initialization failures that manifest as BSODs.
Addressing software conflicts typically involves updating, uninstalling, or repairing components within Windows 11. This is often where troubleshooting should begin.
Interpreting Bluescreen Error Codes
When your Dell laptop bluescreens on Windows 11, it displays a “Stop Code” or “Bug Check Code.” This code is your most valuable clue for diagnosing the problem. While the screen itself might not provide a full explanation, the code acts as a reference point for further research.
Common stop codes you might encounter include:
- CRITICAL_PROCESS_DIED: Indicates a critical system process has terminated unexpectedly.
- DRIVER_IRQL_NOT_LESS_OR_EQUAL: Often points to a faulty or incompatible device driver.
- PAGE_FAULT_IN_NONPAGED_AREA: Usually signifies a problem with RAM or a faulty driver trying to access an invalid memory address.
- UNEXPECTED_KERNEL_MODE_TRAP: Can indicate hardware failure, especially memory or CPU, or corrupted system files.
- SYSTEM_SERVICE_EXCEPTION: A general error often caused by faulty drivers, system service issues, or corrupted system files.
- MEMORY_MANAGEMENT: Directly points to issues with your system’s RAM.
When you see a BSOD, make sure to write down the exact stop code. You can then use this code to search online forums, Microsoft’s knowledge base, or Dell’s support resources for more specific troubleshooting steps. Understanding these codes provides context for subsequent troubleshooting efforts.
“The stop code displayed on a blue screen error provides vital information to diagnose the root cause of the system crash. Always note it down for effective troubleshooting.”
Initial Troubleshooting Steps for Dell BSOD
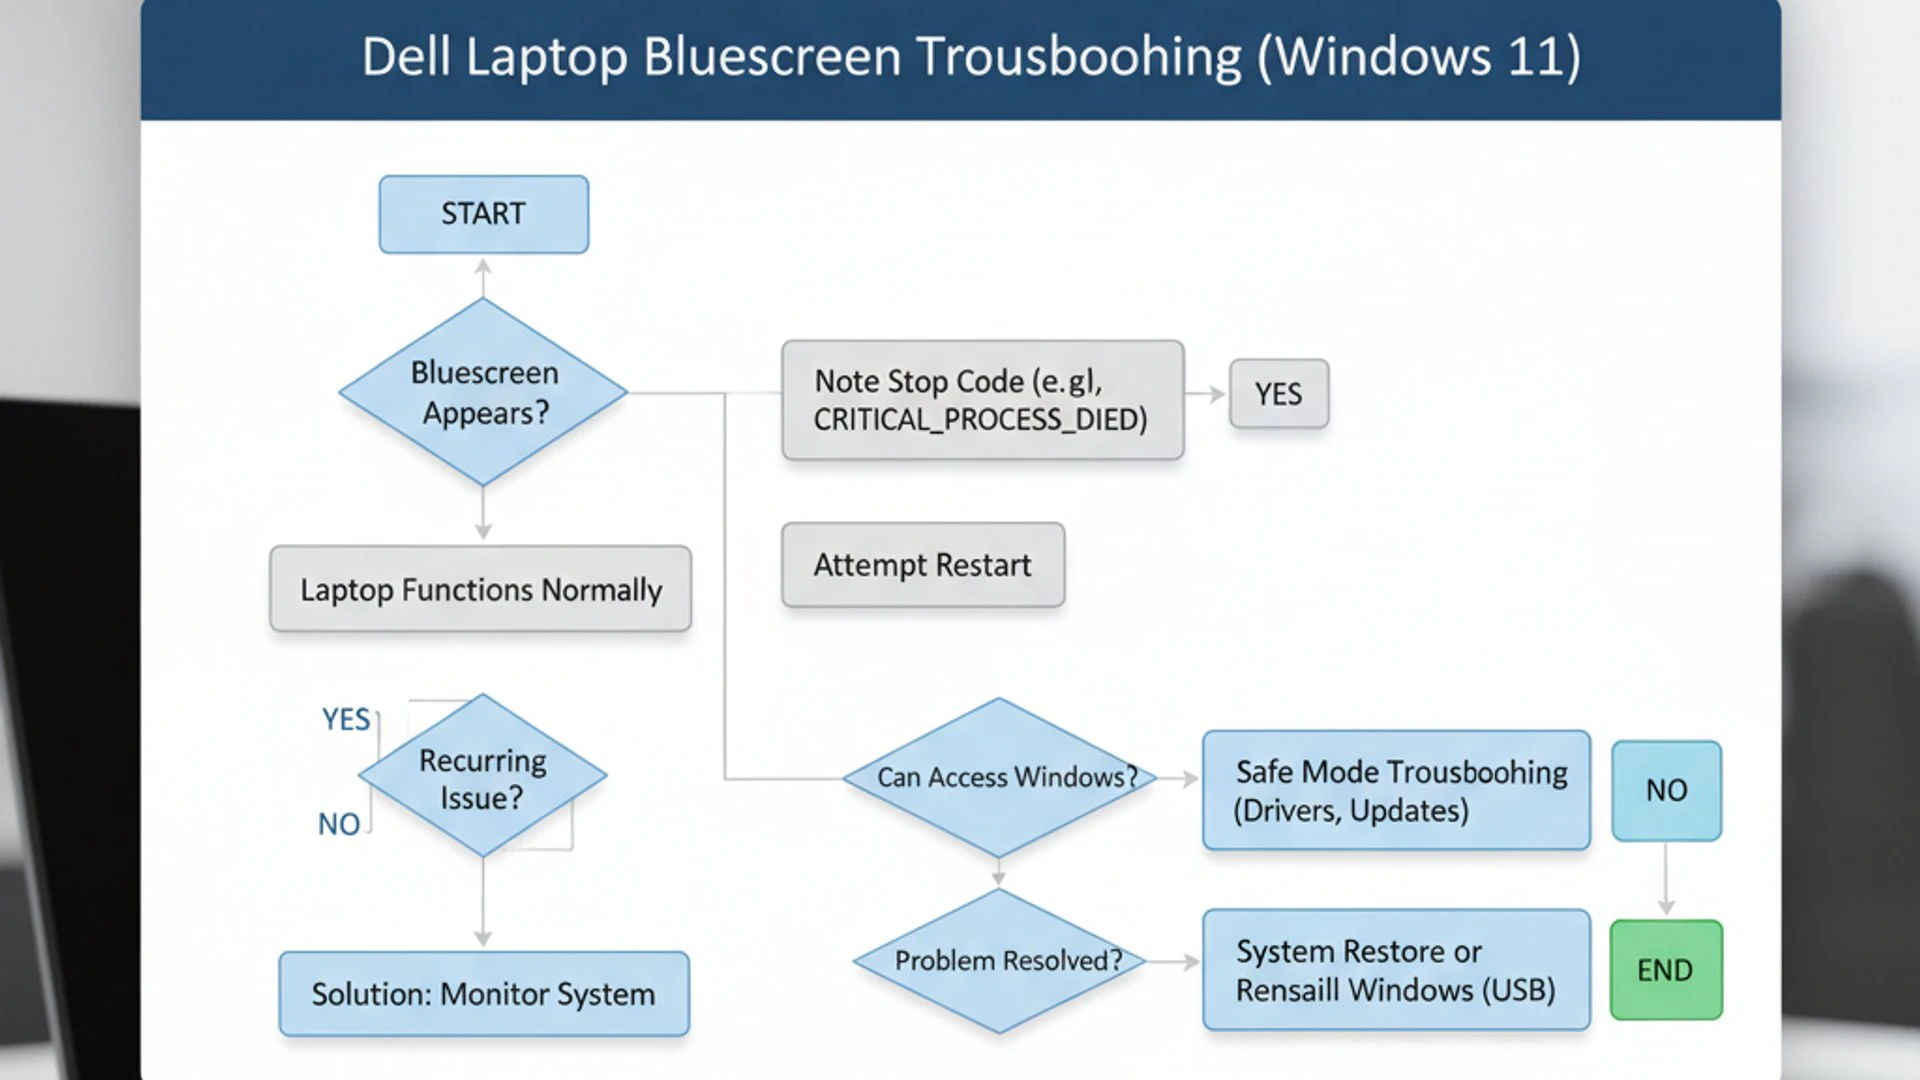
Before diving into complex diagnostics, there are several straightforward steps you can take when your Dell laptop bluescreens on Windows 11. These initial actions can often resolve transient issues or quickly identify obvious culprits, saving you significant time and effort.
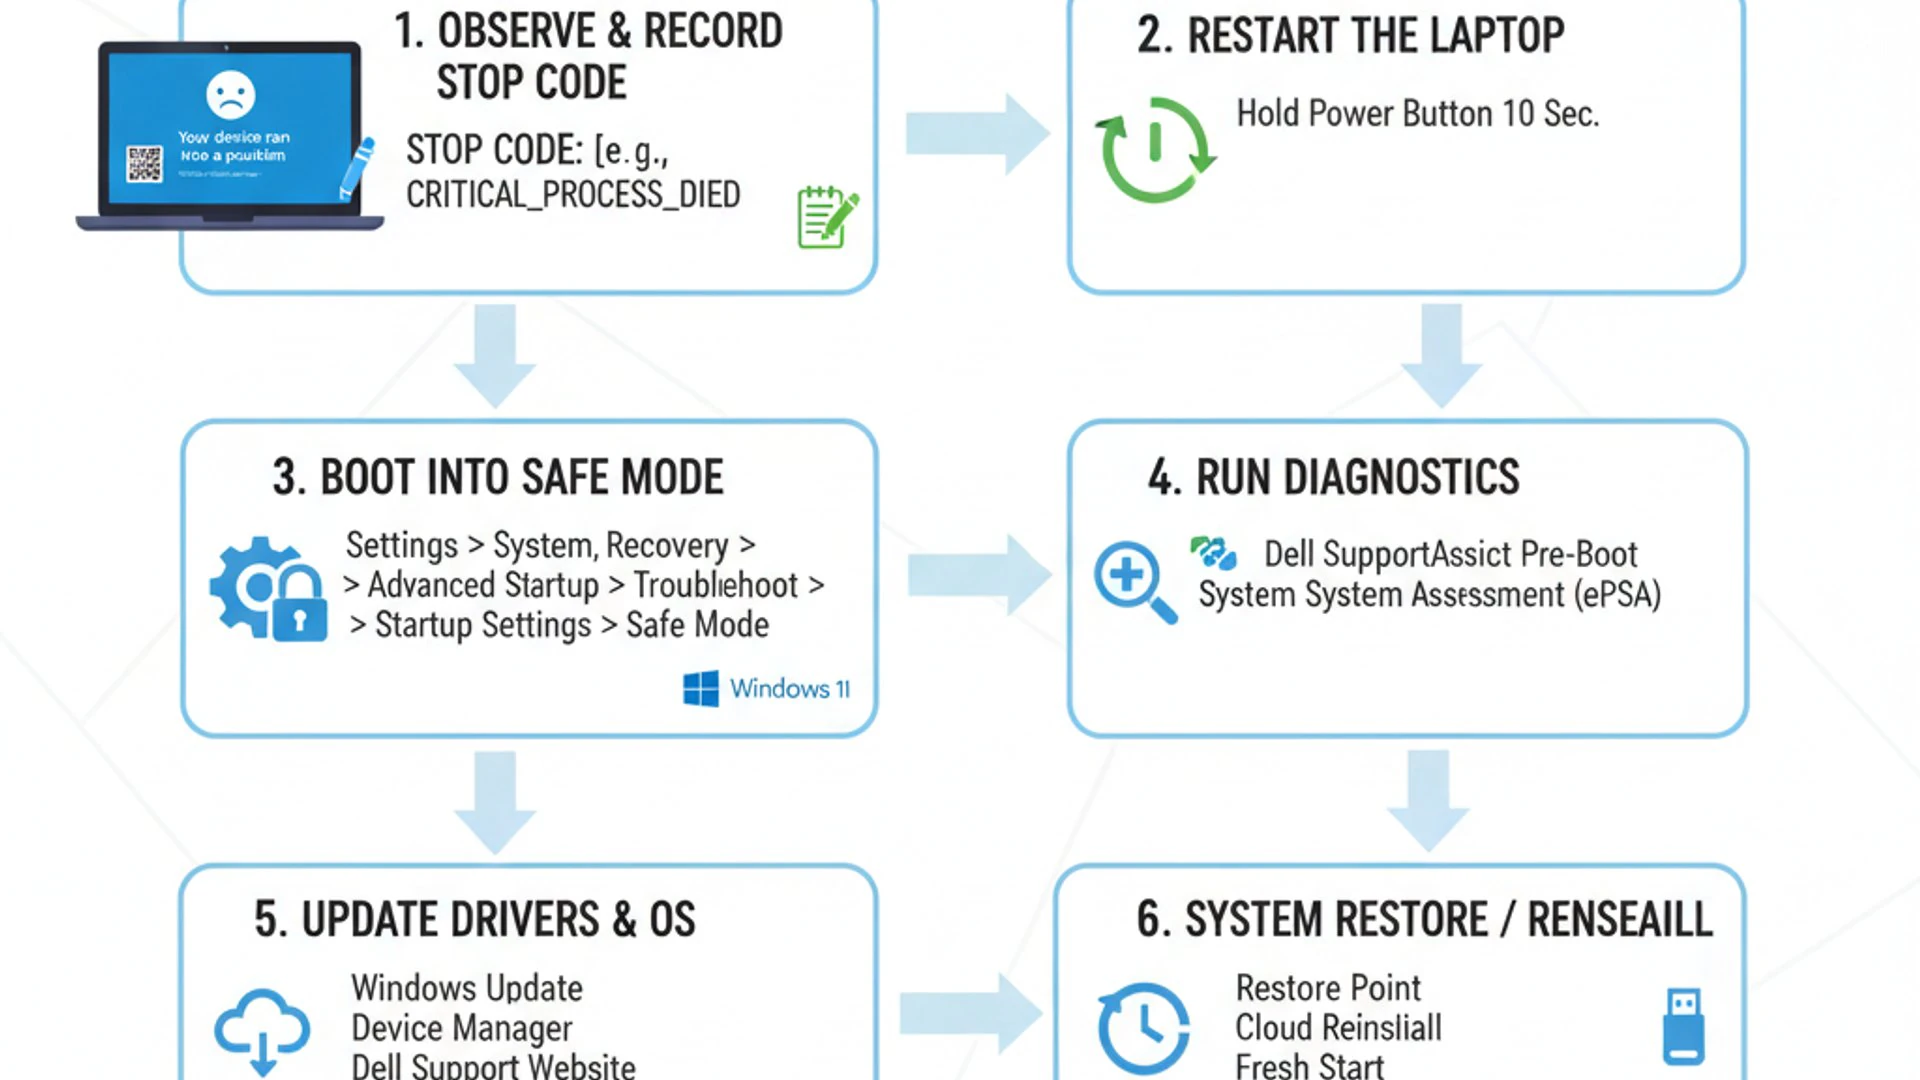
Restarting Your Dell Laptop Safely
Sometimes, a bluescreen is a one-off event caused by a temporary glitch. A simple restart can clear minor errors and restore normal operation. However, it’s important to do this safely.
- If your laptop is still on the bluescreen, wait for it to automatically restart.
- If it’s stuck, press and hold the power button for about 10-15 seconds until the laptop completely shuts down.
- Wait a few moments, then press the power button again to turn it back on.
If the system boots normally after a restart, monitor it closely for any recurrence of the BSOD. If it happens again, you’ll need to proceed with more in-depth troubleshooting.
Checking for Recent Hardware or Software Changes
One of the most effective diagnostic questions is: “What changed recently?” A bluescreen often appears shortly after a new component is installed or new software is added. This correlation is a strong indicator of the problem’s source.
- New Hardware: Did you just install a new RAM stick, an external drive, or any other peripheral? Try removing it to see if the BSOD resolves.
- New Software: Have you recently installed a new application, especially a utility, security software, or a game? Consider uninstalling it temporarily.
- Windows Updates: Did Windows 11 recently install an update? Sometimes updates can introduce incompatibilities.
If you can pinpoint a recent change, reversing it is often the quickest way to identify if it’s the cause of your Dell laptop bluescreen on Windows 11. This step helps isolate the problem efficiently.
Disconnecting External Peripherals
External devices can sometimes cause conflicts or draw too much power, leading to system instability and bluescreens. This is a very simple yet often effective troubleshooting step.
- Shut down your Dell laptop completely. Do not just restart.
- Disconnect all external peripherals: This includes USB drives, external hard drives, printers, webcams, docking stations, external monitors, and even your mouse and keyboard if they are not essential for booting.
- Restart your laptop.
If the BSOD disappears, reconnect your peripherals one by one, restarting the laptop after each connection, until you identify the problematic device. This method helps isolate external hardware conflicts.
Advanced Software-Based Solutions
Once you’ve exhausted the initial troubleshooting steps, it’s time to delve into more advanced software-based solutions. These methods target common causes of a Dell laptop bluescreen on Windows 11, such as outdated drivers, corrupted system files, and malicious software. A systematic approach here is key to resolving persistent issues.
Updating Drivers and Windows 11
Outdated, corrupted, or incompatible drivers are among the most frequent culprits behind BSODs. Ensuring all your drivers and Windows 11 itself are up-to-date is a critical step.
- Update Windows 11: Go to Settings > Windows Update and click “Check for updates.” Install all available updates, including optional ones, as they often contain critical bug fixes and driver updates.
- Prioritize Key Drivers: Focus on updating drivers for your graphics card (Intel, NVIDIA, AMD), chipset, network adapter (Wi-Fi and Ethernet), and storage controller. These are frequently involved in BSODs.
Keeping your system updated helps maintain compatibility and security, significantly reducing the chances of a Dell laptop bluescreen on Windows 11.
Using Dell SupportAssist for Driver Updates
Dell provides a dedicated tool called SupportAssist designed to keep your system optimized, secure, and up-to-date. It’s an excellent first stop for managing drivers on a Dell laptop.
- Launch Dell SupportAssist: You can usually find it in your Start Menu or by searching for “SupportAssist.”
- Run a Scan: Select the “Start Now” or “Scan Hardware and Drivers” option. SupportAssist will analyze your system and identify any outdated or missing drivers.
- Install Updates: Follow the prompts to download and install all recommended driver updates. Restart your laptop if prompted.
SupportAssist streamlines the process, ensuring you get the correct drivers directly from Dell, which often prevents compatibility issues.
Manual Driver Updates via Device Manager
If SupportAssist doesn’t resolve the issue or if you prefer a more hands-on approach, you can manually update drivers through Device Manager.
- Open Device Manager: Right-click the Start button and select “Device Manager.”
- Locate Devices: Expand categories like “Display adapters,” “Network adapters,” or “Sound, video and game controllers.”
- Update Driver: Right-click on the specific device (e.g., your graphics card), select “Update driver,” then choose “Search automatically for drivers.”
- Check Manufacturer’s Website: If Windows can’t find a newer driver, visit the Dell support website (support.dell.com) for your specific laptop model. Download the latest drivers directly and install them manually.
Always download drivers from the official manufacturer’s website to ensure authenticity and compatibility. Incorrect drivers can exacerbate BSOD problems.
Running System File Checker (SFC) and DISM
Corrupted Windows system files can lead to various issues, including BSODs. Windows 11 includes powerful command-line tools to repair these files.
- Open Command Prompt as Administrator: Search for “cmd” in the Start Menu, right-click “Command Prompt,” and select “Run as administrator.”
- Run SFC Scan: Type
sfc /scannowand press Enter. This tool scans for and repairs corrupted Windows system files. The process can take some time. - Run DISM Commands (if SFC fails): If SFC reports errors it couldn’t fix, or if the BSOD persists, run these DISM commands sequentially:
These commands repair the Windows image itself, which SFC relies on.
DISM /Online /Cleanup-Image /CheckHealthDISM /Online /Cleanup-Image /ScanHealthDISM /Online /Cleanup-Image /RestoreHealth
- Restart: After running these tools, restart your Dell laptop.
These tools are invaluable for maintaining the integrity of your Windows 11 installation and preventing a Dell laptop bluescreen on Windows 11 caused by file corruption.
Scanning for Malware and Viruses
Malicious software can deeply infiltrate your system, corrupting files, interfering with processes, and causing system instability that leads to BSODs. A thorough scan is essential.
- Use Windows Security: Open Settings > Privacy & security > Windows Security. Click “Virus & threat protection,” then “Scan options,” and select “Full scan.”
- Consider Third-Party Antivirus: If you have a reputable third-party antivirus installed, ensure it’s up-to-date and run a full system scan with it.
- Boot into Safe Mode: If you can’t complete a scan in normal mode due to repeated BSODs, try booting into Safe Mode and running the scan there.
Removing malware can often resolve persistent bluescreen issues and improve overall system performance and security.
Uninstalling Problematic Software or Updates
If you started experiencing BSODs after installing a new program or a Windows update, removing it might be the solution.
- Uninstall Software: Go to Settings > Apps > Installed apps. Find the recently installed program, click the three dots next to it, and select “Uninstall.”
- Remove Windows Updates: Go to Settings > Windows Update > Update history > Uninstall updates. Select the most recent update and click “Uninstall.”
If uninstalling the software or update resolves the Dell laptop bluescreen on Windows 11, you’ve found your culprit. You might need to find an alternative program or wait for a more stable update.
Adjusting Virtual Memory Settings
Virtual memory (or paging file) acts as an extension of your RAM, using hard drive space. Incorrect or insufficient virtual memory settings can sometimes contribute to system crashes, especially if your physical RAM is low or heavily utilized.
- Open System Properties: Search for “View advanced system settings” in the Start Menu and open it.
- Access Performance Settings: In the “System Properties” window, go to the “Advanced” tab, and under “Performance,” click “Settings.”
- Adjust Virtual Memory: In the “Performance Options” window, go to the “Advanced” tab, and under “Virtual memory,” click “Change.”
- Manage Paging File: Uncheck “Automatically manage paging file size for all drives.” Select your system drive (usually C:), choose “Custom size,” and set an initial size (e.g., 1.5 times your RAM) and a maximum size (e.g., 3 times your RAM).
- Apply and Restart: Click “Set,” then “OK” on all windows, and restart your laptop.
While often managed automatically, manually adjusting virtual memory can sometimes stabilize a system experiencing memory-related BSODs, particularly if you have less than 8GB of RAM.
Addressing Hardware-Related Bluescreen Issues
When software troubleshooting doesn’t resolve the Dell laptop bluescreen on Windows 11, the problem often lies with the hardware. Hardware diagnostics require a different set of tools and approaches, focusing on the physical components of your system. It’s crucial to approach these steps carefully.
Checking RAM (Memory) for Errors
Faulty RAM is a very common cause of BSODs, often manifesting with stop codes like MEMORY_MANAGEMENT or PAGE_FAULT_IN_NONPAGED_AREA. Windows 11 includes a built-in tool to check your memory.
- Open Windows Memory Diagnostic: Search for “Windows Memory Diagnostic” in the Start Menu and open it.
- Run the Test: Choose “Restart now and check for problems (recommended).” Your laptop will restart and run a comprehensive memory test.
- Review Results: After the test completes and Windows reboots, you’ll see the results in a notification. If no notification appears, check the Event Viewer (Windows Logs > System) for “MemoryDiagnostic” entries.
If errors are detected, it suggests a faulty RAM module. If you have multiple RAM sticks, try removing one at a time to isolate the defective one. For a Dell laptop, this might involve opening the chassis, which should only be done if you are comfortable and aware of warranty implications.
Diagnosing Hard Drive/SSD Health
Issues with your storage drive can lead to corrupted system files and BSODs. Checking its health is an important diagnostic step.
- Use CHKDSK: Open Command Prompt as administrator. Type
chkdsk /f /rand press Enter. You’ll likely be prompted to schedule the scan for the next restart. Type ‘Y’ and restart your laptop. This tool scans for and attempts to repair bad sectors. - Check S.M.A.R.T. Status: Many third-party utilities (like CrystalDiskInfo or Dell’s built-in diagnostics) can read your drive’s S.M.A.R.T. (Self-Monitoring, Analysis, and Reporting Technology) data, which indicates its health. Dell SupportAssist can also perform a quick hardware scan that includes the storage drive.
If your drive shows signs of failure, consider backing up your data immediately and replacing the drive. A failing drive is a critical issue that will inevitably lead to more severe problems.
Monitoring CPU and GPU Temperatures
Overheating is a common cause of system instability and BSODs, especially in laptops where cooling can be constrained. High temperatures can cause components to throttle performance or even shut down to prevent damage.
- Install Monitoring Software: Use tools like HWMonitor, Core Temp, or SpeedFan to monitor your CPU and GPU temperatures in real-time.
- Observe Temperatures Under Load: Run a demanding application or game and observe the temperatures. CPU temperatures consistently above 90-95°C (194-203°F) or GPU temperatures above 85-90°C (185-194°F) indicate overheating.
If overheating is an issue:
- Clean Vents: Use compressed air to clear dust from your laptop’s vents and fans.
- Use a Cooling Pad: A laptop cooling pad can significantly improve airflow.
- Check Thermal Paste: In severe cases, the thermal paste on your CPU/GPU might need to be reapplied, which is an advanced procedure best left to professionals.
Preventing overheating is crucial for the longevity and stability of your Dell laptop, helping to avoid a Dell laptop bluescreen on Windows 11.
Verifying Power Supply Stability
While less common for laptops with external power adapters, internal power delivery issues can still occur. An unstable power supply can lead to component malfunction and system crashes.
- Check Adapter and Cable: Ensure your Dell power adapter is working correctly and the cable is not damaged. Try using a different, compatible Dell adapter if available.
- Battery Health: A failing laptop battery can sometimes contribute to power instability, especially if the system draws more power than the adapter can provide. Check your battery health status (often available in Dell SupportAssist or BIOS).
If you suspect power supply issues, especially if the BSODs occur more frequently when running on battery or under heavy load, further diagnosis or replacement of the adapter/battery might be necessary. This helps ensure consistent power, preventing a Dell laptop bluescreen on Windows 11.
Utilizing Windows 11 Recovery Options
When all troubleshooting efforts fail to resolve the Dell laptop bluescreen on Windows 11, Windows 11 offers several powerful recovery options. These range from reverting to a previous stable state to completely reinstalling the operating system. It’s important to understand the implications of each option before proceeding.
Performing a System Restore
System Restore allows you to revert your system files, installed applications, Windows Registry, and system settings to an earlier point in time, called a restore point. This is incredibly useful if the BSOD started after a recent software installation or update.
- Access System Restore: Search for “Create a restore point” in the Start Menu and open it. In the “System Properties” window, click “System Restore.”
- Choose a Restore Point: Click “Next” and select a restore point created before you started experiencing the BSODs. If you don’t see any, you might not have System Protection enabled.
- Confirm and Execute: Follow the prompts to confirm your choice. Your laptop will restart and begin the restore process.
System Restore does not affect your personal files, but it will uninstall any programs or drivers installed after the chosen restore point. This is a non-destructive way to reverse system changes.
Resetting Windows 11 While Keeping Your Files
If System Restore doesn’t work or if you don’t have suitable restore points, resetting Windows 11 can be a more drastic but often effective solution. This option reinstalls Windows 11 but gives you the choice to keep your personal files.
- Access Reset PC: Go to Settings > System > Recovery. Under “Recovery options,” click “Reset PC.”
- Choose “Keep my files”: Select the option “Keep my files.” This will remove apps and settings but retain your personal data.
- Cloud Download or Local Reinstall: Choose “Cloud download” (downloads a fresh copy of Windows) or “Local reinstall” (uses existing system files). Cloud download is often more reliable but requires internet.
- Confirm and Reset: Follow the on-screen instructions to confirm the reset. This process can take a while.
This method effectively gives you a fresh Windows installation while preserving your documents, photos, and other personal data. You will need to reinstall all your applications afterward.
Clean Installation of Windows 11
A clean installation is the ultimate solution for persistent BSODs, especially if you suspect deep-seated software corruption or malware that cannot be removed. This option completely wipes your hard drive and installs a fresh copy of Windows 11.
- Backup Your Data: This step is critical. A clean install will delete everything on your primary drive. Ensure all your important files are backed up to an external drive or cloud storage. Consider a system image backup on Windows 11 if you want to preserve your entire system state.
- Create Installation Media: Download the Windows 11 Media Creation Tool from Microsoft’s website and use it to create a bootable USB drive.
- Boot from USB: Restart your Dell laptop and boot from the USB drive (you might need to adjust boot order in BIOS/UEFI).
- Follow Installation Prompts: Select “Custom: Install Windows only (advanced)” and delete all partitions on your primary drive before installing Windows 11 on the unallocated space.
A clean installation is the most thorough way to eliminate software-related causes of a Dell laptop bluescreen on Windows 11, providing a completely fresh start. It is often the last resort before considering professional hardware repair.
Preventing Future Bluescreen Errors on Dell Laptops
Once you’ve resolved the immediate BSOD issue on your Dell laptop, the next crucial step is to implement proactive strategies to prevent future occurrences. Regular maintenance and vigilant monitoring are key to maintaining a stable and reliable Windows 11 system.
Regular Maintenance and Updates
Consistent system maintenance is the cornerstone of preventing bluescreen errors. It helps keep your operating system and hardware in optimal condition.
- Keep Windows Updated: Regularly check for and install all available Windows 11 updates (Settings > Windows Update). These updates often include critical security patches and bug fixes that improve system stability.
- Disk Cleanup: Periodically run Disk Cleanup (search for it in the Start Menu) to remove temporary files, system logs, and other unnecessary data that can clutter your drive.
- Defragment Drives (for HDDs): If you have a traditional hard disk drive (HDD), schedule regular defragmentation (search for “Defragment and Optimize Drives”). SSDs do not require defragmentation.
- Clean Physical Components: Regularly clean your laptop’s vents with compressed air to prevent dust buildup, which can lead to overheating.
These simple maintenance tasks contribute significantly to a healthier and more stable system, reducing the likelihood of a Dell laptop bluescreen on Windows 11.
Keeping Drivers Up-to-Date
As highlighted earlier, outdated or corrupted drivers are a primary cause of BSODs. Making driver updates a routine part of your maintenance schedule is essential.
- Utilize Dell SupportAssist: Make it a habit to run Dell SupportAssist monthly to check for and install the latest drivers and firmware updates specific to your Dell model.
- Manual Checks for Critical Drivers: Periodically visit the Dell support website for your laptop model to manually check for newer versions of graphics, chipset, and network drivers.
- Avoid Generic Drivers: Always prioritize drivers from Dell or the component manufacturer (e.g., NVIDIA, AMD, Intel) over generic drivers provided by Windows Update, unless a specific issue requires a generic driver.
Proactive driver management can prevent many compatibility and performance issues that lead to bluescreens.
Monitoring System Health
Being aware of your system’s health can help you catch potential problems before they escalate into a BSOD. Several tools can assist with this.
- Task Manager: Use Task Manager (Ctrl+Shift+Esc) to monitor CPU, RAM, Disk, and GPU usage. High, sustained usage could indicate a resource hog or a potential issue.
- Event Viewer: The Event Viewer (search for it in the Start Menu) logs system events, including errors and warnings. Regularly check Windows Logs > System and Application for recurring errors that might precede a BSOD.
- Temperature Monitoring: Continue to use temperature monitoring software (e.g., HWMonitor) to ensure your CPU and GPU are operating within safe temperature ranges, especially under load.
Early detection of unusual system behavior can provide an opportunity to address issues before they cause a Dell laptop bluescreen on Windows 11.
When to Seek Professional Help
While this guide provides extensive troubleshooting steps, there are instances where seeking professional technical assistance becomes necessary. Knowing when to call in the experts can save you time, prevent further damage, and ensure a proper resolution.
“Attempting complex hardware repairs without proper tools or expertise can void warranties and potentially cause more harm than good. Recognize your limits and consult a professional when necessary.”
Consider professional help if:
- Persistent Hardware Issues: You’ve diagnosed a hardware problem (e.g., faulty motherboard, CPU, or GPU) that requires physical replacement or specialized tools.
- Repeated BSODs After All Steps: You’ve diligently followed all software and basic hardware troubleshooting steps in this guide, but the Dell laptop bluescreen on Windows 11 continues to occur frequently.
- Data Recovery Concerns: The BSOD is preventing you from accessing your data, and you lack a recent backup or the expertise to perform data recovery.
- Warranty is Active: If your Dell laptop is still under warranty, attempting complex repairs yourself might void it. Contact Dell support directly for assistance.
- Lack of Confidence or Time: You’re uncomfortable performing some of the more advanced troubleshooting steps, or you simply don’t have the time to dedicate to extensive diagnostics.
A qualified technician can perform deeper diagnostics, including specialized hardware tests, and has access to replacement parts and expertise that might be beyond the average user. They can efficiently diagnose and repair issues that are difficult to pinpoint, ensuring your Dell laptop returns to stable operation.
Conclusion: Restoring Stability to Your Dell Windows 11 Laptop
A Dell laptop bluescreen on Windows 11 can be a daunting problem, but it is rarely insurmountable. By systematically approaching the issue, understanding the underlying causes, and applying the troubleshooting steps outlined in this comprehensive guide, you can effectively diagnose and resolve most BSOD errors. From simple restarts and driver updates to advanced system file repairs and hardware diagnostics, each step brings you closer to a stable and reliable computing experience.
Remember, the key to overcoming these frustrating errors lies in patience, methodical troubleshooting, and proactive maintenance. Always start with the basics, pay attention to error codes, and keep your Windows 11 operating system and drivers meticulously updated. Regular system health monitoring and timely backups are your best defense against unexpected crashes.
Should you find yourself facing persistent issues or complex hardware failures, don’t hesitate to seek professional assistance. Ultimately, your goal is to restore and maintain the stability of your Dell Windows 11 laptop, ensuring smooth operation and protecting your valuable data. By implementing these solutions and adopting a proactive mindset, you can significantly reduce the incidence of bluescreen errors and enjoy a more consistent and productive computing journey.
For more interesting articles, stay tuned to Winsides.com!









Community
Comments (0)