

Imagine working diligently on an important project, engrossed in a game, or simply browsing the web, when suddenly your Windows 11 computer abruptly shuts down and reboots without warning. There’s no dreaded Blue Screen of Death (BSOD) to offer a cryptic error code; just a sudden, jarring power loss. Upon checking the Event Viewer, you discover a recurring entry: Kernel-Power Event ID 41. This particular event signifies that the system rebooted without cleanly shutting down first, indicating an unexpected power loss or system crash.
The absence of a BSOD makes this issue particularly frustrating. Without a clear error message, diagnosing the root cause feels like searching for a needle in a haystack. Users often feel helpless, wondering if their hardware is failing or if a software glitch is to blame. This article aims to demystify the Kernel-Power Event ID 41 when it occurs without an accompanying BSOD on Windows 11, providing a comprehensive guide to understanding, troubleshooting, and ultimately resolving this elusive problem.
We will delve into the technical specifics of this event, explore its common culprits, and offer a structured, step-by-step approach to diagnosis and repair. Our goal is to empower you with the knowledge and tools necessary to restore stability to your system, preventing future unexpected reboots and ensuring a smoother computing experience on your Windows 11 machine.
Table of contents
Key Takeaways: Understanding and Addressing Event ID 41
Before diving into the detailed explanations and troubleshooting steps, here are the most critical points and actionable advice regarding Kernel-Power Event ID 41 no BSOD Windows 11: For additional context, see Microsoft’s official documentation on Event ID 41 Kernel-Power, HWInfo for monitoring system hardware, MemTest86 to check RAM for errors, and Windows Debugger Tools.
- Event ID 41 Indicates Unexpected Power Loss: This event means your system rebooted without a proper shutdown, often pointing to a hardware-related power issue rather than a software crash that would typically trigger a BSOD.
- Power Supply Unit (PSU) is a Prime Suspect: Insufficient wattage, degradation, or a faulty PSU is a very common cause. Always check its connections and consider testing its output or replacing it if other solutions fail.
- Overheating is Critical: High CPU or GPU temperatures can force an emergency shutdown. Regularly monitor your system’s thermals, especially under load, and ensure adequate cooling and airflow.
- Update Drivers and System Files: Outdated or corrupted drivers, particularly for chipset, graphics, and network adapters, can lead to instability. Use SFC and DISM to check for system file corruption.
- Hardware Diagnostics are Essential: Faulty RAM or storage devices can cause inexplicable reboots. Utilize built-in Windows Memory Diagnostic and manufacturer-specific tools to test these components.
- Systematic Troubleshooting is Key: Approach the problem methodically, testing one potential cause at a time. This prevents unnecessary changes and helps pinpoint the exact issue.
- Consider Professional Help: If you’re uncomfortable with hardware testing or advanced diagnostics, or if all your efforts prove fruitless, don’t hesitate to consult a qualified technician.
Deciphering Kernel-Power Event ID 41: What It Means Without a BSOD
The Kernel-Power Event ID 41 is a critical entry in the Windows Event Viewer, signaling that your system has experienced an unexpected shutdown or reboot. This event is logged whenever the system detects that it did not shut down cleanly. Essentially, it’s Windows reporting that it lost power or crashed in a way that prevented it from writing a proper shutdown record or a crash dump file.
When you encounter Kernel-Power Event ID 41 no BSOD Windows 11, it means the operating system itself didn’t initiate the shutdown. Instead, something external or low-level within the hardware stack caused the power interruption. This distinction is crucial for effective troubleshooting, as it shifts the focus from software bugs to potential hardware instabilities or power delivery problems.
Understanding this event is the first step towards diagnosing the underlying issue. It acts as a general indicator of an abrupt power loss, prompting you to investigate further into the system’s physical and electrical components, rather than immediately suspecting a software conflict or operating system corruption.
Understanding the Event Viewer Entry
To view this event, you’ll typically navigate to the Event Viewer in Windows 11. You can access it by searching for “Event Viewer” in the Start menu. Once open, expand Windows Logs, then select System. Here, you’ll find a list of events, and you can filter by Event ID 41 to quickly locate the relevant entries.
A typical Kernel-Power Event ID 41 entry will look something like this:
Log Name: System
Source: Microsoft-Windows-Kernel-Power
Date: [Date and Time]
Event ID: 41
Task Category: (63)
Level: Critical
Keywords: (70368744177664),(2)
User: SYSTEM
Computer: [Your Computer Name]
Description: The system has rebooted without cleanly shutting down first. This error could be caused if the system stopped responding, crashed, or lost power unexpectedly.
The “Task Category (63)” and “Keywords (70368744177664),(2)” are technical identifiers that confirm it’s a Kernel-Power event. The Level: Critical is particularly important, as it highlights the severity of the issue. While the description is generic, it points directly to an unexpected power event, guiding your diagnostic efforts.
Why No Blue Screen of Death?
The absence of a Blue Screen of Death (BSOD) is the defining characteristic of this particular problem. A BSOD occurs when Windows encounters a critical error from which it cannot recover, often due to a faulty driver, corrupted system file, or a severe hardware issue that the operating system can detect and report. When a BSOD happens, Windows attempts to create a memory dump file (minidump or full dump) that can be analyzed to identify the cause.
However, with Kernel-Power Event ID 41 no BSOD Windows 11, the system doesn’t crash in a way that allows Windows to generate a BSOD or a proper dump file. Instead, the power is cut abruptly, or a component fails so catastrophically that the system simply loses power or reboots instantly. This can happen due to:
- A sudden power surge or drop from the wall outlet.
- A failing Power Supply Unit (PSU) that can no longer deliver stable power.
- Overheating components (CPU, GPU) triggering an emergency shutdown mechanism built into the hardware.
- A short circuit within the system.
- A faulty motherboard component that causes an immediate power cycle.
In these scenarios, the system doesn’t have the opportunity to display a BSOD or record a crash dump because the power is gone before Windows can process the error. This makes troubleshooting more challenging, as you lack the specific error codes that a BSOD would provide. Therefore, the focus shifts to hardware integrity and power stability.
Common Causes of Kernel-Power Event ID 41 Without a BSOD
When your Windows 11 system experiences Kernel-Power Event ID 41 no BSOD, it’s often a symptom of underlying hardware or power delivery issues rather than a software bug. Pinpointing the exact cause requires a systematic approach, as several components can contribute to unexpected reboots. Understanding these common culprits is crucial for effective diagnosis.
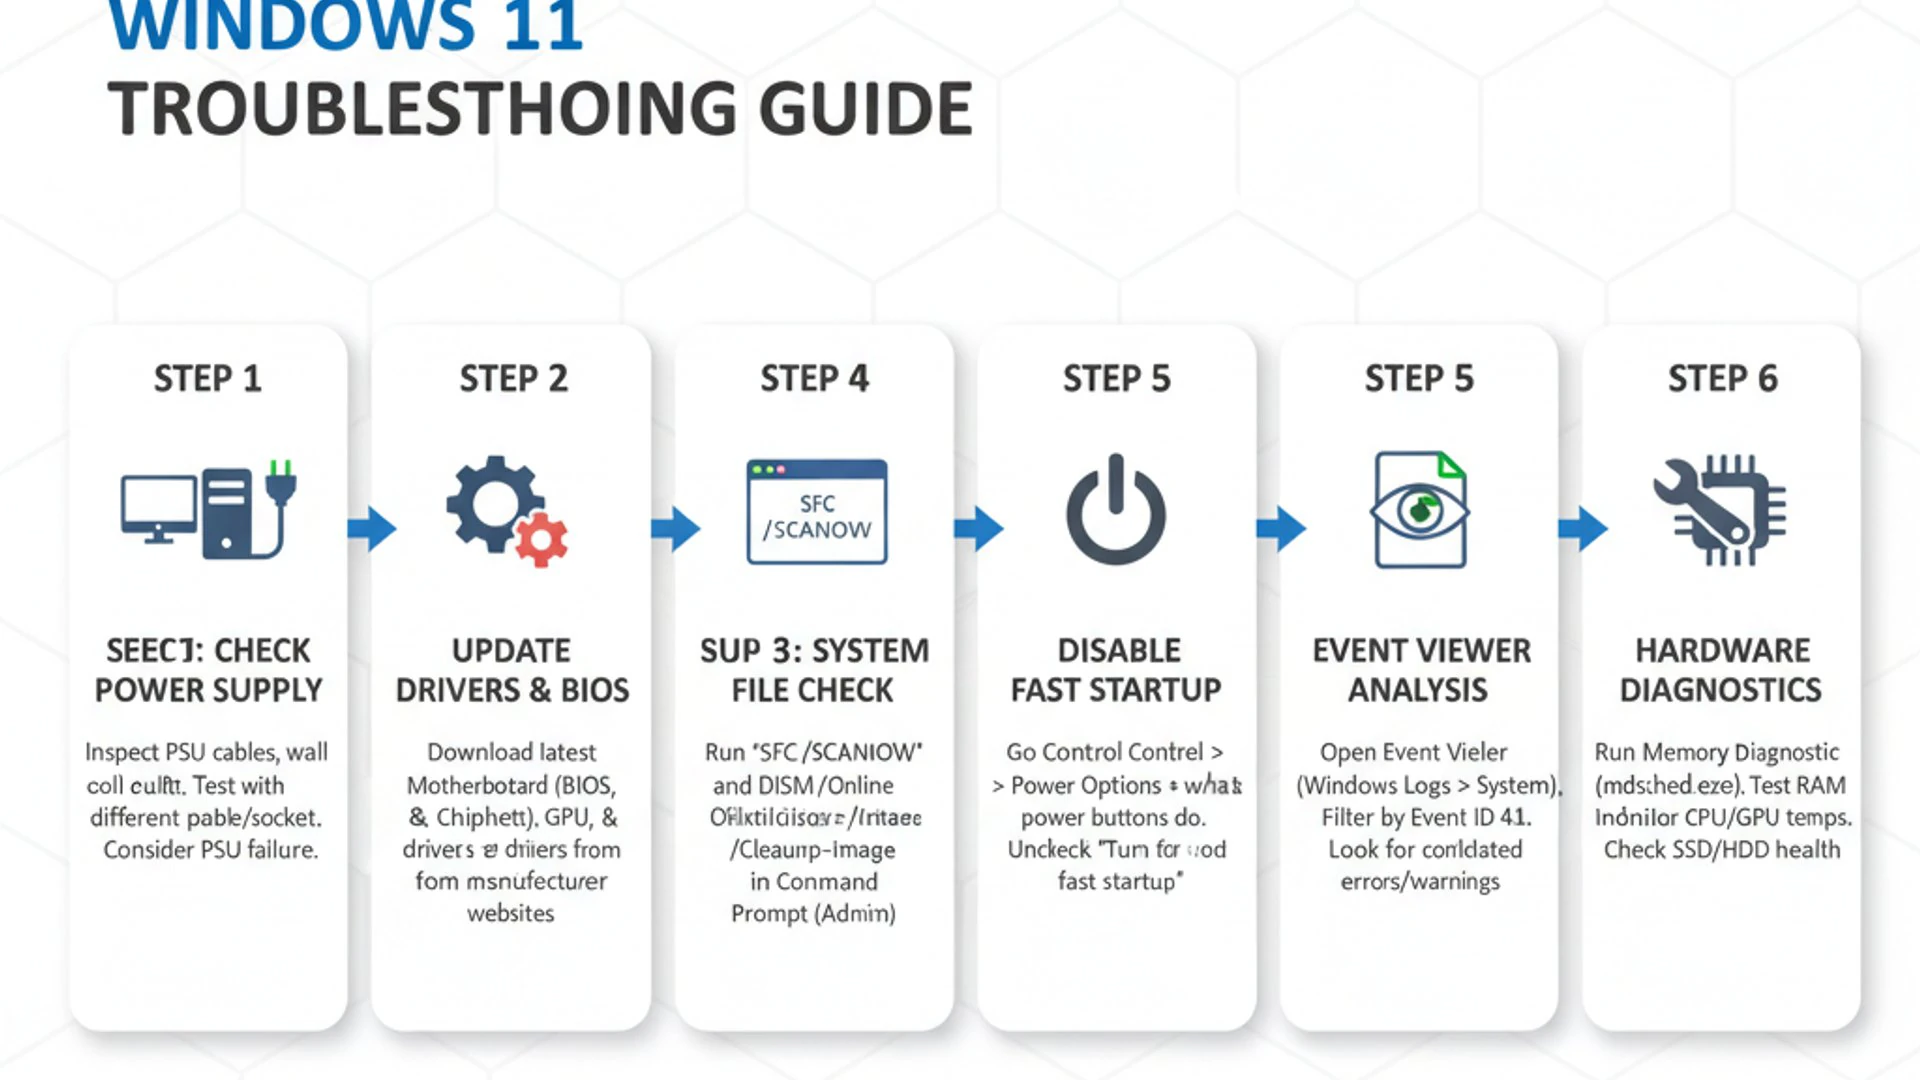
This section will detail the primary reasons why your system might be abruptly shutting down or rebooting without the typical Blue Screen of Death. From power supply deficiencies to overheating components and subtle hardware malfunctions, we’ll explore each potential cause to help you narrow down the problem. Identifying the source is the most critical step in resolving this frustrating issue and restoring stability to your PC.
Power Supply Unit (PSU) Issues
The Power Supply Unit (PSU) is the heart of your computer, delivering electricity to every component. A faulty or inadequate PSU is one of the most frequent causes of Kernel-Power Event ID 41 no BSOD Windows 11. If the PSU cannot provide stable and sufficient power, especially under load, the system can abruptly shut down.
This can manifest as random reboots during demanding tasks like gaming or video editing, or even during idle periods if the PSU is severely degraded. The sudden loss of power prevents Windows from logging a proper crash, leading to the Event ID 41 entry.
Insufficient Wattage or Degradation
One common PSU problem is insufficient wattage. If you’ve upgraded components like a powerful new graphics card or CPU without upgrading your PSU, it might not be able to meet the power demands of your system. When components draw more power than the PSU can reliably deliver, especially during peak usage, it can trigger an emergency shutdown to prevent damage.
Another factor is PSU degradation over time. Capacitors inside the PSU can dry out or swell, reducing its efficiency and stability. An aging PSU might struggle to deliver clean power, leading to voltage fluctuations that cause unexpected reboots. Even if the PSU was sufficient initially, its performance can decline, making it prone to failure under stress.
Overheating Components
Excessive heat is a silent killer for computer components and a significant cause of unexpected shutdowns. Modern CPUs and GPUs are designed with thermal protection mechanisms that will force a system shutdown if temperatures exceed safe operating limits. This is a protective measure to prevent permanent damage to the hardware.
When such a shutdown occurs, it’s often instantaneous, giving Windows no time to generate a BSOD or a crash dump. The system simply powers off, leading to the Kernel-Power Event ID 41. This is particularly common during intensive tasks that push the CPU or GPU to their limits, such as gaming, video rendering, or complex computations.
CPU and GPU Thermal Throttling
CPU and GPU thermal throttling is a built-in feature where the components reduce their clock speed to lower heat output when temperatures rise. If throttling isn’t enough to bring temperatures down, the system’s firmware will initiate an emergency shutdown. This protective shutdown is often indistinguishable from a power loss from the operating system’s perspective, resulting in Event ID 41.
Poor airflow within the case, clogged heatsinks, malfunctioning fans, or dried-out thermal paste can all contribute to overheating. It’s crucial to ensure your system has adequate cooling and that all fans are operating correctly to prevent these thermal shutdowns.
Driver Incompatibilities or Corruption
While Kernel-Power Event ID 41 no BSOD Windows 11 often points to hardware, problematic drivers can sometimes indirectly contribute to system instability that leads to unexpected reboots. A severely corrupted or incompatible driver, especially for critical components like the chipset, graphics card, or network adapter, can cause the system to freeze or become unresponsive.
If the system becomes completely unresponsive, a user might manually force a shutdown by holding the power button, or in some cases, the system might enter a state where it appears to lose power, leading to Event ID 41. This is less common than direct hardware failure but still a possibility worth investigating.
Outdated drivers can also introduce instabilities, particularly after a major Windows update. Ensuring all drivers are current and compatible with Windows 11 is a fundamental troubleshooting step.
Corrupted System Files or OS Instability
Corrupted system files or general operating system instability, while more likely to cause a BSOD, can sometimes lead to an unrecoverable state where the system effectively crashes without a proper error screen. If critical OS files are damaged, Windows 11 might fail to execute a clean shutdown or even generate a crash dump before the system powers off.
This can be caused by improper shutdowns (which ironically, Event ID 41 itself represents), malware infections, or faulty storage drives. Tools like System File Checker (SFC) and Deployment Image Servicing and Management (DISM) are designed to repair such corruptions and restore system integrity.
BIOS/UEFI Settings and Firmware Issues
The Basic Input/Output System (BIOS) or Unified Extensible Firmware Interface (UEFI) is the firmware that initializes your hardware before Windows loads. Incorrect or outdated BIOS/UEFI settings can significantly impact system stability and power management. Overclocking settings, for instance, if unstable, can lead to immediate system crashes without a BSOD.
Issues with power management settings within the BIOS/UEFI, or even a corrupted firmware update, can also cause unexpected reboots. Ensuring your BIOS/UEFI is up-to-date and configured correctly is an important step in troubleshooting Kernel-Power Event ID 41.
Hardware Malfunctions (RAM, Storage, Motherboard)
Beyond the PSU and overheating, other hardware components can also be culprits. Faulty RAM (Random Access Memory) can lead to data corruption and system instability, causing crashes that might not always result in a BSOD, especially if the memory error is severe enough to halt the system instantly.
Similarly, a failing storage device (HDD or SSD) can cause the system to freeze or crash if it fails to read or write critical data. While often leading to specific error messages, in some cases, it can result in an abrupt power loss. Lastly, a failing motherboard, with its complex circuitry, can exhibit a wide range of unpredictable behaviors, including sudden shutdowns, due to issues with power delivery, component communication, or general degradation. Diagnosing these can be more challenging and often requires component testing or substitution.
Step-by-Step Troubleshooting for Kernel-Power Event ID 41
Addressing Kernel-Power Event ID 41 no BSOD Windows 11 requires a methodical approach, systematically eliminating potential causes. Since this issue often points to hardware or power-related problems, our troubleshooting steps will focus heavily on these areas. It’s crucial to perform these checks one by one, testing your system after each potential fix to identify the specific culprit.
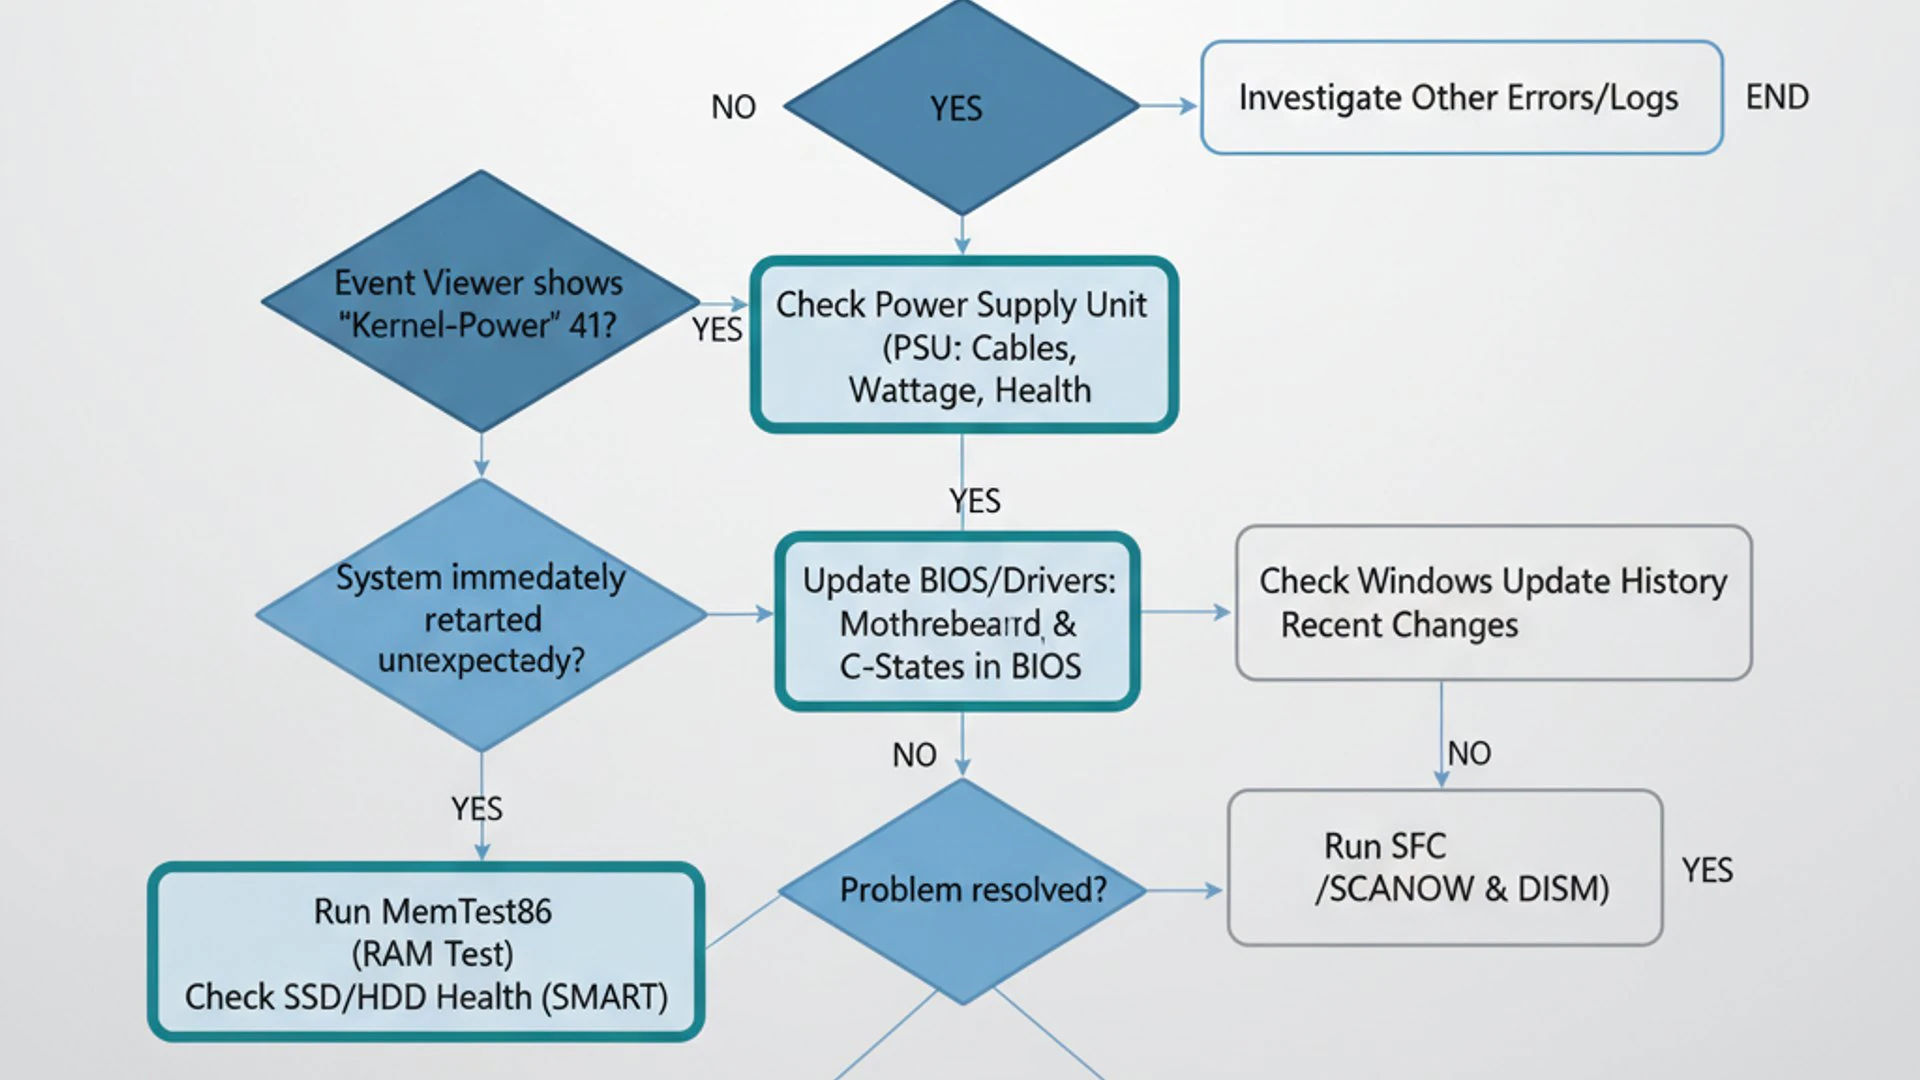
Remember to back up any critical data before performing significant hardware changes or system modifications. A system image backup on Windows 11 can be invaluable for restoring your system to a working state if something goes awry. Let’s begin the diagnostic journey to restore your system’s stability.
Checking Power Supply Unit (PSU) Integrity
The Power Supply Unit is often the first suspect. Its integrity is paramount for stable system operation. Start by physically inspecting your PSU and its connections.
- Inspect Cables: Ensure all power cables are securely connected to the motherboard, graphics card, and other components. Loose connections can cause intermittent power delivery.
- Check for Dust and Airflow: Make sure the PSU fan is clean and unobstructed. Dust buildup can lead to overheating within the PSU itself, reducing its efficiency.
- Listen for Unusual Noises: A failing PSU might emit whining, buzzing, or grinding sounds.
- Test with Another Outlet/Surge Protector: Plug your PC directly into a different wall outlet or use a known-good surge protector to rule out issues with your power source.
- Consider a PSU Tester: For a more definitive check, you can purchase an inexpensive PSU tester to verify voltage outputs. However, these testers only check if the PSU powers on and provides basic voltages, not its stability under load.
- Swap PSU (If Possible): The most reliable way to test a PSU is to temporarily replace it with a known-good, appropriately wattaged unit. If the problem disappears, you’ve found your culprit.
Monitoring Power Consumption
To determine if your PSU is struggling, you can estimate your system’s power consumption. Online PSU calculators (e.g., from OuterVision or component manufacturers) can help you estimate the wattage required for your components. Compare this to your PSU’s rated wattage. Ideally, your PSU should have at least 20-30% headroom above your estimated peak consumption.
While you can’t easily monitor PSU output in real-time without specialized equipment, observing when the crashes occur (e.g., during high load) can indicate if the PSU is being pushed beyond its limits. If your PSU is old or barely meets the minimum wattage for your current components, upgrading it might be a necessary step.
Monitoring System Temperatures
Overheating is a common cause of unexpected shutdowns. Monitoring your CPU and GPU temperatures is critical. There are several reliable tools available:
- HWMonitor (CPU-ID): A free, lightweight tool that displays real-time temperatures, voltages, and fan speeds for various components.
- Core Temp (ALCPU): Specifically for CPU temperature monitoring.
- MSI Afterburner (MSI): Excellent for GPU monitoring, overclocking, and custom fan curves.
Run these tools in the background while performing tasks that usually trigger the shutdown (e.g., gaming, benchmarking). Note the temperatures just before a crash. CPUs typically shouldn’t exceed 85-90°C, and GPUs should ideally stay below 80-85°C under heavy load. If you see temperatures consistently exceeding these thresholds, take action:
- Clean Dust: Use compressed air to clean dust from CPU heatsink, GPU fans, and case fans.
- Improve Airflow: Ensure proper case fan configuration (intake/exhaust) and good cable management.
- Reapply Thermal Paste: If CPU temperatures are high despite cleaning, consider reapplying thermal paste to the CPU.
- Check Fan Functionality: Ensure all case fans, CPU cooler fans, and GPU fans are spinning correctly.
Updating and Reinstalling Drivers
Outdated or corrupted drivers can introduce system instability. Focus on critical drivers first:
- Graphics Card Drivers: Visit the NVIDIA, AMD, or Intel website directly to download the latest drivers for your GPU. Perform a clean installation (often an option within the installer).
- Chipset Drivers: Go to your motherboard manufacturer’s website and download the latest chipset drivers for your specific model.
- Network Adapter Drivers: Update drivers for your Ethernet and Wi-Fi adapters.
- Other Peripheral Drivers: If the issue started after installing a new device, ensure its drivers are up-to-date.
To reinstall a driver:
- Press
Win + Xand select Device Manager. - Locate the problematic device, right-click, and choose Uninstall device. Check “Delete the driver software for this device” if available.
- Restart your computer. Windows will attempt to reinstall a generic driver, or you can manually install the downloaded driver.
Running System File Checker and DISM
Corrupted Windows system files can lead to various issues, including unexpected shutdowns. Use these built-in tools to check and repair them:
- Open Command Prompt as Administrator: Search for “cmd” in the Start menu, right-click, and select “Run as administrator.”
- Run SFC: Type
sfc /scannowand press Enter. This command scans for and repairs corrupted Windows system files. Let it complete, which can take some time. - Run DISM: If SFC finds errors it can’t fix, or if the problem persists, run DISM commands. These commands repair the Windows image itself.
Run these one after another. The
RestoreHealthcommand can take a while and requires an internet connection to download necessary files.DISM /Online /Cleanup-Image /CheckHealthDISM /Online /Cleanup-Image /ScanHealthDISM /Online /Cleanup-Image /RestoreHealth
- Restart: After running these commands, restart your computer and check if the issue persists.
Inspecting BIOS/UEFI Settings
Incorrect or unstable BIOS/UEFI settings can cause system instability. Access your BIOS/UEFI during boot-up (usually by pressing Del, F2, F10, or F12). Look for:
- Overclocking Settings: If you have overclocked your CPU or RAM, revert to default or stable settings. Unstable overclocks are a prime cause of crashes.
- Power Management: Check for any unusual power-saving features. You might temporarily disable C-states or other advanced power options to see if they are contributing.
- Firmware Update: Check your motherboard manufacturer’s website for the latest BIOS/UEFI firmware. Updating can resolve compatibility issues and improve stability. Follow manufacturer instructions carefully, as a failed update can brick your motherboard.
- Load Optimized Defaults: As a last resort in this section, load “Optimized Defaults” or “Factory Defaults” in your BIOS/UEFI. This resets all settings to their manufacturer-recommended values.
Testing Hardware Components (RAM, Storage)
Faulty RAM or storage can lead to unpredictable system behavior, including unexpected reboots. Testing these components can help rule them out.
- RAM (Memory):
- Windows Memory Diagnostic: Search for “Windows Memory Diagnostic” in the Start menu and run it. Choose to restart now and check for problems. This tool performs a basic memory test.
- MemTest86: For a more thorough test, download and create a bootable USB drive with MemTest86. Boot from it and let it run for several passes (at least 4-8 hours, or overnight). Any errors indicate faulty RAM.
- Test RAM Sticks Individually: If you have multiple RAM sticks, remove all but one and test your system. Rotate through each stick to identify a faulty module.
- Storage (HDD/SSD):
- Check Disk (chkdsk): Open Command Prompt as administrator and type
chkdsk /f /rand press Enter. You’ll likely be prompted to schedule it for the next reboot. This scans and attempts to repair bad sectors. - Manufacturer Diagnostics: Download diagnostic tools from your SSD/HDD manufacturer (e.g., Samsung Magician, Western Digital Data Lifeguard Diagnostic). These tools can perform comprehensive tests and report drive health.
- S.M.A.R.T. Data: Use tools like CrystalDiskInfo (CrystalDiskInfo) to check your drive’s S.M.A.R.T. (Self-Monitoring, Analysis and Reporting Technology) status. “Bad” or “Caution” statuses indicate a failing drive.
- Check Disk (chkdsk): Open Command Prompt as administrator and type
Disabling Fast Startup and Sleep Settings
Windows 11’s Fast Startup feature, while speeding up boot times, can sometimes interfere with proper shutdown and startup cycles, leading to instability. Similarly, aggressive sleep settings might cause issues.
- Disable Fast Startup:
- Search for “Control Panel” and open it.
- Go to Hardware and Sound > Power Options.
- Click “Choose what the power buttons do” on the left.
- Click “Change settings that are currently unavailable.”
- Uncheck Turn on fast startup (recommended).
- Click Save changes.
- Adjust Sleep Settings:
- In Power Options, click “Change plan settings” next to your active power plan.
- Click “Change advanced power settings.”
- Expand Sleep and ensure “Allow hybrid sleep” is Off. You can also experiment with “Hibernate after” settings.
These adjustments can sometimes resolve power-related glitches that manifest as Kernel-Power Event ID 41. After making these changes, perform a full shutdown and restart your system to see if the issue is resolved.
Advanced Diagnostic Techniques for Persistent Issues
If the step-by-step troubleshooting hasn’t resolved your Kernel-Power Event ID 41 no BSOD Windows 11 problem, it’s time to delve into more advanced diagnostic methods. These techniques require a bit more technical comfort but can provide crucial insights when basic fixes fall short. They help isolate software conflicts or uncover deeper hardware issues that are harder to detect.
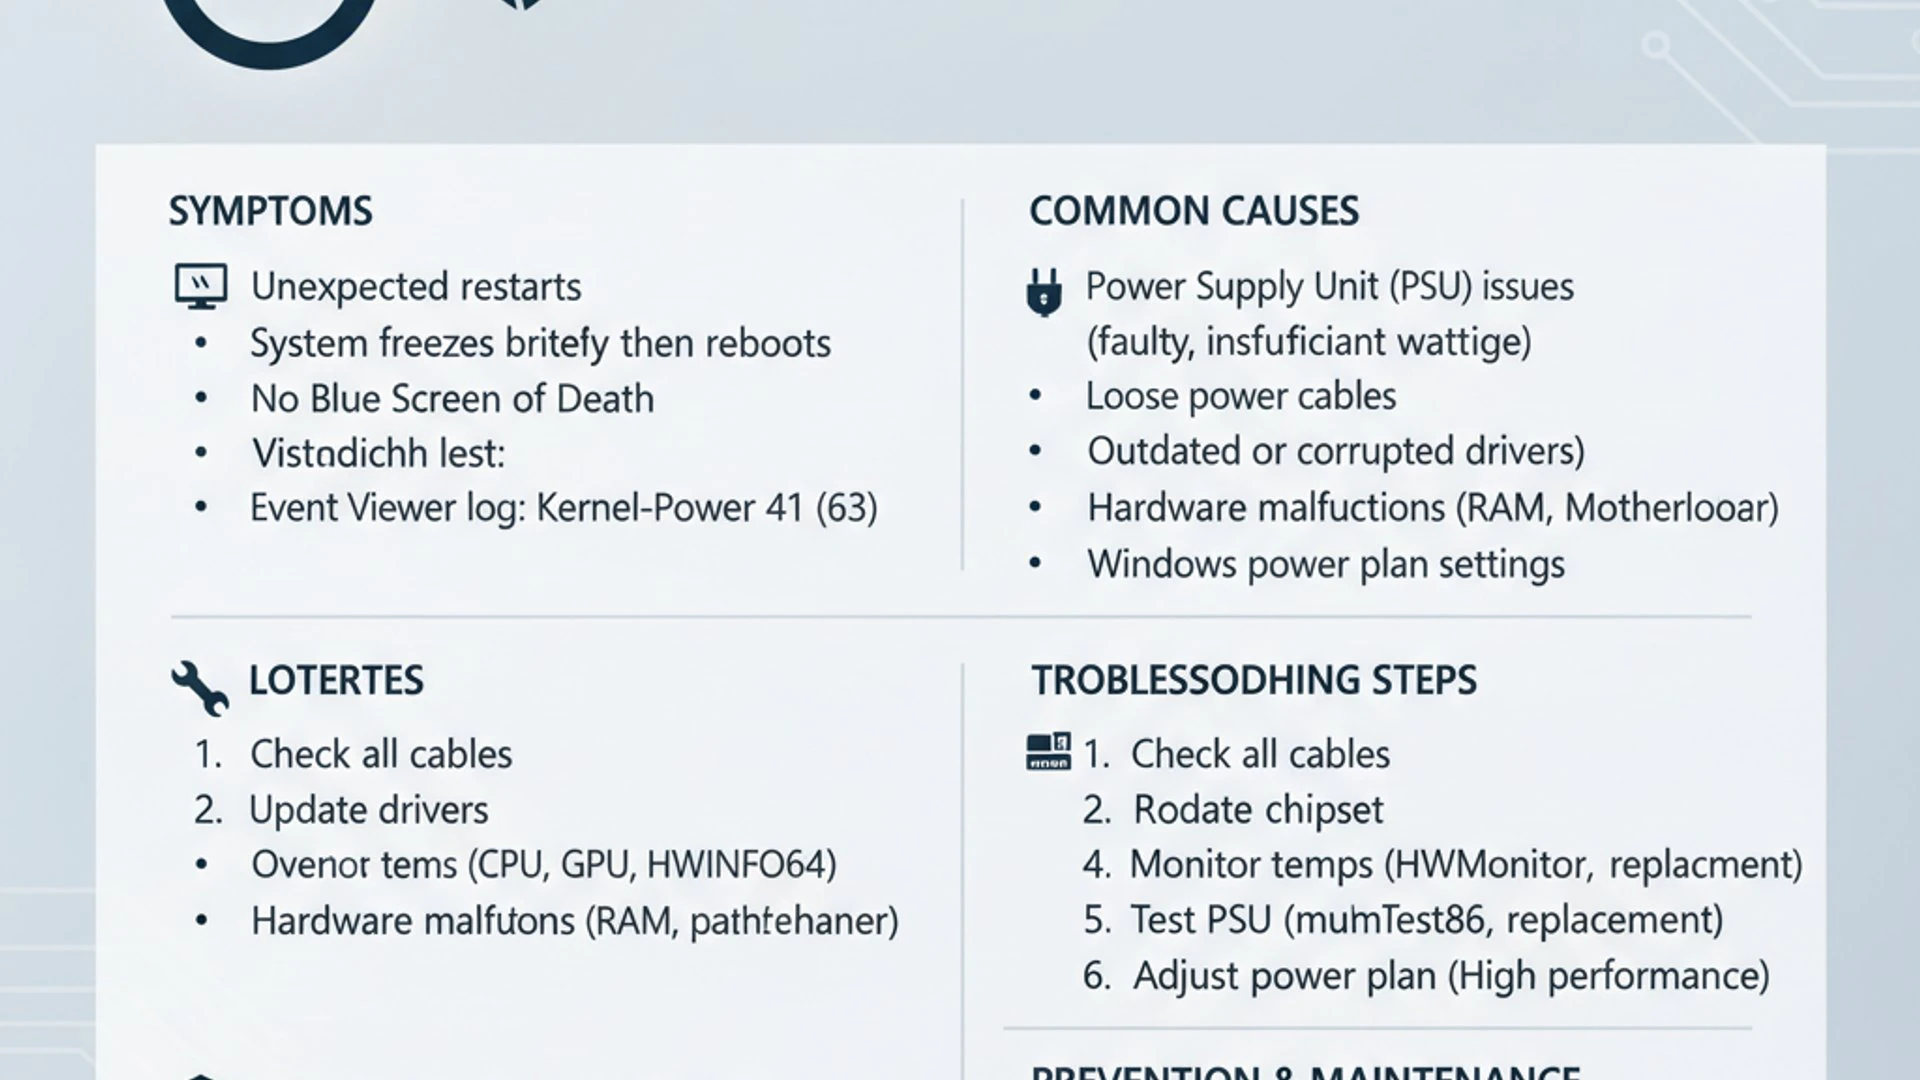
These methods are particularly useful for persistent, intermittent issues that defy simple explanations. Remember to proceed cautiously and consider backing up your data before attempting major system changes, especially if you’re considering a Windows reinstallation.
Analyzing Dump Files (Even Without a BSOD)
While Kernel-Power Event ID 41 typically occurs without a BSOD, meaning no traditional crash dump is generated, there are still scenarios where partial crash information might be available or other logs could offer clues. Sometimes, a “kernel memory dump” or “complete memory dump” might be configured, which captures the entire system memory state if a critical error occurs, even if a BSOD isn’t displayed.
- Check for Dump Files:
- Navigate to
C:\Windows\Minidump. If this folder exists and contains files, you might have mini-dumps from other, less severe crashes. - Check
C:\Windows\MEMORY.DMPfor a full memory dump.
- Navigate to
- Configure Dump File Creation:
- Right-click This PC > Properties > Advanced system settings.
- Under “Startup and Recovery,” click Settings.
- In the “Write debugging information” section, ensure “Automatic memory dump” or “Kernel memory dump” is selected. This might help capture data if the system crashes in a way that allows it.
- Use Debugging Tools: Download and install the Windows Debugging Tools (WinDbg). Even without a BSOD, WinDbg can sometimes open existing dump files (if any) or provide insights from other system logs. While complex, learning basic WinDbg commands can be powerful.
Pro Tip: Even if no dump file is created for Event ID 41, check the Event Viewer’s ‘Application’ and ‘Security’ logs for events immediately preceding the Kernel-Power event. These might indicate a software crash or security issue that led to instability.
Clean Boot Environment Testing
A clean boot starts Windows with a minimal set of drivers and startup programs. This helps isolate software conflicts that might be causing instability leading to unexpected reboots. If your system runs stably in a clean boot environment, it indicates that a third-party application or service is the culprit.
- Open System Configuration: Search for
msconfigin the Start menu and open System Configuration. - Disable Services:
- Go to the Services tab.
- Check Hide all Microsoft services.
- Click Disable all. This will disable non-Microsoft services.
- Disable Startup Items:
- Go to the Startup tab.
- Click Open Task Manager.
- In Task Manager, disable all startup items one by one.
- Restart: Click OK in System Configuration and restart your computer.
- Test Stability: Use your computer as you normally would. If the crashes stop, you can then re-enable services and startup items one by one (or in small groups) to identify the problematic software.
Reinstalling Windows 11
If all other troubleshooting steps fail and you’re still experiencing Kernel-Power Event ID 41 no BSOD Windows 11, a clean reinstallation of Windows 11 might be the ultimate solution. This step should be considered a last resort, as it involves erasing all data on your primary drive and reinstalling the operating system from scratch. It effectively rules out any software-related corruption, driver conflicts, or OS instability as the cause.
- Backup All Data: This is critical. Ensure all personal files, documents, photos, and any other important data are backed up to an external drive or cloud storage.
- Create Installation Media: Download the Windows 11 Media Creation Tool from Microsoft’s website (Microsoft) and create a bootable USB drive.
- Perform Clean Install: Boot from the USB drive and follow the on-screen instructions to install Windows 11. Choose the custom installation option and delete all partitions on your primary drive before proceeding.
- Install Drivers: After Windows is installed, immediately install all necessary drivers, starting with chipset and graphics drivers, downloaded from your motherboard and GPU manufacturers’ websites.
- Test System: Before installing many applications, test your system thoroughly. If the problem persists even after a clean install and updated drivers, it very strongly indicates a fundamental hardware failure.
Preventive Measures to Avoid Future Occurrences
Once you’ve successfully resolved the Kernel-Power Event ID 41 no BSOD Windows 11 issue, taking proactive steps can significantly reduce the likelihood of it recurring. Prevention is always better than cure, especially when it comes to system stability. These measures focus on maintaining optimal hardware health and ensuring your system operates within safe parameters.
Implementing a routine of system maintenance and making informed decisions about hardware choices can contribute to a more reliable and long-lasting computing experience. Let’s explore some key preventive strategies to keep your Windows 11 system running smoothly.
Regular System Maintenance
Consistent maintenance is vital for preventing hardware degradation and ensuring efficient operation:
- Dust Cleaning: Regularly clean the interior of your PC case with compressed air. Pay special attention to CPU heatsinks, GPU fans, and case fan filters. Dust acts as an insulator, trapping heat and hindering airflow, which can lead to overheating. Aim for a thorough cleaning every 3-6 months, or more frequently in dusty environments.
- Monitor Temperatures: Continue to use monitoring software (like HWMonitor) occasionally, especially during demanding tasks. This helps you catch rising temperatures before they become critical.
- Keep Drivers Updated: Make it a habit to check for and install the latest drivers for your graphics card, chipset, and other critical components. Manufacturer websites are the best source for these updates.
- Maintain Good Airflow: Ensure your PC case has adequate intake and exhaust fans, and that cables are managed to not obstruct airflow. Consider upgrading case fans if your system consistently runs hot.
- Check for Windows Updates: Regularly install Windows 11 updates. These often include stability improvements, security patches, and updated drivers that can prevent system issues.
- UPS (Uninterruptible Power Supply): Invest in a UPS for your PC. A UPS provides battery backup during power outages and acts as a surge protector, offering clean, stable power to your system. This can prevent sudden shutdowns due to utility power fluctuations.
Investing in Quality Hardware
The quality and appropriateness of your hardware play a significant role in long-term system stability. Skimping on critical components can lead to recurring issues like Kernel-Power Event ID 41.
- Power Supply Unit (PSU): Do not compromise on your PSU. Invest in a reputable brand (e.g., Seasonic, Corsair, Cooler Master, EVGA, be quiet!) with an 80 PLUS certification (Bronze, Gold, Platinum, Titanium). This certification indicates efficiency, which often correlates with better component quality and stability. Ensure the wattage provides ample headroom (20-30% above peak estimated consumption) for your current and future components.
- Cooling Solutions: If you have high-performance components (e.g., powerful CPU/GPU), ensure you have an adequate cooling solution. This could be a robust air cooler or an All-in-One (AIO) liquid cooler. Stock coolers are often sufficient for basic use but may struggle under heavy loads.
- Reputable Components: Choose RAM, motherboards, and storage devices from well-known and respected manufacturers. While not always guaranteeing perfection, it increases the likelihood of receiving quality components with good support and reliable performance.
- Surge Protectors: Always connect your PC to a quality surge protector, or even better, a UPS, to shield it from power spikes and fluctuations that can damage components or cause unexpected shutdowns.
By combining diligent maintenance with smart hardware choices, you can create a robust and stable computing environment, minimizing the chances of encountering frustrating issues like Kernel-Power Event ID 41 no BSOD Windows 11 in the future.
When to Seek Professional Help
While this guide provides comprehensive steps for troubleshooting Kernel-Power Event ID 41 no BSOD Windows 11, there are situations where seeking professional assistance becomes the most sensible and efficient course of action. Not everyone is comfortable performing advanced hardware diagnostics, and some problems simply require specialized tools or expertise.
Knowing when to call in the experts can save you time, frustration, and potentially prevent further damage to your system. Here are key indicators that it might be time to consult a professional:
- Lack of Comfort with Hardware: If you are uncomfortable opening your computer case, handling components, or performing tasks like reapplying thermal paste or swapping a PSU, it’s best to let a professional handle it.
- Persistent Issues After Exhausting All Steps: If you have meticulously followed all the troubleshooting steps outlined in this article, including advanced diagnostics, and the problem still recurs, it strongly suggests a complex or intermittent hardware failure that requires specialized diagnosis.
- Suspected Motherboard Failure: Diagnosing a faulty motherboard is particularly challenging and often requires swapping components or using specialized diagnostic cards. If you suspect your motherboard is the issue, professional help is highly recommended.
- No Spare Parts for Testing: Many troubleshooting steps involve swapping components (like PSU or RAM) with known-good ones. If you don’t have access to spare parts, a repair shop will.
- Intermittent Problems: Issues that occur randomly and are difficult to reproduce can be the hardest to diagnose. Professionals often have more experience with such elusive problems and can dedicate more time to thorough testing.
- Warranty Concerns: If your computer is still under warranty, attempting to repair it yourself might void the warranty. Contacting the manufacturer’s support or an authorized service center is the appropriate first step.
- Time Constraints: Troubleshooting can be time-consuming. If you rely heavily on your computer for work or study and cannot afford extended downtime, a professional can often provide a quicker resolution.
A reputable computer repair technician or service center will have the experience, tools, and spare parts to accurately diagnose and fix complex hardware issues. They can perform more in-depth tests, such as stress testing components under controlled conditions, to pinpoint the exact cause of your unexpected reboots. Don’t hesitate to seek their expertise when you’ve reached the limits of your own troubleshooting capabilities.
Conclusion: Restoring Stability to Your Windows 11 System
The occurrence of Kernel-Power Event ID 41 no BSOD Windows 11 can be one of the most perplexing and frustrating issues a user faces. Unlike a typical crash with a clear error code, this event points to an abrupt, ungraceful shutdown, often indicating a deeper hardware or power-related problem. We’ve explored that this critical event signifies an unexpected power loss, rather than a software-initiated system crash, shifting our focus to the physical integrity of your PC.
Through this comprehensive guide, we’ve identified the most common culprits, ranging from an inadequate or failing Power Supply Unit and overheating components like the CPU and GPU, to more subtle issues such as corrupted system files, outdated drivers, or even faulty RAM and storage devices. Each potential cause requires a systematic approach to diagnosis and resolution.
Our step-by-step troubleshooting journey has equipped you with practical methods: from physically inspecting your PSU and monitoring system temperatures, to updating critical drivers and running system integrity checks. We’ve also delved into advanced techniques like clean boot testing and, as a last resort, a clean Windows 11 reinstallation. Ultimately, the goal is to methodically eliminate possibilities until the root cause is identified and addressed.
Remember that proactive maintenance, such as regular dust cleaning, ensuring proper airflow, and investing in quality hardware, is paramount for preventing future occurrences. While self-troubleshooting is empowering, knowing when to seek professional help is equally important for complex or persistent issues. By applying these strategies, you can restore stability and reliability to your Windows 11 system, ensuring a smoother and more predictable computing experience.
For more interesting articles, stay tuned to Winsides.com!









Community
Comments (0)