

Introduction to ntoskrnl.exe Blue Screen Errors
Encountering a Blue Screen of Death (BSoD) on your Windows 11 system can be a profoundly frustrating experience, often halting your work or entertainment without warning. Among the various BSoD messages, one that frequently appears and causes significant concern is related to ntoskrnl.exe. This critical system file is at the very core of the Windows operating system, serving as its kernel. For additional context, see Using System File Checker in Windows, Create a recovery drive for Windows, Getting Started with WinDbg, and Driver Verifier.
When ntoskrnl.exe triggers a blue screen, it indicates a fundamental problem within Windows 11’s core operations. This isn’t just a minor glitch; it suggests an issue so severe that the operating system cannot continue to function safely, leading to an immediate shutdown to prevent potential data corruption or further system damage.
Understanding the nature of the ntoskrnl exe blue screen on Windows 11 is the first step toward resolving it. This comprehensive guide will demystify this error, explore its common causes, and provide you with a structured approach to diagnose and fix the underlying problems, helping you restore stability to your PC.
We’ll walk through initial checks, advanced diagnostic tools, and specific solutions for driver, hardware, and software-related issues, ensuring you have all the knowledge needed to tackle this challenging error.
Table of contents
Key Takeaways for Resolving ntoskrnl.exe BSoDs
Dealing with a ntoskrnl exe blue screen on Windows 11 can seem daunting, but a systematic approach can lead to a successful resolution. Here are the most important points to remember:
- Always start with recent changes: New software or driver installations are often the culprits.
- Utilize System Restore as an immediate rollback option if recent changes are suspected.
- Analyze crash dump files with tools like WinDbg for precise error identification.
- Regularly check RAM integrity using Windows Memory Diagnostic and hard drive health with CHKDSK.
- Ensure all device drivers are updated, or roll them back if the issue started after an update.
- Run SFC and DISM commands to repair corrupted system files, which can often cause ntoskrnl.exe errors.
- Keep Windows 11 fully updated to benefit from the latest bug fixes and stability improvements.
- Investigate hardware issues, including overheating, faulty RAM, or an unstable power supply.
- Perform thorough malware scans and use a clean boot to identify software conflicts.
- As a last resort, a clean reinstallation of Windows 11 can resolve deeply embedded issues, but always back up your data first.
Understanding ntoskrnl.exe and Its Role in Windows 11
To effectively troubleshoot the ntoskrnl exe blue screen on Windows 11, it’s crucial to understand what this file is and why it’s so important. This knowledge forms the foundation for diagnosing and resolving the problem.
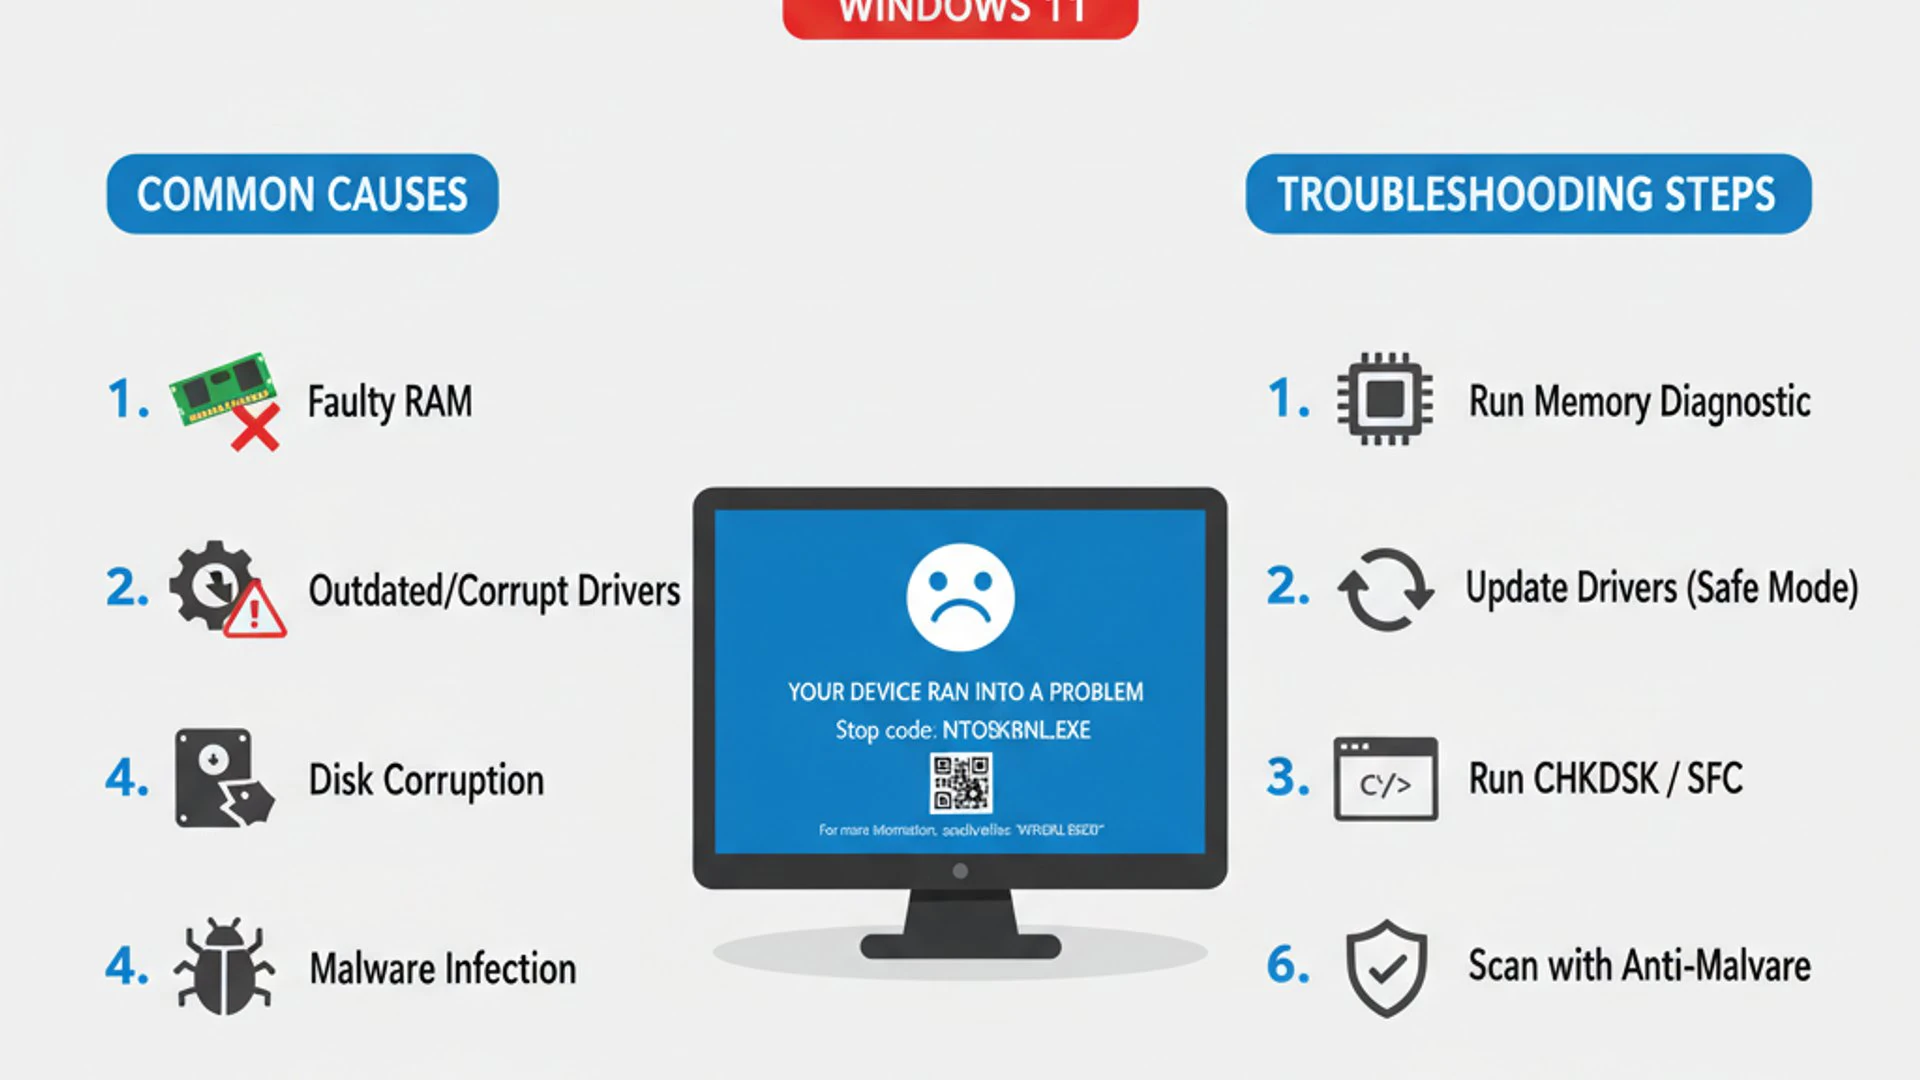
What is ntoskrnl.exe?
The file ntoskrnl.exe stands for “Windows NT Operating System Kernel.” It is the core component, or kernel, of the Windows operating system. Think of it as the brain of your Windows 11 PC, responsible for managing virtually all system processes and resources.
Its primary functions include memory management, process and thread scheduling, hardware abstraction, and handling interrupts. Without a properly functioning ntoskrnl.exe, your Windows 11 system simply cannot operate. Any instability or corruption within this file or its operations can lead to severe system crashes, manifesting as a BSoD.
When Windows 11 starts, ntoskrnl.exe is one of the first components loaded into memory. It then orchestrates the loading of other essential system services and drivers. Its integrity is paramount for system stability and performance.
Common Causes of ntoskrnl.exe Blue Screens
The appearance of a ntoskrnl exe blue screen on Windows 11 can stem from a variety of sources, making diagnosis sometimes challenging. However, certain common culprits emerge repeatedly. Identifying these helps narrow down the troubleshooting process significantly.
One of the most frequent causes is faulty or incompatible device drivers. Drivers act as translators between your hardware and the operating system. If a driver is outdated, corrupted, or not fully compatible with Windows 11, it can cause ntoskrnl.exe to malfunction when trying to communicate with that specific hardware component.
Another significant factor is hardware issues. This includes failing RAM modules, an unstable power supply, or an overheating CPU or GPU. Since ntoskrnl.exe manages hardware interactions, any physical defect can directly impact its ability to perform its duties, leading to a crash.
Corrupted system files are also a common trigger. Over time, system files can become damaged due to improper shutdowns, disk errors, or malware. If ntoskrnl.exe or any of the files it relies upon are corrupted, the system’s core functionality is compromised.
Lastly, malware infections or conflicts with third-party software can interfere with core system processes. Malicious software can sometimes target or corrupt critical system files, including ntoskrnl.exe, leading to instability and BSoDs. Similarly, poorly coded applications or conflicting security software can also disrupt normal kernel operations.
Initial Troubleshooting Steps for ntoskrnl.exe BSoDs
When faced with a ntoskrnl exe blue screen on Windows 11, it’s natural to feel overwhelmed. However, starting with a few basic troubleshooting steps can often resolve the issue quickly, especially if it’s a recent development. These initial actions focus on reversing recent changes that might have introduced the problem.
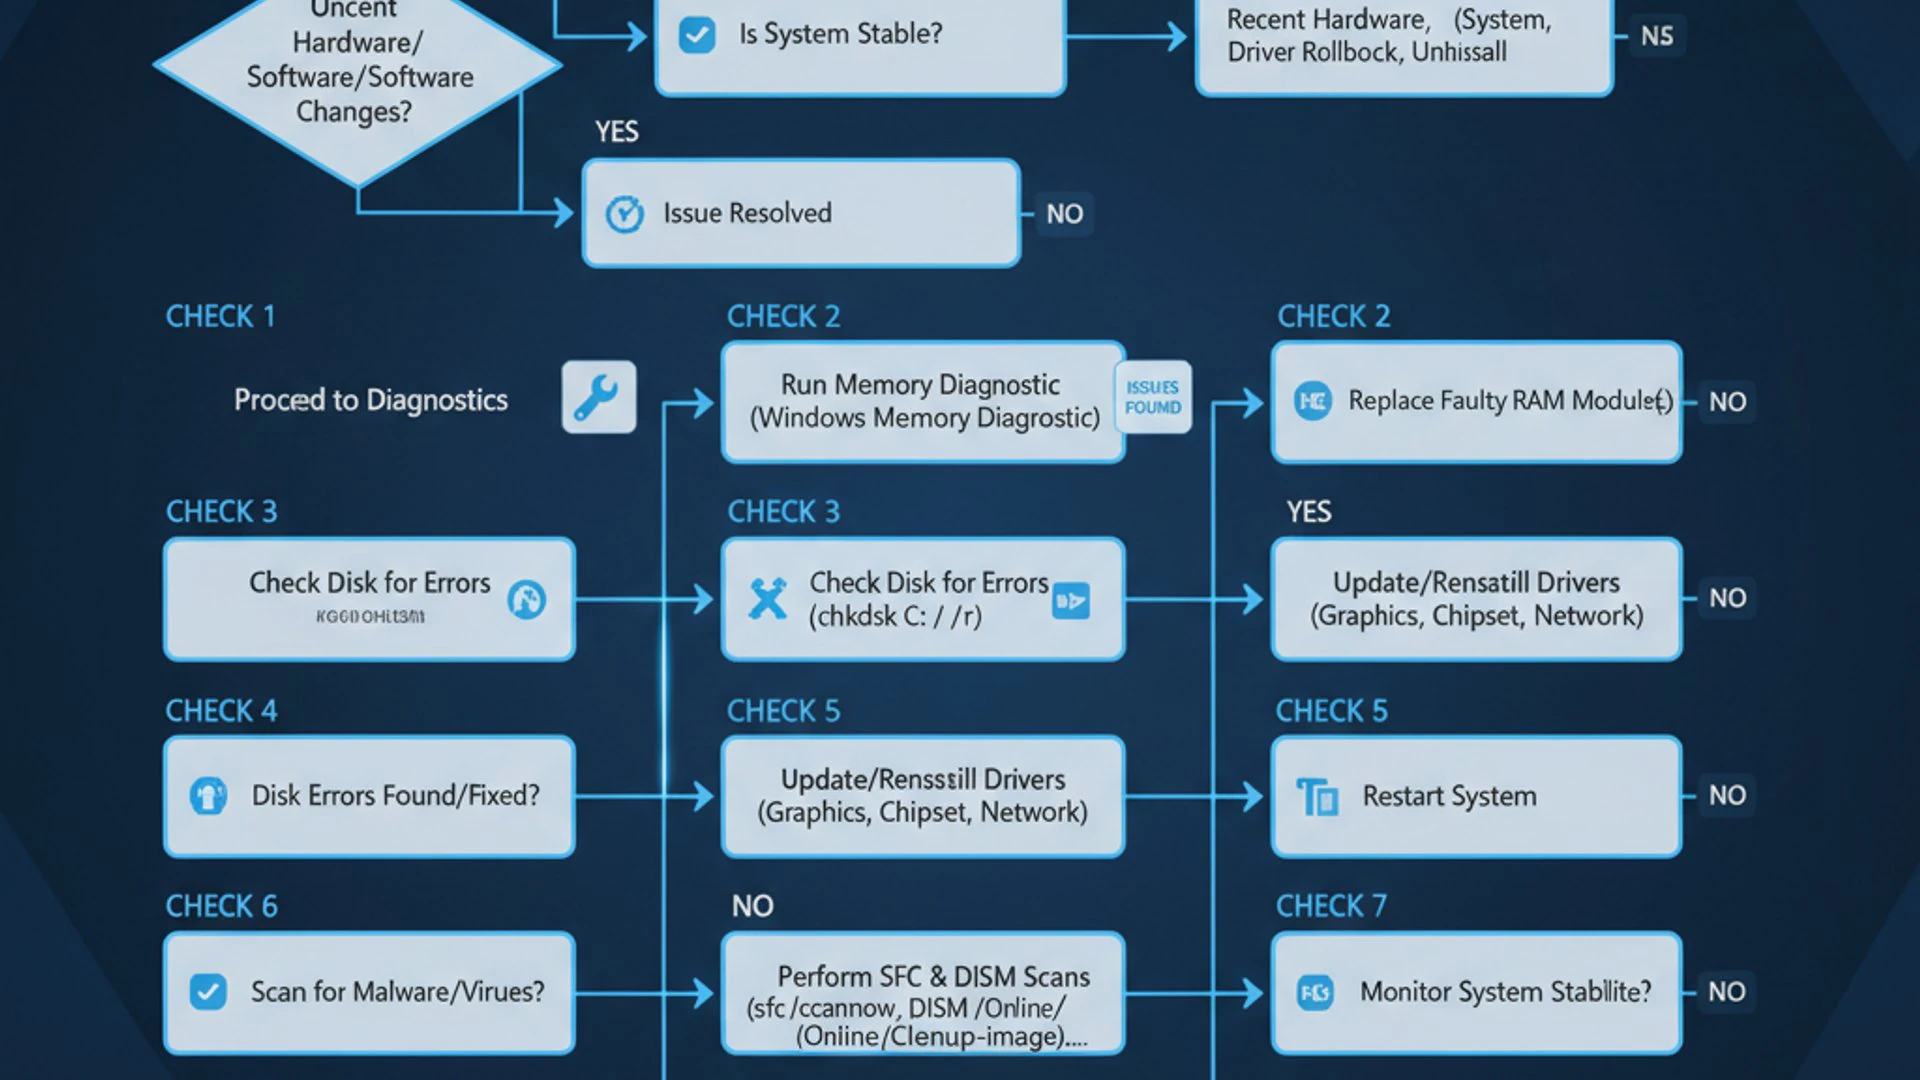
Checking for Recent Software or Driver Changes
Often, the most recent change made to your system is the cause of new problems. If your PC started experiencing BSoDs shortly after installing new software, updating a driver, or connecting a new peripheral, these are prime suspects.
Begin by thinking back: What did you install or change just before the blue screens started? This could be a new game, an application, a printer driver, or even a Windows update. If you can identify a recent installation, try uninstalling that software or rolling back the driver.
To uninstall software, go to Settings > Apps > Installed apps, locate the suspicious program, and click the three dots next to it to select Uninstall. For drivers, you’ll typically use Device Manager, which we’ll cover in more detail later.
Performing a System Restore
Windows 11 includes a powerful feature called System Restore, which allows you to revert your system’s state to an earlier point in time without affecting your personal files. This is incredibly useful if you suspect a recent software installation or system change caused the ntoskrnl exe blue screen on Windows 11.
To perform a System Restore:
- Search for “Create a restore point” in the Windows search bar and open the System Properties window.
- Click the System Restore button.
- In the System Restore wizard, click Next.
- Choose a restore point from the list that predates when the BSoDs started. If you don’t see any, ensure system protection is enabled for your C: drive.
- Click Next, then Finish to confirm. Your computer will restart and revert to the chosen state.
This process can undo system changes, driver installations, and software installations that might be causing the problem. It’s a non-destructive way to revert your system to a known good configuration.
Advanced Diagnostics: Identifying the Root Cause
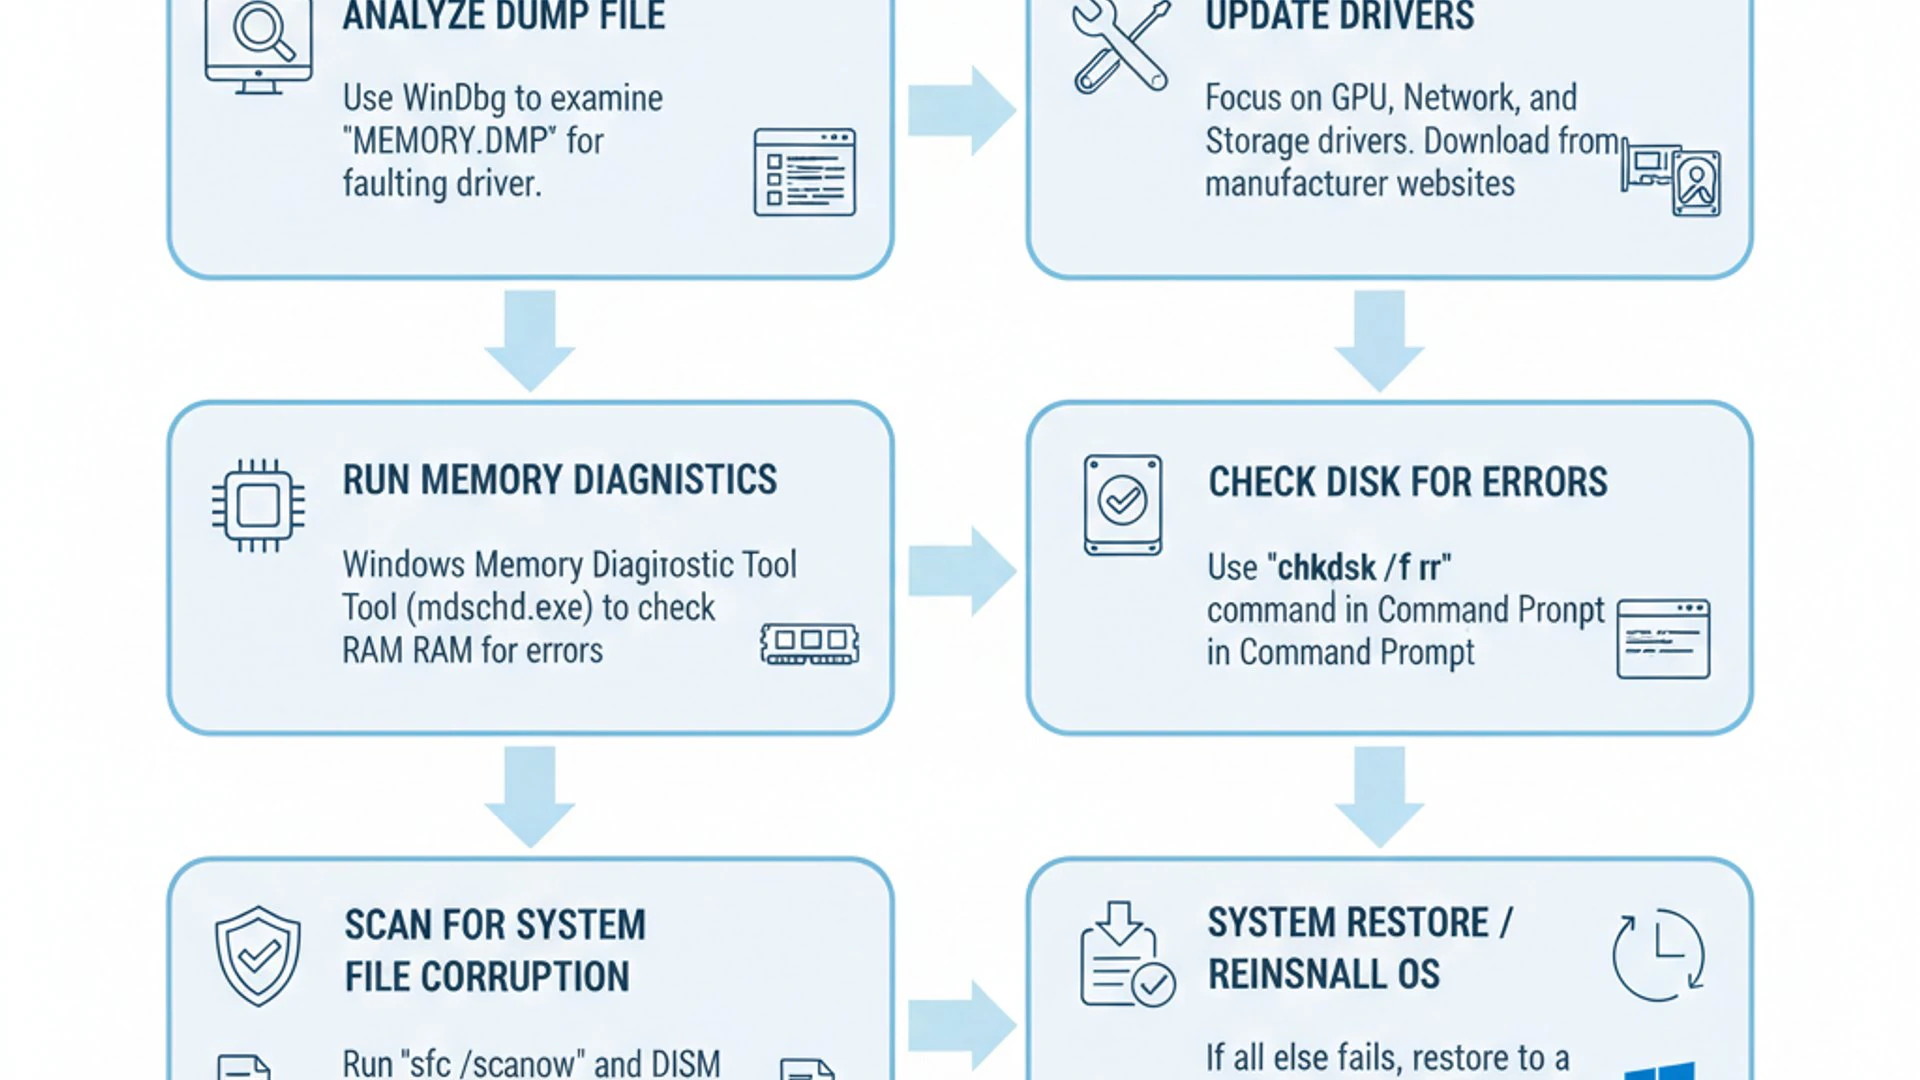
If initial troubleshooting doesn’t resolve the ntoskrnl exe blue screen on Windows 11, it’s time to delve deeper. Advanced diagnostics involve analyzing crash dump files, checking memory integrity, and scanning your hard drive for errors. These steps provide more specific clues about the underlying cause.
Analyzing Dump Files with WinDbg
When a BSoD occurs, Windows typically creates a “dump file” (often a minidump) that contains information about the system’s state at the time of the crash. Analyzing these files can pinpoint the exact driver or module that caused the ntoskrnl exe blue screen on Windows 11.
The most powerful tool for this is WinDbg Preview, a debugger from Microsoft. It can interpret the cryptic information in dump files and often identify the problematic component directly.
Installing and Configuring WinDbg
To get started with WinDbg:
- Open the Microsoft Store and search for “WinDbg Preview.” Install the application.
- After installation, launch WinDbg Preview.
- Go to File > Symbol File Path. Enter
srv*c:\symbols*https://msdl.microsoft.com/download/symbolsand click OK. This configures WinDbg to download necessary debugging symbols from Microsoft, which are crucial for interpreting crash data. - Close and reopen WinDbg to ensure the symbol path is loaded correctly.
This setup allows WinDbg to correctly translate memory addresses and module names into readable information, making crash analysis much more effective.
Interpreting Crash Dumps
Once WinDbg is configured, you can open a dump file. Minidump files are usually located in C:\Windows\Minidump. They are named with the date of the crash (e.g., MMDDYY-XXXXX-01.dmp).
- In WinDbg, go to File > Open Dump File and navigate to the
Minidumpfolder. Select the most recent.dmpfile. - After loading, WinDbg will display a lot of information. Look for the BugCheck Analysis section.
- The key information to look for is
MODULE_NAME,IMAGE_NAME, orPROCESS_NAME. This will often directly name the driver or executable that caused the crash. For example, if it points tonvlddmkm.sys, it’s likely an NVIDIA graphics driver issue. - You might also see
STACK_TEXT, which shows the sequence of function calls leading up to the crash. This can provide further context.
Identifying a specific file name, especially one ending in .sys, is a strong indicator of the problematic driver. This insight is invaluable for resolving the ntoskrnl exe blue screen on Windows 11.
Pro Tip: If WinDbg points to
ntoskrnl.exeitself, it often means the kernel crashed due to an external factor, such as a faulty driver or hardware. The surrounding stack text or other modules mentioned in the analysis will usually provide the actual culprit.
Running Memory Diagnostics
Faulty RAM is a very common cause of BSoDs, including those related to ntoskrnl.exe. Even a single bad sector on a memory stick can lead to system instability. Windows 11 includes a built-in tool to check your RAM for errors.
To run the Windows Memory Diagnostic Tool:
- Save all your work and close open applications.
- Search for “Windows Memory Diagnostic” in the Windows search bar and open it.
- Select Restart now and check for problems (recommended).
- Your computer will restart and run a memory test. This process can take several minutes to an hour, depending on the amount of RAM you have.
- After the test completes, Windows will restart. You can check the results in the Event Viewer under Windows Logs > System, looking for “MemoryDiagnostic” entries.
If errors are reported, it’s highly likely that one or more of your RAM modules are failing and need to be replaced. If you have multiple RAM sticks, try testing them one by one to isolate the faulty module.
Checking Disk Health with CHKDSK
Corrupted files on your hard drive, especially system files, can also lead to a ntoskrnl exe blue screen on Windows 11. The CHKDSK (Check Disk) utility can scan your hard drive for logical and physical errors and attempt to repair them.
To run CHKDSK:
- Open Command Prompt as an administrator. Search for “cmd”, right-click on “Command Prompt”, and select Run as administrator.
- Type
chkdsk /f /rand press Enter. - If prompted that the volume is in use, type
Yand press Enter to schedule the scan for the next restart. - Restart your computer. The scan will run before Windows 11 boots, checking for bad sectors and file system errors, and attempting to fix them.
This process can take a considerable amount of time, especially for large drives, so ensure you have enough time before starting it. Resolving disk errors can often prevent future BSoDs caused by file corruption.
Driver-Related Solutions for ntoskrnl.exe Errors
As previously mentioned, faulty or incompatible drivers are a leading cause of the ntoskrnl exe blue screen on Windows 11. Addressing driver issues is a critical step in troubleshooting. This section will guide you through updating, rolling back, and even isolating problematic drivers.
Updating and Rolling Back Device Drivers
Keeping your drivers up to date is generally good practice, but sometimes a new driver can introduce instability. Conversely, an outdated driver might not be fully compatible with Windows 11 updates.
To manage drivers via Device Manager:
- Right-click the Start button and select Device Manager.
- Expand the categories (e.g., Display adapters, Sound, video and game controllers) to find the device you suspect is causing issues.
- To update a driver: Right-click the device and select Update driver. Choose Search automatically for drivers. If Windows finds a newer driver, install it. Alternatively, visit the manufacturer’s website (e.g., NVIDIA, AMD, Intel, Realtek) to download the latest driver directly, then choose Browse my computer for drivers and point to the downloaded file.
- To roll back a driver: If the BSoD started after a driver update, right-click the device, select Properties, go to the Driver tab, and click Roll Back Driver. This option will only be available if a previous driver version exists.
- To uninstall and reinstall: If rolling back isn’t an option or doesn’t help, right-click the device and select Uninstall device. Check the box to Attempt to remove the driver for this device if available. Restart your PC; Windows will often reinstall a generic driver, or you can manually install a fresh one from the manufacturer.
Pay particular attention to graphics drivers, network adapters, and chipset drivers, as these are frequent sources of BSoD issues.
Using Driver Verifier to Isolate Faulty Drivers
If you suspect a driver issue but can’t pinpoint which one, Windows’ built-in Driver Verifier tool can help. This utility stress-tests drivers and forces them to reveal their flaws, often leading to a BSoD with specific information about the faulty driver.
Warning: Driver Verifier can cause frequent BSoDs if a problematic driver is present. Use this tool carefully and ensure you know how to disable it if your system becomes unbootable.
- Open Command Prompt as an administrator.
- Type
verifierand press Enter. - In the Driver Verifier Manager, select Create standard settings and click Next.
- Choose Automatically select unsigned drivers or Select driver names from a list (recommended for more control). If you select from a list, choose all non-Microsoft drivers.
- Click Finish and restart your computer.
If a driver is faulty, your system will likely crash more frequently, and the BSoD message or the subsequent minidump analysis (using WinDbg) should clearly indicate the problematic driver. Once identified, you can update, roll back, or uninstall that specific driver.
To disable Driver Verifier:
- Open Command Prompt as an administrator.
- Type
verifier /resetand press Enter. - Restart your computer.
This will stop Driver Verifier from running at startup, allowing your system to boot normally once the problematic driver is addressed.
System File Integrity and Windows Updates
Corruption within core Windows system files or an outdated operating system can lead to the dreaded ntoskrnl exe blue screen on Windows 11. Ensuring the integrity of your system files and keeping Windows up to date are crucial preventative and corrective measures.
Running SFC and DISM Scans
Windows provides two powerful command-line tools to check and repair system file corruption: System File Checker (SFC) and Deployment Image Servicing and Management (DISM).
SFC Scan:
- Open Command Prompt as an administrator.
- Type
sfc /scannowand press Enter. - This command scans all protected system files for corruption and attempts to repair them using cached copies. The process can take some time.
- Once completed, it will report whether any integrity violations were found and successfully repaired.
If SFC reports that it found corrupted files but couldn’t fix them, or if the problem persists, it’s time to use DISM.
DISM Scan:
DISM is used to repair the Windows image itself, which SFC relies on. If the source files SFC uses are corrupted, DISM can fix them.
- Open Command Prompt as an administrator.
- Run these three commands sequentially, pressing Enter after each:
DISM /Online /Cleanup-Image /CheckHealth(Checks for corruption)DISM /Online /Cleanup-Image /ScanHealth(Performs a more thorough scan)DISM /Online /Cleanup-Image /RestoreHealth(Repairs the image using Windows Update as a source)
- After DISM completes, run
sfc /scannowagain to ensure all system files are now properly repaired.
These scans are vital for maintaining the health of your Windows 11 installation and can often resolve BSoDs caused by underlying system file damage.
Ensuring Windows 11 is Up to Date
Microsoft regularly releases updates for Windows 11 that include bug fixes, security patches, and performance enhancements. Keeping your operating system current can resolve known issues that might be causing the ntoskrnl exe blue screen on Windows 11.
To check for and install updates:
- Go to Settings > Windows Update.
- Click Check for updates.
- If updates are available, download and install them. You may need to restart your computer multiple times.
It’s also a good idea to check the “Advanced options” in Windows Update for optional updates, which sometimes include critical driver updates that aren’t automatically installed.
Utilizing the Windows Update Troubleshooter
Occasionally, Windows Update itself can encounter issues, preventing necessary updates from installing. If you suspect this is the case, the built-in troubleshooter can help.
- Go to Settings > System > Troubleshoot > Other troubleshooters.
- Find Windows Update and click Run.
- Follow the on-screen prompts to allow the troubleshooter to detect and fix any problems preventing updates.
Resolving update issues ensures your system receives all necessary patches, contributing to overall stability and reducing the likelihood of a ntoskrnl exe blue screen on Windows 11.
Hardware-Related Troubleshooting
While software and drivers are common culprits, hardware failures are equally significant causes of the ntoskrnl exe blue screen on Windows 11. Diagnosing hardware issues often requires a more hands-on approach. This section covers key hardware components that frequently lead to BSoDs.
Testing RAM Modules
As discussed earlier, faulty RAM is a prime suspect. If the Windows Memory Diagnostic reported errors, or if you’re still experiencing crashes after other troubleshooting, further RAM testing is necessary.
If you have multiple RAM sticks:
- Power off your computer and unplug it.
- Open your computer case.
- Remove all but one RAM stick.
- Boot your computer and use it normally to see if the BSoD recurs.
- If it doesn’t crash, swap out that RAM stick for another and repeat the process.
This method helps isolate a faulty module. If the system is stable with one particular stick removed, that’s likely the problem. If it crashes with all individual sticks, the issue might be with the RAM slots on the motherboard, though this is less common.
Monitoring CPU and GPU Temperatures
Overheating components, especially the CPU and GPU, can cause system instability and BSoDs as a protective measure. When components get too hot, they can behave erratically, leading to kernel errors.
You can use third-party tools like HWMonitor or Core Temp to monitor your CPU and GPU temperatures in real-time. Run these tools while performing demanding tasks (like gaming or video editing) to see if temperatures spike excessively.
- Typical safe CPU temperatures under load are generally below 80-85°C.
- GPU temperatures under load are usually safe below 85-90°C.
If temperatures are consistently high:
- Ensure your computer’s fans are clean and functioning correctly. Dust buildup can severely impede airflow.
- Check if CPU cooler is properly seated and thermal paste is applied correctly.
- Consider improving case airflow with additional fans or better cable management.
- For laptops, use a cooling pad.
Addressing overheating can often resolve erratic BSoDs, including those related to ntoskrnl.exe.
Verifying Power Supply Stability
An insufficient or failing power supply unit (PSU) can lead to unstable voltage delivery to components, causing system crashes. While harder to diagnose without specialized equipment, there are some indicators.
- Random shutdowns or reboots: If your PC suddenly powers off without a BSoD, it could be a PSU issue.
- New hardware: If you recently added a powerful GPU or CPU and then started experiencing BSoDs, your PSU might not be providing enough wattage.
- Age: PSUs degrade over time. An old PSU might struggle to deliver stable power.
If you suspect your PSU, the most reliable test is to swap it with a known good, adequately rated power supply. This requires some technical comfort with opening your PC case and connecting components. If replacing the PSU resolves the ntoskrnl exe blue screen on Windows 11, then the old unit was indeed the problem.
Addressing Malware and System Conflicts
Even with robust security measures, malicious software can sometimes infiltrate your system, leading to instability and BSoDs. Similarly, conflicts between legitimate software can also disrupt core Windows functions. Addressing these issues is crucial for a stable Windows 11 environment.
Performing a Full System Scan for Malware
Malware can corrupt system files, interfere with drivers, or consume excessive resources, all of which can trigger a ntoskrnl exe blue screen on Windows 11. A thorough scan is essential.
- Ensure your antivirus software is up to date.
- Perform a full system scan. This can take several hours, so plan accordingly.
- Consider running a scan with a reputable second-opinion scanner like Malwarebytes, even if you already have an antivirus. Sometimes, one scanner might miss what another catches.
- If malware is detected, follow the instructions to quarantine or remove it.
- After removal, restart your PC and monitor for further BSoDs.
Running scans in Safe Mode can sometimes be more effective, as malware might be less active or able to defend itself in that environment.
Clean Boot for Conflict Isolation
A “clean boot” starts Windows with a minimal set of drivers and startup programs. This helps eliminate software conflicts as a cause of the ntoskrnl exe blue screen on Windows 11. If the BSoD doesn’t occur in a clean boot environment, you can then systematically enable services and startup items to find the culprit.
- Search for msconfig in the Windows search bar and open System Configuration.
- Go to the Services tab. Check Hide all Microsoft services, then click Disable all.
- Go to the Startup tab. Click Open Task Manager.
- In Task Manager, disable all startup items one by one. Close Task Manager.
- Click OK in System Configuration and restart your computer.
If the BSoDs stop, you’ve confirmed a software conflict. To find the problematic program:
- Re-enable services and startup items in small groups.
- Restart your computer after each group.
- When the BSoD returns, the last group of items you enabled contains the conflicting software. You can then narrow it down further.
Once identified, you can update, reinstall, or remove the conflicting application. Remember to revert to a normal startup configuration after troubleshooting by selecting Normal startup in the System Configuration’s General tab.
Last Resort: Reinstalling Windows 11
If you’ve exhausted all other troubleshooting steps and the ntoskrnl exe blue screen on Windows 11 persists, a clean reinstallation of the operating system might be the only remaining solution. This is a drastic step, but it often resolves deep-seated software conflicts, corrupted system files, or driver issues that are otherwise impossible to fix.
Backing Up Important Data
Before proceeding with a clean installation, backing up your data is absolutely critical. A clean install will erase everything on your primary drive (usually C:), including all personal files, programs, and settings.
- Use an external hard drive, USB stick, or cloud storage (OneDrive, Google Drive, Dropbox) to save all your documents, photos, videos, music, and other important files.
- Don’t forget browser bookmarks, email archives, and application-specific data.
- Consider creating a system image backup on Windows 11 if you want to be able to restore your entire system to its current state, though this might also reintroduce the problem if it’s software-related.
Double-check that all essential data is safely stored elsewhere before proceeding. There’s no recovery for data overwritten during a clean install.
Performing a Clean Installation
A clean installation involves booting from Windows 11 installation media (USB drive or DVD) and formatting your primary drive before installing a fresh copy of the OS.
- Create Windows 11 Installation Media: Download the Windows 11 Media Creation Tool from Microsoft’s official website. Use it to create a bootable USB drive (at least 8GB).
- Boot from Installation Media: Insert the USB drive, restart your computer, and enter your BIOS/UEFI settings (usually by pressing Del, F2, F10, or F12 during startup). Change the boot order to prioritize the USB drive.
- Start Installation: Follow the on-screen prompts. When asked “Which type of installation do you want?”, choose Custom: Install Windows only (advanced).
- Format Drive: Select the drive where Windows is currently installed (typically Drive 0 Partition 2, labeled “Primary”) and click Delete. Then select the unallocated space and click New, then Apply. Finally, select the newly created partition and click Next to install Windows 11.
- Complete Setup: Follow the remaining prompts to set up your region, keyboard layout, Microsoft account, and other preferences.
- Install Drivers and Software: After installation, install necessary drivers (especially chipset, graphics, and network) from your PC manufacturer’s website. Then, reinstall your essential applications and restore your backed-up data.
While time-consuming, a clean installation is often the most effective way to eliminate persistent ntoskrnl exe blue screen on Windows 11 issues by providing a fresh, stable foundation.
Preventing Future ntoskrnl.exe Blue Screen Issues
After going through the arduous process of troubleshooting and potentially resolving a ntoskrnl exe blue screen on Windows 11, the last thing you want is for it to recur. Proactive maintenance and best practices are key to maintaining a stable and healthy Windows 11 environment.
Regular System Maintenance Practices
Consistent system maintenance can significantly reduce the risk of BSoDs and other performance issues.
- Keep Windows Updated: Regularly check for and install all available Windows updates. These often contain critical bug fixes and security patches.
- Run Disk Cleanup: Use the built-in Disk Cleanup tool to remove temporary files, system logs, and other unnecessary data that can clutter your drive.
- Monitor Disk Health: Periodically run CHKDSK scans, especially if you notice any unusual disk activity or performance drops.
- Check for Malware: Maintain an active and updated antivirus solution and perform full system scans regularly.
- Monitor Temperatures: Use monitoring software to keep an eye on CPU and GPU temperatures, especially during intensive tasks. Ensure your cooling system is clean and efficient.
- Defragment Hard Drives (if applicable): If you still use traditional HDDs, defragmentation can improve performance. For SSDs, ensure TRIM is enabled, but avoid manual defragmentation.
These simple practices contribute to overall system health and can prevent many issues that might otherwise lead to a ntoskrnl exe blue screen on Windows 11.
Best Practices for Driver Management
Drivers are a frequent source of BSoDs, so managing them wisely is crucial.
- Download Drivers from Official Sources: Always obtain drivers directly from the hardware manufacturer’s website (e.g., NVIDIA, AMD, Intel, motherboard manufacturer) or your PC manufacturer’s support page. Avoid generic driver download sites.
- Avoid Beta Drivers (Unless Necessary): While beta drivers might offer new features, they can also introduce instability. Stick to stable, WHQL-certified drivers for critical components.
- Create Restore Points Before Major Driver Updates: Before installing a significant driver update (especially for graphics or chipset), create a manual system restore point. This gives you an easy rollback option if the new driver causes problems.
- Regularly Update Key Drivers: While not every driver needs constant updating, graphics, chipset, and network drivers are often critical and benefit from being kept relatively current.
- Uninstall Unused Device Drivers: If you’ve removed hardware, ensure its drivers are also uninstalled to prevent potential conflicts.
Thoughtful driver management significantly reduces the chances of encountering a ntoskrnl exe blue screen on Windows 11 due to driver conflicts or malfunctions.
Conclusion: Maintaining a Stable Windows 11 Environment
The ntoskrnl exe blue screen on Windows 11 is undoubtedly one of the more intimidating BSoD errors, signaling a fundamental issue within the operating system’s core. However, as we’ve explored, it’s not an insurmountable problem. By systematically approaching the troubleshooting process, from initial checks and driver management to advanced diagnostics and hardware verification, you can effectively identify and resolve the root cause.
Understanding the critical role of ntoskrnl.exe empowers you to appreciate the complexity of Windows 11 and the importance of maintaining its integrity. Whether the culprit is a faulty driver, corrupted system files, failing hardware, or a software conflict, patience and a methodical approach are your best tools.
Ultimately, preventing future occurrences of the ntoskrnl exe blue screen on Windows 11 boils down to diligent system maintenance. Regular updates, careful driver management, routine hardware checks, and robust security practices collectively build a resilient and stable computing experience. By following the advice in this guide, you equip yourself with the knowledge to not only fix current issues but also to ensure your Windows 11 system remains healthy and reliable for the long term.
For more interesting articles, stay tuned to Winsides.com!









Community
Comments (0)