

Introduction to DistributedCOM Error 10016 on Windows 11
Navigating the intricacies of Windows 11 can sometimes present users with cryptic error messages, and among the most frequently encountered is the DistributedCOM Error 10016. This particular event log entry often appears without any immediate, noticeable impact on system performance or application functionality, leading many users to wonder about its significance. For additional context, see Component Object Model (COM), troubleshoot Event ID 10016, DCOM security settings, System File Checker (SFC), and sfc command-line utility.
While it might seem like a minor nuisance, the persistent logging of Event ID 10016 can be a source of frustration, cluttering the Event Viewer and potentially masking more critical issues. It signifies a permissions problem within the Distributed Component Object Model (DCOM) framework, a core technology that enables software components to communicate across different processes or even different computers.
For many, this error is benign, a mere digital echo of a minor access denial that Windows gracefully handles in the background. However, in certain scenarios, it can point to underlying configuration flaws that might affect specific applications or system stability. This comprehensive guide aims to demystify the DistributedCOM 10016 error on Windows 11, providing you with the knowledge and tools to understand, diagnose, and effectively resolve it when necessary.
We will delve into its technical origins, differentiate between critical and ignorable instances, and offer a range of actionable solutions, from simple permission adjustments to advanced registry modifications. Our goal is to empower you to maintain a robust and error-free Windows 11 environment.
Table of contents
Key Takeaways for Resolving DistributedCOM 10016
Understanding and resolving the DistributedCOM 10016 error on Windows 11 can seem daunting, but these key takeaways summarize the most important aspects and solutions:
- Not Always Critical: Many instances of DistributedCOM 10016 are harmless and can be safely ignored if they don’t cause functional problems.
- Permissions are Key: The error almost always stems from insufficient launch or activation permissions for a DCOM component.
- Event Viewer is Your Friend: The Event Viewer provides crucial CLSID and APPID details needed to identify the problematic component.
- Component Services is the Primary Tool: Most resolutions involve modifying permissions directly within the Component Services management console.
- Registry Edits for Stubborn Cases: For persistent issues, adjusting permissions directly in the Registry Editor might be necessary, but exercise extreme caution.
- System Preparation is Crucial: Always create a system restore point and ensure you have administrative privileges before making any system changes.
- Application-Specific Troubleshooting: If the error is tied to a particular application, updating or reinstalling that software can often resolve the issue.
Understanding DistributedCOM and Event ID 10016
To effectively tackle the DistributedCOM 10016 error, it’s essential to grasp the underlying technology it relates to. This error is deeply intertwined with how Windows manages inter-process communication and component interactions.
What is Distributed Component Object Model (DCOM)?
The Distributed Component Object Model (DCOM) is a fundamental Microsoft technology that extends the Component Object Model (COM) to support communication among software components distributed across a network. Essentially, DCOM allows applications to interact with each other, regardless of whether they are on the same machine or different machines connected via a network.
It acts as a middleware layer, enabling objects (software components) to call methods on other objects as if they were local, even when they reside in separate processes or on remote computers. This capability is vital for many Windows services, applications, and even core operating system functions to operate seamlessly. Think of it as the invisible glue that helps different parts of Windows and installed programs talk to each other.
When you launch an application, or when a system service needs to perform a task, it often relies on DCOM to activate or communicate with specific components. These components are identified by unique identifiers, such as Class IDs (CLSIDs) and Application IDs (APPIDs), which are stored in the Windows Registry.
The Nature of Event ID 10016 and Its Impact
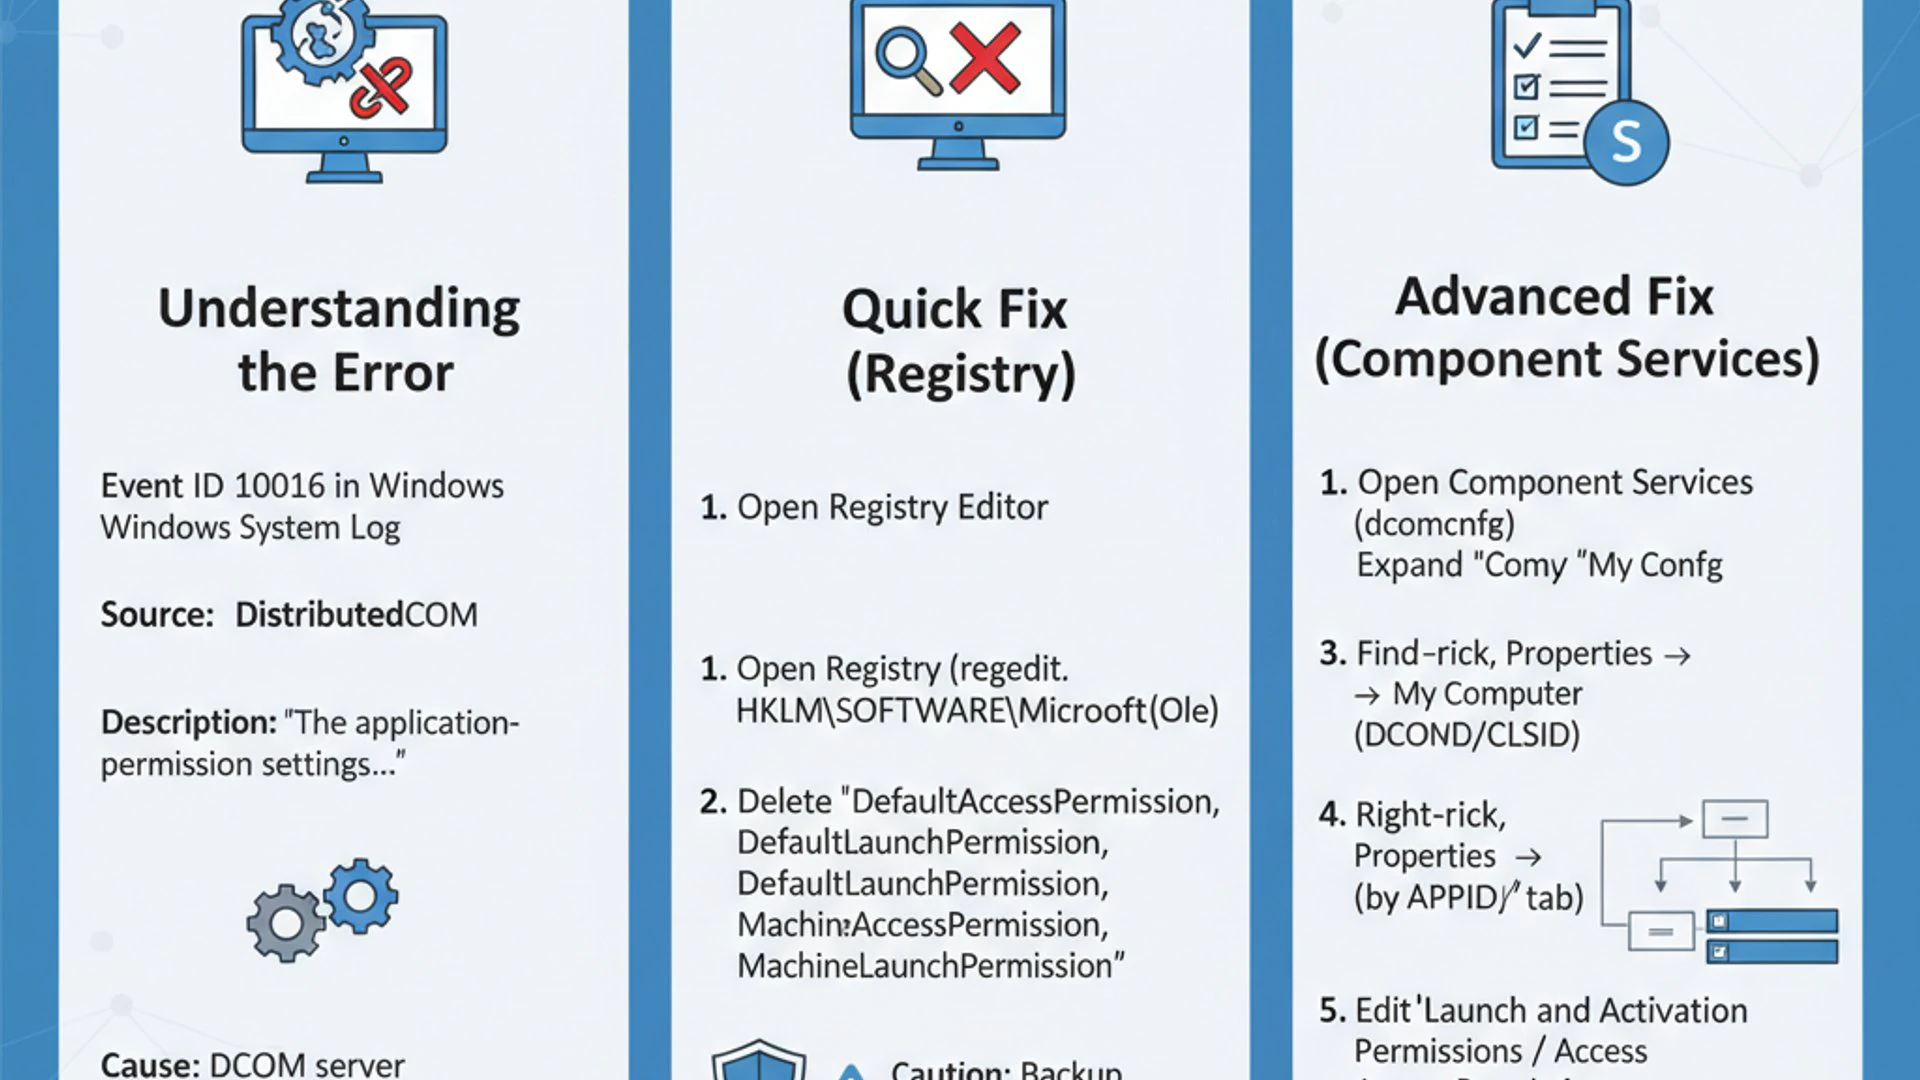
Event ID 10016, specifically concerning DistributedCOM, signifies a permission issue. It occurs when a DCOM server attempts to launch or activate a component, but the requesting user or process lacks the necessary security permissions to do so. The Event Viewer log entry typically details which component (via its CLSID and APPID) and which user/group (via its Security Identifier or SID) was denied access.
The error message usually states something like: “The application-specific permission settings do not grant Local Activation permission for the COM Server application with CLSID {GUID} and APPID {GUID} to the user SID {SID} from address LocalHost (Using LRPC) running in the application container SID {SID}.” This provides a precise roadmap for troubleshooting.
The impact of this error can vary significantly. In many cases, Windows 11 is designed to handle these minor permission hiccups gracefully. It might retry the operation, or the component might not be strictly necessary for the core functionality being attempted. As a result, users might not experience any noticeable performance degradation, application crashes, or functional problems.
However, a persistent DistributedCOM 10016 error can sometimes indicate a misconfigured application or a system service that genuinely requires those permissions. In such scenarios, you might observe:
- Specific application features failing to work.
- Slow application launch times.
- System services failing to start correctly.
- General system instability or unexpected behavior.
Therefore, while often benign, understanding the nature of this error is the first step toward deciding whether intervention is required. We will explore this distinction further in the next section, helping you determine when to act and when to simply observe.
Is DistributedCOM 10016 a Critical Error?
One of the most common questions users have when encountering the DistributedCOM 10016 error on Windows 11 is whether it’s a critical issue that demands immediate attention. The answer, perhaps unsatisfyingly, is: it depends.
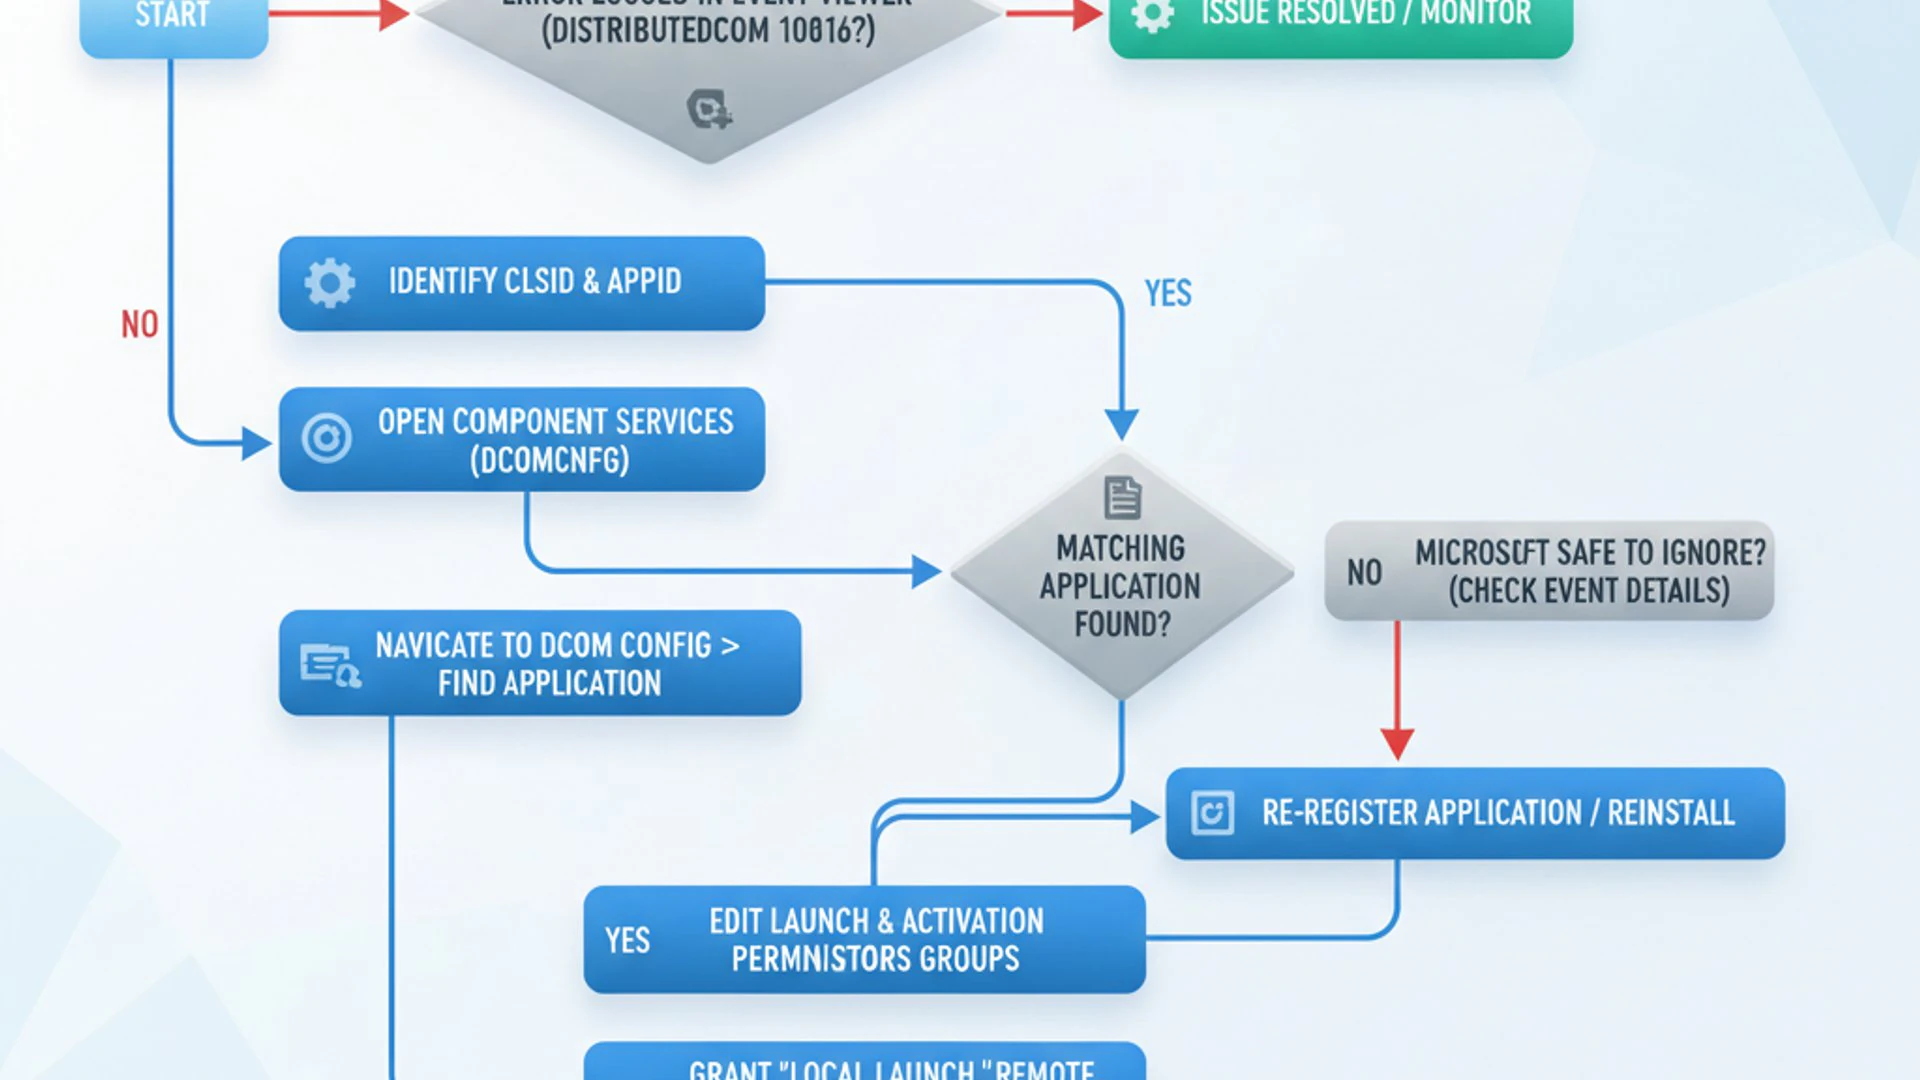
For the vast majority of users, this error is more of a diagnostic nuisance than a critical system failure. Microsoft itself has acknowledged that many instances of Event ID 10016 can be safely ignored, as they often represent attempts by legitimate applications or services to access DCOM components for which they don’t strictly need elevated permissions, or where Windows has built-in mechanisms to recover or bypass the denied access.
When to Worry and When to Ignore
Distinguishing between a benign log entry and a genuine problem is crucial. Here’s a breakdown:
When to Safely Ignore DistributedCOM 10016:
- No Observable Symptoms: If your Windows 11 system is running smoothly, applications are launching and functioning correctly, and you don’t experience any crashes or performance issues, then the error is likely harmless.
- Frequent but Harmless: Some DCOM components are designed to attempt activation with various permission levels. If the initial attempt fails but a subsequent one succeeds with different credentials, the error logs the failure but the operation completes.
- System Handles It: Windows 11 often has built-in resilience to handle minor permission denials, gracefully recovering or finding alternative ways to achieve the desired outcome without user intervention.
“Many instances of DistributedCOM 10016 are simply informational and do not indicate a problem with system stability or functionality. It’s important to correlate the error with actual system behavior.”
When DistributedCOM 10016 Might Require Intervention:
- Associated with Specific Application Issues: If you notice the error appearing consistently in the Event Viewer whenever you launch a particular application, and that application then fails to start, crashes, or exhibits missing functionality, then the error is likely the root cause.
- System Performance Degradation: While rare, a constant stream of DCOM 10016 errors could indicate a service repeatedly failing to launch, potentially consuming system resources or causing delays.
- Service Failures: If a critical Windows service or a third-party service fails to start, and the Event Viewer shows DistributedCOM 10016 errors around the same time, it warrants investigation.
- Security Concerns: Although less common, persistent permission errors could theoretically be exploited in specific, highly controlled scenarios. However, for typical home users, this is not a primary concern.
The key takeaway here is to observe your system’s behavior. If the DistributedCOM 10016 error is merely a log entry without any tangible negative effects, you can often leave it alone. However, if it coincides with noticeable problems, then it’s time to follow the troubleshooting steps outlined in the subsequent sections to resolve the underlying permission conflict.
Preparing Your System for Troubleshooting
Before you dive into modifying system settings, especially those related to DCOM and the Windows Registry, it’s paramount to prepare your system properly. These steps are crucial for safeguarding your data and ensuring you can revert any unintended changes.
Creating a Restore Point Before Making Changes
A system restore point is an invaluable safety net. It captures a snapshot of your Windows 11 system files, installed applications, Windows Registry, and system settings at a specific moment in time. If any of the troubleshooting steps lead to unforeseen issues or system instability, you can easily roll back your system to this previous, stable state.
This simple precaution can save you significant time and frustration. It allows you to experiment with solutions without the fear of permanently damaging your operating system. Always make it a habit to create a restore point before making any significant system modifications.
Here’s how to create one:
- Press
Win + Rto open the Run dialog. - Type
sysdm.cpland press Enter to open System Properties. - Navigate to the System Protection tab.
- Click the Create… button under “Protection Settings.”
- Give your restore point a descriptive name, such as “Before DCOM 10016 Fix,” and click Create.
- Wait for the process to complete. You’ll receive a confirmation message.
For more comprehensive backup strategies, consider exploring options like System Image Backup on Windows 11: Comprehensive Guide.
Ensuring Administrator Privileges
Modifying DCOM component permissions, editing the registry, or using tools like Group Policy Editor all require elevated privileges. You must be logged into Windows 11 with an account that has administrator rights.
Attempting these steps with a standard user account will result in permission denied errors, preventing you from making the necessary changes. If you are not currently logged in as an administrator, you will need to switch to an administrator account or provide administrator credentials when prompted by User Account Control (UAC).
To check if your account has administrator privileges:
- Open the Settings app (
Win + I). - Go to Accounts > Your info.
- Under your name, it should say “Administrator” if you have the necessary rights.
Without these essential preparatory steps, troubleshooting the DistributedCOM 10016 error on Windows 11 can be both ineffective and potentially risky. Always prioritize system safety before diving into advanced configurations.
Method 1: Modifying DCOM Component Permissions via Component Services
This is often the most direct and effective method for resolving the DistributedCOM 10016 error on Windows 11. It involves directly adjusting the security permissions for the specific DCOM component that is causing the issue.
Identifying the CLSID and APPID from Event Viewer
The first and most critical step is to pinpoint exactly which DCOM component is triggering the error. The Event Viewer provides all the necessary details.
Locating Event ID 10016 Details
- Press
Win + Xand select Event Viewer from the power user menu. - In the Event Viewer window, navigate to Windows Logs > System.
- Look for events with Event ID 10016 and “Source” listed as DistributedCOM. You might need to sort by Event ID or filter the logs to find them quickly.
- Double-click on a relevant 10016 error entry to open its details.
- In the “General” tab, you will find a description similar to: “The application-specific permission settings do not grant Local Activation permission for the COM Server application with CLSID {Your CLSID Here} and APPID {Your APPID Here} to the user SID {Your SID Here}…”
- Carefully note down both the CLSID and APPID GUIDs. These are unique identifiers enclosed in curly braces
{}. You will also need the SID, which identifies the user or group being denied access.
It’s important to copy these values accurately, as a single incorrect character can prevent you from finding the correct component. You can often copy the text directly from the event details.
Granting Launch and Activation Permissions
Once you have the CLSID and APPID, you can proceed to modify the permissions using Component Services.
Step-by-Step Permission Adjustment
- Press
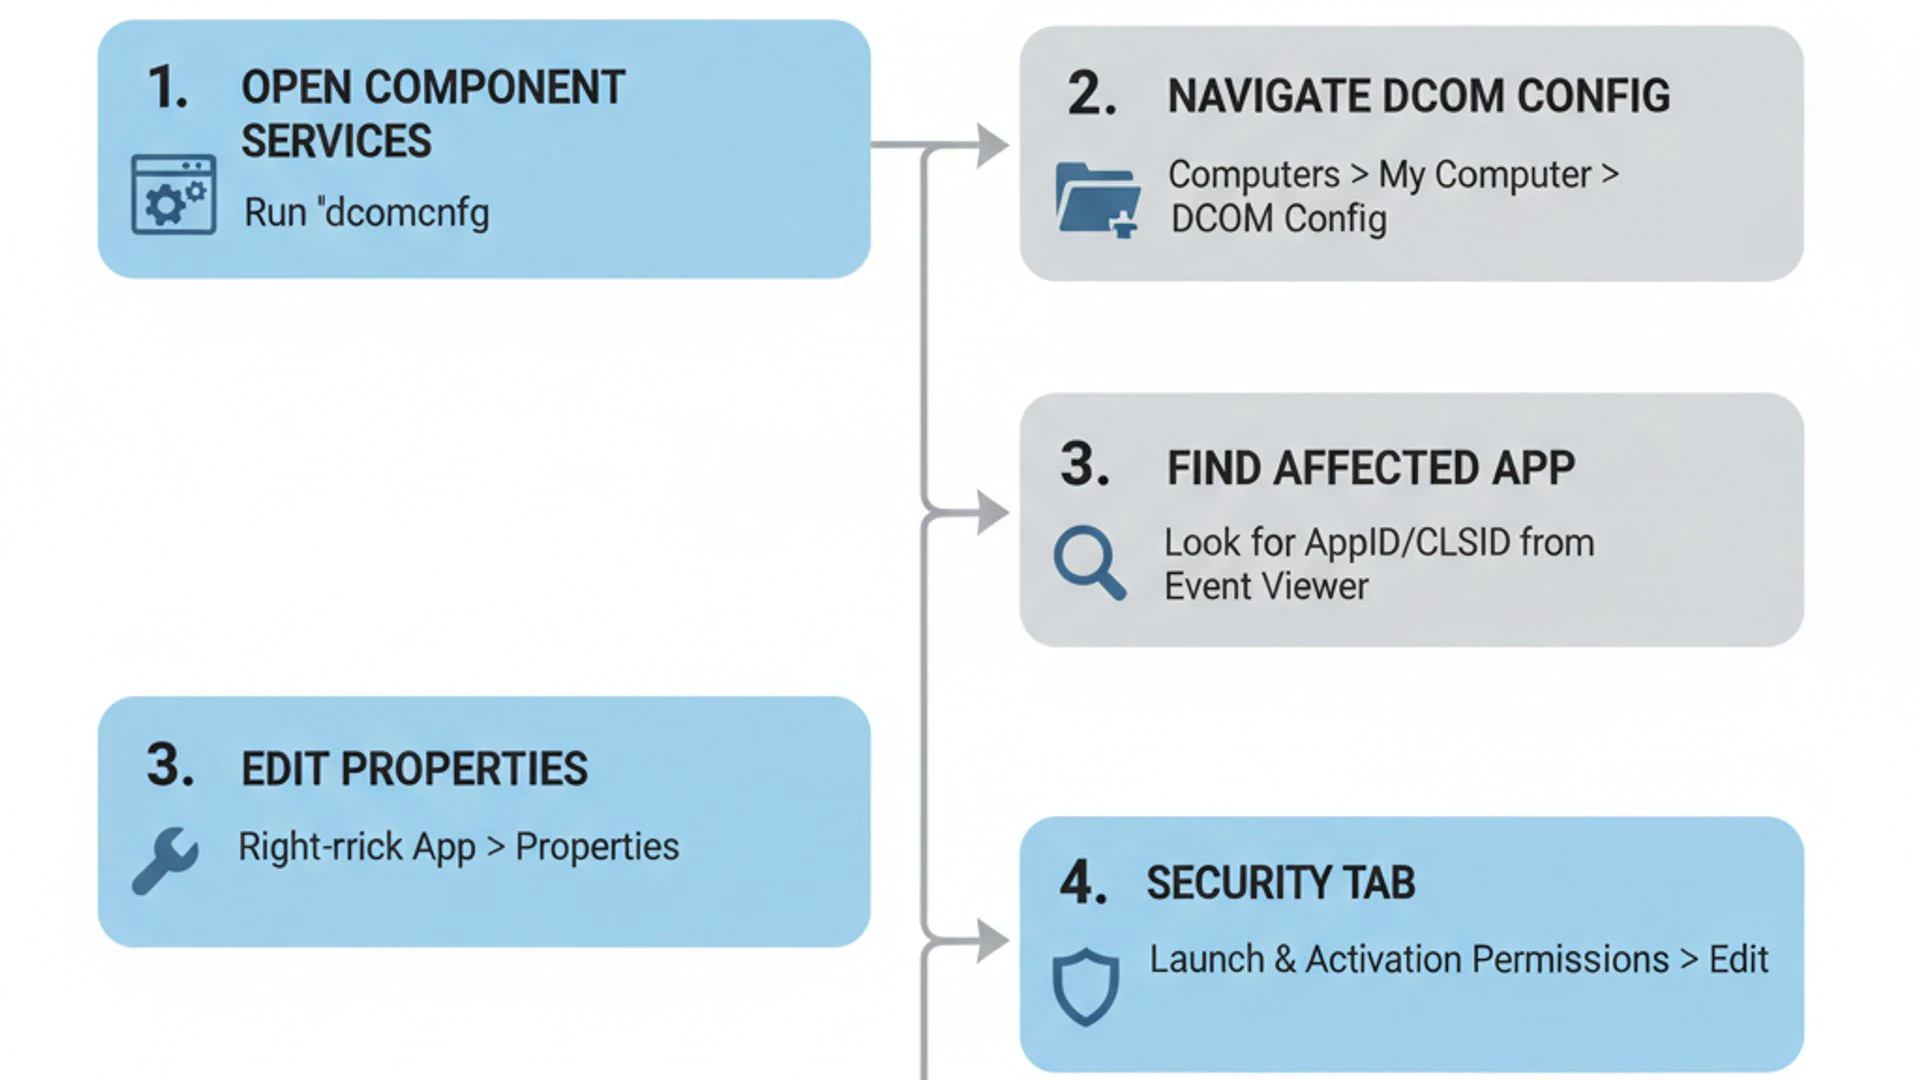
Win + R, typedcomcnfg, and press Enter. This opens the Component Services console. - In the left pane, navigate to Component Services > Computers > My Computer > DCOM Config.
- You’ll see a long list of DCOM components. To find the correct one, you’ll need to match the APPID you noted earlier.
- Right-click on the DCOM Config folder and select View > Details to show more columns, including “Application ID.”
- Scroll through the list or use the “Find” feature (Edit > Find) to locate the component whose “Application ID” matches the APPID you copied from the Event Viewer. If you can’t find it by APPID, try searching by the CLSID or the “Application Name” if it’s listed in the Event Viewer.
- Once you’ve found the correct component, right-click on it and select Properties.
- Go to the Security tab.
- Under “Launch and Activation Permissions,” click Edit….
- In the “Launch and Activation Permission” dialog, click Add….
- Enter the username or group corresponding to the SID you identified in the Event Viewer. Common SIDs often translate to “SYSTEM,” “LOCAL SERVICE,” “NETWORK SERVICE,” or specific user accounts. If you’re unsure, you can often add “Everyone” temporarily for testing, but it’s better to be specific. Click Check Names and then OK.
- Select the newly added user/group from the list.
- Under “Permissions for [User/Group],” ensure that Local Launch and Local Activation are both checked for Allow. If the error mentions “Remote Launch” or “Remote Activation,” check those as well.
- Click OK on all open dialogs to apply the changes.
After applying these changes, restart your computer or the affected application/service. Check the Event Viewer again to see if the DistributedCOM 10016 error persists. This method directly addresses the permission denial by granting the necessary access rights.
Method 2: Adjusting Registry Permissions for DCOM Components
In some more stubborn cases, modifying permissions directly through Component Services might not fully resolve the DistributedCOM 10016 error on Windows 11. This can happen if the underlying registry keys for the DCOM component have corrupted or incorrect ownership/permissions. In such scenarios, you might need to delve into the Registry Editor.
Warning: The Windows Registry is a critical part of your operating system. Incorrect modifications can lead to system instability or even prevent Windows from booting. Always back up your registry or create a system restore point before proceeding.
Navigating to the Relevant Registry Keys
The DCOM components are primarily defined under specific keys within the Registry. You’ll need the CLSID you identified from the Event Viewer in Method 1.
- Press
Win + R, typeregedit, and press Enter. This opens the Registry Editor. - Navigate to the following path:
HKEY_LOCAL_MACHINE\SOFTWARE\Classes\AppID. - Within the
AppIDkey, you will find numerous subkeys, each represented by a GUID (Globally Unique Identifier). Look for the subkey that matches the APPID you copied from the Event Viewer. - If you cannot find a direct match for the APPID, you might need to search for the CLSID. Navigate to
HKEY_LOCAL_MACHINE\SOFTWARE\Classes\CLSID. - Search for the subkey that matches the CLSID you copied. Inside this CLSID key, there might be an
AppIDstring value that points to the actual APPID key underHKEY_LOCAL_MACHINE\SOFTWARE\Classes\AppID.
Once you’ve located the correct APPID key (or the CLSID key if the APPID entry is missing or incorrect), this is where you’ll adjust permissions.
Taking Ownership and Granting Full Control
Sometimes, you might not even have the necessary permissions to modify the security settings of these registry keys. In such cases, you first need to take ownership.
- Right-click on the identified APPID key (e.g.,
{Your-APPID-GUID}) in the Registry Editor and select Permissions…. - In the “Permissions for [APPID GUID]” dialog, click Advanced.
- At the top of the “Advanced Security Settings” window, next to “Owner:”, click Change.
- In the “Select User or Group” dialog, type your administrator username or “Administrators” (if you want to grant ownership to the entire Administrators group) and click Check Names, then OK.
- Back in the “Advanced Security Settings” window, check the box that says “Replace owner on subcontainers and objects”. This ensures ownership is applied recursively.
- Click Apply, then OK. You might need to close and reopen the Permissions window for the changes to fully take effect.
- Now that you own the key, reopen the Permissions… dialog for the APPID key.
- Click Add….
- Enter the username or group that was denied access (the SID you noted earlier, e.g., “SYSTEM,” “LOCAL SERVICE,” “NETWORK SERVICE,” or your specific user account) and click Check Names, then OK.
- Select the newly added user/group from the list.
- Under “Permissions for [User/Group],” check the box for Full Control under the “Allow” column.
- Click Apply, then OK on all open dialogs to save the changes.
After making these registry modifications, it is highly recommended to restart your computer. This ensures that the system reloads the DCOM configuration with the updated permissions. Check the Event Viewer again to confirm if the DistributedCOM 10016 error has been resolved. This method addresses deeper permission issues that might prevent Component Services from effectively applying changes.
Method 3: Utilizing Group Policy Editor for DCOM Security Settings
For users in managed environments, or for those comfortable with advanced system configurations, the Group Policy Editor offers a centralized way to manage DCOM security settings. This method can be particularly useful if you need to apply consistent DCOM access restrictions across multiple systems or for specific user groups. It can also serve as an alternative if direct Component Services modifications don’t stick.
Configuring DCOM Access Restrictions
The Group Policy Editor allows you to define default DCOM launch and activation permissions, which can sometimes override local settings or provide a baseline for components that lack explicit configurations.
- Press
Win + R, typegpedit.msc, and press Enter. This opens the Local Group Policy Editor. (Note: This tool is not available in Windows 11 Home edition. You would need to use a Professional, Enterprise, or Education edition.) - In the left pane, navigate to: Computer Configuration > Windows Settings > Security Settings > Local Policies > Security Options.
- In the right pane, scroll down and locate the following policies under “DCOM Security”:
- DCOM: Machine Access Restrictions in Security Descriptor Definition Language (SDDL) syntax
- DCOM: Machine Launch Restrictions in Security Descriptor Definition Language (SDDL) syntax
- Double-click on DCOM: Machine Launch Restrictions in Security Descriptor Definition Language (SDDL) syntax.
- In the policy settings window, check the box for “Define this policy setting”.
- Click the Edit Security… button.
- This will open a standard “Launch and Activation Permission” dialog, similar to the one in Component Services. Here, you can add users or groups (like “SYSTEM,” “LOCAL SERVICE,” “NETWORK SERVICE,” “Administrators”) and grant them Local Launch and Local Activation permissions. Ensure that the user/group identified in your DistributedCOM 10016 error is present and has the necessary “Allow” permissions.
- Repeat the process for DCOM: Machine Access Restrictions in Security Descriptor Definition Language (SDDL) syntax if the error also mentions “Access” permissions.
- Click OK on all open dialogs.
After making changes in the Group Policy Editor, you may need to force a policy update for them to take effect immediately. Open Command Prompt as an administrator and type gpupdate /force, then press Enter. A system restart is also recommended.
This method sets system-wide default DCOM permissions. While it can resolve many 10016 errors, it’s a broader brushstroke compared to targeting individual components via Component Services. Use it when specific component fixes are not working, or if you suspect a more general DCOM security misconfiguration affecting multiple components. Always be cautious when modifying security policies, as overly permissive settings can pose a security risk, while overly restrictive ones can break legitimate applications.
Method 4: Addressing Specific Application-Related DCOM Errors
Sometimes, the DistributedCOM 10016 error on Windows 11 isn’t a general system issue but rather a specific problem tied to a particular application. When an application attempts to use a DCOM component without the correct permissions, it can generate this error. Identifying the problematic application is key to resolving these instances.
Identifying Problematic Applications
The Event Viewer, once again, is your primary diagnostic tool. When you examine the details of the DistributedCOM 10016 error, pay close attention to the context in which it appears.
- Open Event Viewer (
Win + X> Event Viewer). - Navigate to Windows Logs > System.
- Filter or search for Event ID 10016 from the DistributedCOM source.
- Look at the “General” tab of the error details. While it provides the CLSID, APPID, and SID, it might also sometimes implicitly or explicitly mention the application associated with the error.
- More importantly, observe the timestamps. If the error consistently appears immediately after you launch a specific application, or when that application attempts a particular function, then you’ve likely found your culprit.
- You can also check the “Details” tab (XML View) for more information, though it’s often more technical.
Common applications that might trigger DCOM errors include certain third-party utilities, older software not fully compatible with Windows 11’s security model, or even some Microsoft applications if their installation or updates were incomplete.
Reinstalling or Updating Affected Software
Once you’ve identified an application as the likely cause of the DistributedCOM 10016 error, the troubleshooting steps shift from system-wide DCOM adjustments to application-specific solutions.
1. Update the Application:
The simplest solution is often to ensure the application is running its latest version. Developers frequently release updates that fix bugs, improve compatibility, and address permission issues with newer operating systems like Windows 11.
- Check the application’s built-in update mechanism.
- Visit the developer’s official website to download the latest version or patch.
2. Reinstall the Application:
A clean reinstallation can often resolve corrupted files, incorrect registry entries, or permission issues that arose during the initial installation. This is particularly effective if the application’s DCOM components were not registered correctly.
- Uninstall the application: Go to Settings > Apps > Installed apps, find the problematic application, click the three dots, and select Uninstall. Follow any prompts.
- Clean up residual files (optional but recommended): After uninstalling, manually check common installation directories (like
Program Files,Program Files (x86),AppData) for any leftover folders. You can also use a reputable third-party uninstaller tool that cleans the registry. - Restart your computer: This helps clear any cached data.
- Reinstall the application: Download the latest installer from the official source and run it. Ensure you have administrator privileges during installation.
3. Check Application-Specific Settings:
Some applications might have their own security or compatibility settings that can influence DCOM behavior. Explore the application’s preferences or options menu for any relevant configurations that might be causing permission conflicts.
4. Run in Compatibility Mode:
For older applications, running them in compatibility mode for an earlier Windows version might sometimes circumvent DCOM permission issues. Right-click the application’s executable, go to Properties > Compatibility tab, and experiment with different compatibility settings.
By focusing on the application directly, you can often resolve the DistributedCOM 10016 error without making broader system-level DCOM changes, especially when the error is isolated to a single piece of software.
Advanced Troubleshooting and Prevention Tips
Even after trying the specific DCOM permission adjustments and application-focused solutions, some DistributedCOM 10016 errors on Windows 11 might persist. In such cases, or as part of a proactive maintenance routine, these advanced troubleshooting and prevention tips can help ensure overall system health and stability.
Running System File Checker (SFC) and DISM Scans
Corrupted system files can sometimes lead to unexpected behavior, including permission issues with DCOM components. Windows 11 provides built-in tools to scan for and repair such corruption.
1. System File Checker (SFC):
SFC scans for and restores corrupted Windows system files. It compares your current system files with known good versions and replaces any discrepancies.
- Press
Win + Xand select Terminal (Admin) or Command Prompt (Admin). - In the elevated command prompt, type
sfc /scannowand press Enter. - Allow the scan to complete. It might take some time.
- Upon completion, you’ll see a message indicating whether any integrity violations were found and repaired.
2. Deployment Image Servicing and Management (DISM):
DISM is a more powerful tool that can repair the Windows image itself, which SFC relies upon. If SFC fails to fix issues, DISM can often resolve the underlying problems.
- Open Terminal (Admin) or Command Prompt (Admin) again.
- First, check the health of the Windows image:
Dism /Online /Cleanup-Image /CheckHealth - Then, scan the image for corruption:
Dism /Online /Cleanup-Image /ScanHealth - If issues are found, restore the image:
Dism /Online /Cleanup-Image /RestoreHealth - After DISM completes, it’s a good practice to run
sfc /scannowagain to ensure all system files are consistent with the repaired image.
These scans can resolve underlying system integrity issues that might indirectly contribute to DCOM errors by ensuring that all core Windows components are functioning as expected.
Keeping Windows 11 and Drivers Updated
One of the simplest yet most effective prevention strategies for many Windows errors, including DistributedCOM 10016, is to keep your operating system and device drivers consistently updated.
1. Windows Updates:
Microsoft regularly releases cumulative updates, feature updates, and security patches for Windows 11. These updates often include bug fixes for known issues, improved compatibility, and enhanced security features that can prevent DCOM-related problems.
- Go to Settings (
Win + I). - Navigate to Windows Update.
- Click Check for updates and install any available updates.
- Restart your computer as prompted.
2. Driver Updates:
Outdated or corrupted device drivers can sometimes interfere with how applications and services interact with hardware, potentially leading to DCOM errors. Ensuring your drivers are current can prevent a host of compatibility problems.
- Open Device Manager (
Win + X> Device Manager). - Expand categories (e.g., Display adapters, Network adapters).
- Right-click on a device and select Update driver.
- Choose “Search automatically for drivers.”
- Alternatively, visit your computer manufacturer’s website or the website of individual component manufacturers (e.g., NVIDIA, AMD, Intel) to download the latest drivers specifically for Windows 11.
Regular updates not only fix existing bugs but also introduce performance improvements and security enhancements, contributing to a more stable and efficient Windows 11 environment. By combining these advanced troubleshooting steps with consistent maintenance, you can significantly reduce the occurrence of DistributedCOM 10016 and other system errors.
Conclusion: Maintaining a Stable Windows 11 Environment
The DistributedCOM 10016 error on Windows 11, while often perceived as a persistent and perplexing issue, is ultimately a manageable one. Throughout this comprehensive guide, we’ve explored its technical underpinnings, differentiating between instances that can be safely ignored and those that warrant intervention. The key takeaway remains that this error primarily signals a permissions conflict within the DCOM framework.
We’ve outlined a structured approach to troubleshooting, starting with essential preparatory steps like creating a system restore point and ensuring administrative privileges. From there, we delved into practical, step-by-step methods, beginning with the most common resolution: adjusting DCOM component permissions via the Component Services console. This involves carefully identifying the CLSID and APPID from the Event Viewer and granting the necessary launch and activation permissions.
For more stubborn cases, we explored modifying registry permissions directly, a powerful but delicate operation that requires precision and caution. We also touched upon the Group Policy Editor for system-wide DCOM security configurations, particularly useful in managed IT environments. Finally, we addressed application-specific errors, emphasizing the importance of updating or reinstalling problematic software.
By applying these techniques, coupled with advanced troubleshooting like SFC/DISM scans and diligent system updates, you can effectively mitigate the DistributedCOM 10016 error. Understanding its context and applying the appropriate solution ensures that your Windows 11 system remains stable, efficient, and free from unnecessary clutter in the Event Viewer. Empower yourself with this knowledge to maintain a robust computing experience.
For more interesting articles, stay tuned to Winsides.com!









Community
Comments (0)