

Introduction to PAGE_FAULT_IN_NONPAGED_AREA on Windows 11
Encountering a Blue Screen of Death (BSOD) on your Windows 11 system can be a profoundly frustrating experience. Among the various stop codes that signal critical system failures, PAGE_FAULT_IN_NONPAGED_AREA stands out as a particularly common and vexing issue. This error indicates that your operating system has attempted to access a page of memory that was not present in the non-paged area of the RAM, leading to an immediate system halt to prevent data corruption. For additional context, see troubleshoot blue screen errors, PAGE_FAULT_IN_NONPAGED_AREA bug check, and System File Checker (SFC).
When this specific BSOD appears, it often points towards deeper problems within your computer’s hardware, drivers, or core system files. It’s more than just a temporary glitch; it’s a critical alert that your system’s memory management is failing in a fundamental way. Ignoring this error can lead to repeated crashes, data loss, and ultimately, an unusable system.
This comprehensive guide will demystify the PAGE_FAULT_IN_NONPAGED_AREA on Windows 11 error, providing you with a structured approach to diagnose and resolve it. We’ll delve into its technical underpinnings, explore common causes, and offer a range of actionable solutions, from simple restarts to advanced system repairs. By following these steps, you can regain control over your Windows 11 machine and restore its stability.
Table of contents
Key Takeaways for Resolving This Error
Before diving into the detailed troubleshooting steps, here’s a quick summary of the most critical actions you can take to address the PAGE_FAULT_IN_NONPAGED_AREA on Windows 11 error:
- Run Memory Diagnostics: The Windows Memory Diagnostic Tool is your first line of defense to check for faulty RAM modules.
- Update or Roll Back Drivers: Outdated or corrupted device drivers, especially for network adapters, graphics cards, or storage controllers, are frequent culprits.
- Verify System Files: Use SFC and DISM commands to scan and repair corrupted Windows system files that might be causing memory access issues.
- Adjust Virtual Memory: Incorrectly configured paging file settings can exacerbate memory management problems.
- Disable Fast Startup: This feature, while speeding up boot times, can sometimes interfere with proper driver loading and memory initialization.
- Scan for Malware: Malicious software can corrupt system processes and memory, leading to BSODs.
- Check Disk Health: Errors on your hard drive or SSD can prevent the system from accessing necessary files, including those in non-paged memory.
Understanding the PAGE_FAULT_IN_NONPAGED_AREA Error
To effectively troubleshoot the PAGE_FAULT_IN_NONPAGED_AREA on Windows 11 error, it’s crucial to understand what it signifies. This specific stop code, 0x00000050, indicates that the operating system has encountered an invalid memory reference. Essentially, the system tried to access a piece of information from memory that it expected to be there but wasn’t, or it was trying to access an invalid address.
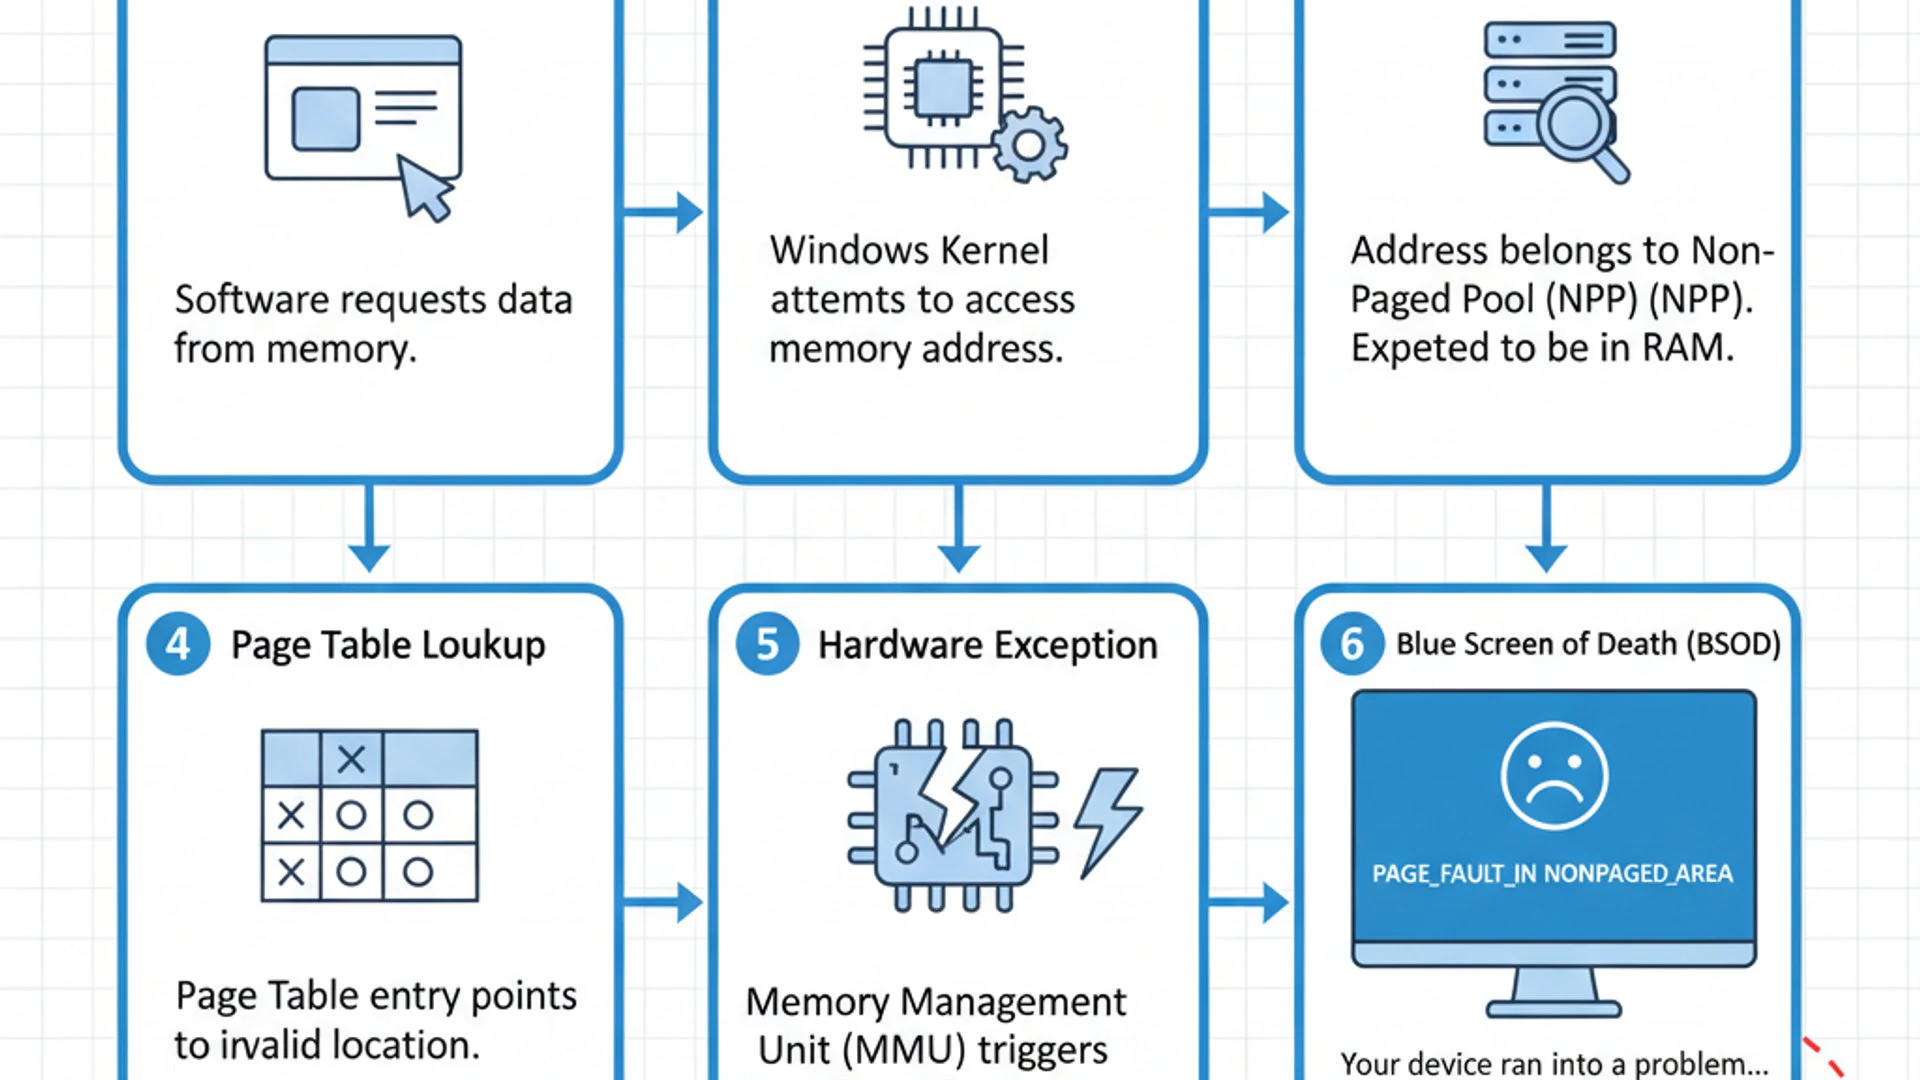
The “non-paged area” part of the error message is particularly important. Windows manages memory in pages, which are fixed-size blocks. Some of these pages can be “paged out” to the hard drive (virtual memory) when physical RAM is low, while others, deemed critical for system operation, must always remain in physical RAM. These critical pages reside in the non-paged pool.
What is Non-Paged Area Memory?
The non-paged pool is a section of system memory that is guaranteed to remain in physical RAM and will never be written to the paging file on the hard disk. This area is reserved for crucial operating system components, device drivers, and kernel-mode processes that require immediate and constant access to their data. If the system were to page out these critical components, it could lead to severe instability and system crashes.
When the PAGE_FAULT_IN_NONPAGED_AREA error occurs, it means that a program or driver tried to access data within this non-paged pool, but the data it was looking for was either corrupt, missing, or the memory address itself was invalid. This is a severe problem because the operating system relies on the integrity of this memory region for its fundamental operations.
Common Triggers for the BSOD Error
Several factors can lead to the PAGE_FAULT_IN_NONPAGED_AREA on Windows 11 error. Understanding these common triggers can help you narrow down your troubleshooting efforts:
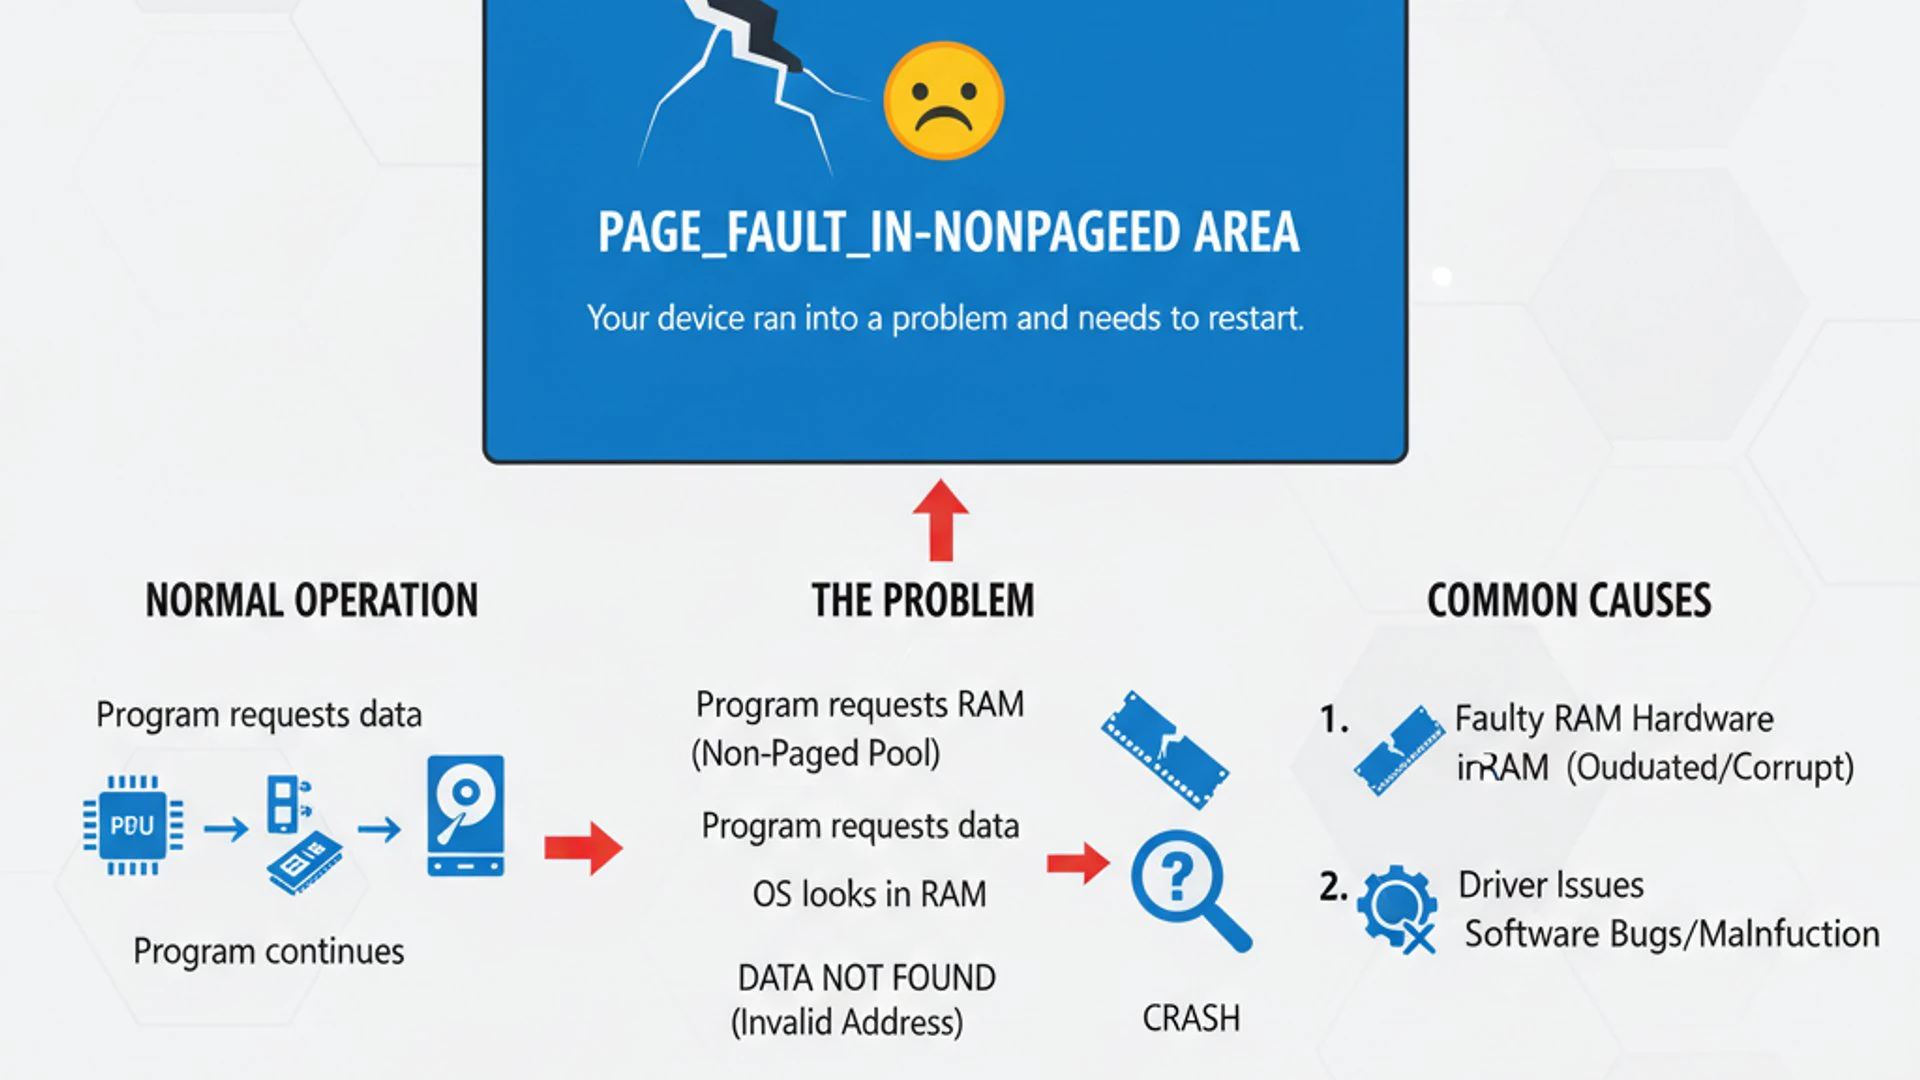
- Faulty Device Drivers: This is arguably the most common cause. An outdated, corrupted, or incompatible device driver (especially for graphics cards, network adapters, or storage controllers) can attempt to access memory incorrectly, leading to this BSOD.
- Defective RAM Modules: Physical damage or defects in your computer’s Random Access Memory (RAM) can cause data corruption in the non-paged pool. If the system tries to read from a faulty sector, it will trigger the error.
- Corrupted System Files: Essential Windows system files can become damaged due to improper shutdowns, disk errors, or malware. If these files, which reside in or interact with the non-paged pool, are compromised, the system can crash.
- Malware or Viruses: Malicious software can infiltrate system processes, corrupt memory, and interfere with the operating system’s memory management, leading to BSODs.
- Disk Errors: Problems with your hard drive or SSD, such as bad sectors, can prevent the operating system from reading or writing necessary files correctly, which can indirectly affect memory integrity.
- Software Conflicts: Newly installed applications or updates, particularly those that interact deeply with the system kernel or drivers, can sometimes conflict with existing software or drivers, leading to memory access violations.
- Incorrect Virtual Memory Settings: While the error specifies “non-paged,” issues with the overall virtual memory configuration (paging file) can sometimes have ripple effects on how the system manages its entire memory space.
Identifying the precise trigger can be challenging, but by systematically working through the solutions provided in this guide, you can pinpoint and resolve the underlying cause of the PAGE_FAULT_IN_NONPAGED_AREA on Windows 11 error.
Initial Troubleshooting Steps Before Deeper Dives
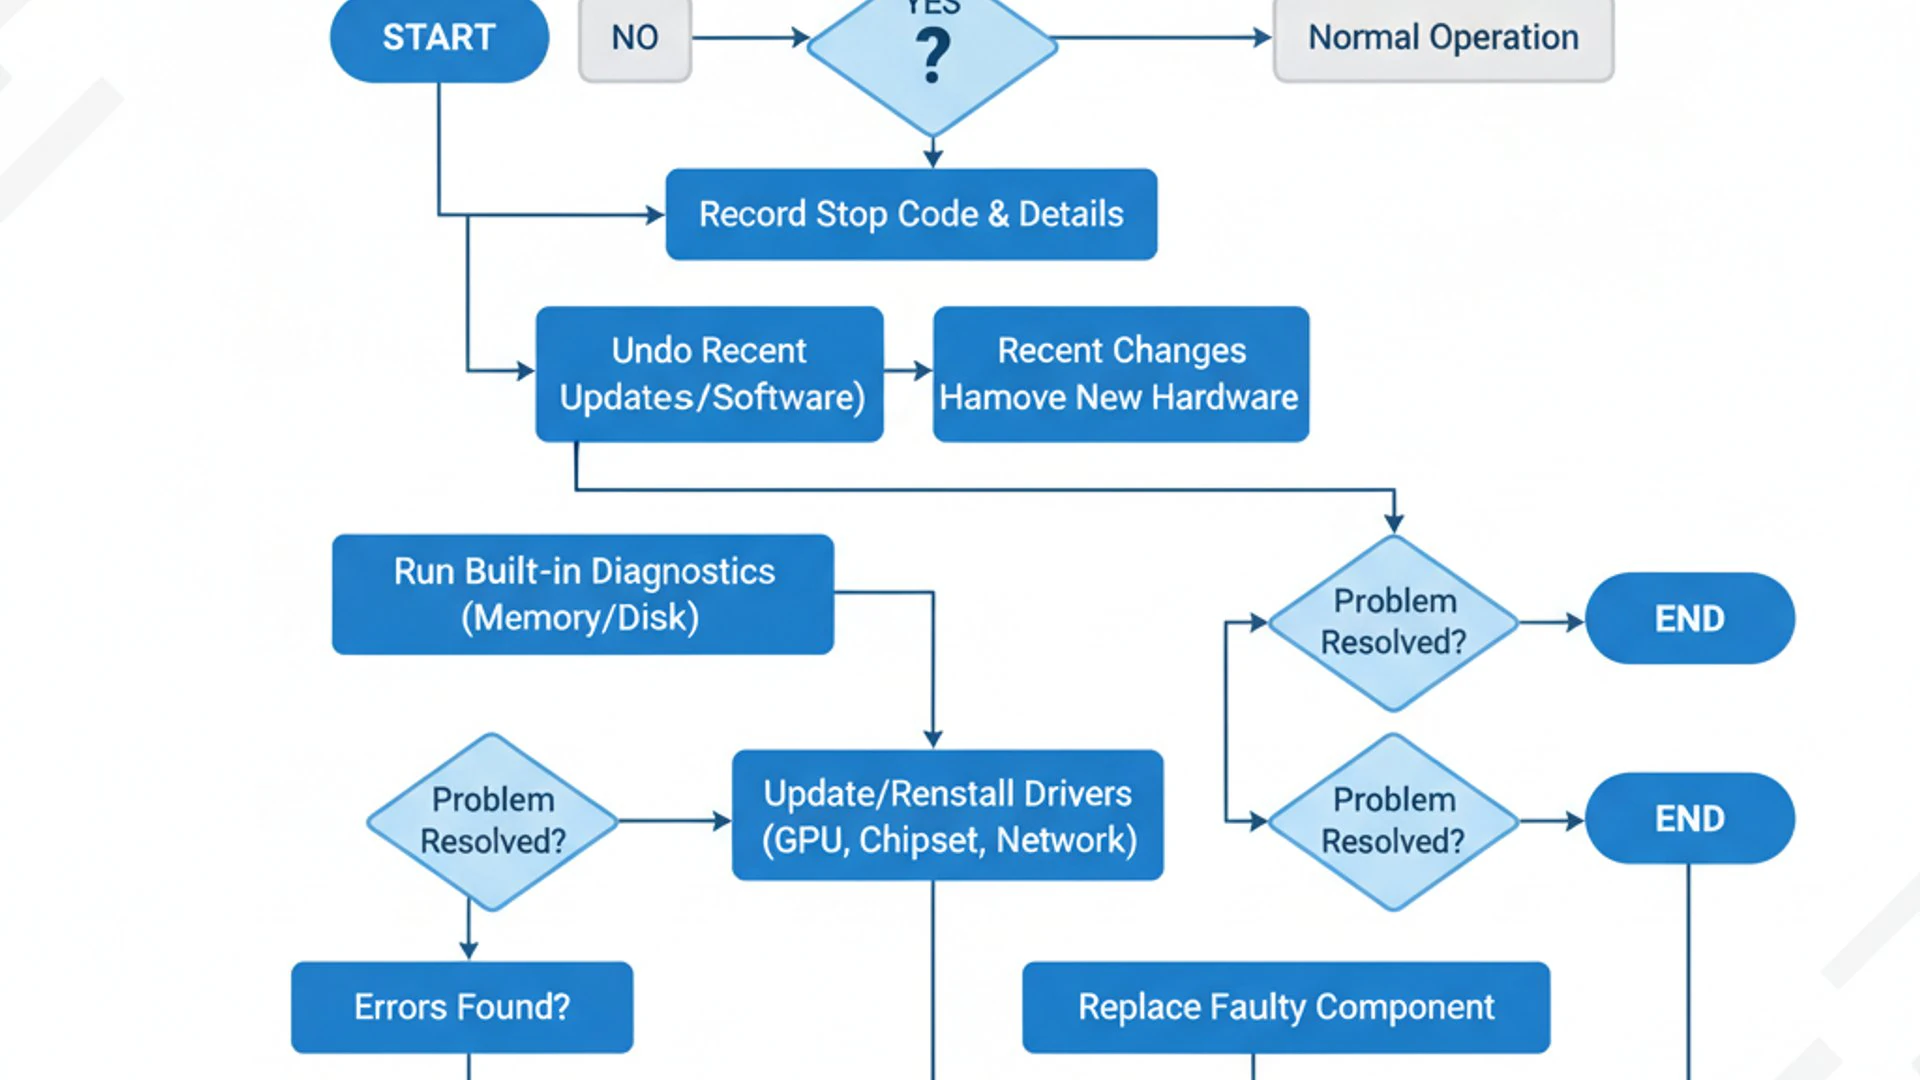
Before embarking on more complex diagnostic procedures, it’s always wise to start with a few basic troubleshooting steps. These simple actions can often resolve minor, transient issues that might be mimicking a more serious problem, saving you time and effort.
Restarting Your System
It might sound overly simplistic, but a good old-fashioned restart can work wonders. Many temporary software glitches, memory leaks, or driver conflicts that accumulate over time can be cleared by simply rebooting your computer. A fresh start allows the operating system to reload all its components and drivers from scratch, often resolving the PAGE_FAULT_IN_NONPAGED_AREA on Windows 11 error if it was a one-off occurrence.
To restart, simply click the Start button, then the Power icon, and select Restart. If your system is stuck on the BSOD, you might need to perform a hard shutdown by holding down the power button for several seconds. Wait a minute, then power it back on. Observe if the error reappears. If it does, proceed to the next steps.
Checking for Recent Hardware or Software Changes
Often, system instability, including BSODs, can be directly linked to recent modifications. Think back to what you’ve installed or changed just before the PAGE_FAULT_IN_NONPAGED_AREA on Windows 11 error started appearing. Identifying these recent changes is a crucial diagnostic step.
- New Software Installations: Did you install any new applications, especially those that require administrative privileges or interact with system drivers? Try uninstalling them temporarily to see if the problem resolves.
- Driver Updates: Have you recently updated any device drivers? If so, the new driver might be incompatible or faulty. We’ll cover how to roll back drivers in a later section.
- Windows Updates: Sometimes, a recent Windows 11 update can introduce bugs or incompatibilities. While rolling back Windows updates is possible, it’s often better to first check for subsequent patches.
- New Hardware: If you’ve recently added new hardware (e.g., a new RAM stick, graphics card, or peripheral), try removing it to see if the error disappears. This helps isolate whether the new component is the culprit.
By systematically reviewing and potentially undoing recent changes, you can often quickly identify the source of the problem. This method leverages the principle of elimination, making your troubleshooting much more efficient.
Method 1: Running Windows Memory Diagnostic Tool
One of the most frequent causes for the PAGE_FAULT_IN_NONPAGED_AREA on Windows 11 error is faulty RAM. The Windows Memory Diagnostic Tool is a built-in utility designed to check your computer’s RAM for potential errors. It’s an essential first step in hardware-related troubleshooting.
Accessing the Tool
Initiating the Windows Memory Diagnostic Tool is straightforward. You can access it directly from Windows 11:
- Press the Windows key + R to open the Run dialog box.
- Type
mdsched.exeand press Enter. - Alternatively, type “Windows Memory Diagnostic” into the Windows Search bar and select the application.
A small window will appear with two options. You’ll want to choose the first one: “Restart now and check for problems (recommended)”. This will immediately restart your computer and begin the memory test. Ensure you save any open work before proceeding, as the system will reboot.
Interpreting Results and Next Steps
Once your computer restarts, it will boot into the Windows Memory Diagnostic environment. The tool will run a series of tests on your RAM. This process can take anywhere from a few minutes to an hour or more, depending on the amount of RAM you have and the thoroughness of the tests. You’ll see a progress bar and status messages on the screen.
After the test completes, your computer will automatically restart and boot back into Windows 11. The results of the diagnostic will typically appear as a notification in the system tray near the clock. If you don’t see it immediately, you can check the Event Viewer:
- Press Windows key + X and select Event Viewer.
- Navigate to Windows Logs > System.
- In the right-hand pane, click on Find… and type “MemoryDiagnostic” to locate the relevant event entries.
If the tool reports errors, it strongly suggests that one or more of your RAM modules are faulty. In this scenario, the most effective solution is to replace the problematic RAM stick(s). If you have multiple RAM modules, you can try removing them one by one and re-running the test to identify the specific faulty module. If no errors are found, your RAM is likely not the direct cause of the PAGE_FAULT_IN_NONPAGED_AREA on Windows 11 error, and you should proceed to other troubleshooting methods.
Pro Tip: If you suspect a RAM issue but the Windows tool doesn’t find anything, consider using a more thorough third-party memory testing utility like MemTest86, which can run more exhaustive tests.
Method 2: Updating or Rolling Back Device Drivers
As mentioned earlier, faulty or incompatible device drivers are a leading cause of the PAGE_FAULT_IN_NONPAGED_AREA on Windows 11 error. Drivers are essential software components that allow your operating system to communicate with your hardware. If a driver is outdated, corrupted, or has a bug, it can cause memory access violations, leading to a BSOD.
Identifying Problematic Drivers
Pinpointing the exact driver causing the issue can be challenging. However, if the error started after installing new hardware or updating a specific driver, that’s your primary suspect. Otherwise, you’ll need to systematically check and update your most critical drivers, such as those for your graphics card, network adapter, and storage controller.
Using Device Manager
The Device Manager is your central hub for managing all hardware components and their associated drivers. Here’s how to use it:
- Press Windows key + X and select Device Manager from the menu.
- Expand categories like Display adapters, Network adapters, and Storage controllers.
- Right-click on each device and select Update driver.
- Choose “Search automatically for drivers.” Windows will attempt to find and install the latest driver.
- If Windows doesn’t find a newer driver, you might need to visit the manufacturer’s website (e.g., NVIDIA, AMD, Intel, Realtek) directly to download the latest drivers for your specific hardware model.
- After installing any new drivers, restart your computer to ensure the changes take effect.
Pay close attention to any devices with a yellow exclamation mark in Device Manager, as these indicate a problem with the device or its driver. Resolving these issues is often key to fixing the PAGE_FAULT_IN_NONPAGED_AREA on Windows 11.
Checking for Driver Updates via Windows Update
Windows Update doesn’t just deliver operating system patches; it also provides driver updates for many devices. It’s a convenient way to keep essential drivers current.
- Go to Settings > Windows Update.
- Click on Check for updates.
- If updates are available, including optional driver updates, install them.
- Sometimes, driver updates are listed under Advanced options > Optional updates. Be sure to check there as well.
Always restart your system after installing updates to ensure they are properly applied. This can often resolve the PAGE_FAULT_IN_NONPAGED_AREA on Windows 11 if a driver was the root cause.
Rolling Back a Driver
If the error started immediately after a driver update, rolling back to the previous version can be a quick fix. This is particularly useful if the new driver is buggy or incompatible.
- Open Device Manager (Windows key + X, then Device Manager).
- Locate the driver you suspect is causing the problem (e.g., your graphics card under Display adapters).
- Right-click on the device and select Properties.
- Go to the Driver tab.
- Click the Roll Back Driver button. If the button is grayed out, it means there’s no previous driver version to revert to.
- Follow the on-screen prompts and then restart your computer.
Rolling back a driver can often immediately resolve the PAGE_FAULT_IN_NONPAGED_AREA on Windows 11 if the issue was introduced by a faulty update. If rolling back isn’t an option, you might need to uninstall the driver completely and then reinstall an older, stable version from the manufacturer’s website.
Method 3: Verifying and Repairing System Files
Corrupted or missing system files can severely impact the stability of Windows 11, leading to various errors, including the PAGE_FAULT_IN_NONPAGED_AREA BSOD. Windows provides two powerful command-line tools to address these issues: System File Checker (SFC) and Deployment Image Servicing and Management (DISM).
Using System File Checker (SFC)
The System File Checker tool scans for and restores corrupted Windows system files. It compares your current system files with the original, correct versions and replaces any discrepancies. This can be particularly effective if the PAGE_FAULT_IN_NONPAGED_AREA on Windows 11 error is due to a damaged core system component.
- Open Command Prompt as an administrator. You can do this by typing “cmd” into the Windows Search bar, right-clicking on “Command Prompt,” and selecting “Run as administrator.”
- In the Command Prompt window, type the command:
sfc /scannow - Press Enter.
The scan will begin and can take some time to complete. Do not close the Command Prompt window until the verification is 100% finished. Upon completion, you will receive one of several messages:
- “Windows Resource Protection did not find any integrity violations.” (No corrupted files were found.)
- “Windows Resource Protection found corrupt files and successfully repaired them.” (The issue might be resolved.)
- “Windows Resource Protection found corrupt files but was unable to fix some of them.” (You’ll need to use DISM next.)
If SFC reports that it repaired files, restart your computer and check if the PAGE_FAULT_IN_NONPAGED_AREA on Windows 11 error persists.
Deploying DISM Commands
If SFC was unable to repair certain files, or if you suspect a deeper corruption within the Windows system image, the Deployment Image Servicing and Management (DISM) tool comes into play. DISM can repair the Windows image itself, providing the necessary components for SFC to then function correctly. It’s often used before running SFC if SFC fails.
- Open Command Prompt as an administrator (as described above).
- Execute the following commands one by one, pressing Enter after each. These commands will check the health of your Windows image and attempt to repair it:
DISM /Online /Cleanup-Image /CheckHealth(Checks for corruption)DISM /Online /Cleanup-Image /ScanHealth(Performs a more thorough scan for corruption)DISM /Online /Cleanup-Image /RestoreHealth(Attempts to repair detected corruption using Windows Update as a source for healthy files)
The RestoreHealth command can take a significant amount of time, sometimes over an hour, and may appear to hang at certain percentages. Be patient and let it complete. If the process stops or fails, ensure you have a stable internet connection if Windows Update is being used as the source.
After DISM completes, it’s highly recommended to run sfc /scannow again to ensure that all system files are now in their correct state. Restart your computer after completing both sets of scans and repairs. These powerful tools are often instrumental in resolving the PAGE_FAULT_IN_NONPAGED_AREA on Windows 11 by restoring the integrity of your operating system.
Method 4: Adjusting Virtual Memory Settings
Virtual memory, also known as the paging file, is a crucial component of Windows’ memory management system. It allows the operating system to use a portion of your hard drive or SSD as if it were additional RAM. While the PAGE_FAULT_IN_NONPAGED_AREA error specifically refers to memory that should not be paged, incorrect virtual memory settings can sometimes contribute to overall memory instability and indirectly lead to this BSOD.
Accessing Advanced System Settings
To modify virtual memory settings, you need to navigate through the advanced system properties. This process is consistent across most Windows versions, including Windows 11.
- Press Windows key + R to open the Run dialog.
- Type
sysdm.cpland press Enter to open System Properties. - Go to the Advanced tab.
- Under the “Performance” section, click on Settings….
- In the Performance Options window, go to the Advanced tab.
- Under “Virtual memory,” click on Change….
This will open the Virtual Memory window, where you can configure the size of your paging file. It’s important to proceed carefully here, as incorrect settings can lead to performance degradation or further system instability.
Modifying Paging File Size
By default, Windows usually manages the paging file size automatically, which is often the optimal setting. However, if you or another program has manually altered these settings, or if the automatic management isn’t performing ideally, adjusting it might help resolve the PAGE_FAULT_IN_NONPAGED_AREA on Windows 11.
- In the Virtual Memory window, uncheck “Automatically manage paging file size for all drives.”
- Select the drive where Windows is installed (usually C:).
- Choose “Custom size.”
- For Initial size (MB), a common recommendation is 1.5 times the amount of your physical RAM. For example, if you have 8GB (8192 MB) of RAM, set the initial size to 12288 MB.
- For Maximum size (MB), a common recommendation is 3 times the amount of your physical RAM. So, for 8GB RAM, this would be 24576 MB.
Alternatively, you can try setting it to “System managed size” if it was previously set to a custom size. This allows Windows to dynamically adjust the paging file as needed. After making changes, click Set, then OK on all open windows, and restart your computer for the changes to take effect. Monitor if the PAGE_FAULT_IN_NONPAGED_AREA on Windows 11 error reoccurs. If increasing the virtual memory helps, it might indicate that your system is struggling with overall memory pressure.
Method 5: Disabling Fast Startup
Fast Startup is a feature in Windows 11 designed to make your computer boot up more quickly after a shutdown. It does this by saving a kernel session and device drivers to a hibernation file when you shut down, then loading them from that file when you start up again. While beneficial for speed, this process can sometimes lead to issues, especially with drivers or memory management, potentially triggering the PAGE_FAULT_IN_NONPAGED_AREA on Windows 11 error.
Locating Power Options
To disable Fast Startup, you need to access the Power Options settings within the Control Panel. This is where Windows manages all power-related behaviors, including how your system shuts down and starts up.
- Open the Control Panel. You can do this by typing “Control Panel” into the Windows Search bar and selecting the best match.
- In the Control Panel, change the “View by” option to Large icons or Small icons to see all options.
- Click on Power Options.
- In the Power Options window, on the left-hand side, click on “Choose what the power buttons do.”
This will take you to a screen where you can modify shutdown settings. You’ll notice that some options might be grayed out, requiring administrative privileges to change.
Unchecking Fast Startup
To make changes to the Fast Startup setting, you’ll need to click on a specific link first.
- Click on “Change settings that are currently unavailable.” This will unlock the grayed-out shutdown settings.
- Under “Shutdown settings,” locate the option labeled “Turn on fast startup (recommended).”
- Uncheck the box next to this option.
- Click Save changes.
After disabling Fast Startup, perform a full shutdown (not a restart) and then power your computer back on. This ensures that the system performs a complete boot cycle, reloading all drivers and memory components from scratch. If the PAGE_FAULT_IN_NONPAGED_AREA on Windows 11 error was related to an issue with the hibernation file or driver loading during Fast Startup, this step might resolve it. While your boot times might be slightly longer, the increased stability is often worth the trade-off.
Method 6: Scanning for Malware and Viruses
Malicious software, such as viruses, Trojans, and rootkits, can wreak havoc on a computer system. They can corrupt system files, interfere with legitimate processes, and even directly manipulate memory, leading to critical errors like the PAGE_FAULT_IN_NONPAGED_AREA on Windows 11. A thorough scan for malware is therefore an essential troubleshooting step.
Utilizing Windows Security
Windows 11 comes with a robust built-in antivirus solution called Windows Security (formerly Windows Defender). It’s capable of detecting and removing a wide range of threats.
- Open Windows Security. You can find it by typing “Windows Security” in the search bar, or by going to Settings > Privacy & security > Windows Security.
- Click on Virus & threat protection.
- Click on Scan options.
- Select Full scan and then click Scan now.
A full scan can take several hours, depending on the size of your hard drive and the number of files. It will thoroughly check all files and running programs for threats. If any threats are detected, Windows Security will typically quarantine or remove them. After the scan, restart your computer and observe if the PAGE_FAULT_IN_NONPAGED_AREA on Windows 11 error has been resolved.
Third-Party Antivirus Solutions
While Windows Security is effective, sometimes a second opinion from a reputable third-party antivirus scanner can be beneficial, especially if you suspect a particularly stubborn infection or if Windows Security didn’t find anything. Many free and paid options are available, such as Malwarebytes, Avast, or AVG.
- Download and install a reputable third-party antivirus program.
- Perform a full system scan using the newly installed software.
- Allow the program to quarantine or remove any detected threats.
- It’s often recommended to uninstall the third-party antivirus software after the scan if you prefer to rely on Windows Security, as running multiple real-time antivirus programs simultaneously can sometimes cause conflicts or performance issues.
Malware can be very insidious, hiding deep within system processes. Eliminating these threats can significantly improve system stability and potentially resolve the PAGE_FAULT_IN_NONPAGED_AREA on Windows 11 error by restoring proper memory and file access. Always keep your antivirus definitions up to date for the best protection.
Method 7: Checking Disk for Errors
Hard drive or Solid State Drive (SSD) errors can manifest in various ways, including data corruption, slow performance, and even BSODs like the PAGE_FAULT_IN_NONPAGED_AREA on Windows 11. If the operating system or a critical driver attempts to read data from a bad sector on the disk, and that data is supposed to be loaded into non-paged memory, it can trigger this error. The CHKDSK utility is designed to scan your disk for logical and physical errors and attempt to repair them.
Running CHKDSK via Command Prompt
CHKDSK (Check Disk) is a powerful command-line tool that can identify and fix file system errors and bad sectors on your storage drive. It’s crucial to run this command with administrative privileges.
- Open Command Prompt as an administrator. You can do this by typing “cmd” into the Windows Search bar, right-clicking on “Command Prompt,” and selecting “Run as administrator.”
- In the Command Prompt window, type the command:
chkdsk /f /r - Press Enter.
If you’re checking the drive where Windows is installed (usually C:), CHKDSK will likely tell you that it cannot run immediately because the volume is in use. It will then ask if you want to schedule the check to run the next time the system restarts. Type Y and press Enter to confirm. Then, restart your computer.
Understanding CHKDSK Parameters
The parameters used with CHKDSK are important for a comprehensive scan:
/f: This parameter tells CHKDSK to fix errors on the disk. It will attempt to correct logical file system errors./r: This parameter locates bad sectors and recovers readable information. It implies/f, so you technically don’t need to specify/fif you use/r, but including both ensures all bases are covered. This is a more thorough scan and takes significantly longer.
When CHKDSK runs during startup, it will display its progress on a blue screen before Windows loads. Do not interrupt this process. Once completed, your system will boot into Windows 11. You can check the Event Viewer (under Windows Logs > Application, filter by Source: Wininit or Chkdsk) for the detailed results of the scan.
If CHKDSK finds and repairs errors, it could resolve the underlying disk integrity issues contributing to the PAGE_FAULT_IN_NONPAGED_AREA on Windows 11. If CHKDSK reports many bad sectors that it cannot repair, it might indicate a failing hard drive or SSD, in which case replacement would be necessary to prevent further data loss and system instability. Consider backing up your data if this is the case: System Image Backup on Windows 11: Comprehensive Guide.
Method 8: Performing a Clean Boot
Software conflicts are a common source of system instability, including BSODs like the PAGE_FAULT_IN_NONPAGED_AREA on Windows 11. A clean boot helps you diagnose these conflicts by starting Windows with a minimal set of drivers and startup programs. If the error doesn’t occur in a clean boot environment, it indicates that a third-party application or service is the culprit.
Identifying Conflicting Software
The goal of a clean boot is to isolate the problematic software. Once your system boots cleanly, you can re-enable services and startup items incrementally until the PAGE_FAULT_IN_NONPAGED_AREA on Windows 11 error reappears. This process of elimination helps pinpoint the specific application or service causing the conflict.
Steps to Perform a Clean Boot
- Press Windows key + R, type
msconfig, and press Enter to open System Configuration. - Go to the General tab.
- Select “Selective startup.”
- Uncheck “Load startup items.” Ensure “Load system services” and “Use original boot configuration” remain checked.
Next, you need to disable all non-Microsoft services:
- Go to the Services tab.
- Check the box for “Hide all Microsoft services.” This is a crucial step to avoid disabling essential Windows functions.
- Click “Disable all.”
- Click Apply and then OK.
- When prompted, click Restart.
After restarting, your computer will be in a clean boot state. If the PAGE_FAULT_IN_NONPAGED_AREA on Windows 11 error does not occur, you can then proceed to re-enable services and startup items in small groups (e.g., five at a time) and restart each time until the error returns. The last group you enabled before the error reappeared likely contains the conflicting software. You can then uninstall or update that specific program.
To return to a normal startup, go back to msconfig, select “Normal startup” on the General tab, and click OK, then restart. Performing a clean boot is an invaluable diagnostic technique for resolving persistent software-related BSODs.
Method 9: Updating Windows 11
Microsoft regularly releases updates for Windows 11 that include bug fixes, security patches, and performance improvements. These updates often address known issues, including those that can cause BSODs like the PAGE_FAULT_IN_NONPAGED_AREA on Windows 11. Ensuring your operating system is fully up-to-date is a fundamental troubleshooting step.
Checking for Available Updates
The process for checking and installing Windows 11 updates is straightforward and integrated into the Settings application.
- Open Settings (Windows key + I).
- Navigate to Windows Update in the left-hand pane.
- Click on the “Check for updates” button.
Windows will then scan for any available updates. If updates are found, they will be downloaded and installed automatically. You might be prompted to restart your computer to complete the installation process. Make sure to restart as soon as it’s convenient to ensure all updates are applied correctly.
Importance of Keeping Windows Current
Beyond just fixing specific bugs that might lead to the PAGE_FAULT_IN_NONPAGED_AREA on Windows 11, keeping your system updated is vital for overall security and stability. Updates often include:
- Driver Updates: As discussed, outdated drivers are a major cause of this BSOD. Windows Update often delivers critical driver updates.
- Security Patches: These protect your system from new vulnerabilities that could be exploited by malware, which in turn could cause system instability.
- Performance Enhancements: Updates can improve how Windows manages memory, processes, and hardware interactions, potentially mitigating the conditions that lead to memory faults.
It’s a good practice to enable automatic updates to ensure your system always has the latest fixes. If you’ve been deferring updates, now is the time to install them. A recent update might contain the specific fix for the PAGE_FAULT_IN_NONPAGED_AREA on Windows 11 that you’re experiencing.
Method 10: Resetting Windows 11
If you’ve exhausted all other troubleshooting methods and the PAGE_FAULT_IN_NONPAGED_AREA on Windows 11 error persists, a full system reset might be the most effective solution. This process reinstalls Windows 11, effectively giving you a fresh start and eliminating any deep-seated software corruption or configuration issues that are difficult to pinpoint otherwise.
Choosing to Keep or Remove Files
Windows 11 offers two main options when performing a reset, giving you some flexibility regarding your personal data:
- Keep my files: This option reinstalls Windows 11 but retains your personal files (documents, pictures, videos, etc.). However, it will remove all installed applications and revert system settings to their defaults. You will need to reinstall all your software afterward.
- Remove everything: This option performs a complete wipe of your drive and reinstalls Windows 11. It’s akin to getting a brand-new computer and is the most thorough way to eliminate software-related problems. This is often recommended if you suspect deep-seated corruption or are preparing to sell your computer.
To initiate a reset:
- Go to Settings (Windows key + I).
- Navigate to System > Recovery.
- Under “Recovery options,” next to “Reset this PC,” click on “Get started.”
- Choose either “Keep my files” or “Remove everything.”
- Follow the on-screen prompts. Depending on your choice, you might also be asked whether to download Windows from the cloud or reinstall locally. Cloud download is generally recommended for the freshest image.
Regardless of the option you choose, it is highly recommended to back up all your important data before starting the reset process. While “Keep my files” aims to preserve your data, unforeseen issues can always occur. Consider using a tool like System Image Backup on Windows 11: Comprehensive Guide for a complete safety net.
When to Consider a Full Reset
A Windows 11 reset should be considered a last resort when:
- All other troubleshooting steps have failed to resolve the PAGE_FAULT_IN_NONPAGED_AREA on Windows 11 error.
- You suspect deep-seated software corruption, driver conflicts, or persistent malware that cannot be otherwise removed.
- The system is consistently unstable, with frequent BSODs or crashes, making it difficult to use.
- You want to ensure a clean, optimal operating environment.
While time-consuming, a reset often provides the most definitive software-based solution to persistent system errors. It effectively eliminates the software variables, allowing you to determine if the problem is indeed software-related or points to a deeper hardware issue.
When to Seek Professional Help
While this guide provides a comprehensive set of solutions for the PAGE_FAULT_IN_NONPAGED_AREA on Windows 11 error, there are situations where professional assistance becomes necessary. Knowing when to call in the experts can save you time, prevent further damage, and ensure your system is properly repaired.
Consider seeking professional help if:
- Hardware Failure is Suspected: If the Windows Memory Diagnostic Tool or other hardware tests indicate faulty RAM, a failing hard drive/SSD, or issues with other components (like the motherboard or CPU), and you’re not comfortable replacing these parts yourself.
- Error Persists After All Steps: You’ve diligently followed every troubleshooting step in this guide, including a full Windows 11 reset, and the PAGE_FAULT_IN_NONPAGED_AREA on Windows 11 error still occurs. This strongly suggests a complex hardware problem or an obscure software conflict beyond typical user-level repair.
- Lack of Necessary Tools or Expertise: You don’t have the tools, spare parts, or the technical confidence to perform certain diagnostics or repairs (e.g., opening your PC case, swapping RAM, or advanced driver debugging).
- Data Recovery Concerns: If your system is unbootable and you need to recover critical data, a professional data recovery service or technician might be able to help retrieve your files from a failing drive.
- System is Under Warranty: Attempting advanced repairs yourself might void your warranty. If your computer is still under warranty, contacting the manufacturer’s support is often the best first step.
A professional technician has specialized diagnostic tools, experience with a wide range of hardware and software issues, and access to replacement parts. They can accurately diagnose complex problems and perform repairs that might be beyond the scope of a typical user. Don’t hesitate to seek expert help when you’ve reached the limits of your own troubleshooting capabilities.
Conclusion: Restoring System Stability
The PAGE_FAULT_IN_NONPAGED_AREA on Windows 11 error is undoubtedly a disruptive and concerning Blue Screen of Death. However, as we’ve explored, it’s not an insurmountable problem. By systematically approaching the issue with the methods outlined in this comprehensive guide, you significantly increase your chances of diagnosing and resolving the underlying cause.
From checking your RAM with the Windows Memory Diagnostic Tool to ensuring your drivers are updated or rolled back, and from repairing corrupted system files with SFC and DISM to optimizing virtual memory, each step plays a crucial role in restoring your system’s health. Disabling Fast Startup, scanning for malware, checking disk integrity, and performing a clean boot further refine your diagnostic efforts, targeting a broad spectrum of potential culprits.
Ultimately, keeping your Windows 11 installation fully updated and, as a last resort, performing a system reset, are powerful tools in your arsenal. The goal is to identify whether the problem lies with faulty hardware, incompatible drivers, corrupted software, or a combination thereof. By diligently working through these solutions, you can often bring your Windows 11 machine back to a state of reliable operation, ensuring stability and preventing future occurrences of the PAGE_FAULT_IN_NONPAGED_AREA on Windows 11 error.
For more interesting articles, stay tuned to Winsides.com!









Community
Comments (0)