

Introduction to Event ID 153 on Windows 11
In the intricate ecosystem of Windows 11, maintaining optimal system health is paramount for a smooth and reliable computing experience. While many background processes operate seamlessly, certain indicators can signal underlying issues that demand attention. One such critical indicator is Event ID 153 on Windows 11, a common yet often misunderstood event log entry that points directly to potential problems with your storage devices. For additional context, see CHKDSK command, SFC (System File Checker), DISM (Deployment Image Servicing and Management), and Driver Installation Process.
This event, logged diligently by the operating system, serves as an early warning system, highlighting instances where your disk operations are not proceeding as expected. Ignoring it can lead to degraded performance, data corruption, or even catastrophic drive failure. Understanding the nuances of Event ID 153 is not just for IT professionals; it’s essential for any Windows 11 user who values their data and system stability.
This comprehensive guide will demystify Event ID 153, providing you with the knowledge and tools to diagnose, troubleshoot, and ultimately prevent its recurrence. We’ll explore its meaning, common causes, and a step-by-step approach to resolving the issues it signifies, empowering you to keep your Windows 11 system running flawlessly.
Table of contents
Key Takeaways
Before diving into the specifics, here are the core insights and actionable steps you should grasp regarding Event ID 153 on Windows 11:
- Event ID 153 indicates a disk operation timeout: This means your storage device (HDD or SSD) failed to respond to a command within the expected timeframe, often pointing to hardware or driver issues.
- Don’t ignore it: Persistent Event ID 153 occurrences can foreshadow serious disk problems, data loss, or system instability.
- Hardware is a common culprit: Faulty cables, inadequate power supply, or a failing drive itself are frequent causes. Physical inspection is crucial.
- Software and drivers also play a role: Outdated storage drivers, conflicting software, or file system corruption can trigger this event. Keep your system updated.
- Event Viewer is your diagnostic tool: Learn to navigate and interpret the details within the Event Viewer to pinpoint the specific cause.
- Proactive maintenance is key: Regular disk health checks, driver updates, and robust backup strategies are vital for prevention.
- Backup your data immediately: If you’re frequently seeing Event ID 153, your data is at risk. Prioritize creating a reliable backup.
Understanding Event ID 153: What It Signifies
When your Windows 11 system logs Event ID 153, it’s essentially reporting a communication breakdown with a storage device. Specifically, this event signifies that a disk operation, such as a read or write command, timed out. The operating system sent a request to the disk, but the disk failed to respond within the predetermined time limit.
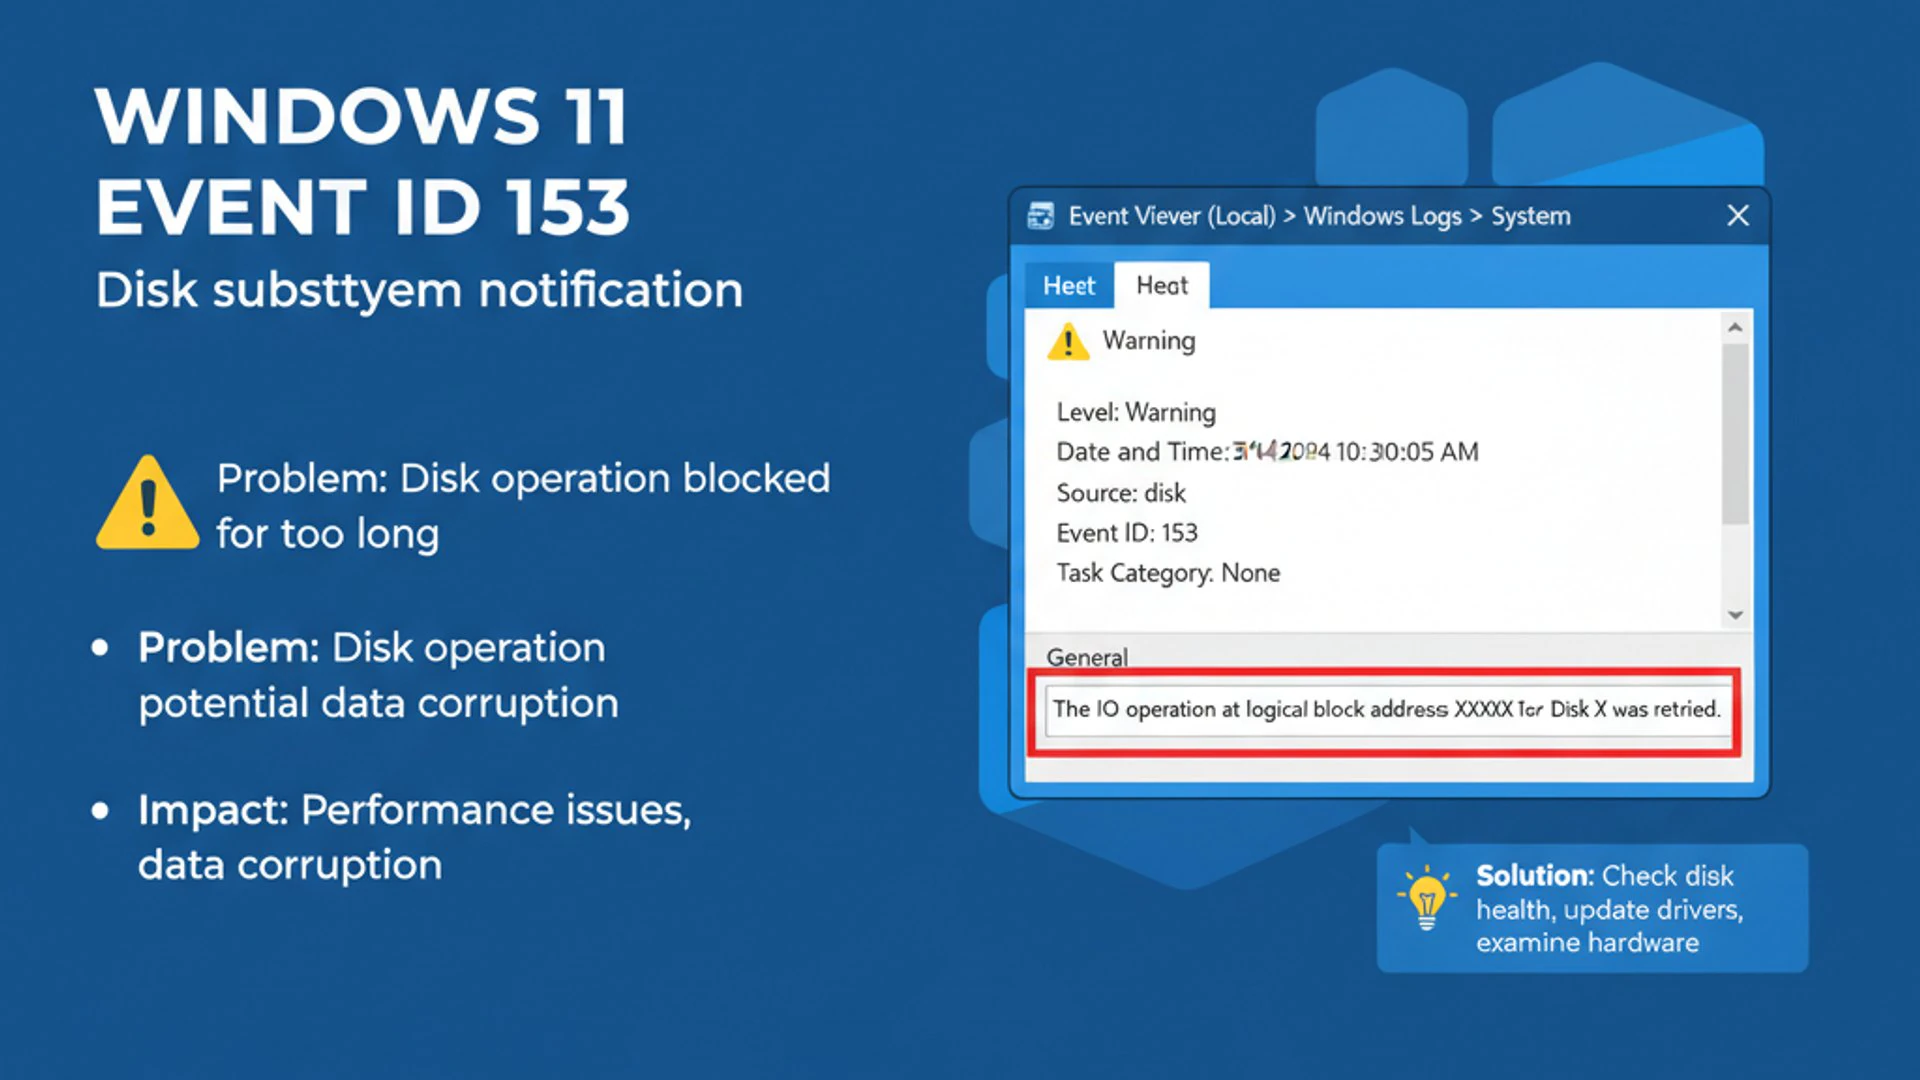
This timeout can occur for various reasons, from minor hiccups in communication to severe hardware failures. While a single occurrence might be an anomaly, repeated instances of Event ID 153 are a strong indicator that something is amiss with your storage subsystem, demanding immediate investigation.
The event message often includes details about the specific disk involved, which is crucial for troubleshooting. It helps narrow down whether the issue lies with your primary boot drive, a secondary data drive, or an external storage device connected to your system.
The Role of Disk in System Stability
Your computer’s disk drive, whether a traditional Hard Disk Drive (HDD) or a Solid State Drive (SSD), is the backbone of your Windows 11 system. It houses the operating system itself, all your applications, and every piece of data you create or store. Any instability or performance degradation in this critical component directly impacts the overall stability and responsiveness of your entire system.
When a disk fails to respond promptly, as indicated by Event ID 153, it can lead to a cascade of problems. Applications might freeze, files could become corrupted, and the system might experience slowdowns, crashes, or even fail to boot. A healthy disk ensures quick access to data, smooth application loading, and reliable saving of your work.
Therefore, addressing Event ID 153 isn’t just about fixing an error message; it’s about safeguarding the integrity of your data and ensuring the continuous, stable operation of your Windows 11 environment. Proactive management of disk health is a cornerstone of a robust computing experience.
Differentiating Disk Warnings from Critical Errors
It’s important to understand that not all event log entries carry the same weight. Event ID 153 typically falls under the “Warning” category in the Event Viewer, which distinguishes it from more severe “Error” or “Critical” events. However, a warning should never be dismissed, especially when it pertains to storage devices.
A warning, like Event ID 153, indicates a potential problem that could escalate if left unaddressed. It suggests that the system encountered an unexpected condition or a non-fatal issue that might impact performance or reliability. Think of it as a yellow light on your car’s dashboard — it tells you to check something before it becomes a major breakdown.
In contrast, an error or critical event usually signifies a failure that has already occurred or a condition that has led to immediate data loss or system instability. For instance, a “disk bad block” error or a “system crash” event would fall into these more severe categories. While Event ID 153 is a warning, its persistence can quickly lead to these more critical states, making early intervention crucial.
Common Causes Behind Event ID 153 Occurrences
Understanding the root causes of Event ID 153 on Windows 11 is the first step toward effective troubleshooting. This particular event is rarely a standalone issue; it’s typically a symptom of an underlying problem within your system’s hardware or software. Identifying the specific cause requires a systematic approach, examining various components that interact with your storage devices.
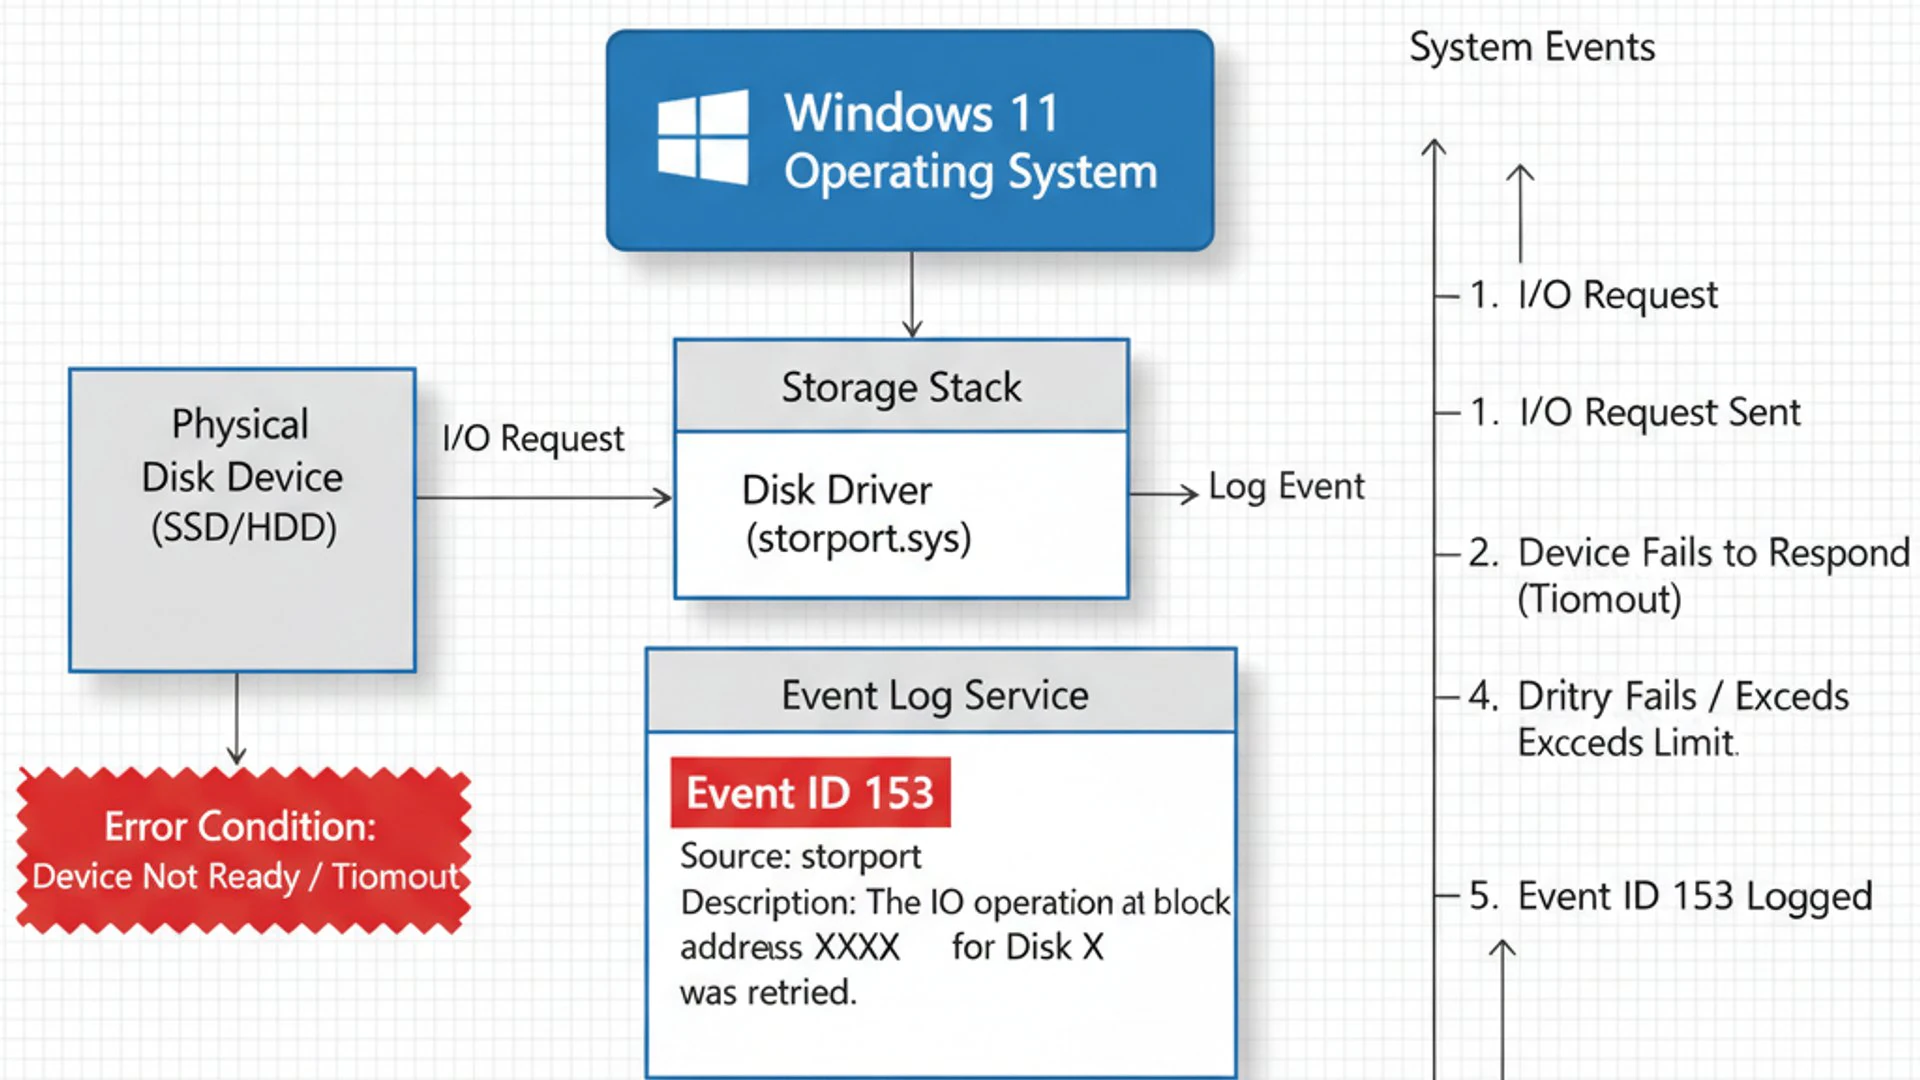
Causes can range from simple, easily fixable issues like loose cables to more complex problems involving failing hardware or corrupted system files. We will explore the most common culprits in detail, providing you with the knowledge to diagnose your specific situation accurately.
Hardware-Related Issues
Hardware problems are among the most frequent reasons for Event ID 153. Your storage device relies on a complex interplay of physical components to function correctly. Any weakness in this chain can disrupt communication and lead to timeouts.
These issues can include a failing hard drive or SSD itself, which might be struggling to read or write data efficiently. Over time, all mechanical and electronic components degrade, and storage drives are no exception. Furthermore, the cables connecting your drive to the motherboard, or even the power supply delivering electricity to the drive, can be significant points of failure.
Even factors like overheating can stress components, leading to intermittent failures. A thorough inspection of your physical setup is often the starting point for resolving hardware-related Event ID 153 errors.
Investigating Cable Connections and Power Supply
One of the simplest yet most overlooked causes of disk timeouts is faulty or loose cabling. Both data cables (SATA for HDDs/SSDs, or NVMe for M.2 drives) and power cables need to be securely connected and in good condition. A partially disconnected cable can lead to intermittent communication, triggering Event ID 153.
For traditional SATA drives, ensure the SATA data cable is firmly seated at both the drive and the motherboard. Similarly, check the SATA power cable connection. If you have an M.2 NVMe drive, ensure it’s properly seated in its slot and secured with its screw. Sometimes, simply reseating these connections can resolve the issue.
The power supply unit (PSU) also plays a critical role. An aging or underpowered PSU might not deliver stable voltage to your drives, especially under load. Fluctuations in power can cause drives to momentarily drop offline or fail to respond, leading to timeouts. Consider testing your PSU or ensuring it meets the power requirements of your system, particularly if you’ve recently added new components.
Software and Driver Conflicts
Beyond hardware, software and driver issues are another significant contributor to Event ID 153 on Windows 11. The operating system relies on specific drivers to communicate with your storage devices. If these drivers are outdated, corrupted, or incompatible, they can cause communication errors and timeouts.
Outdated storage controller drivers, for instance, might not correctly handle modern disk operations or interact poorly with recent Windows 11 updates. Similarly, third-party software that heavily interacts with disk I/O, such as certain antivirus programs, backup utilities, or disk encryption tools, can sometimes interfere with normal disk operations, leading to delays and timeouts.
These conflicts can be challenging to diagnose because they might only manifest under specific conditions or when certain applications are running. Keeping your drivers updated and being mindful of recently installed software are good practices to mitigate these risks.
File System Corruption and Bad Sectors
The integrity of your file system is crucial for stable disk operations. The file system (NTFS on Windows) organizes how files are stored and retrieved on your disk. If this structure becomes corrupted, the operating system might struggle to access data, leading to delays and potential Event ID 153 errors.
File system corruption can arise from various factors, including sudden power loss, improper system shutdowns, malware infections, or even software bugs. When the system attempts to read from or write to a corrupted area, it might time out as it tries to resolve the inconsistency.
Furthermore, bad sectors on the disk — areas of the storage medium that are physically damaged or unreliable — can also trigger Event ID 153. When the system encounters a bad sector, it attempts to reread the data, which can cause significant delays and ultimately lead to a timeout if the operation fails repeatedly. Regular disk health checks can help identify and sometimes remap these problematic sectors.
How to Access and Analyze Event ID 153 Details
When confronted with Event ID 153 on Windows 11, the first critical step is to gather more information directly from the source: the Event Viewer. This built-in Windows utility provides a detailed log of system events, offering invaluable clues about the nature and timing of the problem. Simply knowing an event ID isn’t enough; you need to delve into its specifics to accurately diagnose the underlying cause.
The Event Viewer records a wealth of data, including the exact time of the event, the source component, and a detailed description that often points to the affected device or operation. Learning to navigate this tool and interpret its output is a fundamental skill for any Windows 11 user facing system issues.
Navigating the Event Viewer
Accessing the Event Viewer is straightforward in Windows 11. Here’s how to get there and locate Event ID 153:
- Press Windows Key + X to open the Quick Link menu, then select Event Viewer.
- In the Event Viewer window, expand Windows Logs in the left-hand pane.
- Click on System. This log contains most hardware and system-related events.
- In the right-hand “Actions” pane, click on Filter Current Log… to refine your search.
- In the “Filter Current Log” dialog box, under “Event IDs:”, type 153. You can also select “Warning” from the “Event level:” dropdown to narrow down the results further.
- Click OK. The System log will now display only Event ID 153 entries.
Scroll through the filtered events to identify recent occurrences. Pay close attention to the frequency and timing of these events, as this can indicate whether the problem is intermittent or persistent.
Interpreting Event Log Data for Troubleshooting
Once you’ve located an Event ID 153 entry, click on it to reveal its full details in the lower pane. The “General” tab provides a summary, but the “Details” tab (often in XML view) offers the most granular information. Key pieces of information to look for include:
- Source: Typically “disk” or “stornvme” (for NVMe drives).
- Event ID: Confirms it’s 153.
- Level: Should be “Warning.”
- Log Name: “System.”
- Description: This is crucial. It often states something like “The IO operation at logical block address X for Disk Y (PDO Name: \Device\000000XX) was retried.” The Disk Y part is vital as it identifies the problematic drive.
- Device Name: Sometimes, the description or details will explicitly mention the device, like “PhysicalDrive1.”
The logical block address (LBA) mentioned in the description indicates the specific location on the disk where the timeout occurred. While you won’t directly interact with LBAs, seeing consistent timeouts at similar LBAs can suggest bad sectors. Knowing “Disk Y” allows you to target your troubleshooting efforts to the correct physical drive. For example, if it’s Disk 0, that’s usually your primary boot drive. If it’s Disk 1, it’s a secondary drive. You can verify disk numbers in Disk Management.
Pro Tip: When troubleshooting, always note the exact time and date of the Event ID 153 occurrences. This can help you correlate them with any recent software installations, hardware changes, or specific activities you were performing on your computer.
Step-by-Step Troubleshooting for Event ID 153
Addressing Event ID 153 on Windows 11 requires a methodical approach, starting with the simplest potential fixes and progressing to more involved solutions. This section provides a comprehensive troubleshooting guide, designed to help you systematically identify and resolve the underlying issues causing disk timeouts. Remember to restart your system and check the Event Viewer after each step to see if the problem persists.
Checking Disk Health with CHKDSK
The CHKDSK (Check Disk) utility is a fundamental tool for diagnosing and repairing file system errors and identifying bad sectors on your storage drive. Running CHKDSK can often resolve Event ID 153 if the cause is related to file system corruption or minor physical damage.
- Open Command Prompt as an administrator. You can do this by searching for “cmd” in the Start menu, right-clicking “Command Prompt,” and selecting “Run as administrator.”
- In the Command Prompt window, type
chkdsk C: /f /r /xand press Enter. ReplaceC:with the drive letter identified in the Event Viewer (e.g., D:, E:). - If you’re checking the C: drive (your boot drive), you’ll be prompted to schedule the check for the next system restart. Type Y and press Enter.
- Restart your computer. CHKDSK will run before Windows loads, scanning the drive for errors and attempting to fix them. This process can take a significant amount of time, depending on the size and health of your drive.
The /f flag tells CHKDSK to fix errors on the disk, /r locates bad sectors and recovers readable information, and /x forces the volume to dismount first if necessary. After the scan, check the Event Viewer again to see if Event ID 153 still appears.
Updating and Reinstalling Disk Drivers
Outdated or corrupted storage controller drivers are a common cause of disk communication issues. Ensuring your drivers are current and properly installed can often resolve Event ID 153.
- Press Windows Key + X and select Device Manager.
- Expand Storage controllers and Disk drives.
- Right-click on your primary storage controller (e.g., “Standard SATA AHCI Controller” or your NVMe controller) and select Update driver. Choose “Search automatically for updated driver software.”
- If Windows doesn’t find a newer driver, visit your motherboard manufacturer’s website (for integrated controllers) or your SSD/NVMe drive manufacturer’s website. Download the latest drivers specifically for your Windows 11 version and install them manually.
- Repeat the update process for each disk drive listed under “Disk drives.”
- If updating doesn’t help, try reinstalling the driver. Right-click the problematic controller/drive, select Uninstall device, then restart your computer. Windows will typically reinstall a generic driver upon reboot. Then, proceed to install the latest manufacturer-provided driver.
Keeping your drivers current is a crucial part of maintaining system health and preventing various issues, including those related to RPC Endpoint Mapper on Windows 11 or even Distributed Link Tracking Client on Windows 11.
Verifying and Replacing SATA/NVMe Cables
As discussed earlier, physical connections are critical. A loose or faulty cable can cause intermittent communication failures that manifest as Event ID 153.
- Shut down your computer completely and unplug it from the power outlet.
- Open your computer case.
- For SATA drives: Carefully disconnect and then firmly reconnect both the SATA data cable and the SATA power cable at both ends (drive and motherboard/PSU). Inspect the cables for any visible damage, kinks, or frayed wires.
- For M.2 NVMe drives: Ensure the drive is fully seated in its M.2 slot and the retaining screw is secure.
- If you suspect a cable is damaged, or if reseating doesn’t resolve the issue, replace the data cable with a new, known-good one. SATA data cables are inexpensive and a common point of failure.
- Close your computer case, plug it back in, and restart. Check the Event Viewer for new Event ID 153 entries.
This simple physical check often resolves a surprising number of disk-related problems, making it a highly recommended initial step.
Running System File Checker (SFC) and DISM
Corrupted Windows system files can sometimes interfere with disk operations and lead to errors like Event ID 153. The System File Checker (SFC) and Deployment Image Servicing and Management (DISM) tools can help diagnose and repair these issues.
- Open Command Prompt as an administrator.
- First, run DISM to prepare your system for SFC. Type
DISM /Online /Cleanup-Image /RestoreHealthand press Enter. This command uses Windows Update to provide files needed to fix corruptions. This process can take several minutes. - Once DISM completes, type
sfc /scannowand press Enter. SFC will scan all protected system files for corruption and attempt to repair them. This also takes some time. - After SFC finishes, restart your computer.
These tools ensure the integrity of your Windows 11 installation, which is fundamental for stable hardware interaction and preventing errors like Event ID 153.
Assessing Power Supply Unit (PSU) Stability
An unstable or insufficient power supply can cause your drives to malfunction, leading to timeouts. This is particularly relevant if you’ve recently upgraded components or if your PSU is old.
- Check PSU wattage: Ensure your power supply unit provides enough wattage for all your components, especially if you have multiple drives, a powerful graphics card, or an overclocked CPU. Online PSU calculators can help estimate your needs.
- Inspect PSU cables: Ensure all power cables from the PSU to your motherboard and drives are securely connected.
- Test with minimal components: If possible, temporarily disconnect non-essential components (e.g., secondary drives, extra peripherals) to reduce the load on your PSU. If Event ID 153 stops appearing, your PSU might be struggling.
- Consider replacement: If your PSU is old or you suspect it’s failing, replacing it with a new, reputable brand PSU with adequate wattage is a wise investment. A failing PSU can cause a myriad of unpredictable system issues.
A stable power delivery is paramount for all electronic components, including your storage devices, to operate reliably.
Performing a Clean Boot to Isolate Conflicts
If software or driver conflicts are causing Event ID 153, a clean boot can help isolate the culprit. A clean boot starts Windows with a minimal set of drivers and startup programs, allowing you to determine if a background program is interfering.
- Press Windows Key + R, type
msconfig, and press Enter to open System Configuration. - Go to the Services tab. Check the box for Hide all Microsoft services, then click Disable all.
- Go to the Startup tab, then click Open Task Manager.
- In Task Manager, go to the Startup tab. Disable all startup items one by one by right-clicking each and selecting Disable.
- Close Task Manager, click OK in System Configuration, and restart your computer.
- Monitor for Event ID 153. If it stops, you know a third-party service or startup item was the cause.
- To find the specific culprit, re-enable services and startup items in small groups, restarting after each group, until the Event ID 153 reappears.
This process helps narrow down software-related issues, which can sometimes be the most challenging to pinpoint. Remember to revert to a normal startup once troubleshooting is complete.
Advanced Solutions and Data Recovery Considerations
When the standard troubleshooting steps fail to resolve persistent Event ID 153 on Windows 11, it’s time to consider more advanced solutions. These often involve deeper dives into disk management, firmware updates, and, critically, preparing for potential drive failure through robust data backup and replacement strategies. Ignoring these persistent warnings can lead to irreversible data loss.
Utilizing Disk Management for Drive Health
Windows Disk Management is a powerful tool that allows you to view and manage your storage devices. While it doesn’t directly fix Event ID 153, it can provide crucial information and allow you to perform actions that might indirectly help.
- Press Windows Key + X and select Disk Management.
- Observe the status of all your drives. Look for any drives marked as “Offline,” “Unallocated,” or with unusual partition structures.
- Right-click on the problematic disk (identified from Event Viewer) and select Properties. Go to the Volumes tab to confirm the partition style (MBR/GPT) and capacity.
- You can also right-click a partition on the drive and select Change Drive Letter and Paths… to ensure it’s correctly assigned.
- If the drive appears to be healthy but Event ID 153 persists, consider using third-party SMART monitoring tools (e.g., CrystalDiskInfo) to get a more detailed health report. These tools can often predict drive failure before it becomes critical.
Disk Management is also where you would initialize new drives or manage existing partitions, ensuring your storage is correctly configured for your Windows 11 system.
Considering Firmware Updates for Storage Devices
Just like your motherboard or graphics card, your SSDs and some HDDs have firmware that controls their operation. Manufacturers occasionally release firmware updates to improve performance, fix bugs, and enhance compatibility. An outdated firmware version could potentially contribute to disk timeouts.
- Identify your drive model: Use Disk Management or a tool like CrystalDiskInfo to determine the exact model number of your problematic SSD or HDD.
- Visit the manufacturer’s website: Go to the support section of your drive manufacturer’s website (e.g., Samsung, Western Digital, Crucial, Seagate).
- Search for firmware updates: Look for firmware updates specifically for your drive model and Windows 11.
- Follow manufacturer instructions carefully: Firmware updates can be risky. Incorrectly applying an update can render your drive unusable. Always follow the manufacturer’s instructions precisely, and ensure your system has stable power during the process.
While not always the solution, a firmware update can sometimes resolve obscure compatibility or performance issues that lead to Event ID 153.
Data Backup and Drive Replacement Strategies
If Event ID 153 persists despite all troubleshooting efforts, especially if accompanied by other symptoms like slow performance, freezing, or strange noises (for HDDs), it’s highly likely that your drive is failing. At this point, your absolute top priority should be data backup.
- Immediate Data Backup: Use Windows’ built-in backup features or third-party software to immediately back up all critical data from the problematic drive to another healthy drive or cloud storage. Consider a system image backup if it’s your boot drive.
- Prepare for Drive Replacement: Purchase a new, reliable replacement drive. For the best performance and reliability, consider upgrading to an SSD if you’re currently using an HDD, or a newer, faster NVMe SSD.
- Drive Cloning or Fresh Installation: Once you have the new drive, you can either clone your existing drive to the new one (if the old drive is still partially functional) or perform a clean installation of Windows 11 on the new drive and then restore your data from backup.
- Professional Data Recovery: In severe cases where the drive has failed completely before you could back up, specialized data recovery services might be an option, but they are often very expensive and not always successful.
Proactive data backup is the only true safeguard against data loss due to drive failure. Don’t wait until it’s too late.
Preventing Future Event ID 153 Incidents
While troubleshooting and fixing existing occurrences of Event ID 153 on Windows 11 is crucial, an equally important aspect is implementing preventative measures. Proactive maintenance and good computing habits can significantly reduce the likelihood of encountering this issue again, ensuring the long-term stability and performance of your Windows 11 system. Prevention is always better than cure, especially when it comes to the health of your storage devices.
Regular Disk Maintenance and Monitoring
Consistent attention to your disk health can catch potential problems before they escalate into critical issues. Regular maintenance should be a standard part of your computing routine.
- Schedule CHKDSK Scans: While not necessary for every boot, periodically running
chkdsk /fon your drives (especially non-boot drives) can help identify and fix file system errors. - Monitor SMART Data: Utilize tools that can read your drive’s SMART (Self-Monitoring, Analysis and Reporting Technology) data. Programs like CrystalDiskInfo provide an easy-to-understand overview of your drive’s health, temperature, and error rates. Changes in these metrics can signal impending failure.
- Keep Drivers Updated: Regularly check for and install the latest storage controller and disk drive drivers from your motherboard or drive manufacturer’s website.
- Defragment HDDs (but not SSDs): If you still use traditional HDDs, periodic defragmentation can improve performance. However, never defragment an SSD, as it reduces its lifespan without performance benefits. Windows 11’s “Optimize Drives” tool correctly handles this distinction.
These practices help maintain the integrity and efficiency of your storage, reducing the chances of disk timeouts.
Ensuring Proper System Cooling and Ventilation
Heat is the enemy of electronics, and storage drives are no exception. Excessive temperatures can stress components, leading to premature failure and intermittent errors like Event ID 153. Maintaining good airflow within your computer case is vital.
- Clean Dust Regularly: Dust buildup inside your computer acts as an insulator, trapping heat. Periodically clean out your case fans, CPU cooler, and GPU heatsinks with compressed air.
- Optimize Case Airflow: Ensure your case fans are configured for optimal airflow, typically with intake fans at the front/bottom and exhaust fans at the top/rear.
- Monitor Drive Temperatures: Use monitoring software (like HWMonitor or CrystalDiskInfo) to keep an eye on your drive temperatures. SSDs generally run cooler than HDDs, but both have operating temperature limits.
- Proper Placement: Ensure your computer is in a well-ventilated area, not confined in a cabinet or against a wall where airflow is restricted.
A cool operating environment extends the life of your components and contributes significantly to system stability, preventing heat-induced errors.
Implementing Robust Backup Solutions
Even with the best maintenance, hardware can fail. A robust backup strategy is your ultimate safeguard against data loss, making it the most critical preventative measure against the consequences of Event ID 153.
- Automated Backups: Set up automated backups for your most important files to an external drive or cloud service. Windows 11’s File History feature is a good starting point for personal files.
- System Image Backups: Regularly create a system image backup of your entire operating system drive. This allows you to quickly restore your entire system, including Windows, applications, and settings, in case of catastrophic drive failure.
- Cloud Storage: Utilize cloud services like OneDrive, Google Drive, or Dropbox for critical documents and photos. These services often provide version history and easy access from multiple devices.
- “3-2-1” Backup Rule: Aim for at least three copies of your data, stored on two different types of media, with one copy offsite. This provides maximum redundancy.
By consistently backing up your data, you can face any disk-related issue, including those signaled by Event ID 153, with confidence, knowing your valuable information is safe.
Conclusion: Maintaining a Healthy Windows 11 Storage System
Event ID 153 on Windows 11 is more than just an obscure error code; it’s a critical warning signal from your operating system, indicating that your storage device is struggling to perform its fundamental duties. Ignoring this warning can lead to a cascade of problems, from frustrating slowdowns and application crashes to the devastating loss of irreplaceable data. Understanding its significance and knowing how to respond is paramount for any Windows 11 user.
Throughout this guide, we’ve explored the various facets of Event ID 153, from its underlying causes — be they hardware-related like faulty cables or software-driven like outdated drivers — to the systematic steps required for effective diagnosis and resolution. We’ve emphasized the importance of the Event Viewer as your primary diagnostic tool and provided actionable advice on everything from running CHKDSK to assessing your power supply.
Ultimately, maintaining a healthy Windows 11 storage system boils down to a combination of vigilance and proactive measures. Regular disk maintenance, ensuring proper system cooling, and, most importantly, implementing robust data backup strategies are not just good practices; they are essential safeguards. By taking these steps, you empower yourself to prevent future incidents of Event ID 153, ensuring your Windows 11 experience remains stable, performant, and, most critically, your data secure.
For more interesting articles, stay tuned to Winsides.com!









Community
Comments (0)