

Encountering a Blue Screen of Death (BSOD) on your Windows 11 machine can be a jarring experience, abruptly halting your work or entertainment. Among the various cryptic error messages that can appear, IRQL_NOT_LESS_OR_EQUAL is one of the more common and frustrating culprits. This particular error signifies a critical system instability, often pointing to issues with device drivers, hardware, or core system files.
When this BSOD strikes, your computer typically collects diagnostic information before restarting, leaving you wondering what went wrong and how to prevent it from happening again. It’s a clear signal that something fundamental within your system’s operation has gone awry, demanding immediate attention to restore stability and prevent data loss.
This comprehensive guide aims to demystify the IRQL_NOT_LESS_OR_EQUAL Windows 11 error, breaking down its technical underpinnings into understandable terms. We will explore its common causes and, more importantly, provide a structured approach to troubleshooting and resolving it. By following the methods outlined here, you can systematically diagnose and fix the problem, ensuring your Windows 11 system runs smoothly once more.
Addressing this error promptly is crucial not only for system stability but also for protecting your valuable data. Let’s dive in and empower you with the knowledge to conquer this vexing blue screen.
Table of contents
Key Takeaways for Resolving IRQL_NOT_LESS_OR_EQUAL
For those seeking immediate guidance, here are the most crucial steps and insights for tackling the IRQL_NOT_LESS_OR_EQUAL error: For additional context, see IRQL_NOT_LESS_OR_EQUAL bug check, update drivers manually in Windows, System File Checker, and MemTest86.
- Start with Drivers: The most frequent cause is an outdated, corrupted, or incompatible device driver. Prioritize updating all drivers, especially for network adapters, graphics cards, and chipsets. Consider rolling back recently updated drivers if the error began after an update.
- Check System Files: Corrupted Windows system files can trigger this BSOD. Utilize the built-in System File Checker (SFC) and Deployment Image Servicing and Management (DISM) tools to scan and repair these critical components.
- Memory Matters: Faulty RAM is a significant hardware contributor. Run the Windows Memory Diagnostic tool to identify potential issues. Physically reseating your RAM modules or testing them individually can also help pinpoint a defective stick.
- Windows Updates are Key: Ensure your Windows 11 operating system is fully updated. Microsoft frequently releases patches that resolve driver incompatibilities and system bugs that could lead to the IRQL_NOT_LESS_OR_EQUAL error.
- Isolate with Safe Mode: If the error prevents normal booting, try starting in Safe Mode. This loads only essential drivers and services, helping you diagnose if a third-party application or driver is the culprit.
- Consider System Restore/Reset: As a last resort, if you can’t identify the specific cause, a System Restore can revert your PC to a previous stable state. If that fails, a Windows Reset can reinstall the OS while preserving your files.
These initial steps often resolve the problem for most users. Proceed through the detailed methods below for comprehensive troubleshooting.
Understanding the IRQL_NOT_LESS_OR_EQUAL Error
The IRQL_NOT_LESS_OR_EQUAL error, often displayed as a BSOD with the stop code 0x0000000A, is a critical system error in Windows 11. It indicates that a kernel-mode process or driver attempted to access memory at an Interrupt Request Level (IRQL) that was too high for the operation it was trying to perform. This is a fundamental violation of the operating system’s memory management rules, leading to an immediate system crash to prevent further corruption.
Essentially, the operating system detected an attempt to access a memory address that was either invalid or at an inappropriate time, causing a severe conflict. This type of error is almost always indicative of a problem within the kernel mode, meaning it’s an issue with core system components, drivers, or hardware, rather than a user-level application.
What is an IRQL?
An IRQL, or Interrupt Request Level, is a concept used by the Windows kernel to prioritize hardware interrupts and software routines. Think of it as a hierarchy of importance, where higher IRQLs denote more critical tasks that cannot be interrupted by lower-priority operations.
When a device, like a network card or a hard drive, needs attention from the CPU, it generates an interrupt. The operating system then raises the IRQL to handle this interrupt. There are various IRQLs, each with specific rules about what kind of memory access is permitted.
For instance, at a very high IRQL, the system might be handling a critical hardware interrupt. At this level, a driver should not attempt to access paged memory (memory that can be swapped to disk), as this could lead to a deadlock or system instability. The “IRQL_NOT_LESS_OR_EQUAL” error means a driver or kernel component tried to access memory at an IRQL that was not less than or equal to the current IRQL, violating these strict rules.
Common Causes of This BSOD
Understanding the underlying causes is the first step toward resolving the IRQL_NOT_LESS_OR_EQUAL error. While the error message itself points to a memory access violation, the root cause can vary significantly. Pinpointing the exact trigger often requires a systematic approach to troubleshooting.
The most frequent culprits include issues with software components that interact directly with the hardware, as well as problems with the hardware itself. These issues can manifest after updates, new installations, or simply over time due to wear and tear or corruption.
Driver Conflicts and Incompatibilities
Device drivers are small software programs that allow your operating system to communicate with your hardware. When these drivers are outdated, corrupted, or incompatible with your Windows 11 version, they can easily cause memory access violations and trigger the IRQL_NOT_LESS_OR_EQUAL error.
A common scenario is a graphics card driver that hasn’t been updated for a new Windows build, or a network adapter driver that conflicts with another system component. Even drivers for peripherals like printers or webcams can sometimes be the source of the problem. Identifying and rectifying these driver issues is often the quickest path to resolution.
Faulty Hardware Components
While software is a common cause, hardware failures can also lead to this BSOD. The most prominent hardware component associated with the IRQL_NOT_LESS_OR_EQUAL error is Random Access Memory (RAM). A faulty RAM stick or even an improperly seated module can cause memory corruption, leading to the kernel attempting to access invalid memory locations.
Other hardware components, such as a failing hard drive, an overheating CPU, or a problematic motherboard, can indirectly contribute to system instability and trigger this error. Diagnosing hardware issues often requires more hands-on testing and can sometimes be more challenging than software troubleshooting.
Essential Preliminary Checks and Basic Troubleshooting
Before diving into more complex solutions, it’s always wise to start with a few fundamental checks. These simple steps can often resolve the IRQL_NOT_LESS_OR_EQUAL error quickly, saving you time and effort.
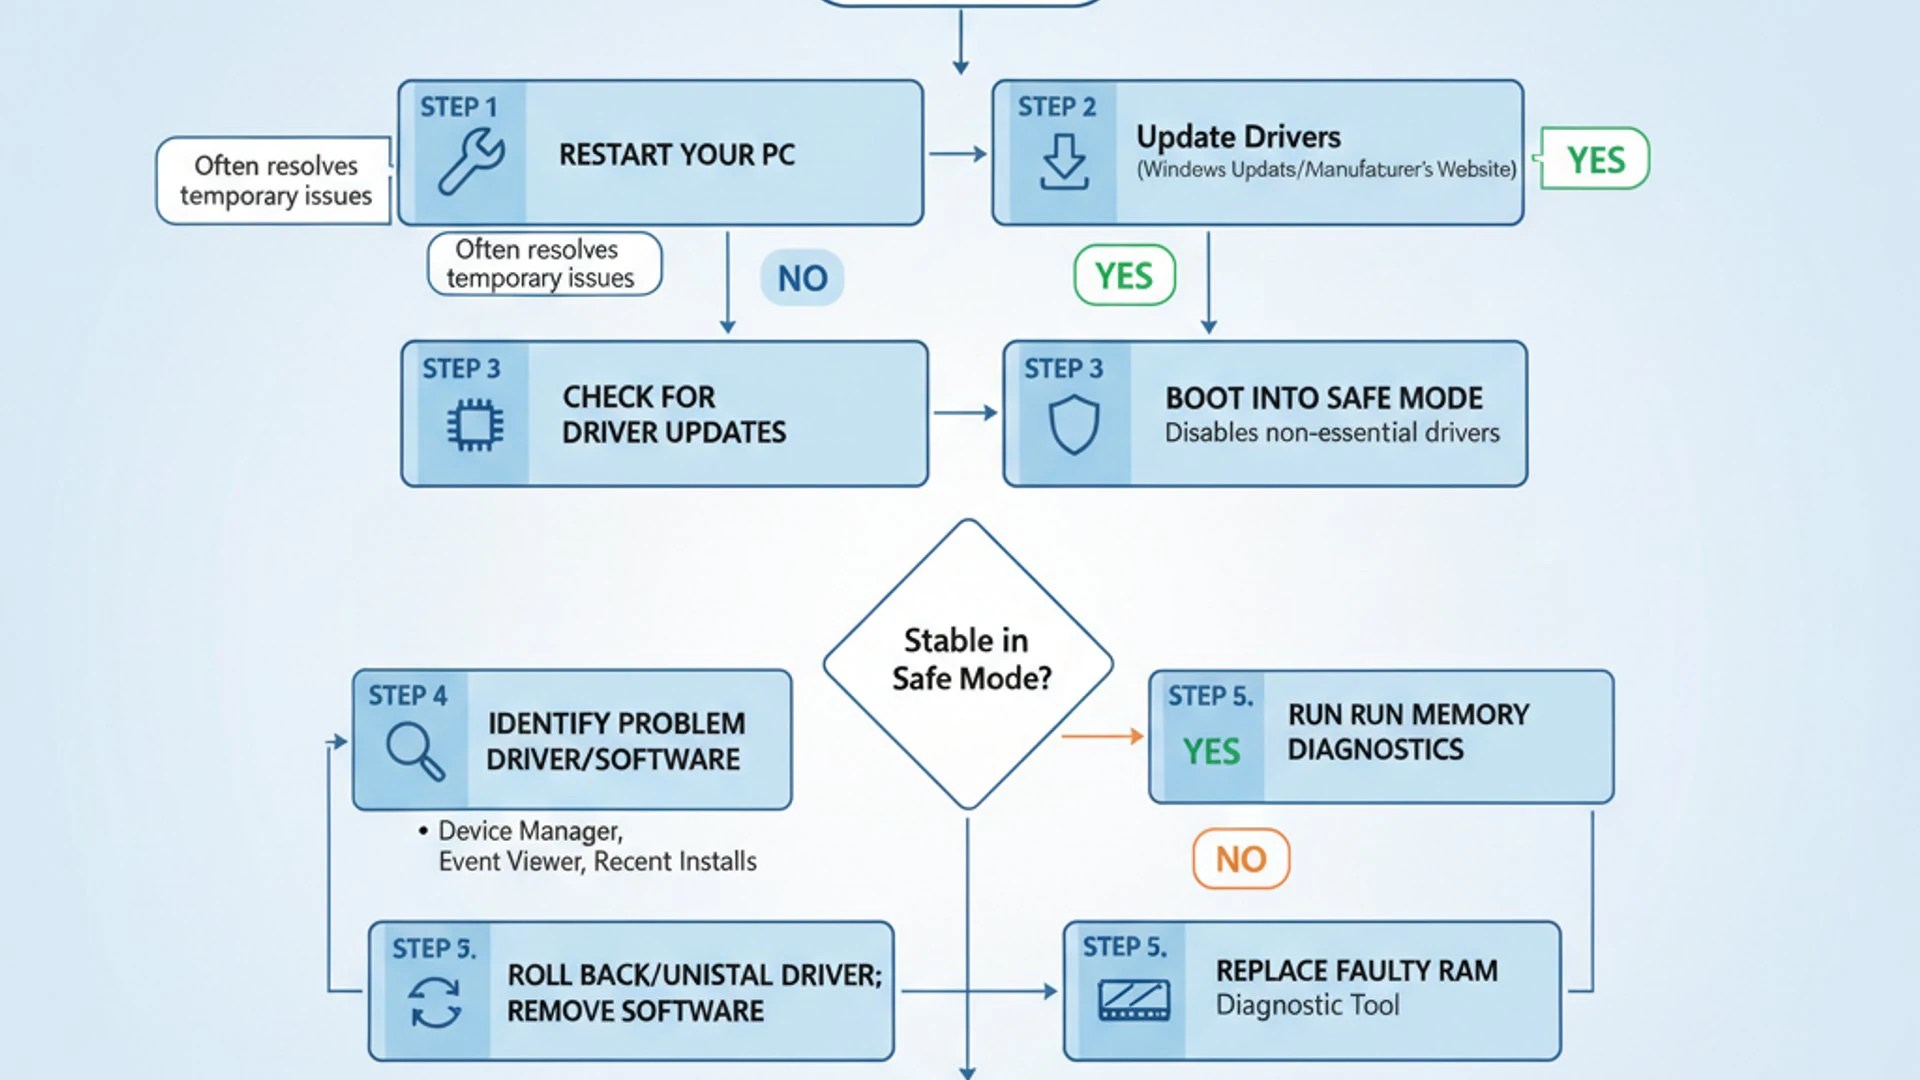
Many system issues are temporary glitches that can be fixed with a fresh start. Additionally, reflecting on recent changes to your system can provide valuable clues about the potential source of the problem.
Restarting Your System
It might sound overly simplistic, but a simple restart can resolve a surprising number of temporary system glitches. This process clears out temporary data, resets active processes, and reloads all system components from scratch.
If the IRQL_NOT_LESS_OR_EQUAL error was a one-off event caused by a momentary resource conflict or a minor software hiccup, a reboot might be all that’s needed to restore stability. Always try this first, especially if the error is intermittent.
Checking for Recent Software/Hardware Changes
Think back to what you’ve done recently on your computer. Did you install new software, update an application, or connect a new peripheral device? Perhaps you installed a Windows Update or a driver update.
Often, the IRQL_NOT_LESS_OR_EQUAL error appears shortly after a change to your system. If you can pinpoint a recent installation or update, that component or driver becomes your primary suspect. This knowledge can significantly narrow down your troubleshooting focus.
“Identifying recent changes is like being a detective for your PC. The most recent modification is often the most likely culprit for new problems.”
If the error started after installing a new piece of software, try uninstalling it. If it was a new hardware component, disconnect it and see if the error persists. This method of elimination is incredibly effective.
Method 1: Updating and Rolling Back Device Drivers
As previously mentioned, problematic device drivers are the leading cause of the IRQL_NOT_LESS_OR_EQUAL error in Windows 11. Ensuring your drivers are up-to-date and compatible is paramount. Conversely, if the error appeared after a driver update, rolling back to a previous version might be the solution.
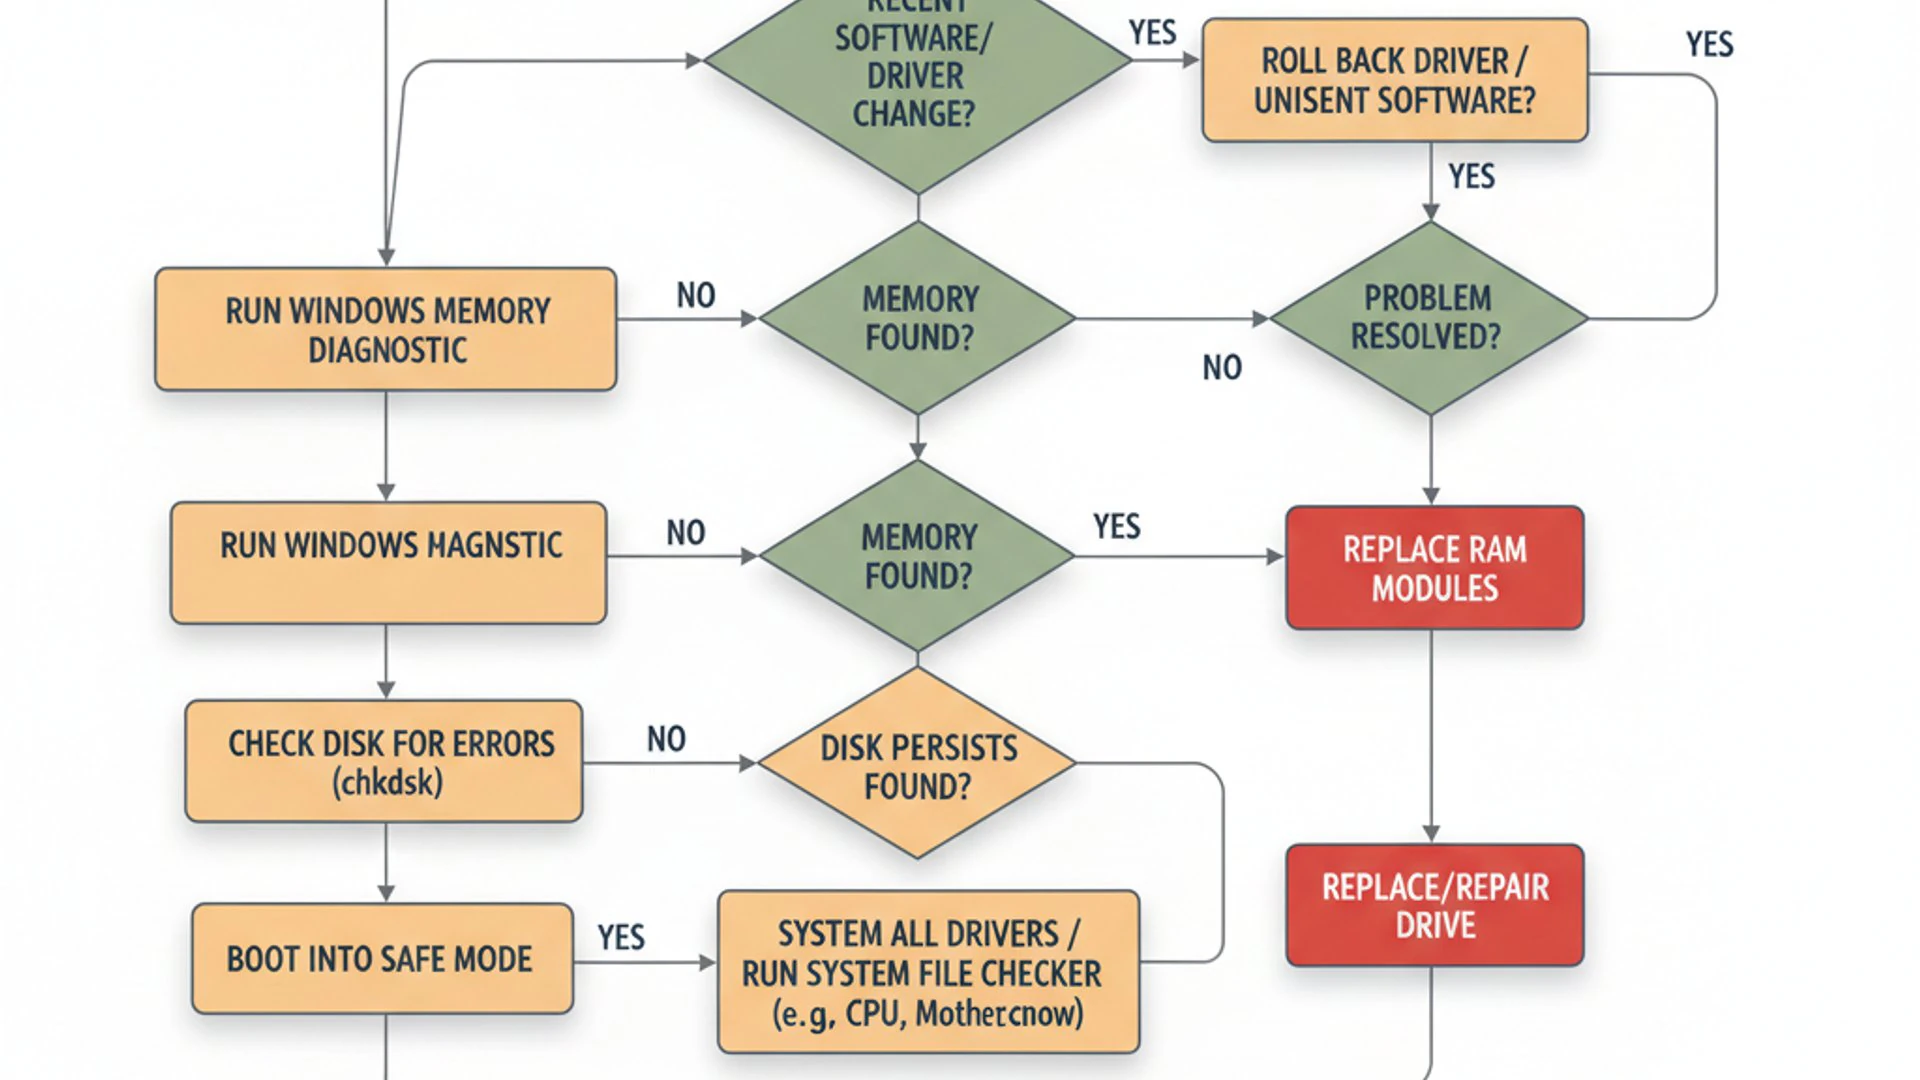
This method focuses on managing your drivers effectively, using both built-in Windows tools and manufacturer resources. It’s a critical step that often resolves the issue for many users.
Updating Drivers via Device Manager
Windows Device Manager is your go-to tool for managing installed hardware and their respective drivers. You can use it to check for updates, disable devices, or uninstall drivers.
- Press Windows Key + X and select Device Manager from the menu.
- Expand categories like “Display adapters,” “Network adapters,” and “Sound, video and game controllers.”
- Right-click on each device and select Update driver.
- Choose Search automatically for drivers. Windows will attempt to find a newer driver online.
- Repeat this process for all critical components, especially those related to graphics, network, and chipset.
While Device Manager is convenient, it doesn’t always find the absolute latest drivers. For the most critical components, you might need to go directly to the source.
Using Manufacturer’s Websites for Driver Updates
For crucial components like your graphics card, motherboard chipset, and network adapter, it’s often best to download drivers directly from the manufacturer’s website. These drivers are typically more recent and optimized than those found via Windows Update.
Identify your graphics card (NVIDIA, AMD, Intel), motherboard model, and network adapter model. Visit their official support websites, navigate to the drivers section, and download the latest Windows 11 compatible drivers. Install them, then restart your PC.
This approach ensures you have the most stable and feature-rich drivers available, which can significantly reduce the chances of encountering the IRQL_NOT_LESS_OR_EQUAL error. Always download from official sources to avoid malware.
Rolling Back Problematic Drivers
If the IRQL_NOT_LESS_OR_EQUAL error began immediately after a driver update, the new driver might be incompatible or faulty. In such cases, rolling back to the previous stable version is the best course of action.
- Open Device Manager (Windows Key + X, then Device Manager).
- Locate the device whose driver you suspect is causing the issue.
- Right-click on the device and select Properties.
- Go to the Driver tab.
- Click on the Roll Back Driver button. If it’s grayed out, Windows doesn’t have a previous driver to revert to.
- Follow the on-screen prompts and restart your computer.
If rolling back isn’t an option, you might need to uninstall the driver completely and then install an older, known-good version downloaded from the manufacturer’s archive.
Method 2: Running System File Checker (SFC) and DISM
Corrupted or missing system files can severely impact Windows 11’s stability, often leading to errors like IRQL_NOT_LESS_OR_EQUAL. Fortunately, Windows includes powerful built-in tools to scan for and repair these critical files: System File Checker (SFC) and Deployment Image Servicing and Management (DISM).
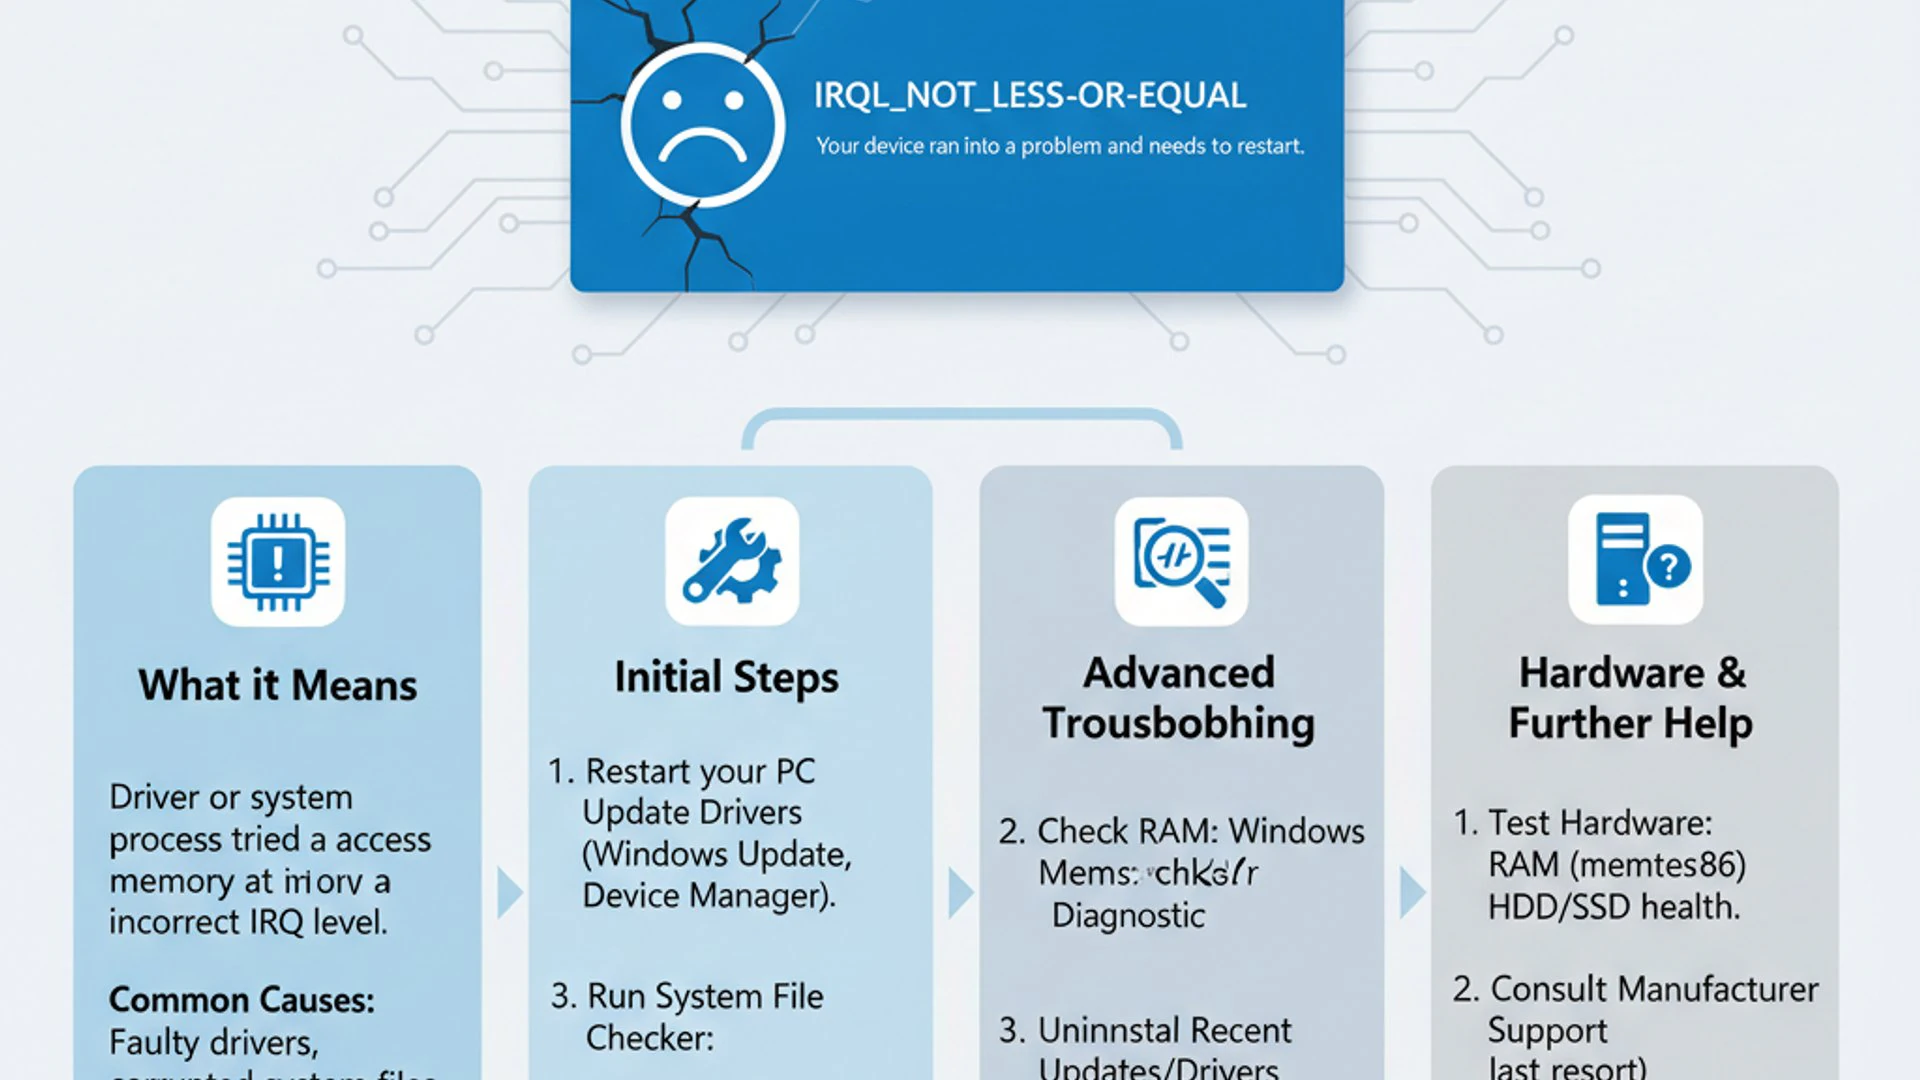
These utilities are essential for maintaining the integrity of your operating system. Running them regularly, especially after encountering system instability, is a good practice.
How to Use SFC Scan
The System File Checker (SFC) tool scans for and restores corrupted Windows system files. It compares your current system files with the official versions and replaces any discrepancies with correct copies.
- Press Windows Key + S, type cmd, right-click on Command Prompt, and select Run as administrator.
- In the Command Prompt window, type
sfc /scannowand press Enter. - The scan will begin and can take some time to complete. Do not close the window until it finishes.
- Upon completion, you’ll see a message indicating whether integrity violations were found and if they were repaired.
- Restart your computer after the scan is complete, even if no errors were reported.
If SFC reports that it found corrupted files but couldn’t fix them, or if the IRQL_NOT_LESS_OR_EQUAL error persists, you should then proceed to use DISM.
Deploying DISM Commands for System Health
The Deployment Image Servicing and Management (DISM) tool is more powerful than SFC. It’s used to repair the Windows system image itself, which SFC relies on. If the source files SFC uses are corrupted, DISM can fix them.
- Open Command Prompt as administrator, just like for SFC.
- Type the following commands one by one, pressing Enter after each:
DISM /Online /Cleanup-Image /CheckHealth(Checks for corruption)DISM /Online /Cleanup-Image /ScanHealth(Performs a more thorough scan for corruption)DISM /Online /Cleanup-Image /RestoreHealth(Repairs the image using Windows Update as a source)
- The
RestoreHealthcommand can take a significant amount of time to complete, sometimes appearing to freeze. Be patient and allow it to finish. - Once DISM completes, run the
sfc /scannowcommand again to ensure all system files are now correctly restored. - Restart your PC.
These tools are crucial for maintaining the fundamental health of your Windows 11 installation and are often effective in resolving the IRQL_NOT_LESS_OR_EQUAL error when it stems from system file corruption.
Method 3: Checking for Windows Updates
Keeping your Windows 11 operating system up-to-date is a fundamental aspect of system maintenance and security. Microsoft frequently releases updates that include bug fixes, performance improvements, and, crucially, updated drivers and compatibility patches that can prevent errors like IRQL_NOT_LESS_OR_EQUAL.
Neglecting Windows Updates can leave your system vulnerable to known issues that have already been addressed by Microsoft. It’s a simple yet highly effective troubleshooting step.
Installing Pending Updates
Ensuring all available Windows updates are installed can resolve many underlying system instabilities. These updates often contain critical fixes for driver incompatibilities or kernel-level bugs that could be triggering the BSOD.
- Press Windows Key + I to open Settings.
- Navigate to Windows Update in the left-hand pane.
- Click on Check for updates.
- If updates are found, click Download & install.
- Allow the updates to download and install, then restart your computer when prompted.
After restarting, check for updates again until no more are available. This ensures your system is running the latest stable version of Windows 11.
Reviewing Update History for Issues
Sometimes, a recently installed Windows Update itself can introduce new bugs or incompatibilities, leading to the IRQL_NOT_LESS_OR_EQUAL error. If the BSOD started occurring immediately after a Windows Update, you might need to temporarily uninstall it.
- Open Settings (Windows Key + I).
- Go to Windows Update.
- Click on Update history.
- Review the list of recently installed updates. Note down any updates installed just before the error started.
- Click on Uninstall updates at the top of the history page.
- Select the suspicious update and click Uninstall.
- Restart your PC and observe if the error persists.
If uninstalling an update resolves the issue, you can pause updates for a week or two to allow Microsoft to release a patched version. Remember to report the issue to Microsoft via the Feedback Hub.
Method 4: Diagnosing and Fixing Memory Issues
Faulty or unstable Random Access Memory (RAM) is a significant hardware cause for the IRQL_NOT_LESS_OR_EQUAL error. Memory integrity is crucial for the operating system’s proper functioning, and any corruption can lead to kernel-level access violations.
Fortunately, Windows 11 provides a built-in tool to test your RAM, and there are physical troubleshooting steps you can take to identify a problematic memory module.
Using Windows Memory Diagnostic Tool
The Windows Memory Diagnostic tool is a simple yet effective utility for checking your RAM for errors. It runs outside of the operating system, performing comprehensive tests to identify potential issues.
- Press Windows Key + R, type mdsched.exe, and press Enter.
- You’ll be presented with two options:
- Restart now and check for problems (recommended)
- Check for problems the next time I start my computer
- Choose the first option. Your computer will restart and run the diagnostic tool.
- The tool will run a series of tests. This can take several minutes.
- Once complete, your computer will restart, and the results will typically be displayed after you log back into Windows. If not, you can find them in the Event Viewer under Windows Logs > System, looking for “MemoryDiagnostic” entries.
If the diagnostic tool reports errors, it strongly suggests a problem with your RAM. Even if it finds no errors, physical checks are still worthwhile.
Physically Reseating RAM Modules
Sometimes, RAM modules can become slightly dislodged from their slots due to vibrations, temperature changes, or simply improper initial installation. Reseating them can re-establish a solid connection and resolve intermittent memory issues.
- Power down your computer completely and unplug it from the wall.
- Open your computer case. Consult your PC’s manual if you’re unsure how.
- Locate the RAM sticks. They are usually held in place by clips on either side.
- Gently push down the clips to release the RAM module.
- Carefully remove each RAM stick from its slot.
- Inspect the slots and the RAM contacts for any dust or debris. You can use compressed air to clean them.
- Reinsert each RAM stick firmly into its slot, ensuring the clips snap back into place on both sides.
- Close your computer case, plug it back in, and power it on.
This simple physical intervention often fixes connection issues that can lead to the IRQL_NOT_LESS_OR_EQUAL error.
Testing Individual RAM Sticks
If you have multiple RAM modules and the Windows Memory Diagnostic tool or reseating didn’t resolve the issue, you can try testing them individually to pinpoint a faulty stick.
- Follow steps 1-5 from “Physically Reseating RAM Modules” to remove all RAM sticks.
- Insert only one RAM stick into the first memory slot.
- Boot your computer and use it normally for a while, or run the Windows Memory Diagnostic tool again.
- If the IRQL_NOT_LESS_OR_EQUAL error does not appear, shut down, remove that stick, and repeat the process with the next RAM stick in the same slot.
- Continue this until you identify a stick that consistently causes the error. That stick is likely faulty and needs replacement.
If the error occurs with every single stick, the issue might be with the motherboard’s RAM slots themselves, which would require professional diagnosis.
Method 5: Scanning for Malware and Viruses
Malware and viruses are notorious for causing system instability, including BSODs like IRQL_NOT_LESS_OR_EQUAL. Malicious software can corrupt system files, interfere with legitimate drivers, or inject itself into critical system processes, leading to memory access violations.
A thorough scan of your system for any unwanted intruders is an essential step in troubleshooting this error. A clean system is a stable system.
Performing a Full System Scan with Windows Security
Windows 11 comes with a robust, built-in antivirus solution called Windows Security (formerly Windows Defender). It’s capable of detecting and removing a wide range of threats.
- Press Windows Key + I to open Settings.
- Go to Privacy & security, then click on Windows Security.
- Click on Open Windows Security.
- Select Virus & threat protection.
- Click on Scan options.
- Choose Full scan and then click Scan now.
A full scan can take a considerable amount of time, depending on the size of your hard drive and the number of files. Allow it to complete and follow any prompts to remove detected threats. Restart your PC afterward.
Utilizing Third-Party Antivirus Solutions
While Windows Security is effective, sometimes a second opinion from a reputable third-party antivirus program can be beneficial, especially if you suspect a deep-seated infection that Windows Security might have missed.
Consider using well-known and trusted antivirus software like Malwarebytes, Avast, AVG, or Bitdefender. Many offer free versions or trial periods that allow for a comprehensive scan.
- Download and install a reputable third-party antivirus program.
- Ensure the program’s definitions are fully updated.
- Perform a full system scan. This will likely take even longer than the Windows Security scan.
- Quarantine or remove any threats detected by the software.
- Uninstall the third-party antivirus if you only intended to use it for a one-time scan to avoid potential conflicts with Windows Security or other software.
Running a clean system is paramount for stability. Malware can introduce unpredictable behavior, making it difficult to diagnose the true cause of the IRQL_NOT_LESS_OR_EQUAL error without first eliminating the possibility of infection.
Method 6: Checking for Disk Errors
A failing hard drive or corrupted file system can also contribute to system instability and lead to the IRQL_NOT_LESS_OR_EQUAL error. If the operating system tries to read or write data to a bad sector, it can cause critical errors. Checking your disk for integrity issues is a crucial troubleshooting step.
The CHKDSK utility is Windows’ built-in tool for this purpose, capable of identifying and often repairing logical and physical errors on your hard drive.
Running CHKDSK Command
The CHKDSK (Check Disk) utility scans your hard drive for errors and attempts to repair them. It’s particularly useful for fixing file system corruption and identifying bad sectors.
- Press Windows Key + S, type cmd, right-click on Command Prompt, and select Run as administrator.
- In the Command Prompt window, type
chkdsk /f /rand press Enter. - You will likely receive a message stating that CHKDSK cannot run because the volume is in use and asking if you’d like to schedule it for the next restart. Type Y and press Enter.
- Restart your computer. The CHKDSK utility will run before Windows 11 loads, scanning and attempting to repair your disk. This process can take a long time, depending on the size and speed of your drive.
- Once complete, Windows will boot normally. You can check the Event Viewer (under Windows Logs > Application, filter by source “Wininit” or “Chkdsk”) for the results of the scan.
Running CHKDSK can help resolve issues where the IRQL_NOT_LESS_OR_EQUAL error is indirectly caused by the inability of the system to properly access files or memory due to disk corruption. This helps ensure the integrity of your Encrypting File System on Windows 11 and other critical data.
Method 7: Disabling Fast Startup
Windows 11 includes a feature called Fast Startup (also known as Hybrid Shutdown) designed to make your computer boot up quicker after a shutdown. While beneficial for speed, it can sometimes lead to driver conflicts or system instability, especially with older or less compatible hardware/drivers.
Fast Startup works by saving a hibernation file of your system state when you shut down, allowing for a faster resume. However, if a driver or hardware component doesn’t handle this “hybrid” state well, it can cause issues like the IRQL_NOT_LESS_OR_EQUAL error upon booting.
Steps to Disable Fast Startup
Disabling Fast Startup forces your computer to perform a full shutdown every time, which can resolve issues caused by incomplete driver initialization or state conflicts.
- Press Windows Key + S, type control panel, and press Enter.
- In the Control Panel, change the “View by” option to Large icons or Small icons.
- Click on Power Options.
- In the left-hand pane, click on Choose what the power buttons do.
- Click on Change settings that are currently unavailable (you may need administrator privileges).
- Under “Shutdown settings,” uncheck the box next to Turn on fast startup (recommended).
- Click Save changes.
- Restart your computer and observe if the IRQL_NOT_LESS_OR_EQUAL error persists.
If disabling Fast Startup resolves the issue, you might experience slightly longer boot times, but the trade-off for a stable system is often worthwhile. If the error continues, you can re-enable Fast Startup.
Method 8: Performing a System Restore or Reset
If all other troubleshooting steps fail to resolve the IRQL_NOT_LESS_OR_EQUAL error, more drastic measures might be necessary. Windows 11 offers options to revert your system to a previous stable state or even reinstall the operating system while preserving your personal files.
These methods are powerful and can often fix deep-seated issues, but they should be considered after exhausting other diagnostic steps. Always ensure you have a System Image Backup on Windows 11 before proceeding with these options.
Restoring to a Previous Point
System Restore allows you to revert your computer’s system files, installed applications, Windows Registry, and settings to an earlier point in time, called a restore point. This is incredibly useful if the error started after a specific software installation or update.
- Press Windows Key + S, type create a restore point, and select the matching result.
- In the System Properties window, click the System Restore… button.
- Click Next.
- Choose a restore point from the list. Ideally, select one created before the IRQL_NOT_LESS_OR_EQUAL error began. If you don’t see any, check the “Show more restore points” box.
- Click Next, then Finish to confirm.
- Your computer will restart and begin the restore process. Do not interrupt it.
System Restore will not affect your personal files, but it will uninstall any programs or drivers installed after the chosen restore point. This can be a very effective way to undo problematic changes.
Resetting Windows 11 While Keeping Files
If System Restore doesn’t help or if no suitable restore points are available, resetting Windows 11 is a more comprehensive solution. This option reinstalls the operating system while giving you the choice to keep your personal files.
- Press Windows Key + I to open Settings.
- Go to System, then click on Recovery.
- Under “Recovery options,” click the Reset PC button.
- You’ll be presented with two options:
- Keep my files: Removes apps and settings, but keeps your personal files.
- Remove everything: Removes all personal files, apps, and settings.
- Choose Keep my files.
- Next, you’ll choose how to reinstall Windows:
- Cloud download: Downloads a fresh copy of Windows 11 from Microsoft.
- Local reinstall: Uses files already on your device.
- Follow the on-screen prompts, review the changes, and click Reset to begin the process.
This process can take some time, and your computer will restart multiple times. While your personal files are preserved, you will need to reinstall all your applications and reconfigure your settings. This is often the most effective way to resolve persistent IRQL_NOT_LESS_OR_EQUAL errors that are software-related.
Advanced Troubleshooting: Driver Verifier and Safe Mode
For persistent or difficult-to-diagnose cases of the IRQL_NOT_LESS_OR_EQUAL error, Windows offers more advanced tools. These methods require a bit more technical comfort but can be invaluable for pinpointing elusive issues, especially with drivers.
Using Driver Verifier can intentionally stress drivers to expose flaws, while Safe Mode provides a minimal environment to isolate conflicts.
Using Driver Verifier to Isolate Problematic Drivers
Driver Verifier is a powerful diagnostic tool designed to detect illegal function calls or actions that might corrupt the system. It monitors Windows kernel-mode drivers and graphics drivers to detect errors that could lead to BSODs like IRQL_NOT_LESS_OR_EQUAL. Use this tool with caution, as it can intentionally cause BSODs if a driver is faulty.
- Press Windows Key + R, type verifier, and press Enter.
- Select Create standard settings and click Next.
- Choose Automatically select unsigned drivers, drivers built for an older version of Windows, etc., or Select driver names from a list for more granular control. If you suspect a specific driver, choose the latter.
- Follow the prompts, select the drivers you want to verify, and click Finish.
- Restart your computer.
If a verified driver causes an error, Windows will likely crash with a specific BSOD, often naming the problematic driver. If your system becomes unbootable due to Driver Verifier, boot into Safe Mode and run verifier /reset in Command Prompt to disable it.
Booting into Safe Mode for Diagnosis
Safe Mode starts Windows 11 with a minimal set of drivers and services. This environment is crucial for troubleshooting because if the IRQL_NOT_LESS_OR_EQUAL error does not occur in Safe Mode, it strongly suggests that a third-party application, driver, or non-essential service is the cause.
- If your PC can’t boot normally, Windows 11 should automatically enter the Windows Recovery Environment (WinRE) after a few failed attempts. If not, you may need to create a bootable USB drive.
- From WinRE, select Troubleshoot > Advanced options > Startup Settings > Restart.
- After your PC restarts, you’ll see a list of options. Press 4 or F4 to start in Safe Mode, or 5 or F5 for Safe Mode with Networking.
- Once in Safe Mode, you can perform troubleshooting steps like uninstalling recently installed software, updating drivers, or running antivirus scans without the interference of potentially problematic components.
Using Safe Mode allows you to systematically eliminate potential causes. If the error disappears, you can then incrementally re-enable services or drivers to identify the specific conflict. This is particularly useful for troubleshooting issues with services like the GameInput Redist Service on Windows 11 or other background processes.
When to Seek Professional Help
While this guide covers a wide range of troubleshooting steps for the IRQL_NOT_LESS_OR_EQUAL error, there are instances where professional assistance becomes necessary. Recognizing these situations can save you further frustration and potentially prevent additional damage to your system.
Don’t hesitate to seek expert help if you encounter any of the following scenarios:
- Persistent Hardware Failures: If memory diagnostics consistently report errors, or if you suspect issues with your motherboard, CPU, or other core components that you’re uncomfortable replacing yourself.
- Unbootable System: If your computer cannot boot into Windows, Safe Mode, or even the Windows Recovery Environment, making it impossible to perform any software-based troubleshooting.
- Data Recovery Concerns: If you’re worried about losing critical data and are unsure about performing advanced troubleshooting steps like a Windows Reset. A professional can often recover data even from seemingly dead drives.
- Lack of Technical Comfort: If you feel overwhelmed by the technical steps, or if you’re concerned about making things worse, a professional technician has the experience and tools to diagnose and fix complex problems safely.
- Time Constraints: If you rely on your computer for work or essential tasks and cannot afford the time required for extensive troubleshooting, a professional can often provide a quicker resolution.
A qualified technician can perform more in-depth diagnostics, including specialized hardware tests, and has access to advanced tools and knowledge to resolve issues that are beyond typical user-level troubleshooting. They can also advise on potential hardware upgrades or replacements if necessary.
Conclusion: Maintaining a Stable Windows 11 System
The IRQL_NOT_LESS_OR_EQUAL error, while daunting, is a solvable problem. By systematically working through the troubleshooting methods outlined in this guide, you can effectively diagnose and resolve the underlying causes, restoring stability to your Windows 11 system. From updating drivers and checking system files to diagnosing memory issues and scanning for malware, each step brings you closer to a reliable computing experience.
Preventing future occurrences of the IRQL_NOT_LESS_OR_EQUAL error involves adopting a few best practices. Regularly update your Windows 11 operating system and device drivers to benefit from the latest bug fixes and compatibility improvements. Always download drivers from official manufacturer websites to ensure their integrity and compatibility. Consider investing in a reliable antivirus solution and performing routine scans to keep malware at bay.
Furthermore, pay attention to your hardware. Ensure proper ventilation to prevent overheating, and consider running memory diagnostics periodically. When installing new software or hardware, do so cautiously and be prepared to roll back changes if issues arise. Creating System Image Backup on Windows 11 or restore points regularly can provide a safety net, allowing you to quickly revert to a stable state if problems occur.
Ultimately, a proactive approach to system maintenance is your best defense against the IRQL_NOT_LESS_OR_EQUAL Windows 11 error and other disruptive BSODs. With patience and these comprehensive steps, you can maintain a robust and efficient Windows 11 environment.
For more interesting articles, stay tuned to Winsides.com!









Community
Comments (0)