

Introduction to SNMP Traps on Windows 11
SNMP Trap on Windows 11: In today’s interconnected digital landscape, maintaining the health and performance of your systems is paramount. For Windows 11 environments, proactive monitoring is not just a best practice; it’s a necessity. This is where SNMP Traps come into play, offering a vital mechanism for real-time alerts and insights into your network devices and servers. Learn more about installing the SNMP service on Windows Server, and learn more about RFC 3411
Imagine a scenario where a critical server resource is running low, or a network interface experiences an unexpected shutdown. Without immediate notification, these issues could escalate, leading to costly downtime and service interruptions. SNMP traps provide that crucial, instantaneous communication, transforming passive monitoring into an active, responsive system.
This comprehensive guide will delve deep into configuring and utilizing SNMP traps on Windows 11. We’ll explore everything from the foundational concepts of SNMP to advanced configuration, security best practices, and effective troubleshooting. By the end, you’ll possess the knowledge to implement a robust monitoring solution, ensuring your Windows 11 systems remain stable and performant.
Understanding how to properly set up and manage these traps is essential for any IT professional or system administrator. It empowers you to detect and address potential problems before they impact users, significantly enhancing your operational efficiency and system reliability. Let’s embark on this journey to master SNMP trap configuration on your Windows 11 machines.
Table of contents
What is SNMP and How Does it Work?
SNMP, or Simple Network Management Protocol, is a widely adopted protocol for managing and monitoring network devices and their functions. It forms a crucial part of the Internet Protocol Suite, enabling administrators to oversee network performance, identify network problems, and configure devices from a central location.
The SNMP architecture typically involves three key components: the SNMP Manager (or Network Management System – NMS), the SNMP Agent, and the Managed Device. The managed device is any network-attached entity, such as a router, switch, server, or even a workstation running Windows 11, that has an SNMP agent enabled.
The SNMP agent resides on the managed device and collects information about its operational status. This data is stored in a hierarchical structure known as the Management Information Base (MIB). Each piece of information within the MIB is identified by a unique Object Identifier (OID).
The SNMP Manager, often a dedicated software application, queries the agents on managed devices to retrieve MIB information. This polling mechanism allows the manager to gather performance metrics, configuration details, and status updates at regular intervals. This pull-based communication is fundamental to how SNMP operates.
However, polling alone isn’t always sufficient for critical events. That’s where SNMP traps come in. Instead of waiting for the manager to ask, an SNMP agent can proactively send an unsolicited message—a trap—to the manager when a significant event occurs, providing immediate notification of an issue.
The Role of SNMP Traps in Network Monitoring
SNMP traps serve as an invaluable tool for proactive network and system monitoring. While an SNMP manager can poll devices for status updates, traps offer an instant, event-driven notification mechanism. This distinction is critical for time-sensitive issues.
Consider a scenario where a hard drive on a Windows 11 server is nearing full capacity. A polling system might detect this during its next scheduled check, perhaps every five or ten minutes. An SNMP trap, however, could be triggered immediately when a predefined threshold is crossed, sending an alert without delay.
This immediate notification capability allows administrators to react swiftly to critical events, often before they escalate into major outages. Traps can signal a wide array of occurrences, including authentication failures, device reboots, link up/down events, resource exhaustion, or even security breaches.
By integrating SNMP traps with a centralized monitoring system, IT teams gain a comprehensive, real-time view of their infrastructure’s health. This enables quicker incident response, reduces mean time to resolution (MTTR), and ultimately enhances the overall reliability and availability of services running on Windows 11.
Without traps, monitoring would be largely reactive, relying on scheduled checks or user reports. With them, it becomes a dynamic, responsive process, ensuring that critical events on your Windows 11 machines are never missed, providing a significant advantage in maintaining robust IT operations.
Key Takeaways
Before we dive into the technical specifics, here are the essential points you should grasp about SNMP traps on Windows 11:
- SNMP Traps are Critical for Proactive Monitoring: They provide immediate, event-driven notifications from your Windows 11 systems to a monitoring server, unlike traditional polling.
- Installation of SNMP Service is Required: Windows 11 does not enable the SNMP Service by default; it must be installed as an optional feature or via PowerShell.
- Security is Paramount with Community Strings: SNMPv1/v2c rely on community strings for authentication, which act as passwords. Use strong, non-default strings and consider SNMPv3 for enhanced security.
- Proper Configuration of Trap Destinations is Key: You must specify the IP addresses or hostnames of your monitoring servers (trap receivers) in the SNMP Service properties.
- Firewall Rules are Essential for Communication: Ensure that Windows Defender Firewall or any third-party firewalls allow UDP port 161 (for SNMP requests) and UDP port 162 (for SNMP traps) traffic.
- Verification and Testing are Non-Negotiable: Always test your SNMP trap setup to confirm that alerts are being sent and received correctly by your monitoring system.
- SNMPv3 Offers Superior Security: For production environments, consider upgrading to SNMPv3 for encryption and stronger authentication, moving beyond the limitations of community strings.
Understanding SNMP Trap Service on Windows
The SNMP Trap Service on Windows 11 is a fundamental component for any organization serious about maintaining system uptime and responsiveness. It acts as the intermediary, collecting notifications from the local SNMP agent and forwarding them to designated management systems. This service is distinct from the primary SNMP Service, though they work in tandem.
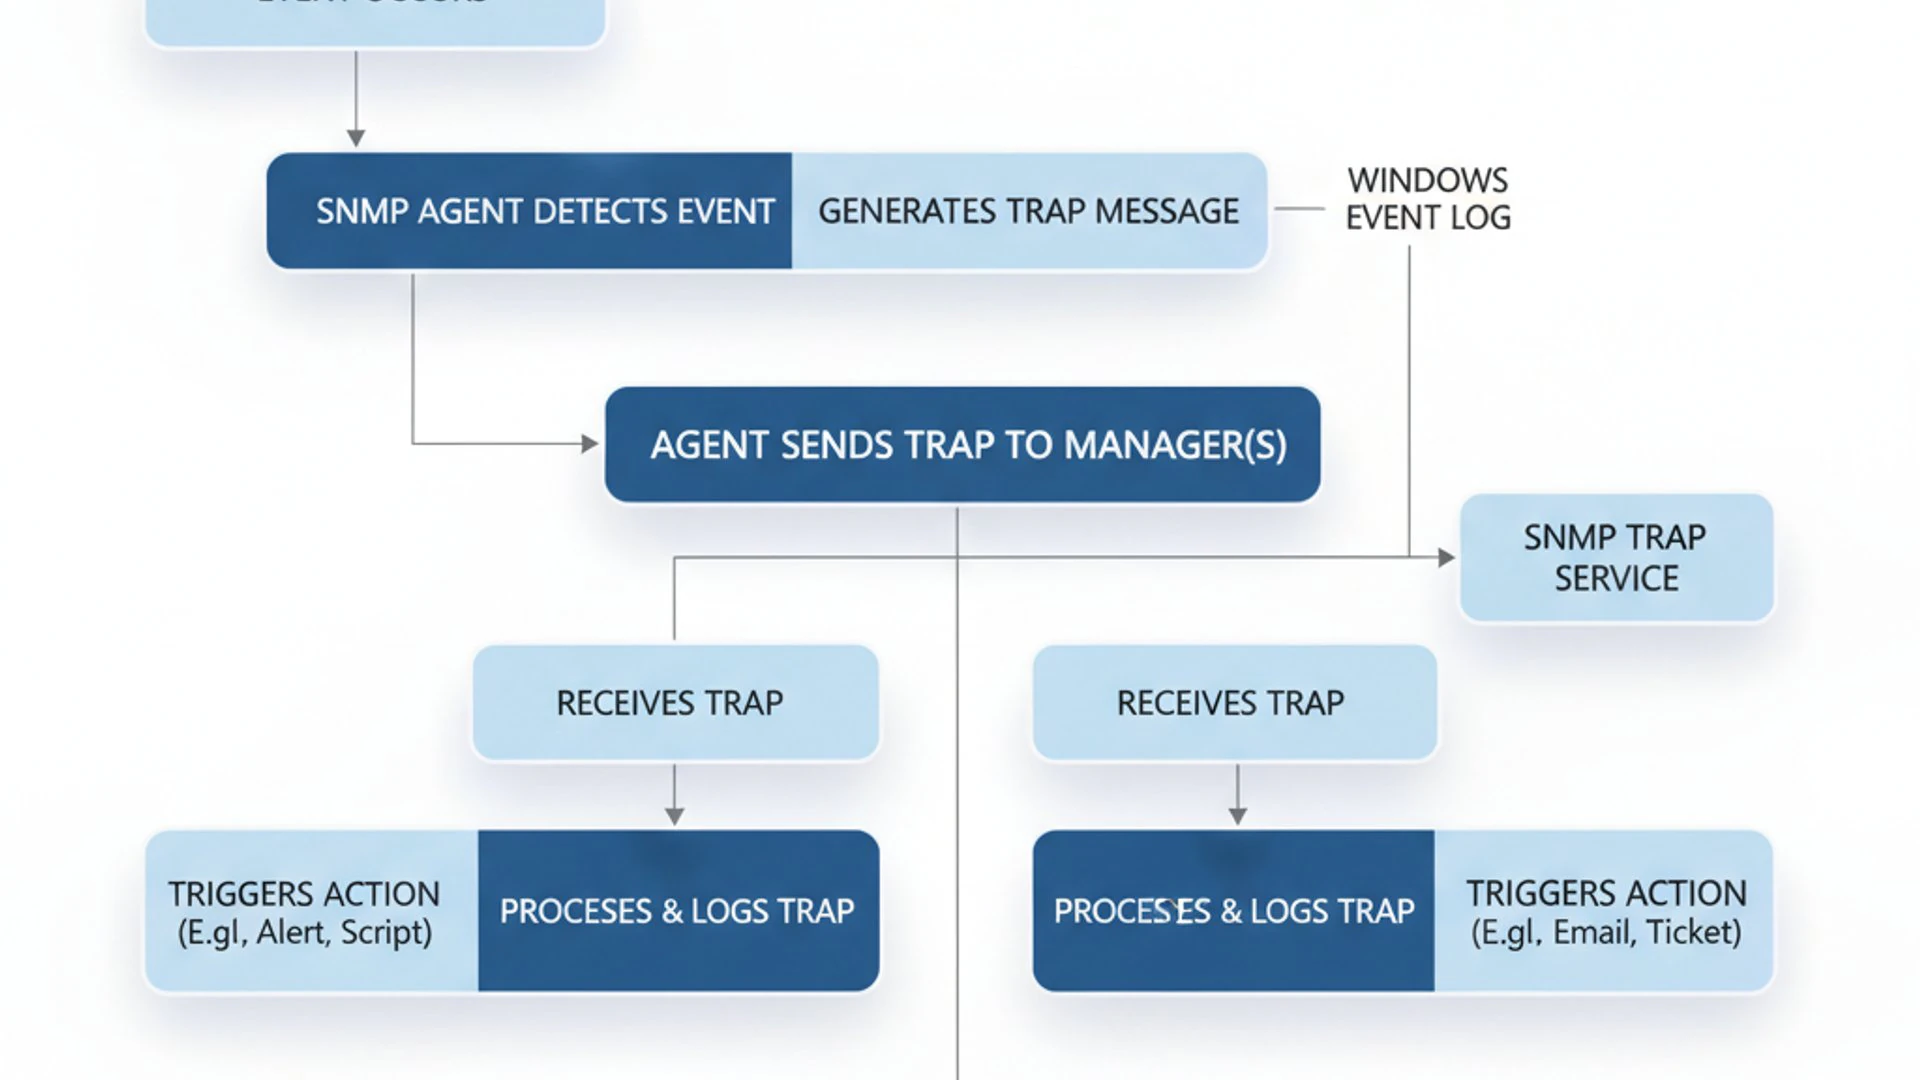
When the SNMP Service (which includes the agent) detects a specific event, such as a service stopping unexpectedly or a resource threshold being breached, it generates a trap. The SNMP Trap Service then takes this trap and sends it out over the network to the configured trap destinations. This push-based notification is what makes traps so powerful.
Without the SNMP Trap Service running and correctly configured, even if the SNMP agent on your Windows 11 machine is generating events, those critical alerts will never reach your monitoring infrastructure. Therefore, understanding its role and ensuring its proper operation is paramount for effective monitoring.
This service allows Windows 11 to actively participate in your network management strategy, providing real-time insights into its operational state. It’s a cornerstone for building a responsive and resilient IT environment, enabling quick detection and resolution of issues across your fleet of Windows 11 devices.
Core Components of SNMP on Windows
When discussing SNMP on Windows 11, several core components work together to facilitate monitoring and trap generation. Understanding these elements is crucial for effective configuration and troubleshooting.
The primary component is the SNMP Service itself. This service, once installed, acts as the SNMP agent for the Windows 11 operating system. It collects system-specific information, such as CPU usage, memory consumption, disk space, and running services, and makes it available via the MIB.
Integrated within the SNMP Service are various SNMP Extension Agents. These are DLL files that extend the functionality of the primary agent, allowing it to gather more specific data. For instance, there are extension agents for the Internet Information Services (IIS), DHCP, and Windows operating system performance counters.
The SNMP Trap Service is a separate, but related, Windows service. Its sole purpose is to receive trap messages generated by the local SNMP agent and forward them to the configured trap destinations (monitoring systems). It does not generate traps itself but acts as a relay.
Finally, Community Strings are used for authentication in SNMPv1 and SNMPv2c. These are essentially plain-text passwords that grant read-only or read-write access to the MIB. For trap sending, the agent uses a configured community string to authenticate with the trap receiver.
Why SNMP Traps are Crucial for System Health
SNMP traps are not merely an optional feature; they are a critical component for maintaining optimal system health on Windows 11. Their ability to provide immediate notification of significant events transforms reactive problem-solving into proactive management.
Consider the potential impact of a critical application crashing on a Windows 11 workstation or server. Without an SNMP trap, you might only discover the issue when users report it, leading to significant downtime and productivity loss. A properly configured trap, however, would alert your monitoring system instantaneously.
This immediate awareness allows IT administrators to initiate troubleshooting procedures without delay. Whether it’s a disk nearing capacity, a service failing, an unauthorized access attempt, or a network interface going offline, traps provide the first line of defense.
Furthermore, traps contribute to a more efficient use of network resources. Instead of constantly polling devices for status updates, which can generate significant network traffic, traps only send data when an event occurs. This event-driven model is particularly beneficial in large-scale environments.
“Proactive monitoring through SNMP traps is the cornerstone of a resilient IT infrastructure. It shifts the paradigm from ‘fixing problems after they break’ to ‘preventing problems before they impact users.'”
By leveraging SNMP traps on Windows 11, organizations can significantly reduce downtime, improve incident response times, and ultimately enhance the overall reliability and performance of their IT services. It’s an indispensable tool for any modern IT operation.
Prerequisites for Configuring SNMP Traps
Before you can begin configuring SNMP traps on your Windows 11 machine, there are a few essential prerequisites that need to be met. These steps ensure that the necessary services are installed and that network communication is properly enabled.
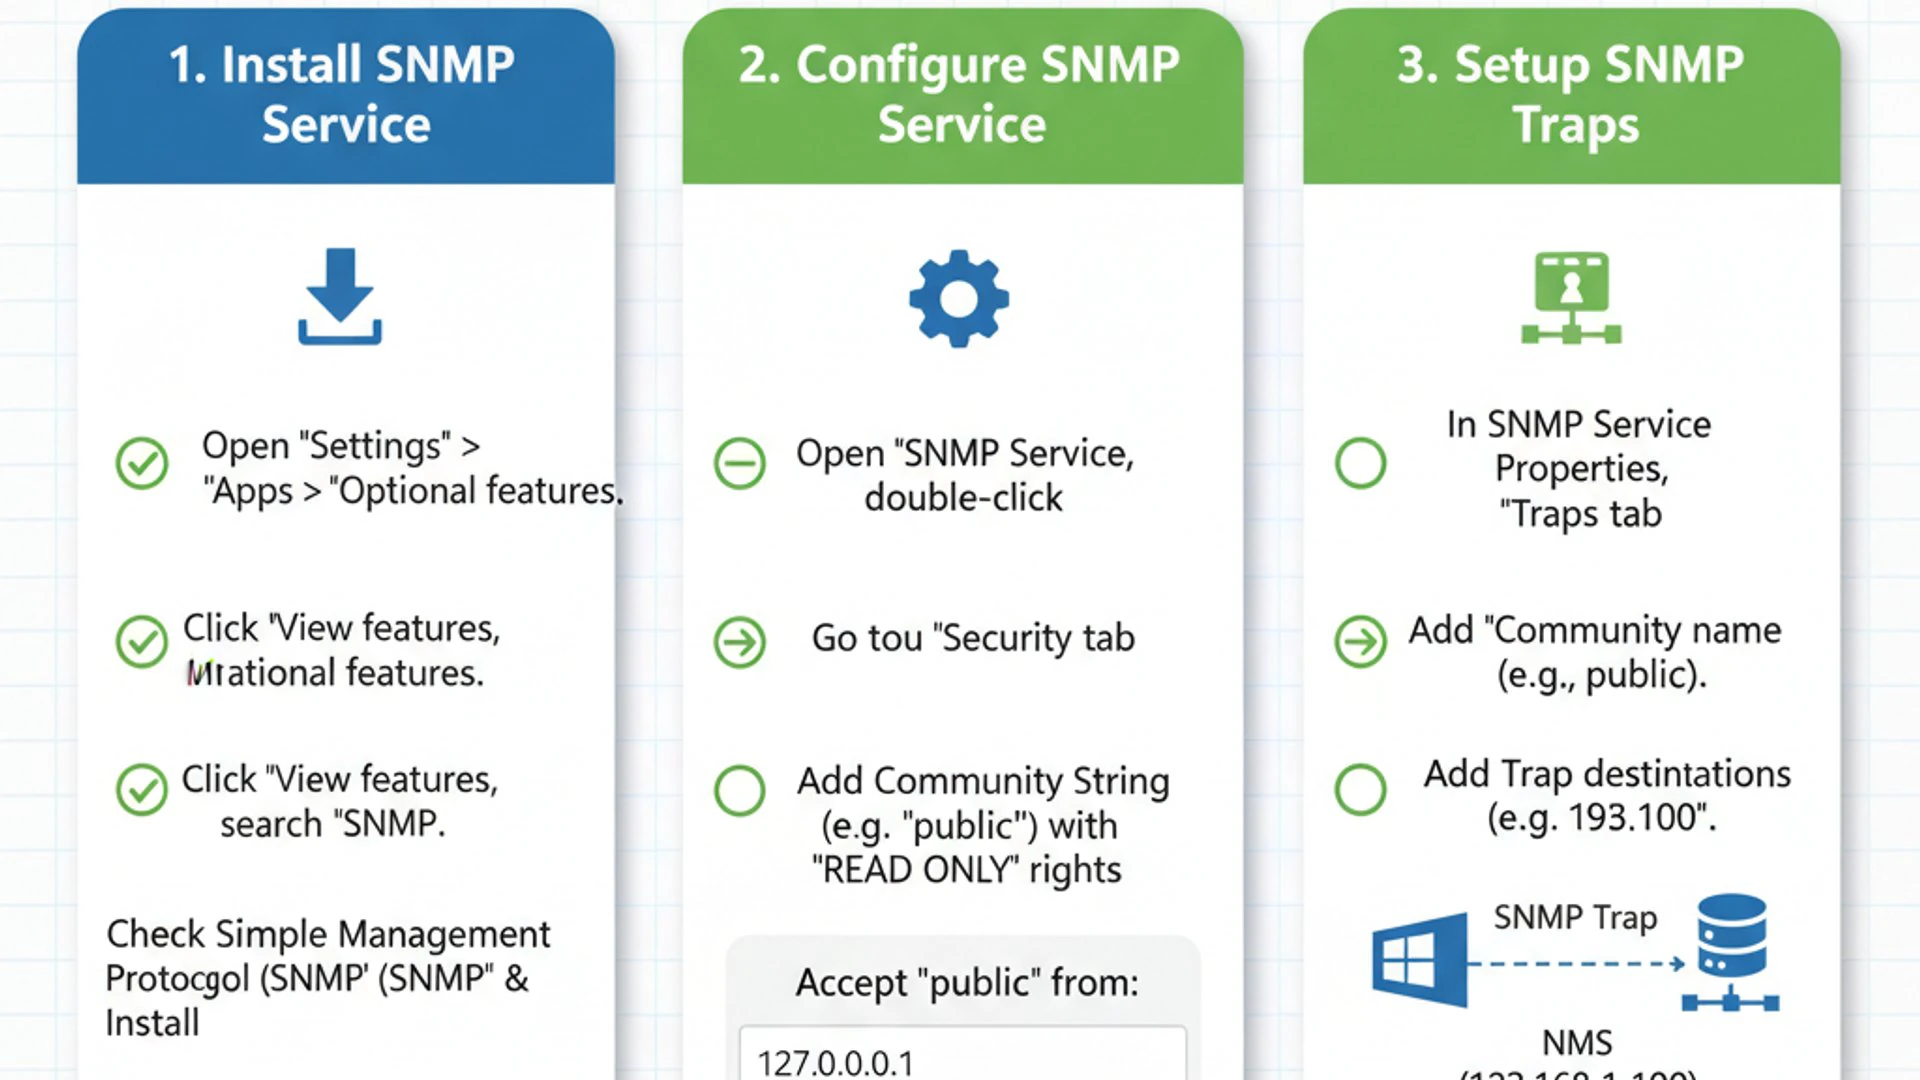
The most fundamental prerequisite is the installation of the SNMP Service itself. Unlike some previous versions of Windows, Windows 11 does not install this service by default. It must be added as an optional feature. Without it, your system cannot act as an SNMP agent or generate traps.
Beyond the service installation, network connectivity and firewall rules are equally important. Even with the SNMP Service running, if your Windows 11 device cannot communicate with your monitoring system, no traps will be received. This involves ensuring correct IP addressing and opening the necessary ports in the firewall.
Taking the time to properly address these prerequisites will save you significant troubleshooting effort later on. A solid foundation is key to a successful SNMP trap implementation. Let’s walk through each of these steps in detail.
Installing SNMP Service on Windows 11
The SNMP Service is not included by default in a standard Windows 11 installation. You’ll need to add it manually. There are two primary methods to achieve this: using the graphical user interface (GUI) through Optional Features or via PowerShell commands.
Using Optional Features in Settings
This is the most straightforward method for most users, involving a few clicks within the Windows Settings application.
- Open Settings by pressing
Windows key + I. - Navigate to Apps > Optional features.
- Click on View features next to “Add an optional feature.”
- In the search box, type
SNMP. - Select Simple Network Management Protocol (SNMP) from the list.
- Click Next, then click Install.
Windows will then download and install the necessary components. You might need to restart your computer for the changes to take full effect, though it’s not always explicitly prompted.
Once installed, the SNMP Service and SNMP Trap Service will be available in the Services console (services.msc). You can verify their presence there. This GUI method is user-friendly and recommended for individual installations.
Installing via PowerShell
For system administrators managing multiple Windows 11 machines or for scripting purposes, installing the SNMP Service via PowerShell is a more efficient and scalable approach.
- Open PowerShell as an administrator. You can do this by searching for “PowerShell” in the Start menu, right-clicking on “Windows PowerShell,” and selecting “Run as administrator.”
- To check if the SNMP feature is already available, you can use the command:
Get-WindowsCapability -Online -Name "SNMP.Client*"This command will show you the state of the SNMP client feature.
- To install the SNMP Service, execute the following command:
Add-WindowsCapability -Online -Name "SNMP.Client~~~~0.0.1.0"This command installs the Simple Network Management Protocol (SNMP) client feature.
PowerShell will display a progress bar and confirm the successful installation. This method is particularly useful for automating deployments or managing a large fleet of Windows 11 devices where manual intervention is impractical.
After installation, regardless of the method, it’s a good practice to verify that the SNMP Service and SNMP Trap Service are listed and set to start automatically in the Services console. This ensures they will be available after a system reboot.
Network Considerations and Firewall Rules
Even with the SNMP Service installed, communication between your Windows 11 machine and your monitoring system won’t happen if network paths are blocked. Network considerations and firewall rules are critical for successful SNMP trap delivery.
Firstly, ensure that your Windows 11 device has proper network connectivity to the monitoring server. This means they should be on the same network segment or have appropriate routing configured between them. Verify basic connectivity using ping commands.
The most common hurdle is the Windows Defender Firewall. By default, it often blocks incoming and outgoing connections on non-standard ports. SNMP uses specific UDP ports that need to be explicitly allowed.
- UDP Port 161: This port is used by the SNMP manager to send requests (like GET, GETNEXT) to the SNMP agent on your Windows 11 machine. While not directly for traps, it’s often needed for the manager to query the agent for MIB information.
- UDP Port 162: This is the crucial port for SNMP traps. The SNMP agent on your Windows 11 machine sends traps to the monitoring server on this port. Your monitoring server must be listening on UDP 162.
To configure Windows Defender Firewall to allow SNMP traffic:
- Open Windows Defender Firewall with Advanced Security. You can search for it in the Start menu.
- In the left pane, click on Inbound Rules.
- In the right pane, click New Rule….
- Select Port, then click Next.
- Choose UDP and specify
161, 162in the “Specific local ports” field. Click Next. - Select Allow the connection, then click Next.
- Choose the profiles for which this rule applies (e.g., Domain, Private, Public). Click Next.
- Give the rule a descriptive name, such as “SNMP Inbound UDP,” and an optional description. Click Finish.
Repeat this process for Outbound Rules if your network topology or monitoring system requires the Windows 11 machine to initiate connections on these ports, though for traps, the inbound rule on the monitoring server and outbound on Windows 11 is usually sufficient.
If you are using a third-party firewall or network appliance (like a corporate firewall), ensure that these ports are also open between your Windows 11 device and the SNMP manager. Failure to configure these firewall rules correctly is a very common cause of SNMP trap delivery failures.
Step-by-Step Guide: Configuring SNMP Trap Service
Once the SNMP Service is installed and your network and firewall are ready, the next crucial step is to configure the SNMP Trap Service on your Windows 11 machine. This involves specifying security settings and defining where the traps should be sent.
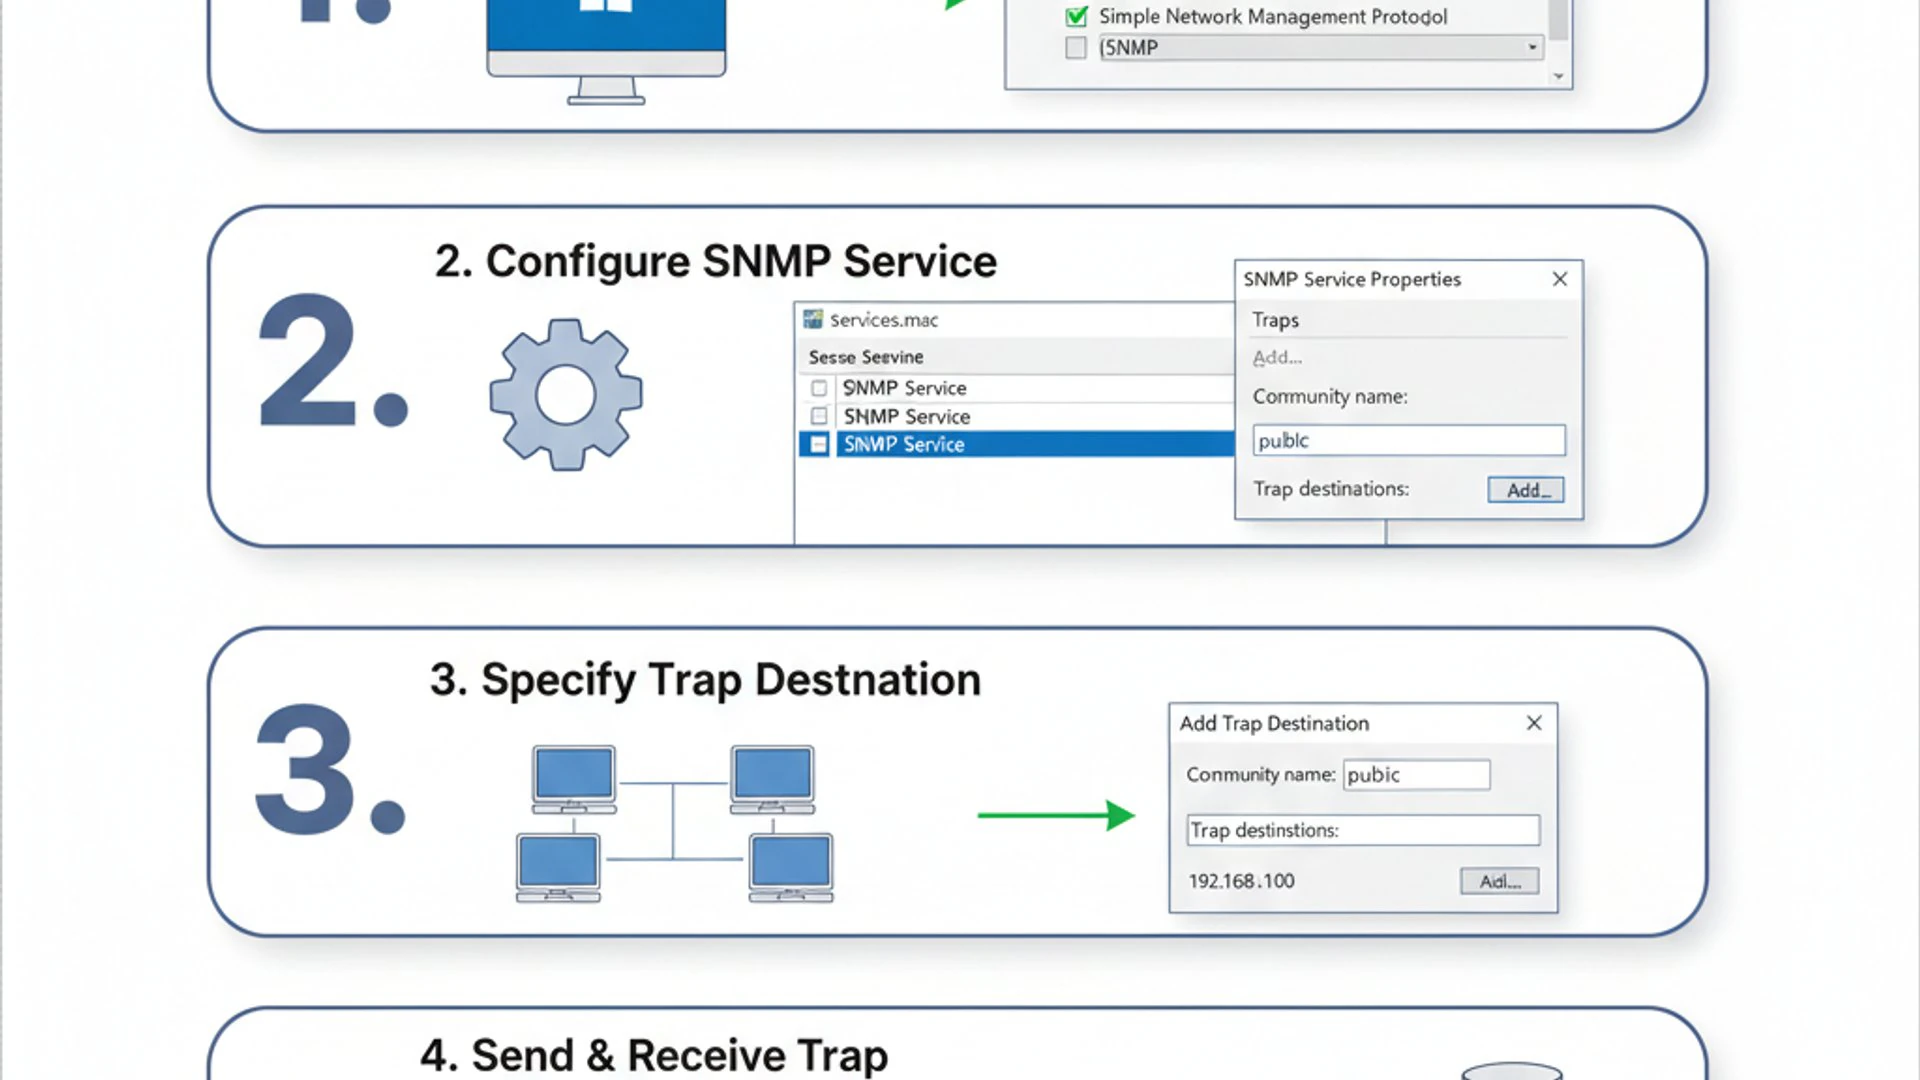
Proper configuration ensures that your Windows 11 system can communicate securely with your monitoring infrastructure and that alerts reach the correct destination. We will walk through accessing the service properties, setting up community strings, and defining trap destinations.
Accessing SNMP Service Properties
The configuration for SNMP traps is managed through the properties of the SNMP Service itself, not a separate “SNMP Trap Service” configuration utility. The SNMP Trap Service merely relays the traps configured within the main SNMP Service.
- Press
Windows key + Rto open the Run dialog. - Type
services.mscand press Enter to open the Services console. - Scroll down and locate the SNMP Service.
- Right-click on the SNMP Service and select Properties.
This will open the SNMP Service Properties window, which contains several tabs for configuration. We’ll focus on the “Security” and “Traps” tabs for configuring SNMP traps on Windows 11.
Configuring Security Settings (Community Strings)
The “Security” tab is where you define who can query your SNMP agent and, importantly, the community strings used for sending traps. Community strings act as a form of password for SNMPv1 and SNMPv2c.
- In the SNMP Service Properties window, go to the Security tab.
- Under “Accepted community names,” click Add….
- For “Community rights,” select READ ONLY. While you might be tempted to select “READ WRITE” for trap sending, read-only is sufficient and more secure.
- In the “Community Name” field, enter a strong, unique community string (e.g.,
MyMonitoringCommunity123!). Avoid default strings like “public.” This string will be used by the SNMP agent when sending traps. Click Add.
This community string is what your monitoring system will expect to receive along with the trap. Mismatched community strings are a common reason why traps fail to be processed.
- Under “Accept SNMP packets from these hosts,” click Add….
- Enter the IP address or hostname of your SNMP manager(s) (the server that will receive the traps). This restricts which hosts can query your SNMP agent, adding a layer of security. Click Add.
- Ensure that the Send authentication trap is checked. This will send a trap if an unauthorized manager attempts to query the agent using an incorrect community string.
Click Apply to save these security settings. Remember, for SNMPv1/v2c, community strings are sent in plain text, making SNMPv3 a more secure option for sensitive environments.
Specifying Trap Destinations
The “Traps” tab is where you tell the SNMP agent on your Windows 11 machine where to send the generated traps. These are your trap destinations, typically the IP addresses of your network monitoring systems.
- In the SNMP Service Properties window, go to the Traps tab.
- Under “Community name,” select the community string you configured in the Security tab (e.g.,
MyMonitoringCommunity123!). This is the community string that will be included in the traps sent from this Windows 11 device. - Under “Trap destinations,” click Add….
- Enter the IP address or hostname of your SNMP manager(s) that will be receiving the traps. This should be the same IP address(es) you added in the “Security” tab. Click Add.
You can add multiple trap destinations if you have redundant monitoring systems or want to send traps to different managers for different purposes. Each destination will receive a copy of every trap generated by this agent.
- Once all trap destinations are added, click Apply, then OK to close the SNMP Service Properties window.
After making these changes, it’s crucial to restart the SNMP Service for the new configuration to take effect. In the Services console, right-click on “SNMP Service” and select “Restart.” Do the same for the “SNMP Trap Service” to ensure both are running with the updated settings.
Verifying SNMP Trap Configuration
After configuring the SNMP Service and its trap settings, verification is a critical step. You need to ensure that the service is running correctly, that the settings have been applied, and that the system is ready to send traps.
- Check Service Status: Open
services.msc. Ensure both SNMP Service and SNMP Trap Service are running and their “Startup type” is set to “Automatic.” If not, start them manually and set the startup type. - Review Event Viewer: Open the Event Viewer (search for it in the Start menu). Navigate to Windows Logs > System. Look for events from “SNMP” or “SNMP Trap” sources. Successful starts and configuration loads are often logged here. Any errors during service startup or configuration parsing will also appear, providing valuable clues.
- Confirm Firewall Rules: Double-check the inbound and outbound firewall rules you created for UDP ports 161 and 162. A misconfigured firewall is a leading cause of trap delivery failures.
- Test Basic Connectivity: From your Windows 11 machine, try to ping your SNMP manager’s IP address. This confirms basic network reachability.
These initial checks confirm that your Windows 11 machine is theoretically ready to send traps. The next step is to actually generate and test a trap to ensure end-to-end functionality.
Generating and Testing SNMP Traps
Configuring the SNMP Trap Service is only half the battle. To confirm that your setup is working as expected, you must generate and test SNMP traps. This involves triggering an event that causes the SNMP agent to send a trap and then verifying its reception on your monitoring system.
Testing helps identify any misconfigurations, firewall issues, or network problems before they impact your ability to receive critical alerts. There are a couple of ways to achieve this: manually triggering a test trap or using third-party tools.
Manually Triggering a Test Trap
Windows does not provide a built-in utility to send a generic test SNMP trap directly from the command line. However, you can simulate an event that typically generates an SNMP trap, such as stopping a critical service.
- Identify a Service to Stop: Choose a non-critical service that is configured to generate an SNMP trap upon failure. A common example is the “Print Spooler” service if it’s not essential for your current operations. Alternatively, you can use a service like Time Broker on Windows 11 or AVCTP Service on Windows 11 for testing, provided they are running.
- Open Services Console: Press
Windows key + R, typeservices.msc, and press Enter. - Locate and Stop the Service: Find the chosen service, right-click it, and select Stop.
If the SNMP agent is configured to send a trap when a service stops, this action should trigger one. You would then check your SNMP manager to see if the trap was received.
Another method, though more involved, is to use a specific tool or script that interacts with the Windows SNMP agent to force a trap. However, for most basic testing, stopping a service is a quick and dirty way to see if traps are being sent.
Using Third-Party Tools for Trap Generation
For more controlled and granular testing, third-party tools are invaluable. These tools allow you to specify the OID, community string, and other parameters of a trap, ensuring a precise test.
One popular tool for sending custom SNMP traps is SNMP Trap Sender or similar utilities available from various network management vendors or open-source projects. These tools typically run on a separate machine and can simulate a trap originating from your Windows 11 device.
Alternatively, some network monitoring systems include a feature to send test traps. For instance, if you’re using PRTG Network Monitor or Zabbix, they might have built-in functions to dispatch a test trap to a specified receiver.
To use a third-party tool for testing:
- Install a Trap Sender: Download and install a reliable SNMP trap sender application on a machine that has network access to your SNMP manager.
- Configure Trap Details: In the trap sender, specify the following:
- Trap Receiver IP: The IP address of your SNMP manager.
- Community String: The exact community string configured on your Windows 11 SNMP Service for traps.
- OID: A test OID (e.g.,
.1.3.6.1.4.1.9999.1.1for a custom test trap). - Trap Type/Generic Trap: Often “coldStart” (generic trap 0) or “enterpriseSpecific” (generic trap 6) with a specific enterprise OID.
- Variable Bindings (Optional): Add custom data to the trap message.
- Send the Trap: Execute the command or click the “Send” button in the tool.
Immediately check your SNMP manager for the incoming trap. If it’s received, your trap receiver is working. If not, you’ll need to troubleshoot the network path, firewall, or manager configuration.
Remember, the goal is to confirm that a trap generated by your Windows 11 system (or simulated to be from it) successfully reaches and is processed by your monitoring solution. This end-to-end test is crucial for validating your SNMP trap setup.
Integrating SNMP Traps with Monitoring Systems
The true power of SNMP traps on Windows 11 is realized when they are integrated with a robust network monitoring system. These systems act as trap receivers, collecting, interpreting, and acting upon the alerts sent by your Windows 11 devices.
Without a monitoring system to process them, traps are just unread messages. Integrating them allows for centralized visibility, automated alerting, historical data logging, and correlation of events across your entire infrastructure.
This section will explore some common network monitoring tools that support SNMP traps and guide you through the general process of setting up these tools to effectively receive and manage the alerts from your Windows 11 systems.
Common Network Monitoring Tools
A wide array of network monitoring tools is available, each with its own strengths and target audience. Most enterprise-grade solutions offer comprehensive SNMP trap receiving capabilities.
- PRTG Network Monitor: Known for its ease of use and comprehensive sensor-based monitoring, PRTG includes a powerful SNMP Trap Receiver sensor that can monitor incoming traps from your Windows 11 devices and trigger alerts based on their content.
- Zabbix: A highly flexible and open-source monitoring solution, Zabbix can be configured to receive SNMP traps. It uses a dedicated SNMP trap daemon (like
snmptrapd) to collect traps, which are then processed and stored in its database for alerting and visualization. - Nagios (with add-ons): Nagios Core, while primarily a polling-based system, can be extended with add-ons like SNMPTT (SNMP Trap Translator) and
snmptrapdto receive and process SNMP traps. This allows it to integrate trap-based alerts into its powerful notification engine. - SolarWinds NPM (Network Performance Monitor): A leading commercial solution, SolarWinds NPM offers robust SNMP trap management, including a dedicated trap viewer, filtering capabilities, and advanced alerting based on trap content.
- ManageEngine OpManager: Another popular commercial tool, OpManager provides extensive support for SNMP, including a trap processing engine that can categorize, filter, and alert on incoming traps from various devices, including Windows 11.
The choice of tool often depends on your organization’s size, budget, existing infrastructure, and specific monitoring requirements. Regardless of the tool, the fundamental principle of setting up a trap receiver remains similar.
Setting Up Trap Receivers
Setting up a trap receiver involves configuring your chosen monitoring system to listen for SNMP traps on UDP port 162 and then defining how it should process those traps.
- Install/Enable SNMP Trap Daemon: Many monitoring systems, especially open-source ones like Zabbix or Nagios, rely on an underlying SNMP trap daemon (e.g.,
snmptrapdon Linux) to actually listen for and collect traps. Ensure this daemon is installed, configured, and running on your monitoring server. - Configure Listener Port: Verify that your monitoring system or its trap daemon is configured to listen on UDP port 162. This is the standard port for SNMP traps.
- Define Community String: Configure your monitoring system to accept traps with the community string you set on your Windows 11 devices (e.g.,
MyMonitoringCommunity123!). Traps with mismatched community strings will often be ignored. - Load MIBs (Optional but Recommended): For the monitoring system to properly interpret the contents of a trap, it often needs the relevant MIB files. While standard traps have well-known OIDs, enterprise-specific traps benefit greatly from having their MIBs loaded. This allows the system to display human-readable descriptions instead of just OIDs.
- Create Trap Processing Rules/Alerts: This is where the real value comes in. Within your monitoring system, you’ll define rules that dictate what happens when a specific trap is received. For example:
- If trap OID
.1.3.6.1.4.1.311.1.17.1(Windows Service Stop) is received for a critical service, send an email alert to the IT team. - If a “disk full” trap is received, create a high-priority incident ticket.
- Log all traps to a database for historical analysis.
- If trap OID
- Test End-to-End: After configuring the trap receiver, perform an end-to-end test by generating a trap from your Windows 11 machine (as described in the previous section) and verify that it is received and processed correctly by your monitoring system, triggering the appropriate alerts.
Properly integrating SNMP traps allows your Windows 11 machines to become active participants in your overall IT operational awareness, providing critical, real-time insights into their health and status.
Advanced SNMP Trap Configuration and Best Practices
While the basic setup of SNMP traps on Windows 11 provides a solid foundation, there are advanced configurations and best practices that can significantly enhance their utility, security, and performance. Moving beyond simple community strings and basic alerts can unlock greater monitoring capabilities.
This section will explore how to customize trap types, delve into the crucial aspect of security enhancements with SNMPv3, and discuss strategies for optimizing performance in environments generating a high volume of traps. Implementing these advanced techniques ensures a more robust and efficient monitoring solution.
Customizing Trap Types and OIDs
The SNMP agent on Windows 11 generates a set of standard traps for common events like service starts/stops, authentication failures, and system reboots. However, for more specific or application-level events, you might need to customize or understand how to leverage specific OIDs.
Windows SNMP agents primarily generate traps based on the Microsoft-specific MIBs (e.g., mib.bin, hostmib.bin, lmmib2.bin). These MIBs define the OIDs for various Windows-specific events and data points. For instance, a service stopping might correspond to a specific OID within the enterprise-specific traps.
To identify specific traps and their OIDs, you often need to consult the documentation for the SNMP agent or the application generating the event. For Windows, the most common generic traps are:
- Generic Trap 0 (coldStart): System reboot.
- Generic Trap 2 (linkDown): Network interface goes down.
- Generic Trap 3 (linkUp): Network interface comes up.
- Generic Trap 4 (authenticationFailure): Incorrect community string used to query the agent.
- Generic Trap 6 (enterprise-specific): This is a catch-all for vendor-specific traps, often accompanied by a specific enterprise OID.
For custom application monitoring, you might need to develop your own SNMP extension agents or use third-party tools that can generate traps with specific enterprise OIDs. This allows you to define unique alerts for events relevant to your custom applications or services running on Windows 11.
When configuring your monitoring system, ensure it has access to the relevant MIB files. This allows it to translate numerical OIDs into human-readable descriptions, making trap interpretation much easier. Without MIBs, you’ll only see cryptic numbers.
Security Enhancements for SNMP
Security is a paramount concern when dealing with network management protocols. SNMP, especially versions 1 and 2c, has inherent security limitations that must be addressed. Community strings, while acting as a form of password, are transmitted in plain text, making them vulnerable to eavesdropping.
This vulnerability means that an attacker sniffing network traffic could easily capture your community strings and then gain unauthorized read-only (or even read-write, if configured) access to your Windows 11 system’s SNMP agent. This could lead to information disclosure or, in worst-case scenarios, configuration changes.
To mitigate these risks, several best practices should be followed:
- Use Strong, Unique Community Strings: Never use default community strings like “public” or “private.” Create long, complex strings with a mix of characters.
- Restrict Accepted Hosts: Configure the SNMP Service on Windows 11 to only accept SNMP packets from known, trusted IP addresses of your monitoring servers. This significantly reduces the attack surface.
- Network Segmentation: Isolate SNMP traffic on a dedicated management network or VLAN where possible, limiting exposure to unauthorized parties.
- Firewall Rules: Strictly enforce firewall rules to only allow SNMP traffic (UDP 161 and 162) from and to authorized monitoring systems.
However, the most significant security enhancement for SNMP is the adoption of SNMPv3.
Implementing SNMPv3 for Enhanced Security
SNMPv3 represents a major leap forward in SNMP security, addressing the fundamental flaws of its predecessors. It introduces robust authentication and encryption mechanisms, making it suitable for sensitive environments.
Key security features of SNMPv3 include:
- Authentication: SNMPv3 uses cryptographic hashes (like MD5 or SHA) to verify the authenticity of messages, ensuring that traps and requests come from legitimate sources and haven’t been tampered with.
- Privacy (Encryption): It supports encryption (using algorithms like DES or AES) of the SNMP message payload, preventing eavesdropping and protecting sensitive MIB data from being read by unauthorized parties.
- User-Based Security Model (USM): Instead of community strings, SNMPv3 uses user accounts with specific authentication and privacy protocols. Each user has unique credentials.
Unfortunately, Windows 11’s built-in SNMP agent does not natively support SNMPv3. The default SNMP Service on Windows only supports SNMPv1 and SNMPv2c.
To implement SNMPv3 on Windows 11, you typically need to install a third-party SNMP agent or a specialized SNMP proxy. These agents replace or augment the built-in Windows SNMP service, providing the necessary SNMPv3 capabilities.
Popular third-party SNMP agents for Windows that support SNMPv3 include solutions from vendors like MG-SOFT or Net-SNMP (though Net-SNMP installation on Windows can be complex). These solutions require more advanced configuration but offer significantly enhanced security for your SNMP communications.
For most enterprise environments, especially those dealing with sensitive data or operating under strict compliance regulations, migrating to SNMPv3 (even with a third-party agent) is a highly recommended best practice for securing your Windows 11 monitoring.
Performance Considerations for High-Volume Traps
In large-scale environments or on systems experiencing frequent events, Windows 11 can generate a high volume of SNMP traps. While beneficial for real-time monitoring, this can introduce performance considerations for both the sending device and the receiving monitoring system.
On the Windows 11 side, an excessive number of traps could potentially consume CPU cycles and network bandwidth, though for typical workstation or server loads, the impact is usually minimal. The more significant concern often lies with the monitoring system.
A monitoring system overwhelmed by a flood of traps might:
- Drop Traps: If the trap receiver cannot process traps fast enough, its UDP buffer might overflow, leading to lost alerts.
- Experience Performance Degradation: The monitoring server’s CPU, memory, and disk I/O could become bottlenecks as it tries to parse, store, and alert on every incoming trap.
- Generate Alert Fatigue: Too many alerts, especially for non-critical events, can lead to administrators ignoring important notifications.
To optimize for high-volume trap environments:
- Filter Traps at the Source (if possible): Some advanced SNMP agents or applications allow you to configure which events trigger traps, reducing unnecessary noise.
- Filter Traps at the Receiver: Most robust monitoring systems allow you to create filters to discard or lower the priority of certain traps based on OID, source IP, or content. Only alert on critical events.
- Aggregate Similar Traps: Implement logic in your monitoring system to consolidate multiple identical traps from the same source within a short timeframe into a single alert.
- Scale Monitoring Infrastructure: Ensure your SNMP manager and its trap processing components have sufficient hardware resources (CPU, RAM, fast storage) to handle the expected trap volume.
- Review Trap Thresholds: Adjust thresholds for resource utilization or event frequency on your Windows 11 devices to avoid triggering traps for minor fluctuations. For example, instead of trapping every time CPU hits 80%, only trap when it sustains 95% for 5 minutes.
By carefully managing the volume and relevance of SNMP traps, you can maintain an effective and performant monitoring solution for your Windows 11 infrastructure without overwhelming your systems or your IT team.
Troubleshooting Common SNMP Trap Issues
Even with careful configuration, you might encounter issues where SNMP traps from your Windows 11 machine are not being received by your monitoring system. Troubleshooting these problems requires a systematic approach, checking various points along the communication path.
Common culprits include firewall blocks, incorrect configuration settings, and issues with the SNMP services themselves. This section will guide you through diagnosing and resolving these frequent problems, including how to leverage the Event Viewer for deeper insights.
Firewall Blocks and Network Connectivity
The most frequent reason for missing SNMP traps is a firewall blocking the communication. This can be either the Windows Defender Firewall on your Windows 11 machine or a network firewall between your device and the monitoring system.
- Check Windows Defender Firewall:
- On your Windows 11 machine, open “Windows Defender Firewall with Advanced Security.”
- Verify that Inbound Rules exist and are enabled for UDP ports 161 (if manager polls) and 162 (if manager also sends traps back to the agent) for the SNMP Service.
- Crucially, verify that Outbound Rules are configured to allow UDP port 162 traffic from your Windows 11 machine to your SNMP manager’s IP address. While often less restrictive, some environments block all outbound traffic by default.
- Ensure the rules apply to the correct network profiles (Domain, Private, Public) active on your system.
- Check Network Firewalls/ACLs: If there are routers, switches, or dedicated firewalls between your Windows 11 device and the SNMP manager, ensure that UDP port 162 traffic is permitted in both directions (outbound from Windows 11, inbound to the manager).
- Verify Basic Network Connectivity: From your Windows 11 machine, try to
pingthe IP address of your SNMP manager. If ping fails, you have a fundamental network connectivity issue that needs to be resolved first. - Use Packet Sniffer: Tools like Wireshark can be invaluable. Install Wireshark on both your Windows 11 machine and your SNMP manager. Start a capture, generate a test trap, and see if the UDP 162 packet leaves Windows 11 and arrives at the manager. This definitely tells you where the traffic is being dropped.
Incorrect Community Strings or IP Addresses
Even if network connectivity is perfect, traps won’t be processed if the security settings are mismatched.
- Verify Community String on Windows 11:
- Open
services.msc, go to SNMP Service Properties > Traps tab. - Ensure the “Community name” listed here exactly matches what your SNMP manager expects. Remember, community strings are case-sensitive.
- Open
- Verify Trap Destinations on Windows 11:
- In the same Traps tab, confirm that the IP address(es) or hostnames listed under “Trap destinations” are the correct IP addresses of your SNMP manager(s).
- If using hostnames, ensure DNS resolution is working correctly on your Windows 11 machine. Try to
pingthe hostname from the command prompt.
- Verify Community String on SNMP Manager: On your SNMP manager, ensure it is configured to accept traps with the exact community string sent by your Windows 11 device. A mismatch here is a very common cause of traps being ignored.
- Verify Listening Port on SNMP Manager: Confirm that your SNMP manager’s trap receiver is actively listening on UDP port 162. Use network utilities like
netstat -anp udpon the manager to check this.
Service Not Running or Misconfigured
The SNMP Services themselves can be a source of problems if they are not running or are improperly configured.
- Check Service Status:
- Open
services.msc. - Ensure both SNMP Service and SNMP Trap Service are running. If not, try to start them.
- Verify their “Startup type” is set to “Automatic.”
- Open
- Restart Services: After any configuration changes, always restart both the SNMP Service and SNMP Trap Service to ensure the new settings are loaded.
- Check Dependencies: Ensure that any services that SNMP depends on are also running. While rare, a dependency issue could prevent SNMP from starting.
Checking Event Viewer for SNMP Errors
The Event Viewer is an invaluable tool for diagnosing issues with Windows services, including SNMP. It often provides specific error messages that point directly to the problem.
- Open Event Viewer (search for it in the Start menu).
- Navigate to Windows Logs > System.
- Filter the logs by Event Source: Look for events from “SNMP” and “SNMP Trap.”
- Examine recent error or warning events. These might indicate:
- Failure to start the service due to missing files or dependencies.
- Problems parsing the SNMP configuration.
- Authentication failures (e.g., if “Send authentication trap” is enabled and an invalid query was attempted).
- Issues with trap destinations.
For example, if the SNMP Service cannot resolve a hostname specified as a trap destination, it might log an error in the Event Viewer. Similarly, if there’s a problem with the community string configuration, you might find a related warning.
By systematically checking these areas, you can effectively diagnose and resolve most SNMP trap issues on your Windows 11 machines, ensuring your monitoring system receives the critical alerts it needs.
Conclusion
Implementing and properly configuring SNMP traps on Windows 11 is a fundamental step towards building a robust and proactive monitoring infrastructure. As we’ve explored, these traps are not just passive data points; they are active alerts that provide immediate notification of critical events, transforming your approach to system management from reactive to preventive.
From understanding the basic architecture of SNMP to the detailed steps of installing the service, configuring security with community strings, and specifying trap destinations, we’ve covered the essential elements required for a successful setup. We also delved into the crucial aspects of network considerations, firewall rules, and the importance of thorough testing to validate your configuration.
Furthermore, by integrating SNMP traps with powerful network monitoring systems, you unlock the ability to centralize alerts, automate responses, and gain comprehensive visibility into the health of your Windows 11 fleet. Advanced practices, such as customizing trap types and, critically, enhancing security through SNMPv3 (even if requiring third-party agents), ensure your monitoring solution is both effective and secure.
Finally, the troubleshooting section provided a systematic guide to resolving common issues, empowering you to diagnose and fix problems ranging from firewall blocks to misconfigured services. A well-configured SNMP trap system on Windows 11 is an indispensable tool for any IT professional, ensuring system stability, minimizing downtime, and providing the peace of mind that comes with real-time operational awareness.
Embrace the power of SNMP traps to keep your Windows 11 systems running smoothly and your IT operations responsive and efficient. It’s an investment that pays dividends in system reliability and reduced operational overhead.









Community
Comments (0)